Blog
How to create an online course in 7 steps? (+mistakes to avoid)
Learn how to create an online course step-by-step, choose the right topic, use the best tools, and avoid common mistakes when creating it.

The e-learning industry is projected to be worth more than $370 billion by 2026 and has grown in popularity by over 900% since 2000.

Yet most creators with valuable knowledge never launch their first course. Why?
They overthink the tech, second-guess their expertise, or spend months building content nobody buys.
You don’t need fancy equipment or a teaching degree to create an online course. You need a clear process and the right tools.
In this guide, we’ll answer the most common questions about how to create an online course. And then I’ll walk you through the steps to create an online course that actually sells.
Let’s get into it.
Typical questions on creating an online course
Where do I start when creating an online course?
You start creating an online course by defining your target audience and the specific problem your course will solve. A clear audience and outcome make your entire course easier to plan.
What tools do I need to create an online course and host it?
To create and host your online course, you’ll need a course creation tool, like Camtasia for video or Canva for design. You’ll also need a hosting and selling platform, like Easytools that combines course management, website, and payment processing.
How do I choose the right online course topic?
You choose the right online course topic by finding where your expertise can be a solution to urgent customer needs. The sweet spot is a topic you’ve recently mastered yourself.
For example, a graphic designer who recently figured out how to land clients on LinkedIn could teach “Client Acquisition for Designers” better than someone teaching generic social media marketing.
The specific, recent experience makes the teaching more relatable and actionable.
Do I need to be an expert to create an online course?
No. You don’t need to be a top expert to create a course; you only need to be a few steps ahead of your learners. If you can explain a process clearly, you can teach it.
Fresh experience can sometimes teach better than decade-old expertise because you remember the “beginner struggles”.
How long should my online course be?
Your online course should be between 4 and 8 hours, ideally. But it can be more or less, depending on your topic. You can break the course into 5 - 20 minute video lessons per module. Research shows that attention span drops after 15 minutes. For beginners, you can aim for five modules at 45 minutes each.
Should my online course be video lessons, PDFs, or both?
Your online course can use videos, PDFs, or both, depending on what explains your content best. Many creators combine video lessons with simple worksheets or slides for better learning.
How to create your online course
Now that you understand the basics, let’s walk through the seven steps to build and launch your course.
Step 1: Identify your target audience and their main problem
The biggest mistake you can make is creating a course that no one wants.
To avoid this, you must define two things: your customer and their single, most urgent problem.
Your course succeeds or fails based on how well you understand who you’re teaching and what keeps them up at night.
Do you want to waste weeks building a course only to have zero sales? Most creators do, by guessing what their audience wants.
Look for a high-urgency pain point. Is it a skill gap, a business process that is too slow, or a tool they can’t figure out? The clearer the problem, the more demand there will be for your solution.
For example: Don’t create a course on “Social Media.” Create a course on “How to get 10 new clients from LinkedIn every week.” This is specific, urgent, and measurable.
Aga Naplocha and Paulina Kacprzak from Design Practice targeted Polish designers frustrated with web design gaps.
They ran a survey that drew over 500 responses, uncovering needs for Figma resources and practical web skills.
This intel shaped their “Digital Designer” course, leading to 991 enrollments at $240K revenue in its first edition.

Using Easytools’ webhook integration with Airtable, Aga and Paulina automatically sent each new participant’s name, email, and registration date to their spreadsheet. This removed the need for manual data entry and helped them focus on keeping things organized.
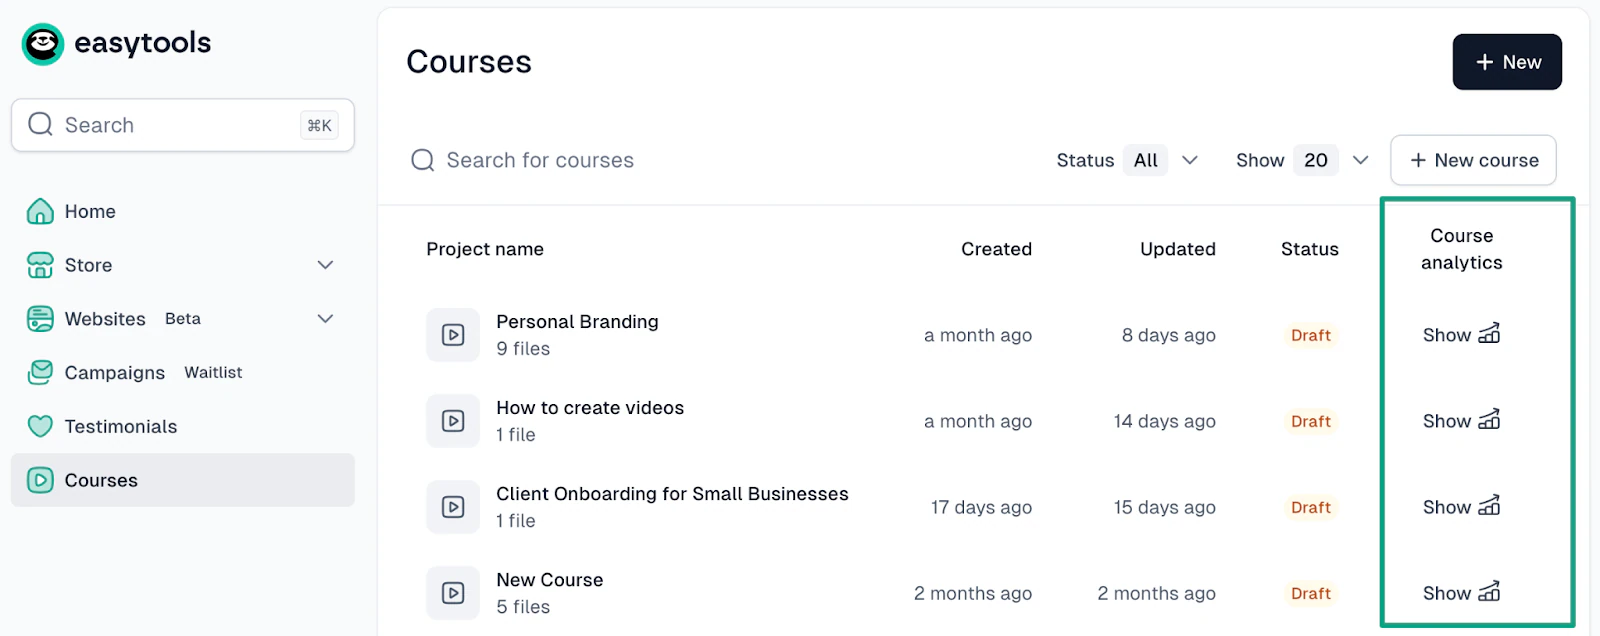
Today, Easytools makes this process even simpler with the built-in course analytics feature.
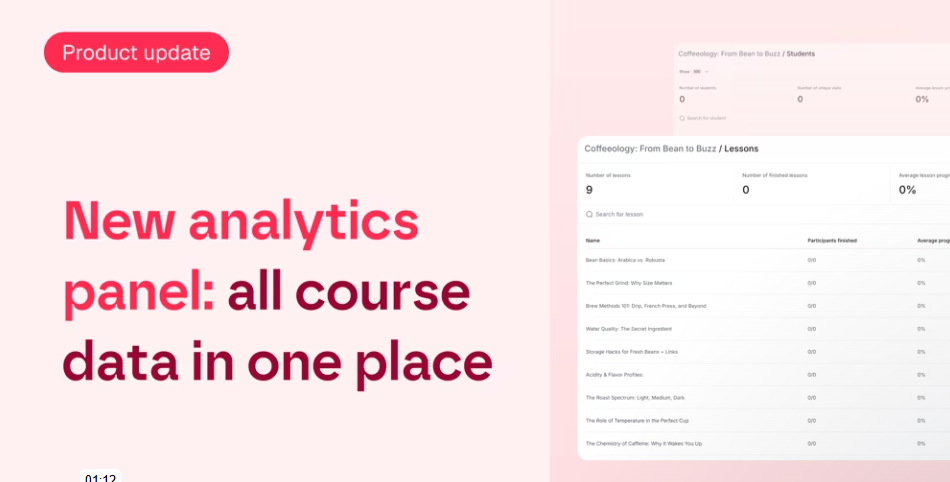
Instead of setting up webhooks, you can now see student progress directly inside your account, like who has started the course, which lessons they’ve completed, and where they may have dropped off.
Everything is tracked automatically, making it much easier to understand how your course is performing.
💡 Pro Tip: Your target audience wants to see that you’re a serious creator. Tools like Easytools help build creator-brand relationships by letting you customize your course pages with your logo, colors, and domain name.
This way, your students see your brand, not a generic platform.
So, you can write down three things:
- Who your student is (role, experience level, current situation)
- The specific problem causing them frustration or loss of money
- The outcome they want (be specific: “land two new clients monthly”, not “grow their business”)
This foundation will guide every decision you’ll make in the next steps.
Step 2: Choose a course topic that solves that problem
With your audience’s problem clear, choose a course topic that directly solves it. Your topic should promise one transformation, not five.
A popular example of this is Ali Abdaal’s Part-Time YouTuber Academy (PTYA).
He didn’t create a course about “becoming a YouTuber, running a creator business, editing like a pro, and building an online brand.”
He chose one simple, clear topic: Learn The Strategies and Techniques used by Ali Abdaal to Thrive on YouTube – Without Quitting Your Day Job.
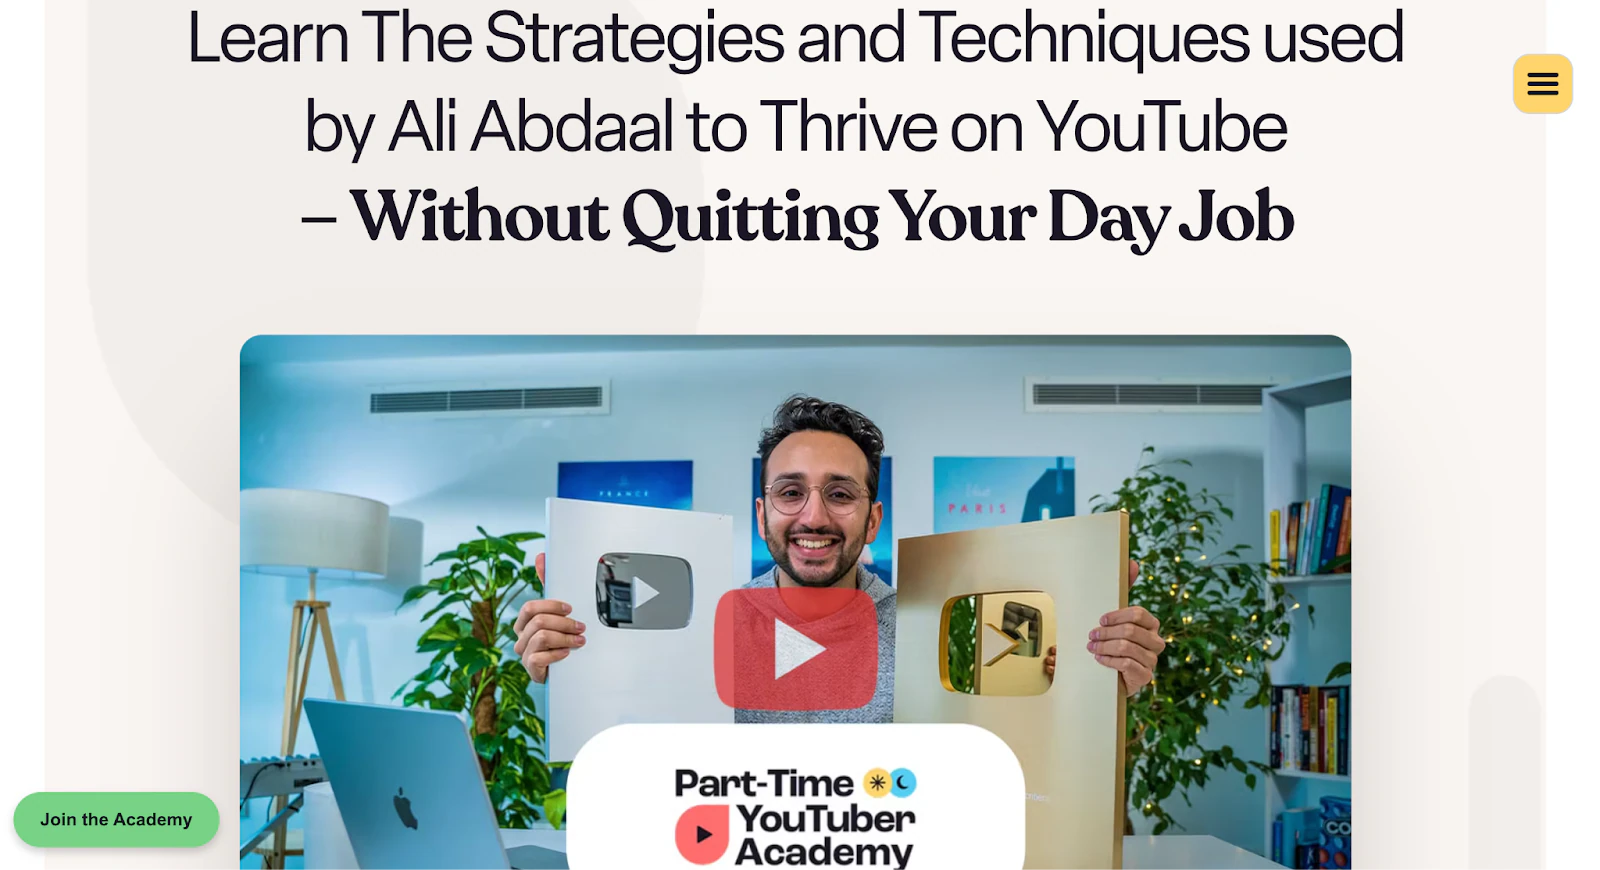
Because the topic solved a single, specific problem for a very clear audience, the course became wildly successful.
Students knew exactly what they were buying, and the transformation was easy to understand.
This is the power of choosing one focused course topic.
Good course topics can follow this formula: “How to [achieve specific outcome] for [specific audience] in [timeframe].”
Here are some examples:
- How to book 10 discovery calls weekly for new coaches (not “social media marketing”)
- How to meal prep 5 dinners in 90 minutes for busy parents (not “healthy eating”)
- How to build a portfolio website in one weekend for designers (not “web development”)
Notice how each topic is narrow and outcome-focused. Students know exactly what they’re getting.
Test your course idea before creating any content. You can create a simple landing page describing the course and its benefits, then share it with your audience. If 50+ people join a waitlist or 10+ people say they’d buy at your price point, that’s a good sign.
Now, with Easytools, you can create landing pages from scratch or use ready-made templates. You can also add headlines, sign-up forms, and testimonials with simple drag-and-drop, without coding.
If you’ve never made a landing page before, this short YouTube tutorial shows the exact steps you need to follow inside Easytools.
It walks through the layout, settings, and form setup so you can publish your page quickly and start collecting signups.
Once your landing page is live and people start joining your waitlist, you’ll immediately see whether your course idea is attracting real interest. Even 30–50 signups is a strong signal that you’re on the right track.
When you choose a course topic that solves a clear problem, people recognize it instantly. That’s exactly what happened with Design Practice.
After surveying their audience, they noticed many people were struggling with one thing: combining web design skills with Figma in a practical, real-world way.
To confirm this topic actually solved a problem people would pay for, they released one free YouTube lesson showing a preview of what the full course would cover.
The video got 5,000 views and generated 540 preorders, which was proof that they had chosen a topic their audience desperately needed.

I see this as “testing your course idea” in action. First, they found the problem (survey feedback), created a focused solution (web design + Figma), tested demand (free lesson), and then built the product (540 preorders before launch).
Your course topic should make someone say “this is exactly what I need” within five seconds of reading it.
Step 3: Outline your online course structure and learning objectives
Before recording anything, map out your entire course structure. This outline becomes your guide and keeps you from rambling or missing crucial concepts.
You can use the backward design framework, a method that educators Grant Wiggins and Jay McTighe made popular, and is now widely adopted on platforms like Coursera and Udemy.
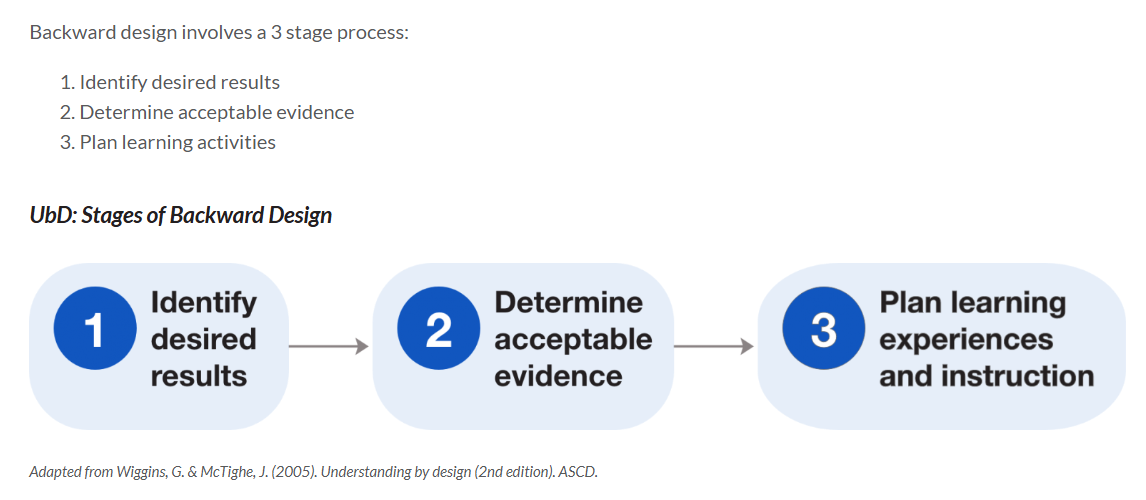
Instead of planning lessons first and hoping everything connects, Backward Design starts with the final transformation you want students to achieve and works backwards.
Here’s how to apply it in three stages:
Stage 1: Start by defining the one clear outcome students will experience by the end of your course. For a “Personal Branding” course, for example, the outcome could be to position yourself as an authority in your niche confidently.
Another one can be to land 3+ speaking gigs or collaborations in 90 days.” This goal anchors everything.
Stage 2. Determine how you’ll know students hit that goal. Keep objectives action-focused using verbs like “create,” “build,” “write,” or “launch” rather than passive verbs like “understand” or “learn about.”
Take this example objective: “By the end of this module, students will write a one-page brand bio that attracts their ideal clients (assessed via a provided template).”
Stage 3. Now break the journey into 4–8 modules, each teaching one major skill or concept. Under each module, add 3–7 short lessons (bite-sized, action-focused).
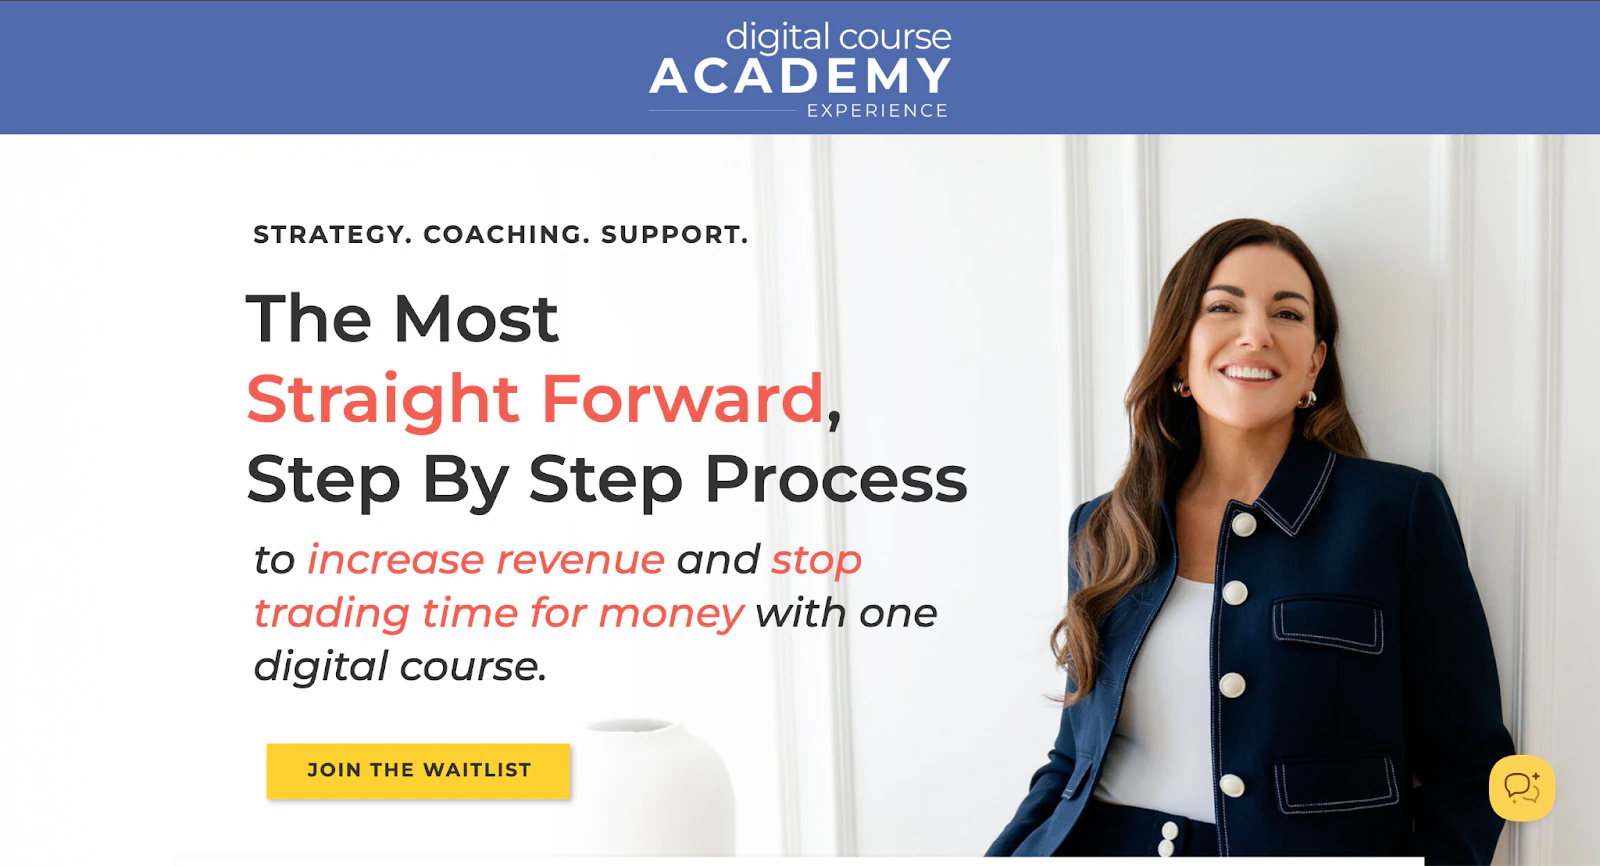
Let’s look at Amy Porterfield, the queen of digital courses, for example. When outlining her flagship course, she used backward design, starting with one transformation. It was to increase revenue and stop trading time for money with one digital course.”
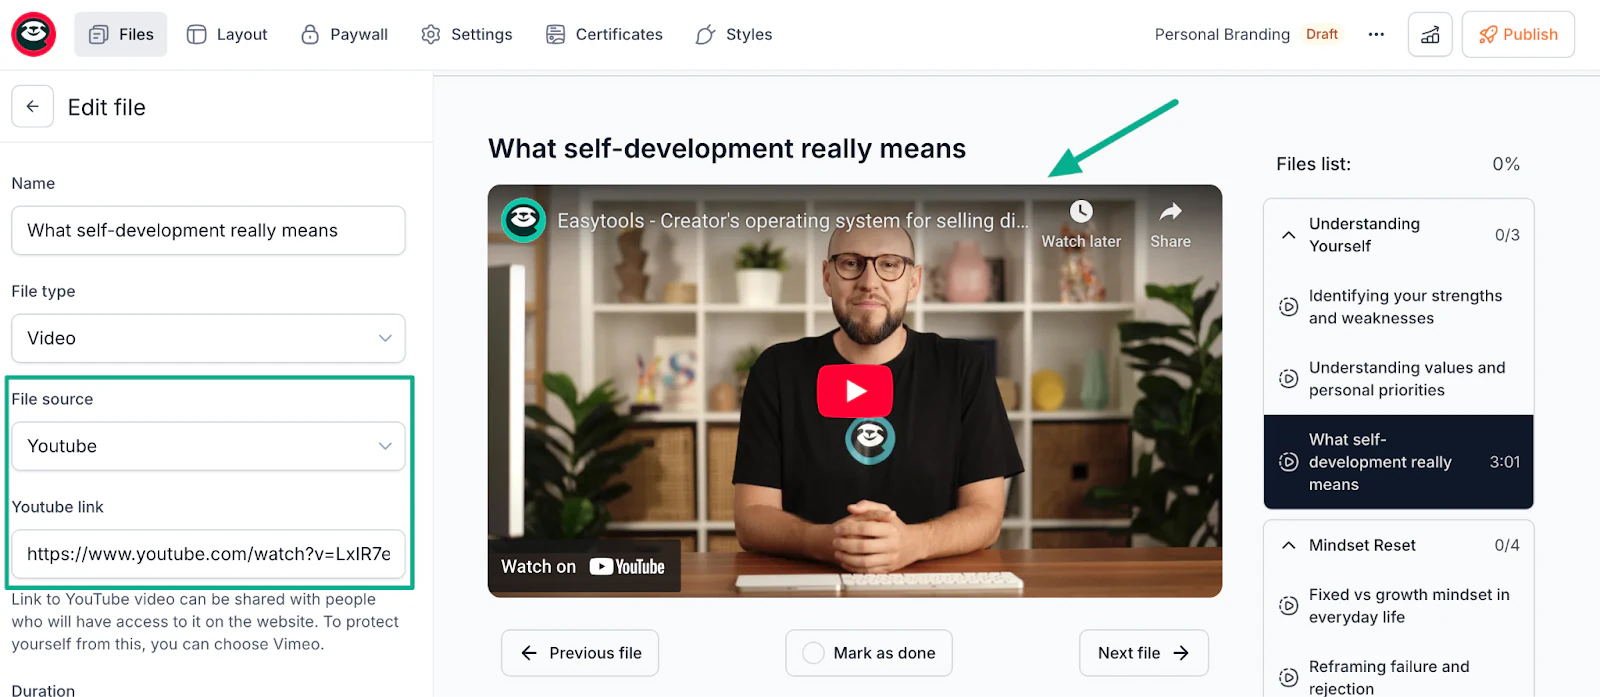
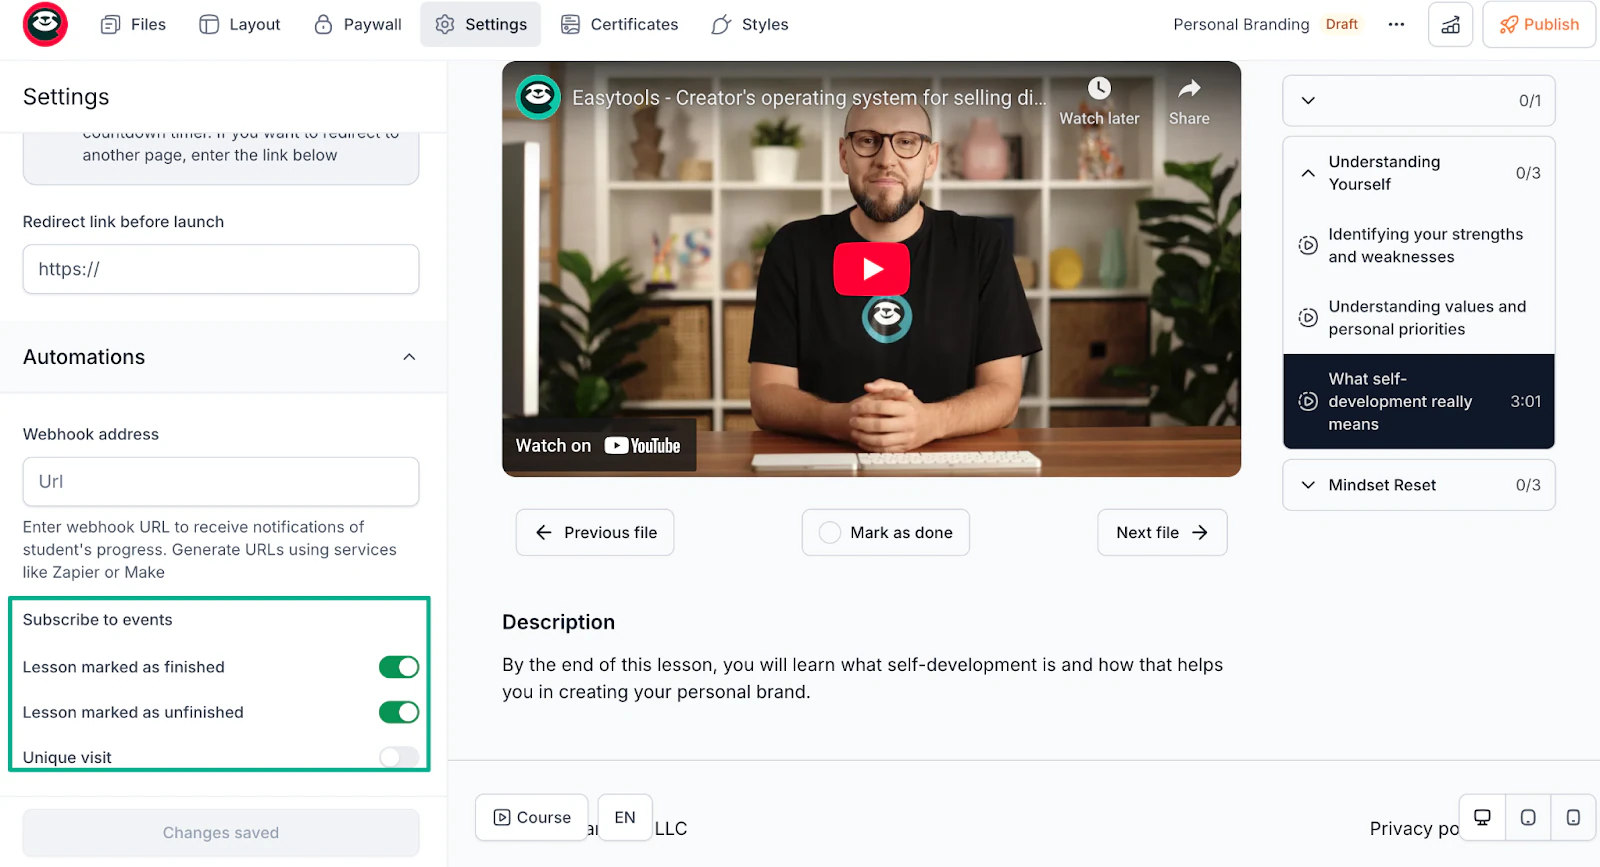
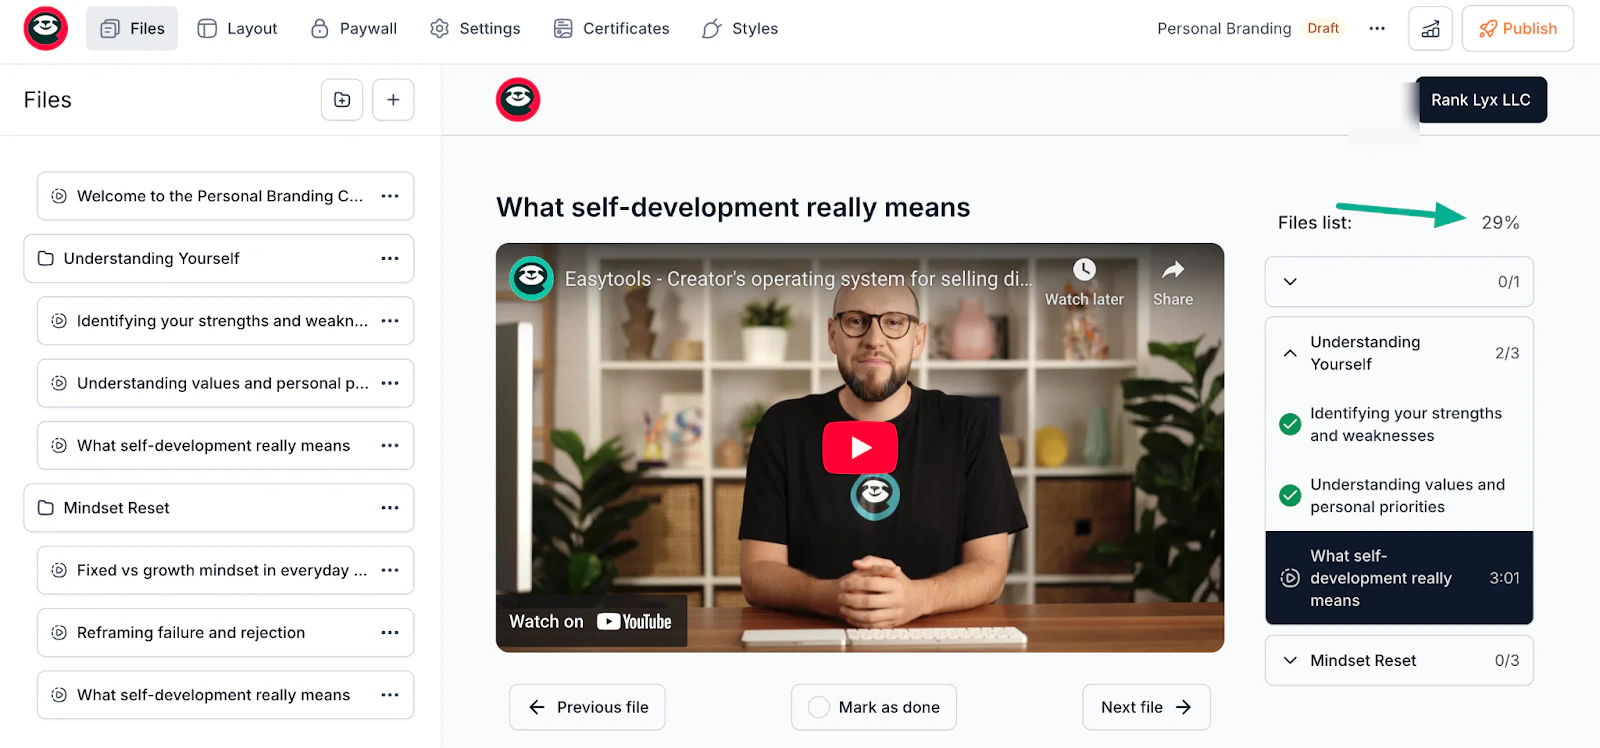
Here’s an example for a course I created on “Personal Branding”:
Module 1: Understanding Yourself
- Lesson 1: Identifying your strengths and weaknesses
- Lesson 2: Understanding values and personal principles
- Lesson 3: What self-development really means
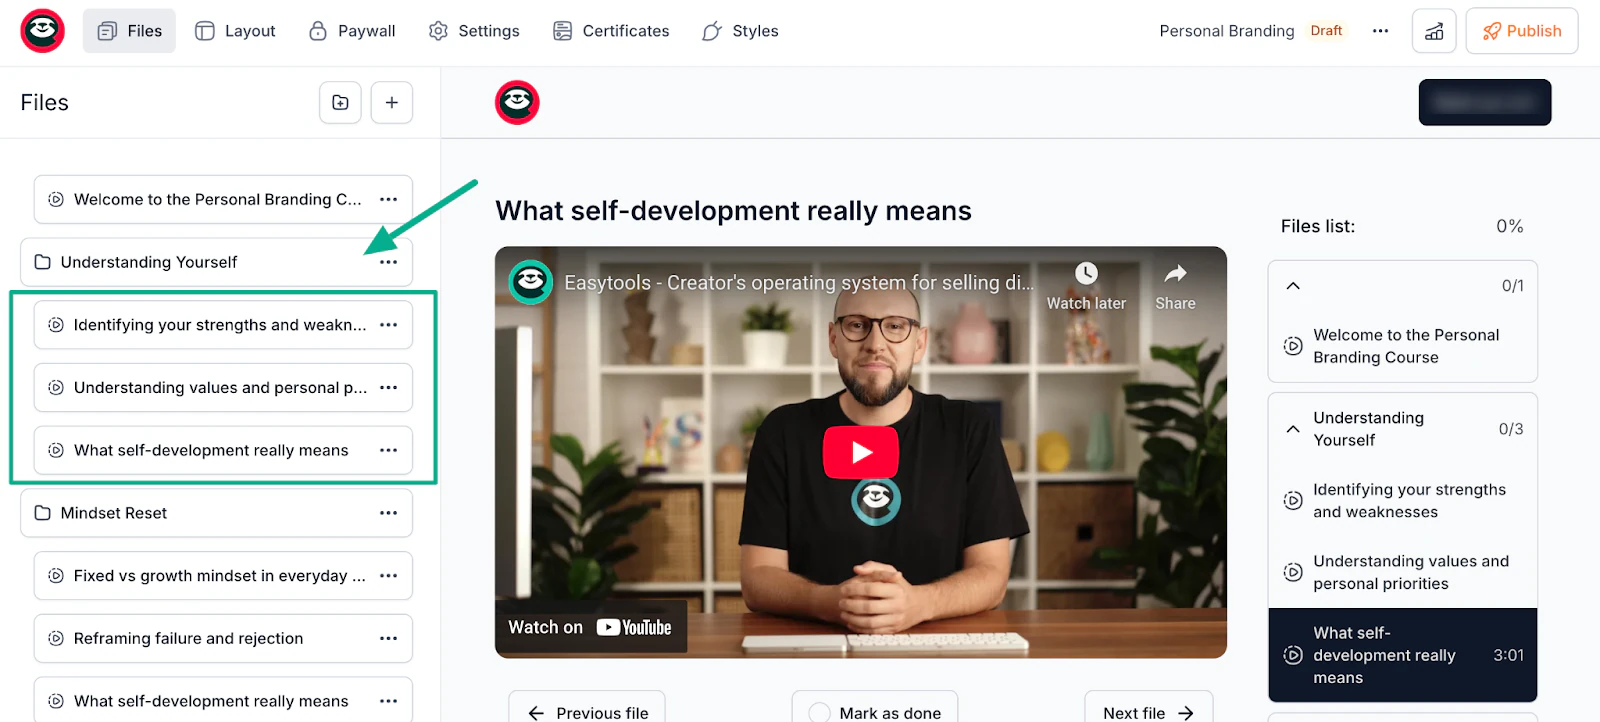
Module 2: Mindset Reset
- Lesson 1: Fixed vs growth mindset in everyday life
- Lesson 2: Reframing failure and rejection
- Lesson 3: What self-development really means

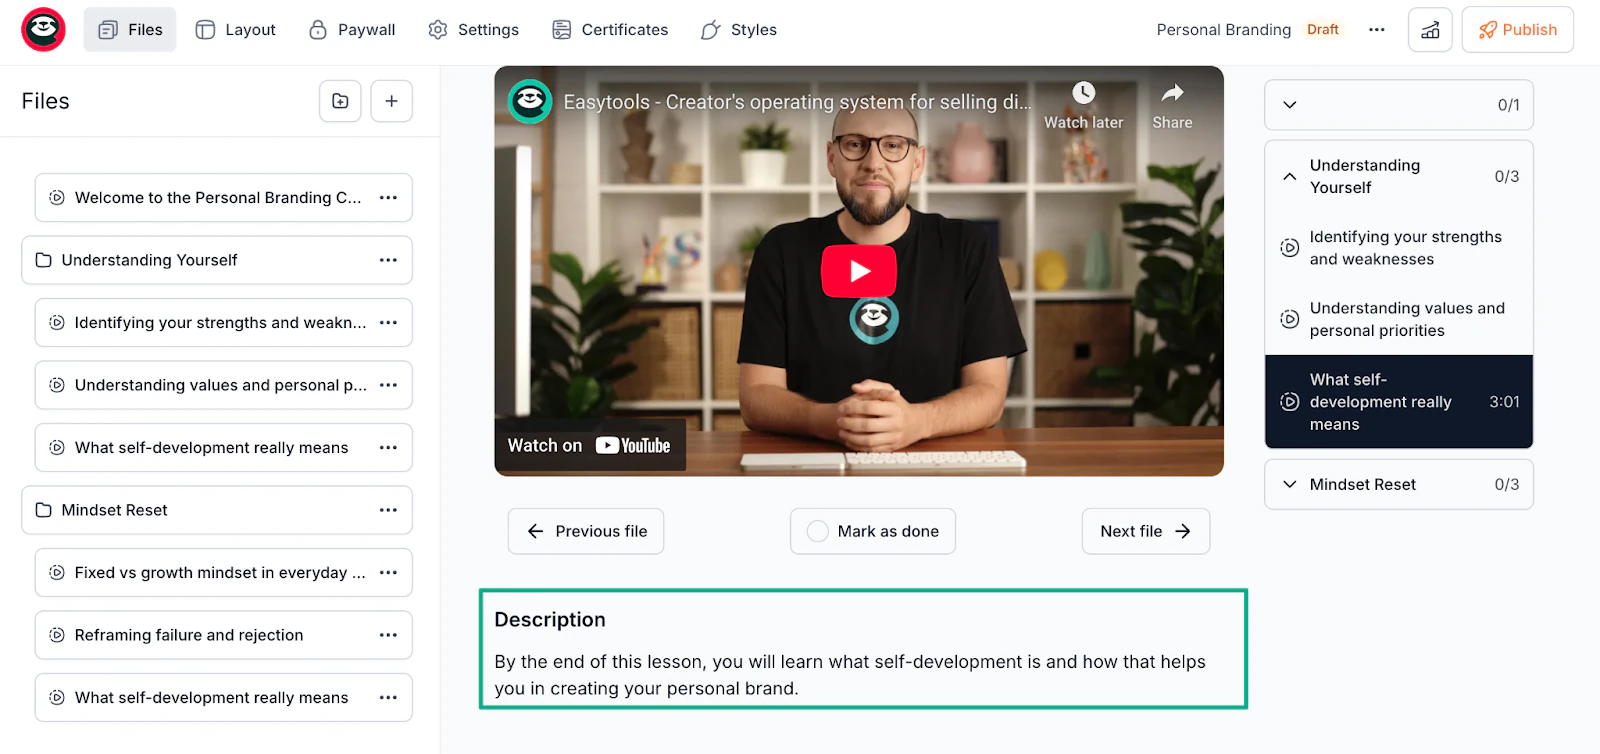
For each lesson, include a clear learning objective. For example, for my Personal Branding course, I wrote:
“By the end of this lesson, you will learn what self-development is and how that helps you in creating your personal brand.”
This keeps every lesson focused and makes progress measurable.
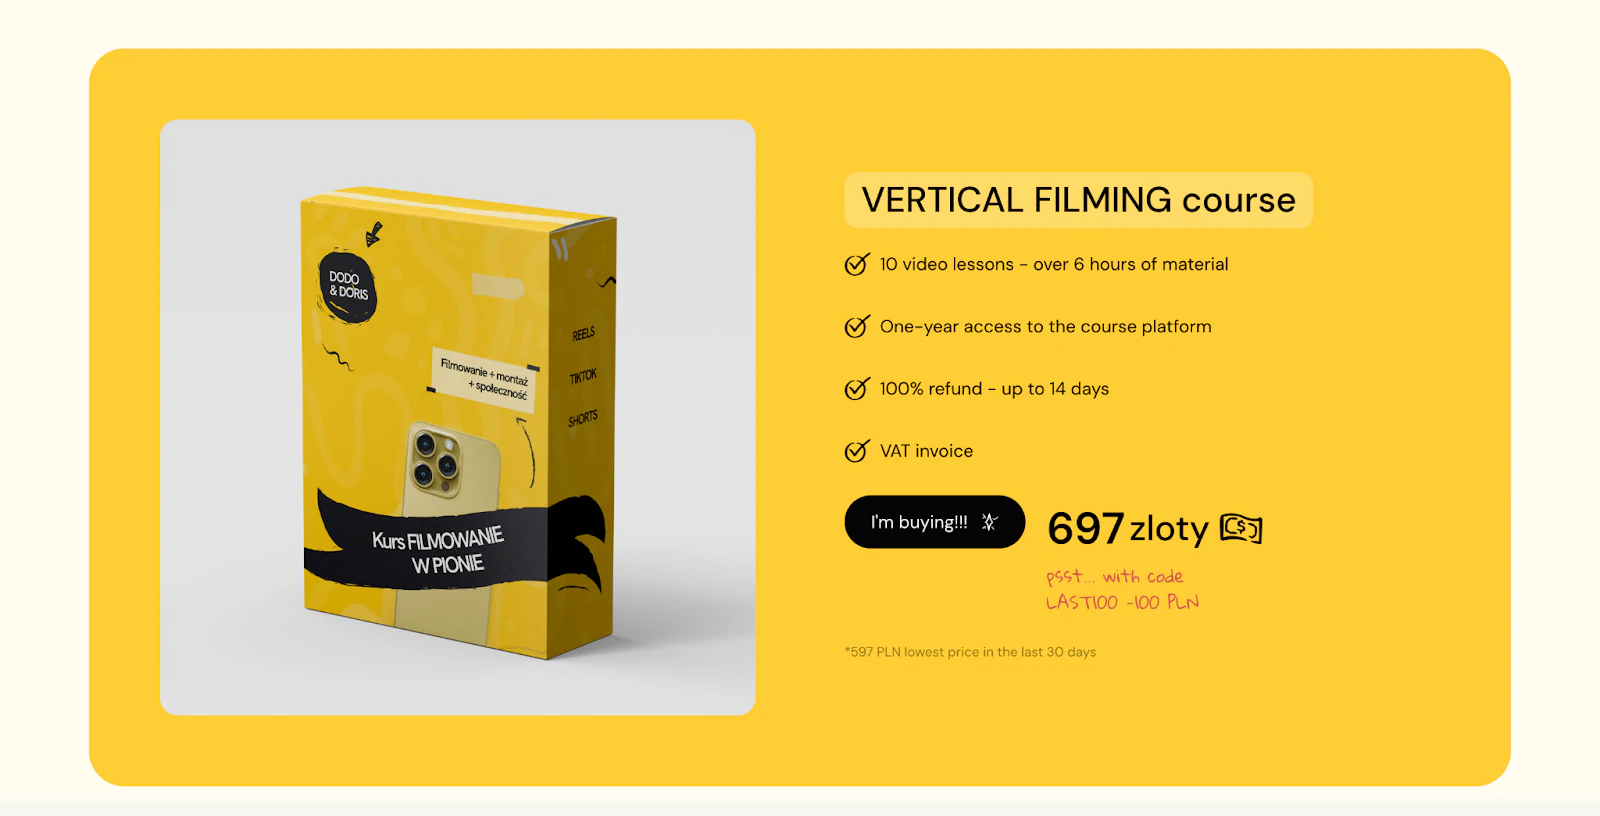
For their “Filmowanie w pionie” (Vertical Filmmaking) course, creators Doris Maklewska, Dodo Knitter, and Kaja Kraska outlined 10 binge-worthy modules covering recording, editing, storytelling, and branding.

They didn’t choose 10 modules “just to have more content.” They chose 10 because their topic required a complete, step-by-step journey that moves students from raw footage to polished vertical videos ready for Instagram, TikTok, or YouTube Shorts.
Each module covers exactly one skill their audience said they struggled with, making the entire course feel manageable and binge-friendly.
The right number of modules comes down to solving the problem completely without overwhelming the student. If your transformation has 10 clear steps, use 10. If it only needs 4, use 4.
By looking at how successful creators structure their topics, you’ll notice they don’t cram everything into one giant module, and they don’t create extra lessons just to fill space.
They break each topic into logical, digestible steps that their audience can follow.
In the same light, your outline should flow logically, where each lesson builds on the previous one. Students shouldn’t feel lost or wonder, “Why am I learning this now?”
Spend a few hours on this outline. It saves weeks of recording content you’ll later delete because it doesn’t fit.
Step 4: Plan your lessons and supporting materials (videos, slides, worksheets)
With your outline ready, plan the format and materials for each lesson. This is where you decide what to record as video, what to provide as downloads, and what additional resources students need.
For each lesson, choose the format that best fits what you’re teaching:
1. Video demonstrations for showing processes, walking through software, or teaching physical skills:
Video demonstrations work because students can see exactly what to do in real-time, pause to follow along, and rewind if they miss a step.
Online courses that rely heavily on video demonstrations include software engineering bootcamps, IT troubleshooting programs, video editing courses, and music production classes.
These fields require students to replicate specific actions, and watching someone do it first dramatically reduces confusion.
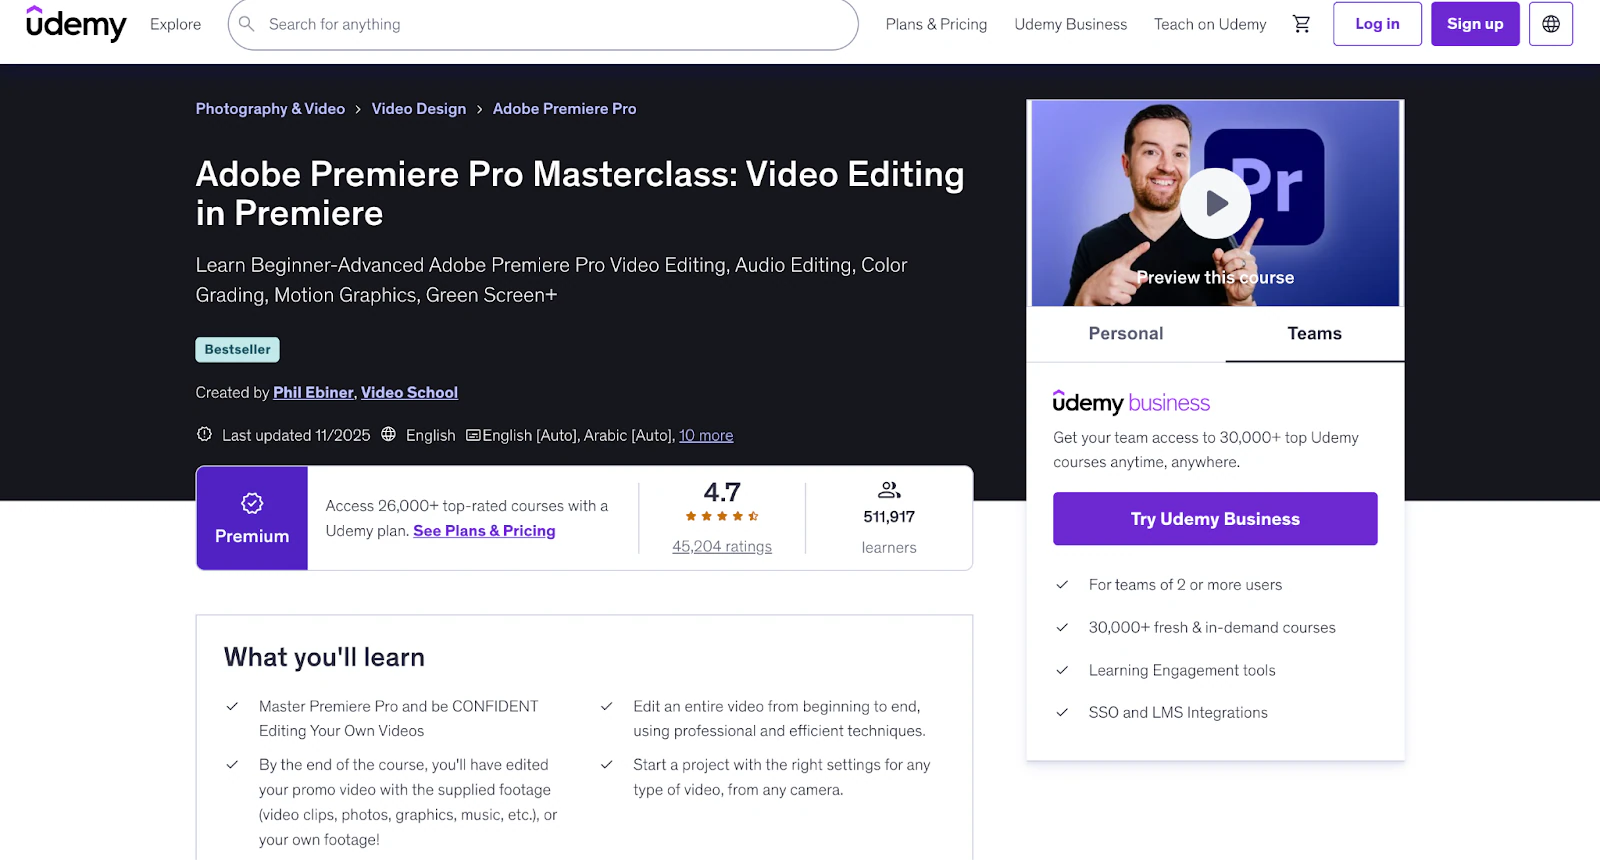
Take Phil Ebiner’s video editing course, for example. It leans heavily on video demonstrations to guide learners through Adobe Premiere Pro timelines, turning beginners into pros in 26 hours.
2. Talking head videos for storytelling, motivation, or building personal connection
When students see your face and hear your tone, they feel like you’re talking directly to them.
This style works best for leadership development, personal growth, mindset coaching, and creative courses where your personal story or experience adds value.
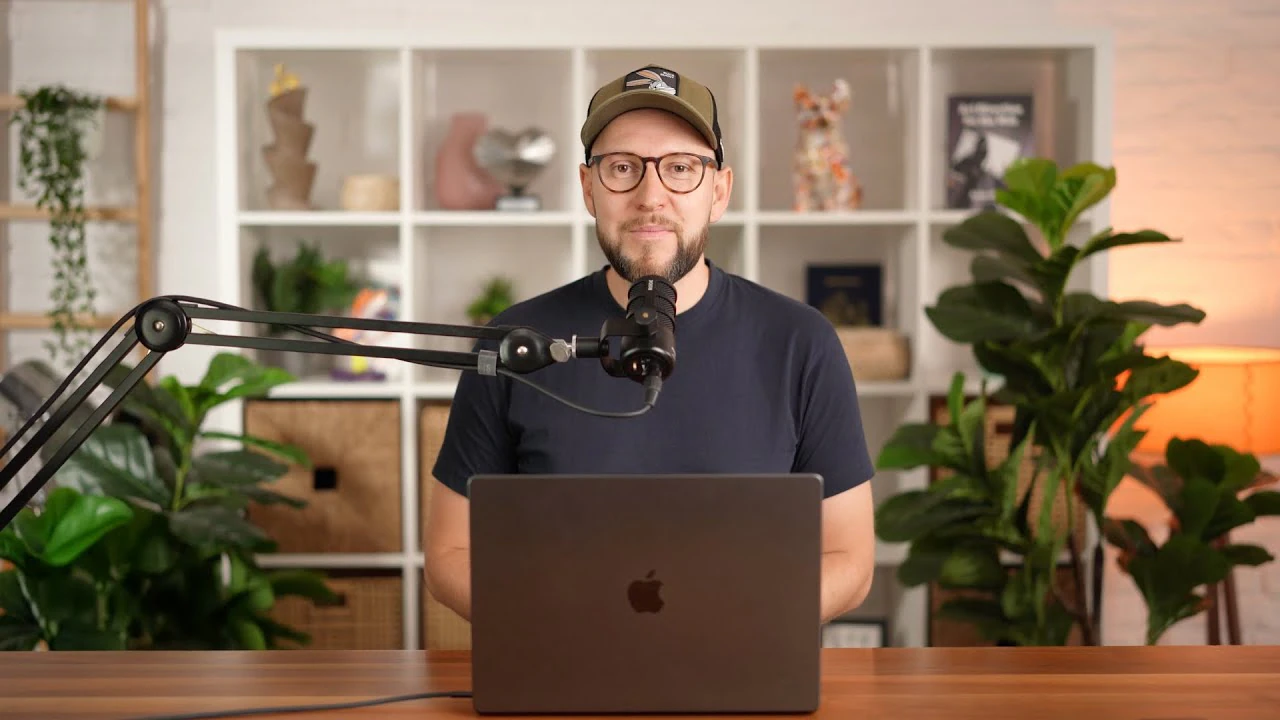
This format increases motivation and course completion, especially in soft-skill courses where relatability matters as much as information.
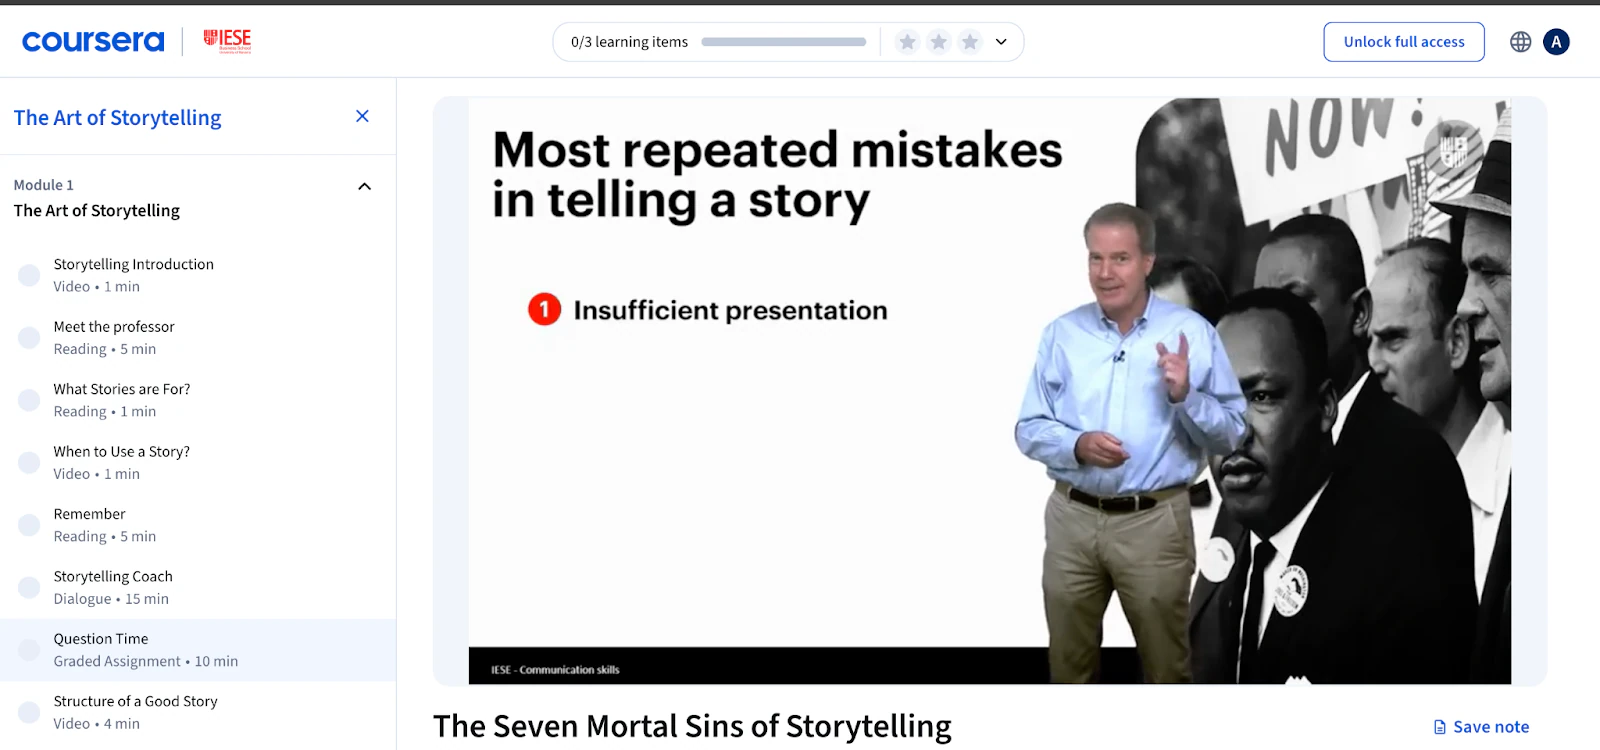
Just like how “The Art of Storytelling” on Coursera by IESE Business School uses talking head videos throughout.
3. Slide presentations for frameworks, statistics, or conceptual explanations
Instead of explaining a framework through talking alone, slides let you show diagrams, bullet points, and statistics that students can screenshot and reference later.
Slides work especially well when teaching frameworks like SWOT analysis, customer journey mapping, or project management methodologies.
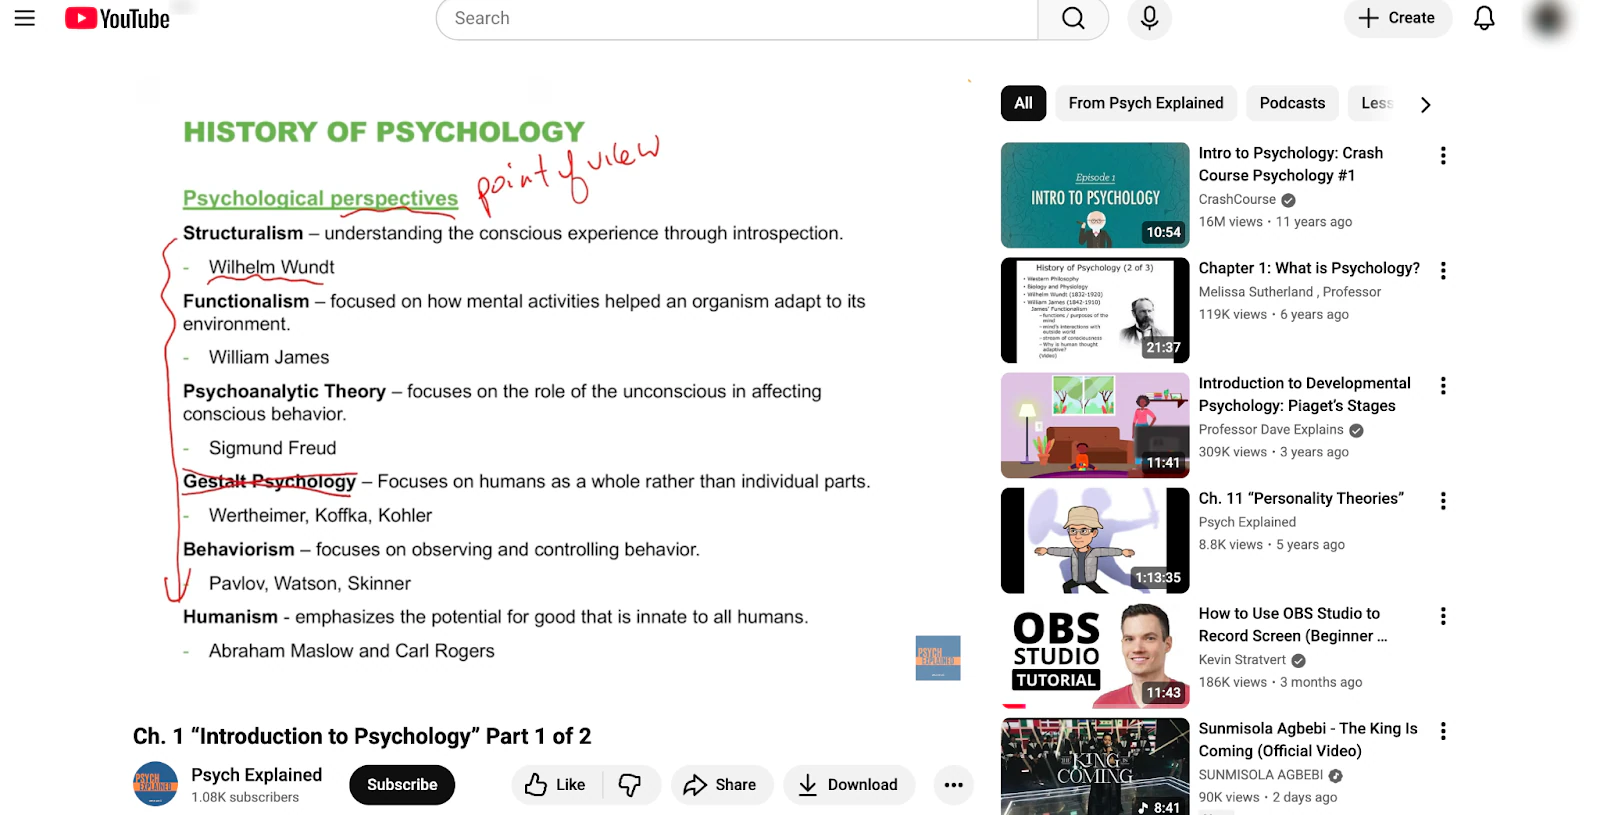
A great example is this narrated university-level lecture on “Introduction to Psychology”. It’s delivered via voiceover synced with clean, content-rich PowerPoint slides.
Use slides for business strategy courses, marketing frameworks, data analysis, finance principles, or any topic where structure and visual hierarchy matter
4. Screen recordings for technical tutorials or tool walkthroughs
Screen recordings capture your exact workflow as you navigate software, dashboards, or apps. Students can follow along precisely without guessing where to find features.
This format is essential for technical accuracy and works perfectly when teaching specific tools.
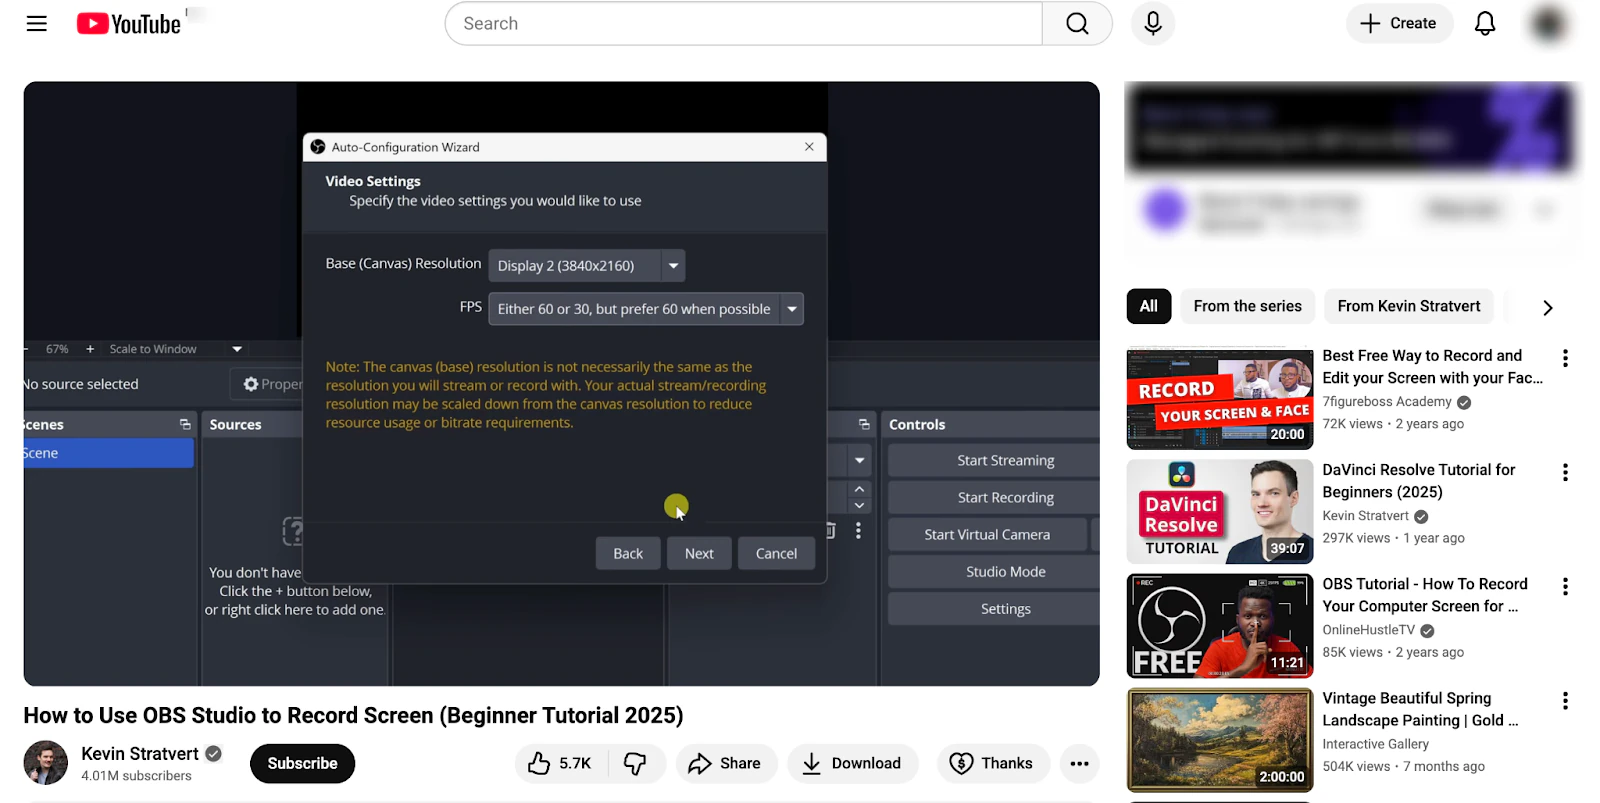
An example of screen recording in teaching is this beginner tutorial on using OBS Studio. The video itself uses clear voiceover narration, zooming in on menus and demoing real-time recordings, making it easy to follow along and pause to try.
Screen recordings dominate in courses teaching CRM systems, coding environments, productivity app setups, automation tools, or any software-specific skill.
Then identify supporting materials:
- Worksheets that help students apply concepts (fillable PDFs work great)
- Templates they can copy and customize (contracts, email scripts, design files)
- Checklists for multi-step processes
- Resource lists with tools, books, or websites you recommend
- Transcripts for students who prefer reading

After planning your lessons and course materials, you can create a simple production table or spreadsheet to track your progress.
For example, you can record all talking-head videos in one session, then do all screen recordings another day, which saves massive time versus switching contexts constantly.
An example of what this plan can look like:
This prevents you from forgetting materials and helps you batch similar tasks together. You can record all talking-head videos in one session, then do all screen recordings another day.
Don’t overproduce at this stage. Students care about results, not Hollywood production value. Your smartphone and decent lighting beat months of perfectionism.
Step 5: Record your lessons using simple tools or software
Now it’s time to create your content. The good news is you don’t need expensive equipment or technical expertise to record quality lessons.
For video lessons: Use your smartphone (iPhone or Android from the last 3-4 years) or laptop webcam. Position yourself in natural light near a window, or use a simple ring light ($20-40).
For audio, smartphone earbuds with a mic work fine, or upgrade to a USB microphone like the Blue Yeti ($100) if your budget allows.
Free recording tools you can explore:
- Loom (screen + webcam recording)
- OBS Studio (advanced, but free)
- Zoom (record yourself and share your screen)
- Your phone’s camera app (for talking head videos)
Loom is perfect for showing how to use software, walking through processes, or presenting slides with your voice-over. Keep these videos focused with one concept per recording.
Record all your talking-head videos in one sitting while you’re dressed and your space is set up.
Do all screen recordings another day, as this saves massive time versus switching contexts constantly.
Tomek Biskup from Design Practice batch recorded the “Digital Designer” course over two months post-presale, using simple screen capture for Figma demos and face cam for tips.

The raw, relatable style resonated, drawing in designers who valued real-world hacks over slick edits.
Easytools’ Vimeo/YouTube integrations in Easyplayer keep recordings secure and embeddable.
Your first course won’t be flawless, and that’s completely fine. You can always re-record lessons later if needed.
💡Pro tip: Smile and pause like you’re chatting with a friend. Edit out “ums” later; raw energy keeps viewers hooked.
Step 6: Edit and organize your online course content
With your lessons recorded, it’s time to edit and organize everything into a polished course. This step is simpler than you think because you’re cleaning up mistakes and arranging content, not creating a documentary.
You can even use free or simple tools like:
- iMovie (Mac, free)
- DaVinci Resolve (free, Windows/Mac)
- Descript (transcribes and lets you edit by editing text)
- Kapwing (browser-based, simple)
Don’t obsess over perfect cuts. If you stumbled over a word but kept going, leave it; it sounds human. Only cut things that hurt clarity or make the video drag.
Add these finishing touches:
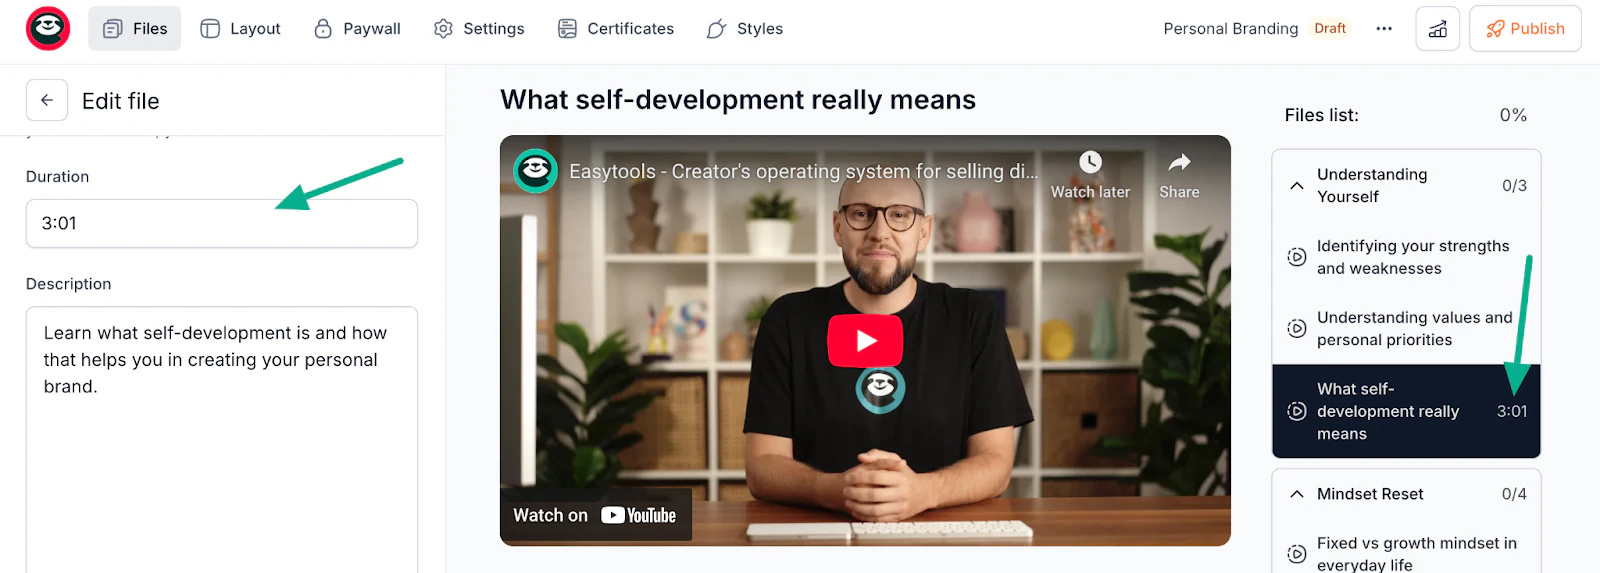
Write a 2-3 sentence description for each lesson explaining what students will learn
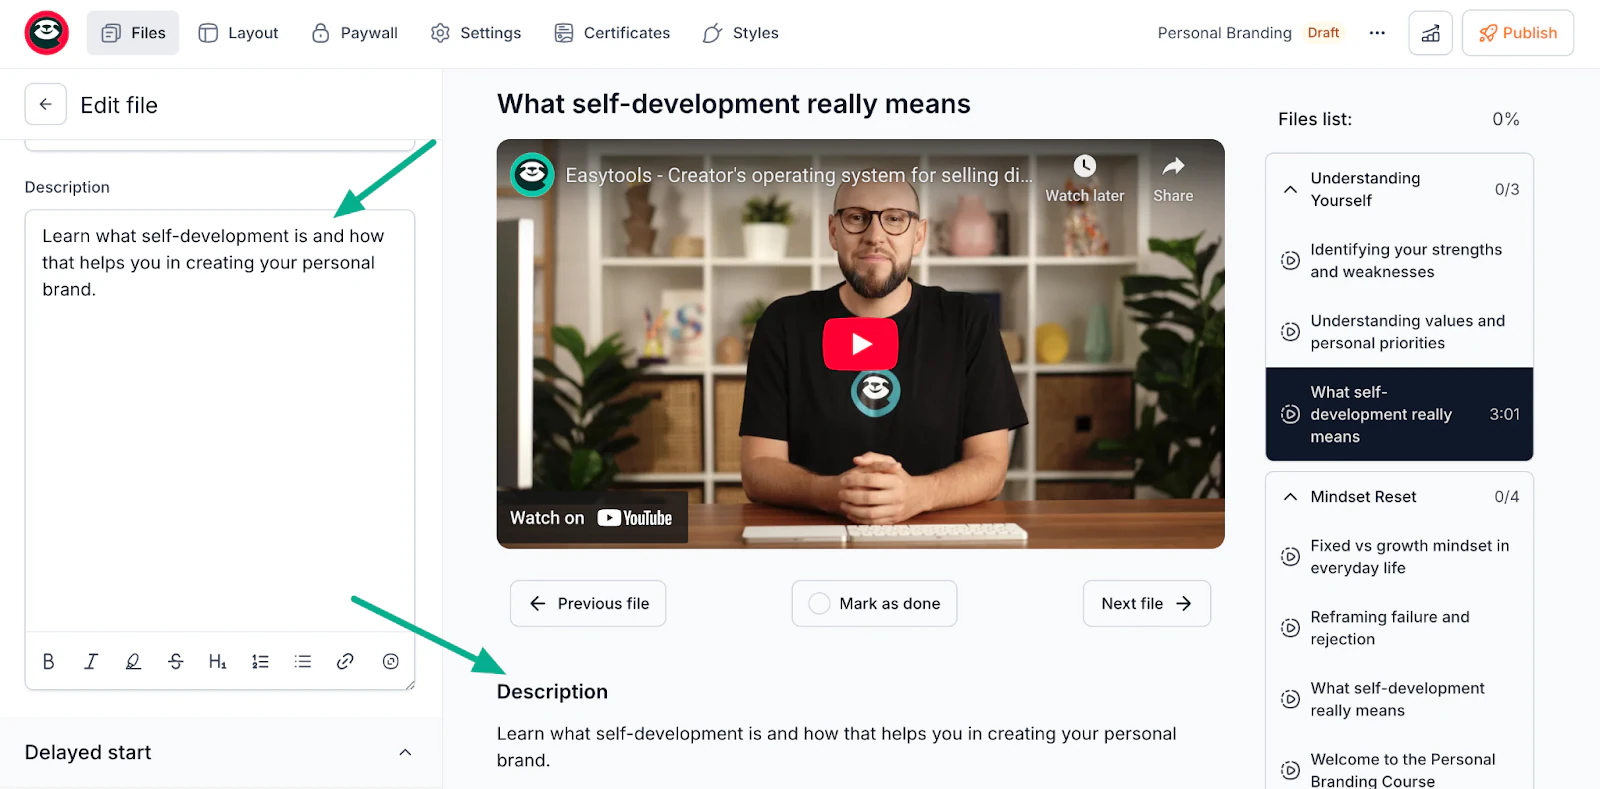
Mark the estimated time for each lesson (Easyplayer can display this)
Create a welcome lesson introducing yourself, setting expectations, and explaining how to navigate the course.

Your course is now built. The final step is getting it in front of customers.
Step 7: Publish and sell your online course
Your course is ready! Now it’s time to publish and start making sales.
This is where Easytools excels by handling the technical headaches so you can focus on marketing.
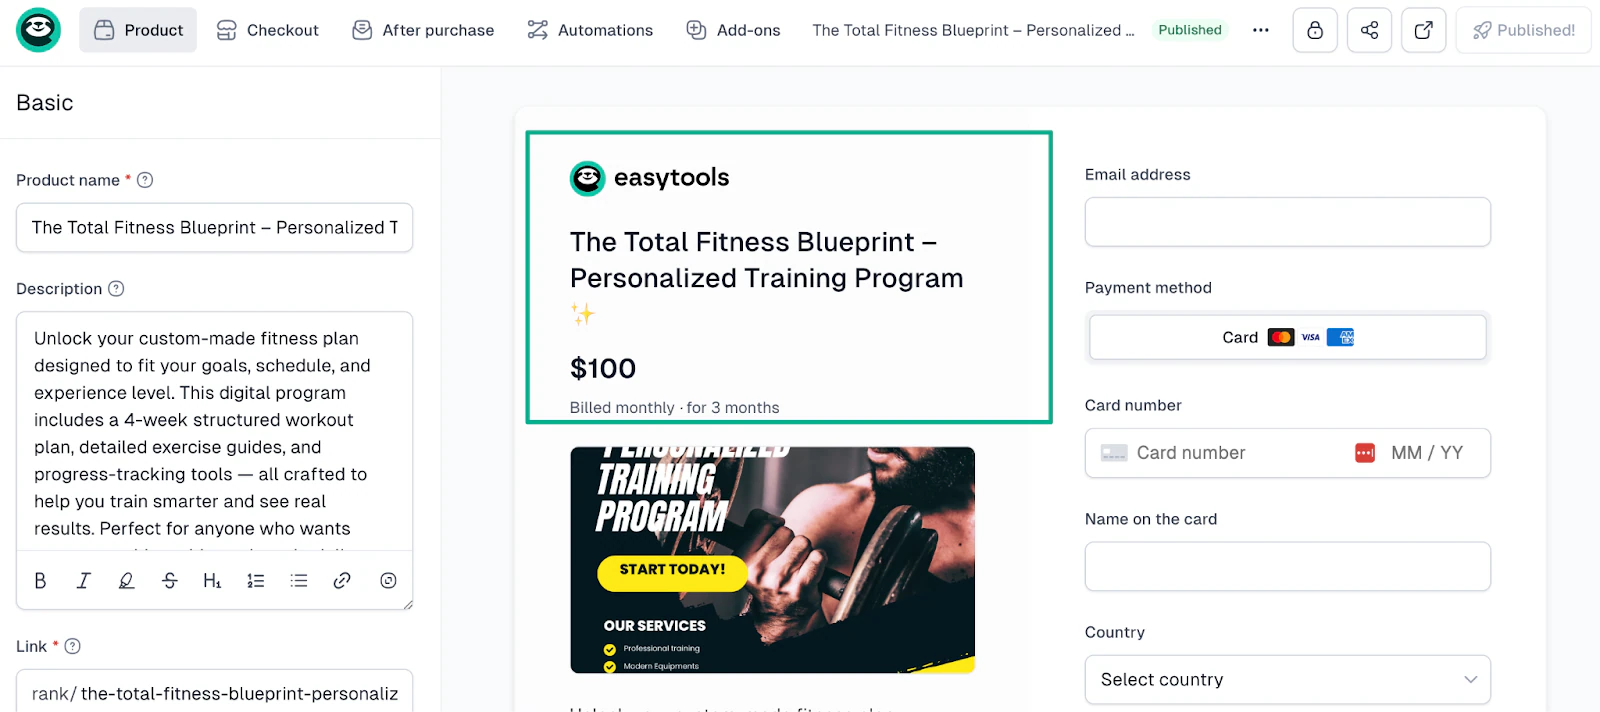
To use Easytools, first you should link your Stripe account in one click. This lets you accept payments globally with credit cards, Apple Pay, and more. Then, Easytools handles all the checkout complexity.
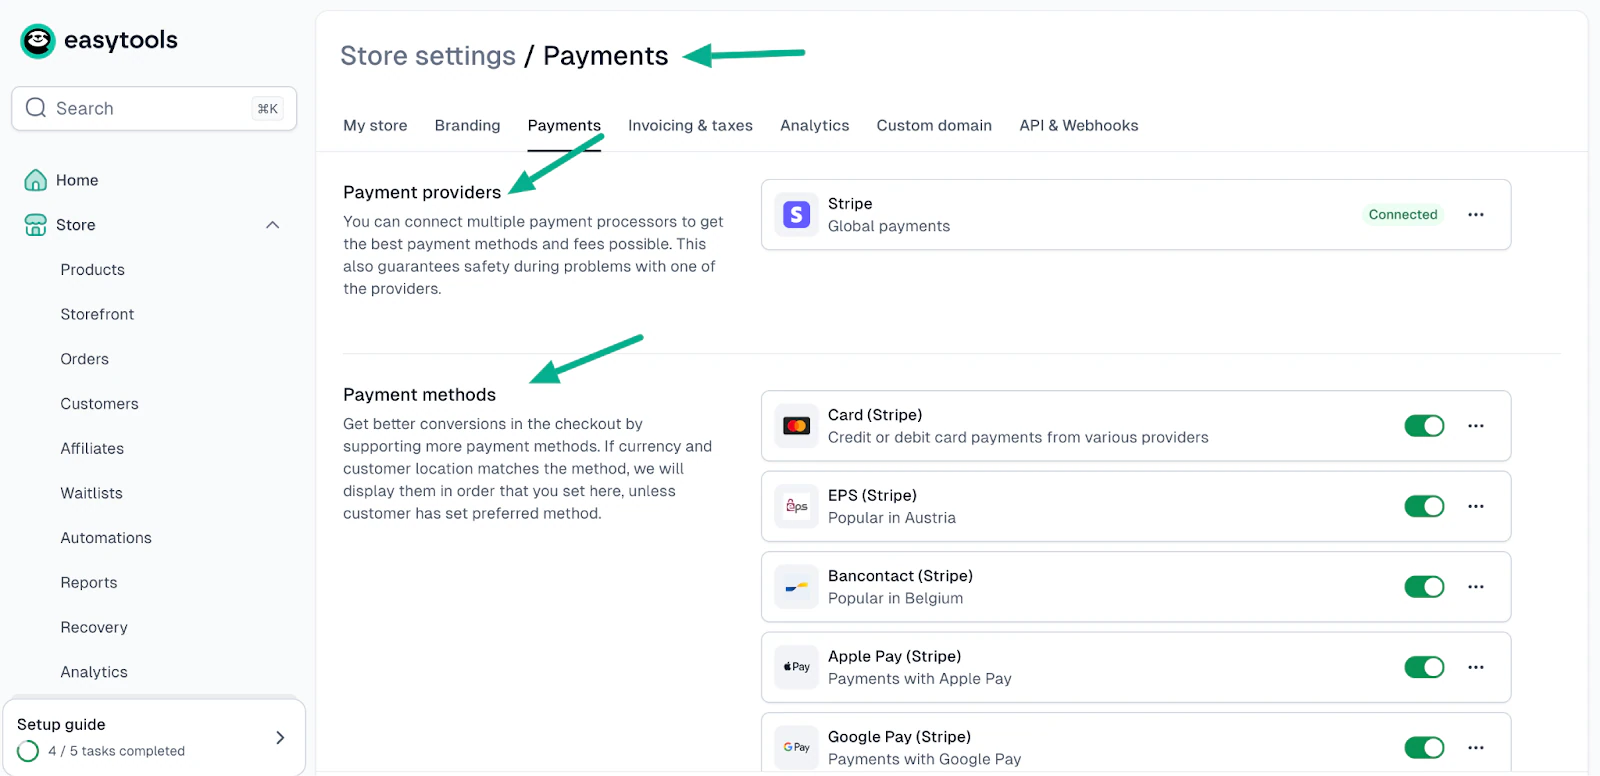
You can add your online course as a new product. Set your price depending on the transformation value and audience. You can also create payment plans (like three monthly payments) to increase affordability.
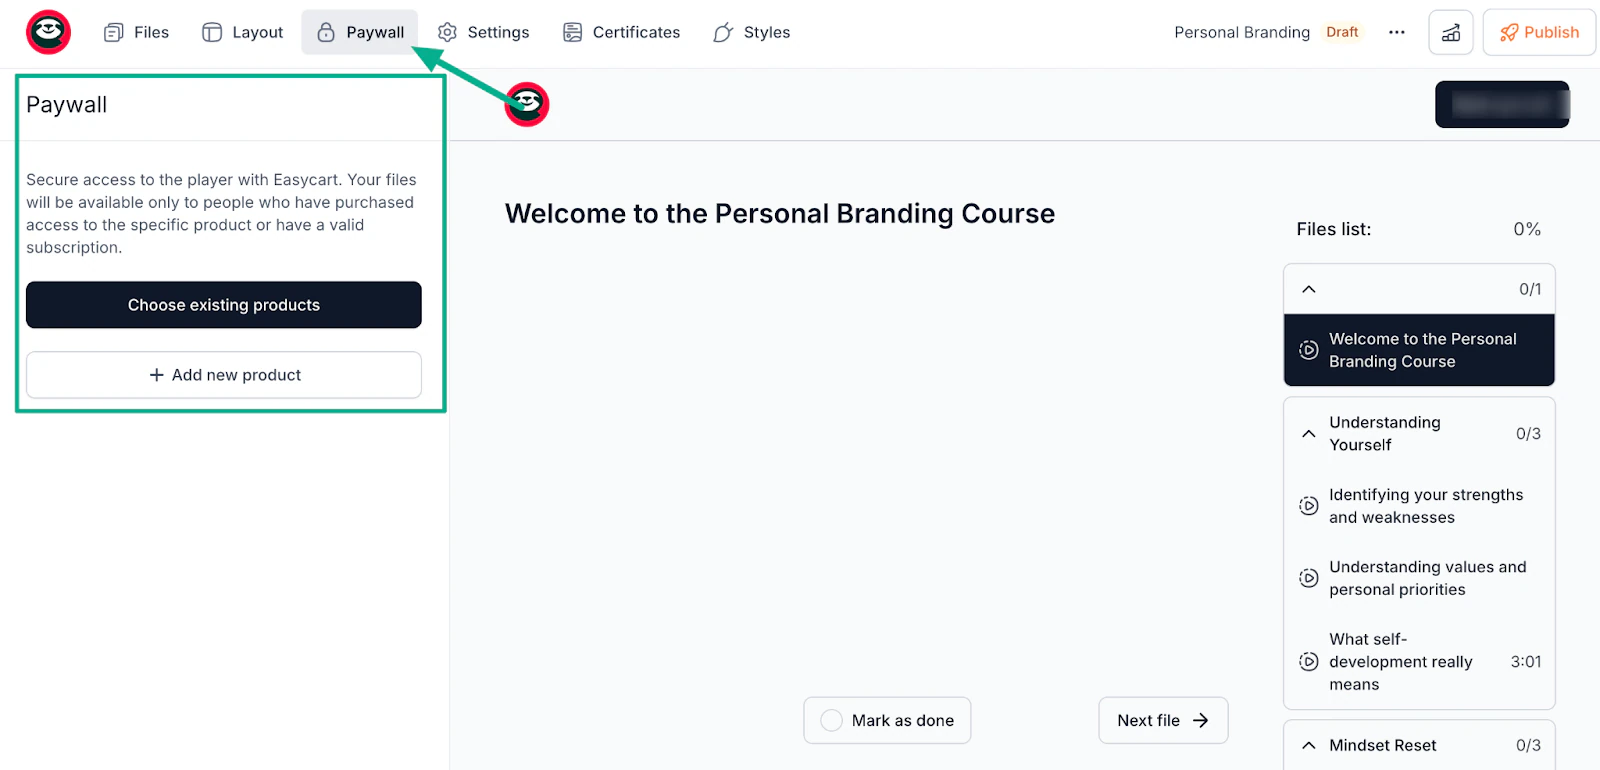
In the Easyplayer settings, you can enable the paywall and select which product(s) unlock access. Now, only paying customers can view your lessons. Free users see a preview or purchase prompt instead.
After that, you can use Easytools’ landing page builder or your own website to create a simple sales page that includes:
- Headline stating the transformation (“Go from overwhelmed to organized in 4 weeks”)
- What’s included (# of lessons, hours of content, bonuses)
- Who it’s for (be specific about your ideal student)
- What they’ll achieve (outcomes, not just topics)
- Social proof, if you have it (testimonials, results)
- Clear call-to-action button (“Enroll now”)
💡Pro tip: Set welcome emails and progress nudges. Easytools handles this, plus certificates for completions to encourage shares.
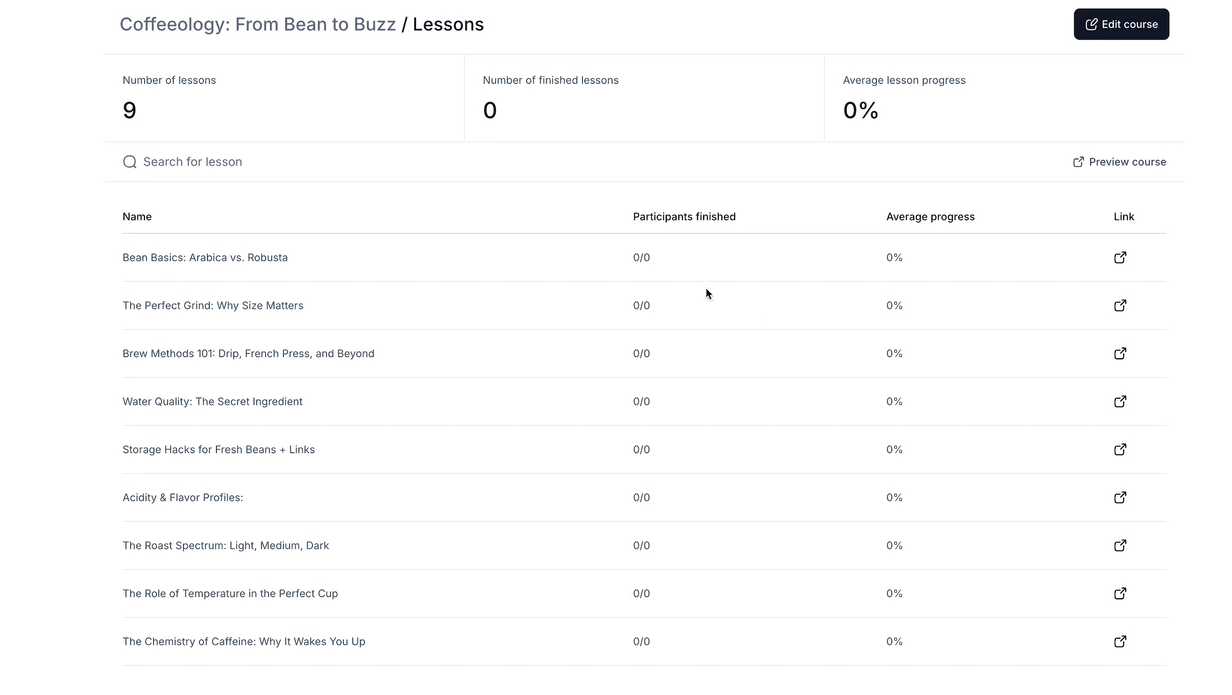
One great thing about Easytools, as I mentioned earlier, is that you can track student progress through the built-in course analytics dashboard.
You can see the number of students, the number of unique visits complete, where they drop off, and their average lesson progress.
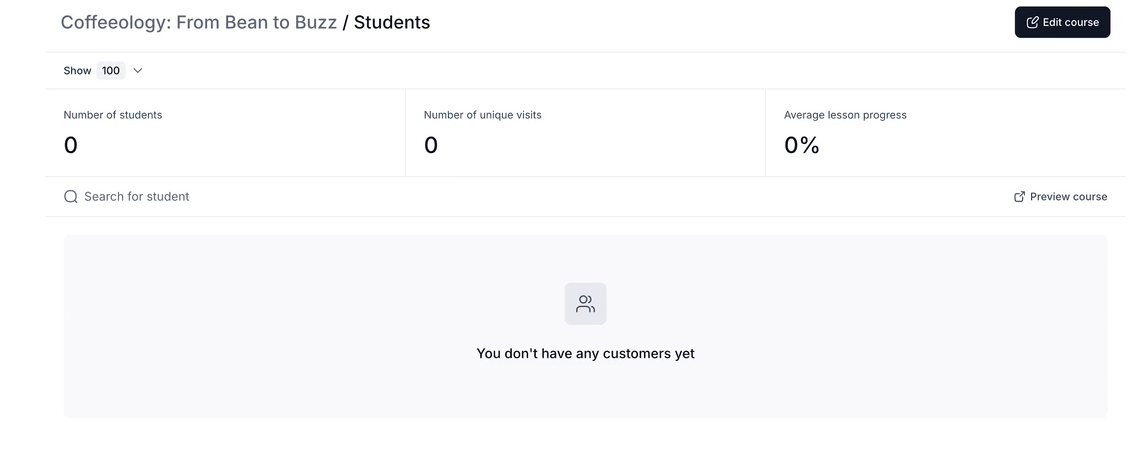
The dashboard also shows lesson completion rates, total course progress per student, and engagement patterns across your entire course. This visibility helps you identify weak spots (like lessons with low completion rates) and improve your online course based on real data.
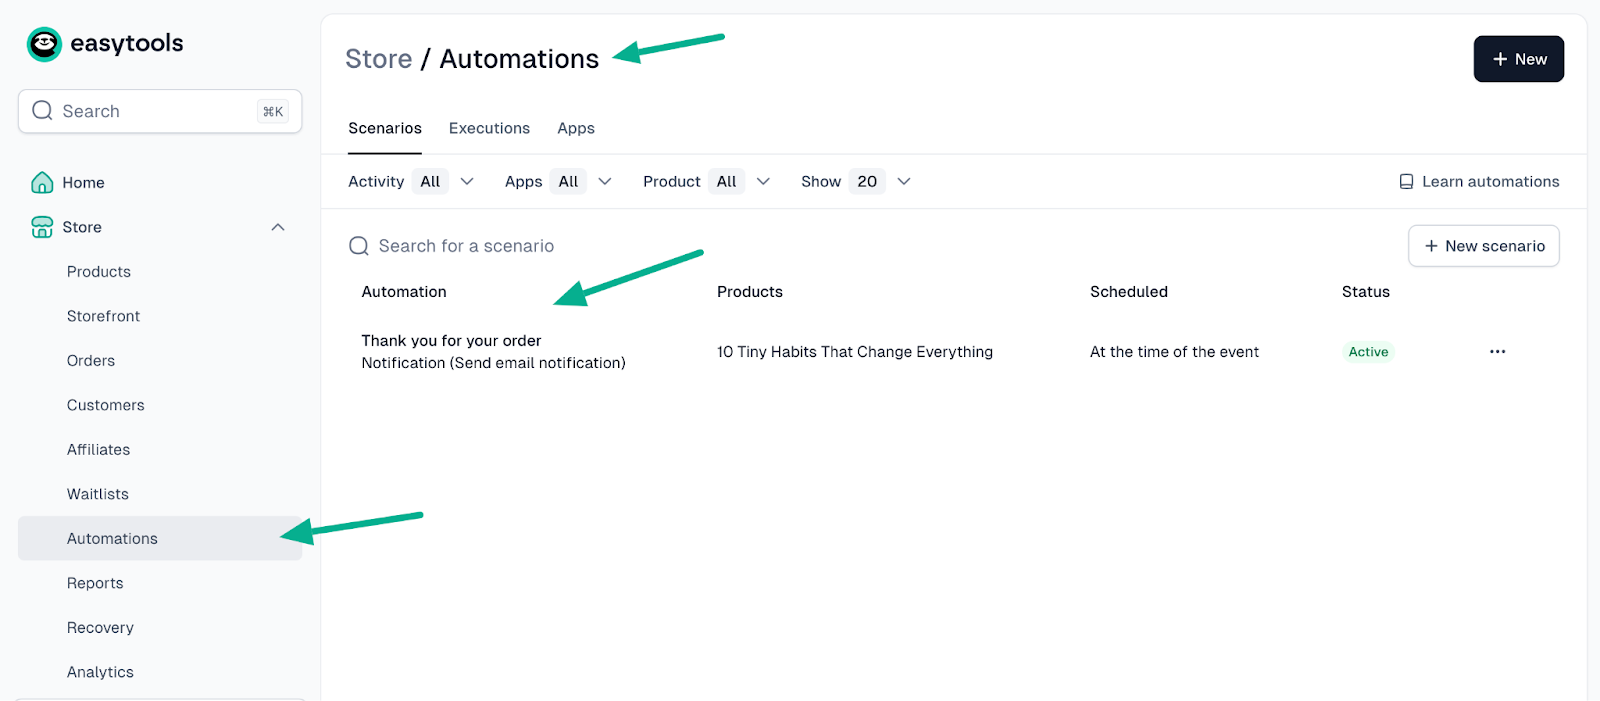
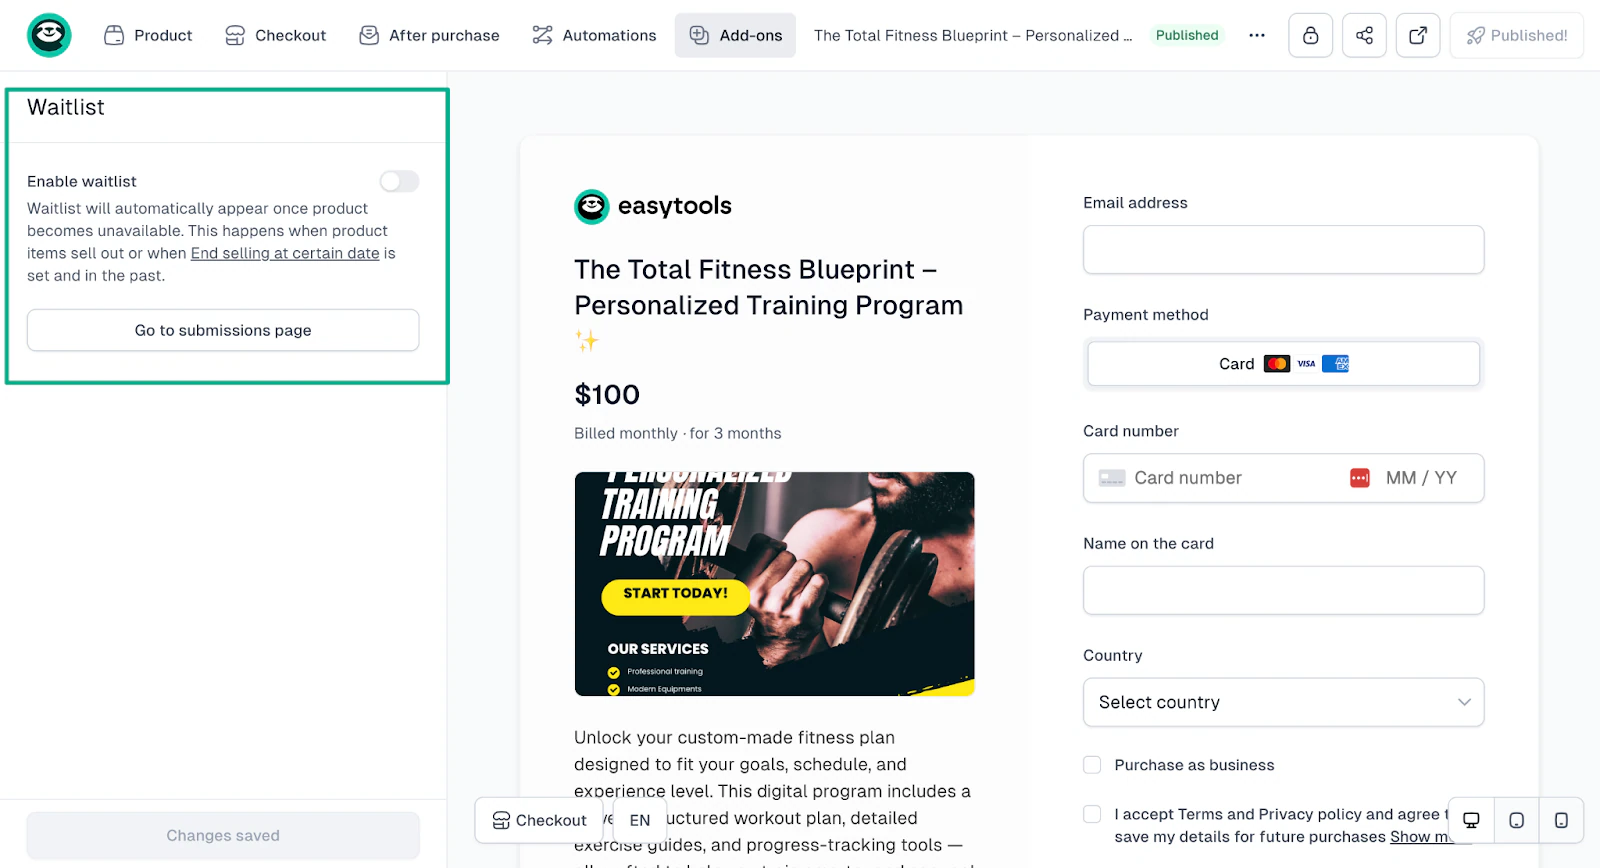
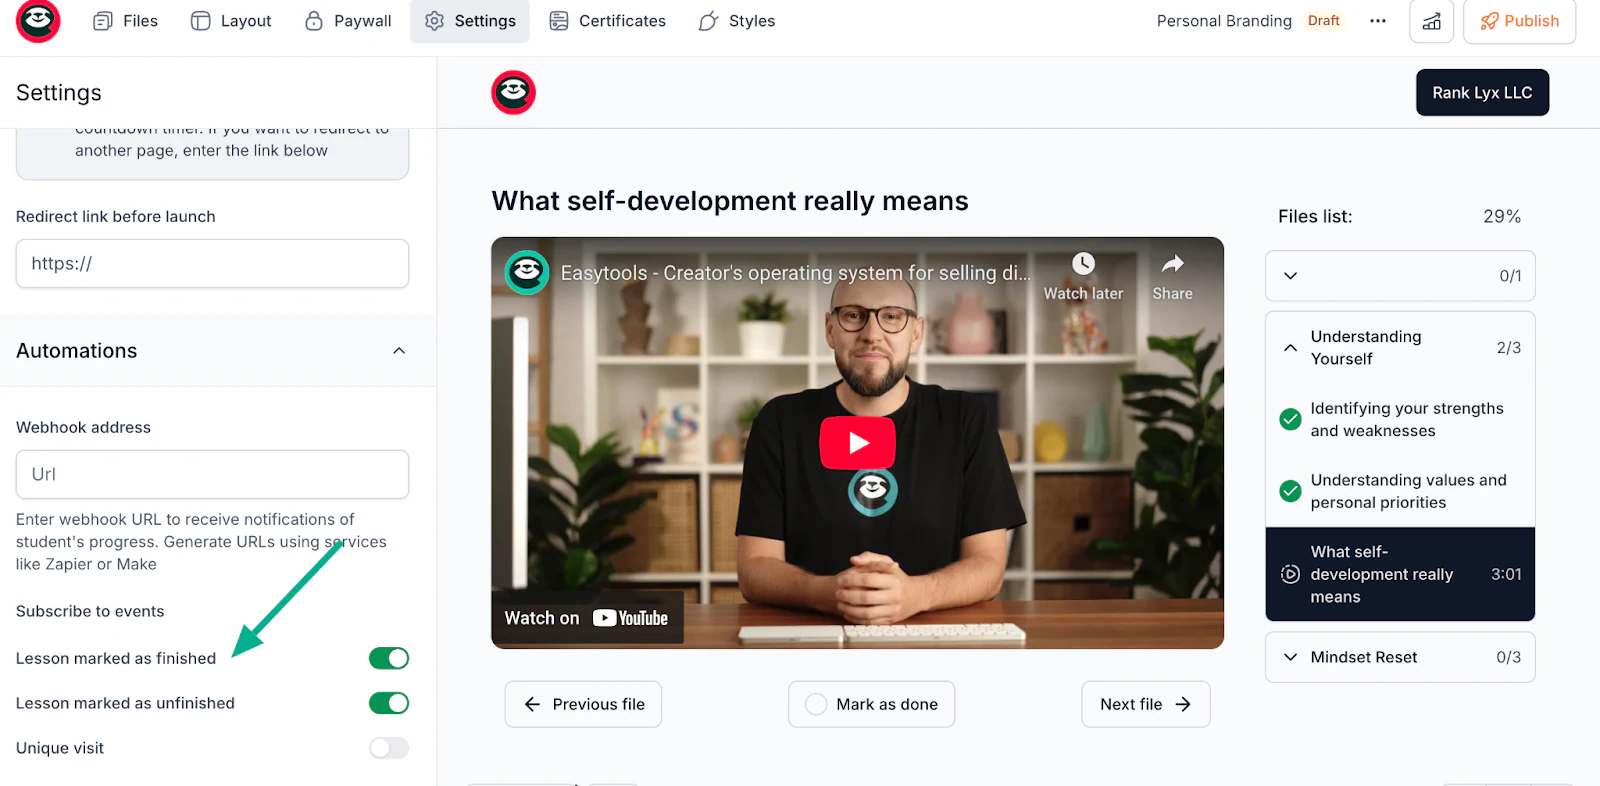
For advanced tracking needs, you can also use Easytools’ Automations feature.
Inside each lesson, you can subscribe to events like “Lesson marked as finished,” “Lesson marked as unfinished,” or “Unique visit.”
When these events trigger, Easytools sends the data to your webhook (Zapier, Make, or any automation tool). This lets you see which lessons students complete, where they drop off, and how they interact with your content.
This will help you identify weak spots and improve your online course.
Your course is now live and selling. The first sale proves your concept works. From here, you can create more courses, build a library, or scale what’s working.
Frequent course creation mistakes and how to avoid them
The three biggest mistakes when creating an online course are trying to cover too many topics, ignoring audience research, and making lessons too long or text-heavy.
Here’s how to avoid them so your course stays clear, practical, and easy to finish.
Trying to cover too many topics at once
The most common mistake is trying to teach everything you know in one course.
You want to provide value, so you pack in 30 hours of content covering every possible angle of your topic.
This can backfire completely.
Students buy online courses to solve one specific problem, not to earn a degree. When you cover too much, they feel overwhelmed and quit.
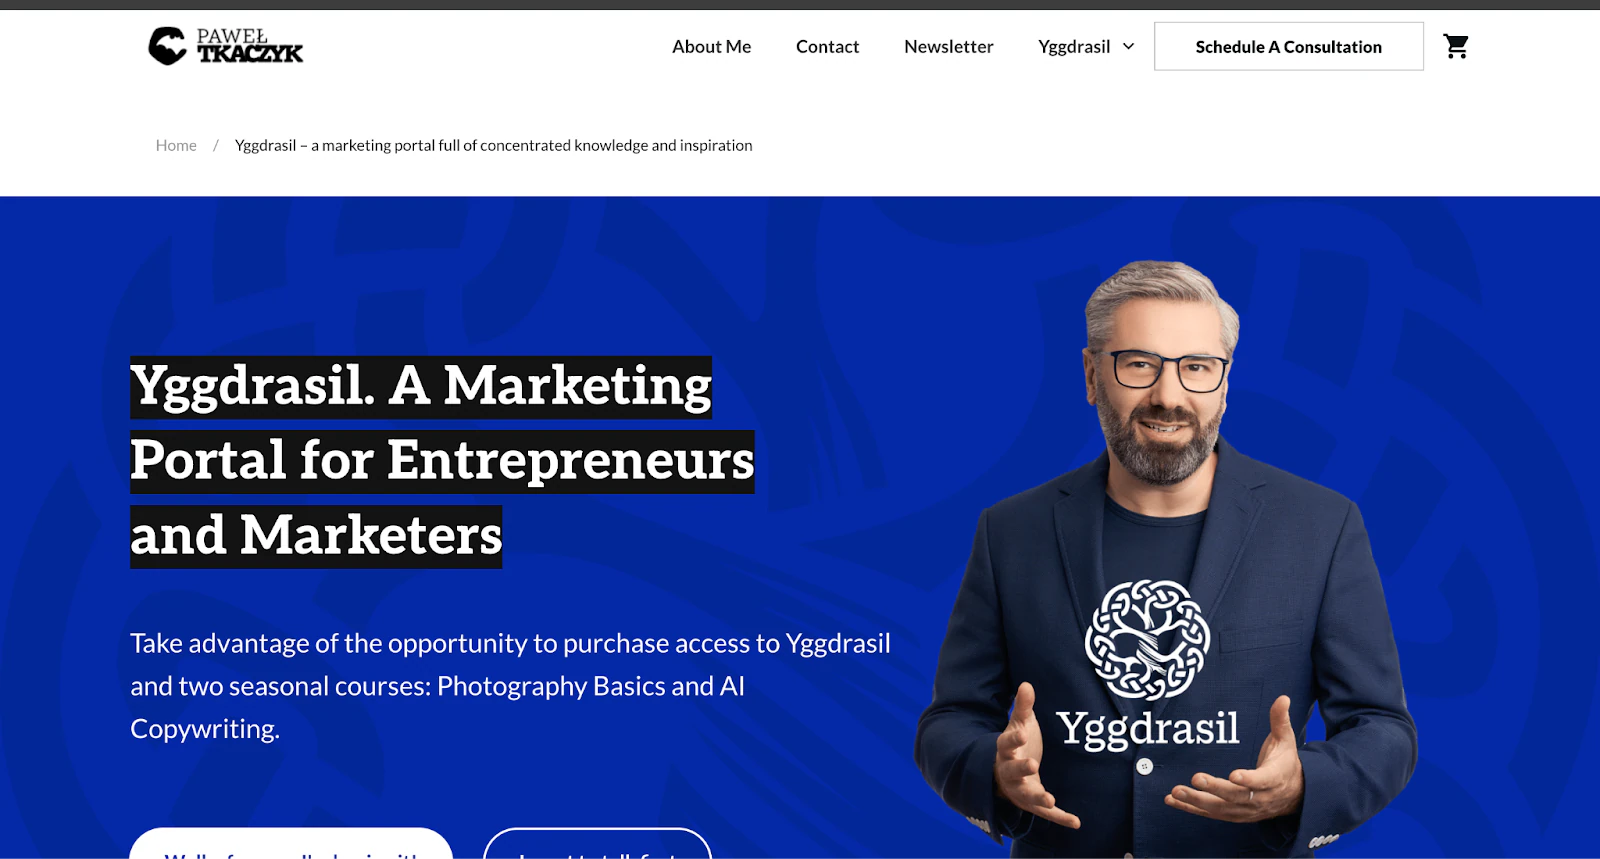
Paweł Tkaczyk nailed “Yggdrasil” by laser-focusing on targeted marketing insights for entrepreneurs and marketers.
Instead of creating one massive “Complete Marketing Guide,” he built specific, targeted courses on individual topics.
What feels like “the basics” to you is actually five different courses to a beginner. Or you worry that keeping it simple means you’re not delivering enough value.
So before adding any lesson, ask: “Does this directly help students achieve the main course outcome?” If not, cut it or save it for a follow-up course.
For example, if you’re teaching “How to land your first SMB client,” resist the urge to include lessons on “How to scale to $10k/month” or “Building a personal brand.”
Those can be separate courses.
💡Pro tip: If a lesson doesn’t advance the transformation, delete it. Save extras for upsells.
Ignoring audience research before creating your course content
The second mistake is building your entire course based on what you think students need, then discovering nobody wants it.
Let’s say you spent three months recording 40 videos about advanced Instagram Reels techniques only to get crickets.
Meanwhile, your audience actually needed help with basic content planning, not advanced editing.
Most creators assume they know their audience’s problems without asking and end up building courses around topics they find personally interesting instead of what sells.
Talk to your audience before creating anything.
The Design Practiceteam surveyed 500 creators first, confirming the pain point the course would address.

With Easytools, you can validate before building by pre-selling your course or creating a waitlists. If 20+ people sign up based on a simple description, you’ve validated demand and can fund your production costs.
The market has a high-urgency pain point that you must identify. You need to know what they are searching for, what they have tried (and failed at), and what language they use to describe their problem.
Your course description and pitch must use that exact language to convert them at checkout.
Making lessons too long or text-heavy
Long lessons drain student attention and reduce completion rates. Students learn better when lessons are short, clear, and focused on one idea at a time.
Students arrive motivated but burn out fast when faced with college-lecture-style content.
They watch the first two lessons, feel exhausted, and never come back.
Here is what you can do to avoid this for videos**:**
First, you can aim to keep lessons under 12 minutes, with the ideal spot being 6-10 minutes. The average video lesson length for courses with high completion rates is 7 minutes. Any longer and students start dropping off before reaching the end.
Next, cover one specific skill or concept per video instead of cramming multiple ideas together. When a lesson tries to teach three things at once, your students will retain none of them; so focus on one concept.
Additionally, use the first 30 seconds to state exactly what students will learn in that lesson. Students who know the outcome upfront are 25% more likely to complete the video because they understand why they’re watching and what they’ll gain.
Fourth, include visual examples, screen recordings, or demonstrations throughout your video. Courses that combine voiceover with visual aids see better retention than talking-head lectures alone, as students can see and hear the information simultaneously.
Finally, end with a clear action step that students can complete immediately. Giving learners a concrete task, like “now create your own version using the template”, transforms passive watching into active learning and boosts skill application.
For text-based lessons:
- Use bullet points, not paragraphs
- Add visuals every 2-3 scrolls (screenshots, diagrams, photos)
- Break content with subheadings
- Include fillable worksheets instead of asking students to “think about this”
- Keep PDFs to 1-3 pages maximum
Easytools’ Easyplayer tracks which lessons students complete and where they drop off.
Once your first 10–20 students go through the course, check your analytics. If you see that completion drops sharply at a certain lesson, that usually means the video is too long, too dense, or unclear. Go back, simplify it, or break it into two shorter lessons.
If you wouldn’t want to sit through your own lesson after a long workday, neither will your students. Keep it tight, visual, and actionable.
Create your online course
You don’t need expensive gear, advanced editing skills, or a huge audience to create an online course.
You only need a clear topic, simple tools, and a platform that helps you publish without stress.
The creators who succeed are the ones who start. They launch version one, get feedback from real students, and improve from there.
With Easytools, you can create your course structure, upload your content, set up payments through Stripe, and start selling, all from one platform.
The best time to create your online course was six months ago. The second-best time is today.