Blog
5 Best membership platforms in 2026!
Best membership platforms: 1. Easytools, 2. Podia, 3. Patreon, 4. Thinkific, and 5. Memberful - Choose the best one for your community

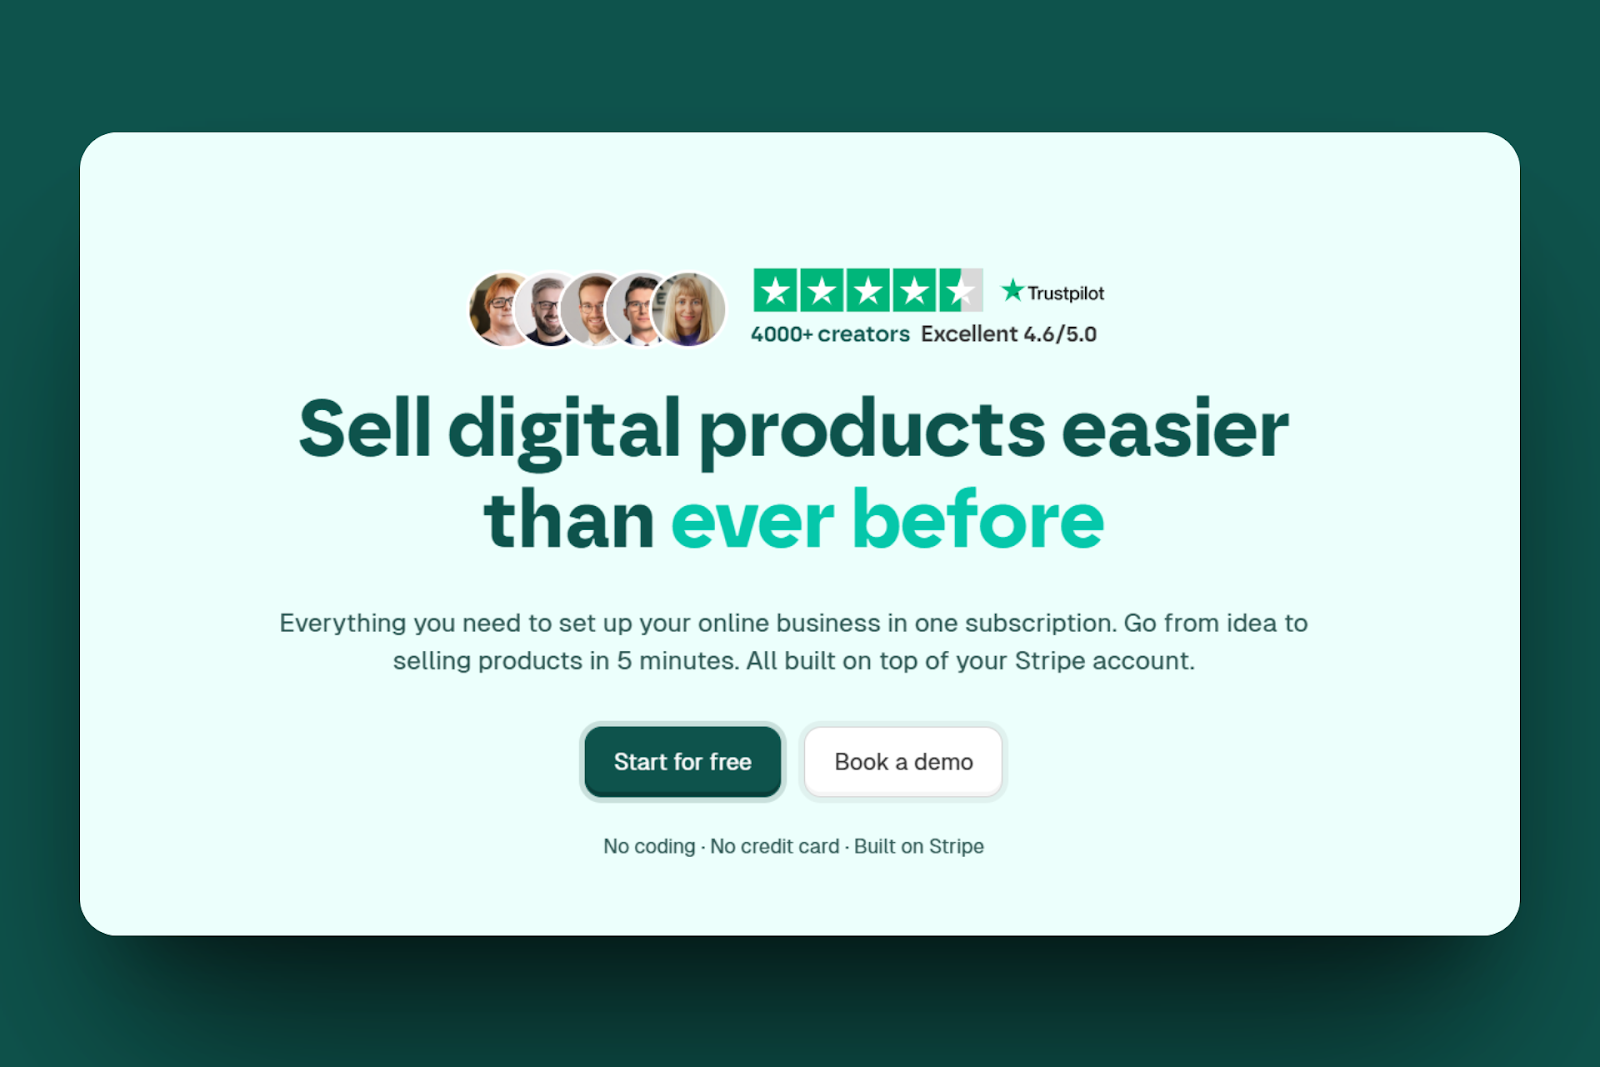
5 Best membership platforms in 2026! (Tested all of them)
The first-ever digital product I created and launched on a platform was a course. I spent a lot of time and effort on it. It took weeks to build the content, design the pages, and publish the course.
In the first 2 months, my course obtained 312 visitors, and only 5 of them signed up. That translates to about a 1.6% conversion rate, which I thought was terrible.
Then I came across an Interaction Design report that indicated that, on average, about 2 to 3% of visitors who access the online store make a purchase or convert.

At that point, I realized that I didn’t just need a storefront. I needed a system that could convert visitors into members who would stay, allow me to offer them exclusive content, and generate recurring income.
After researching what digital products to focus on and how to create them, I selected a few membership platforms and started using them firsthand.
Having developed and created digital products, managed subscribers, tracked results, and paid close attention to what worked, I have selected five of the best membership platforms and would like to take you through them.
In this article, you will learn how each of these tools works, what makes them different, and how to use them.
Also, you will learn about Easytools, my favourite platform, which helped me launch a membership.
Best membership platforms compared
5 Best membership platforms
1. Easytools
Easytools is number one on my list of the best membership platforms. Easytools is one of the best e-commerce tools because it makes it easy to sell memberships, subscriptions, and other digital products all in one place.
With the products feature, you can set up a subscription instead of 1-time payments. When a customer subscribes, Easytools automatically charges them every billing cycle. The feature also enables notifications to customers about successful payments, upcoming renewals, and failed payments.
Once a customer makes a purchase, they instantly get access to Easytools customer portal.
Through the customer portal, customers can view all their purchased products, manage plans or subscriptions, and review invoices, as well as update their billing details.
There is more. Easytools’ automation feature allows you to create customized workflows around subscriptions or memberships.
You can send a welcome email when a customer subscribes, a reminder before their subscription renewal date, and a notification if their payment fails.
More so, you can automatically grant access to your Circle community or Discord server to anyone who has an active subscription. Simply use one of built-in automations.
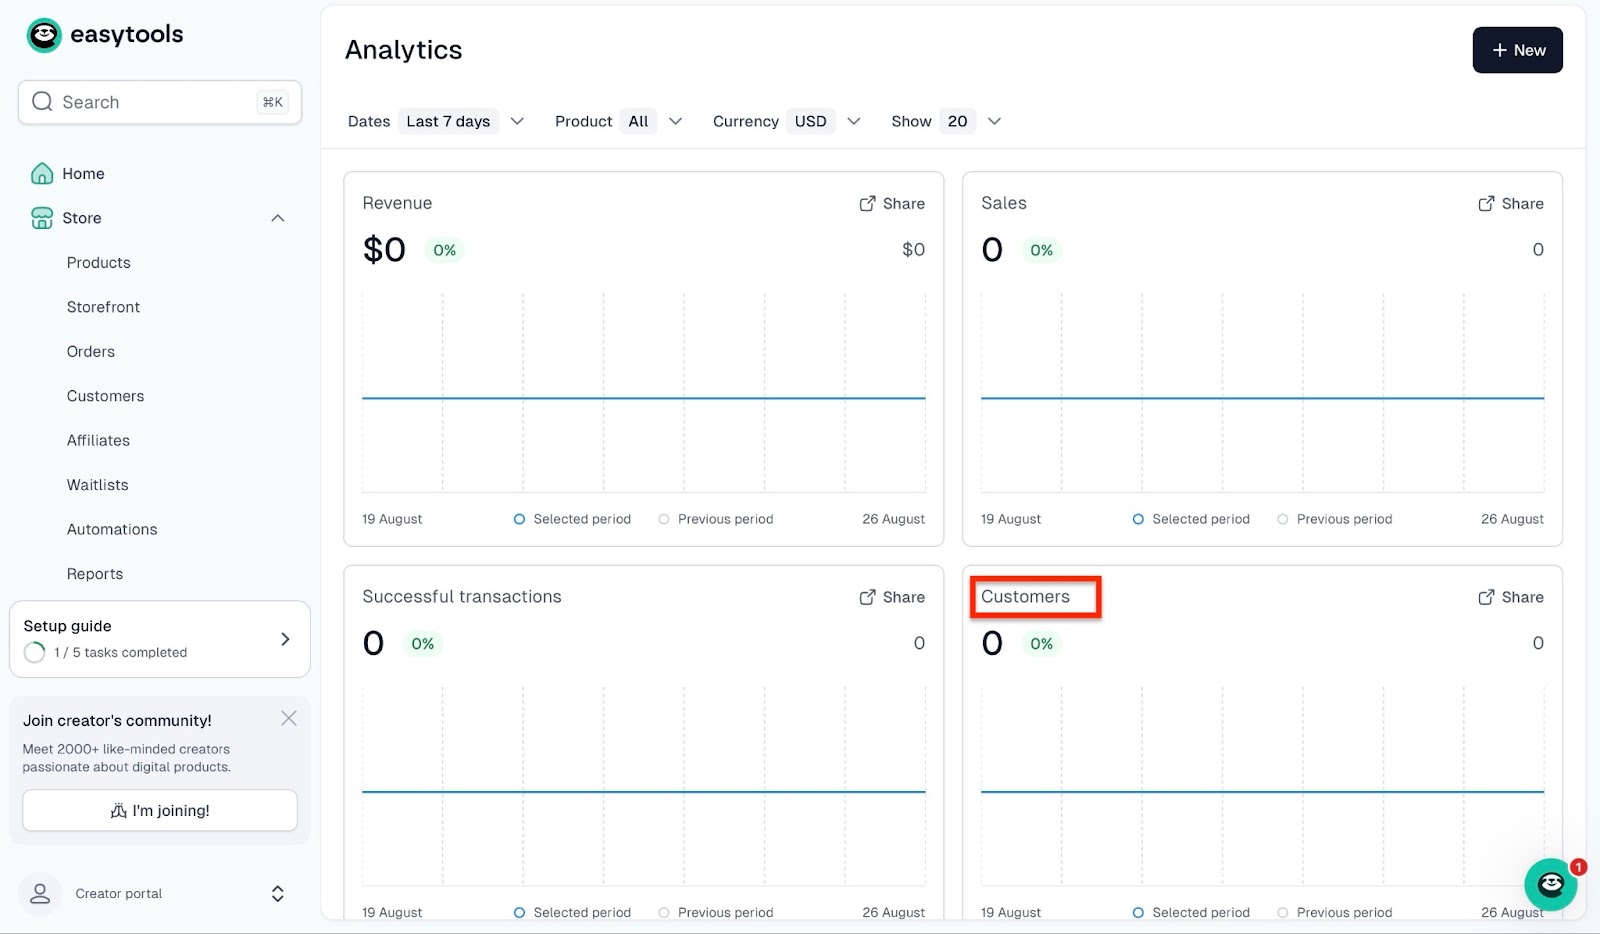
Additionally, the analytics feature allows you to track the performance of memberships and subscriptions. You can monitor revenue, sales, successful transactions, conversions, and customer activity (including members and subscribers).
Easytools excels at helping creators sell and manage memberships. Such creators can then build their communities on industry-leading platforms, such as Circle and Discord, which integrate seamlessly with Easytools.
That said, let me show you how to start selling memberships on Easytools in just a few simple steps.
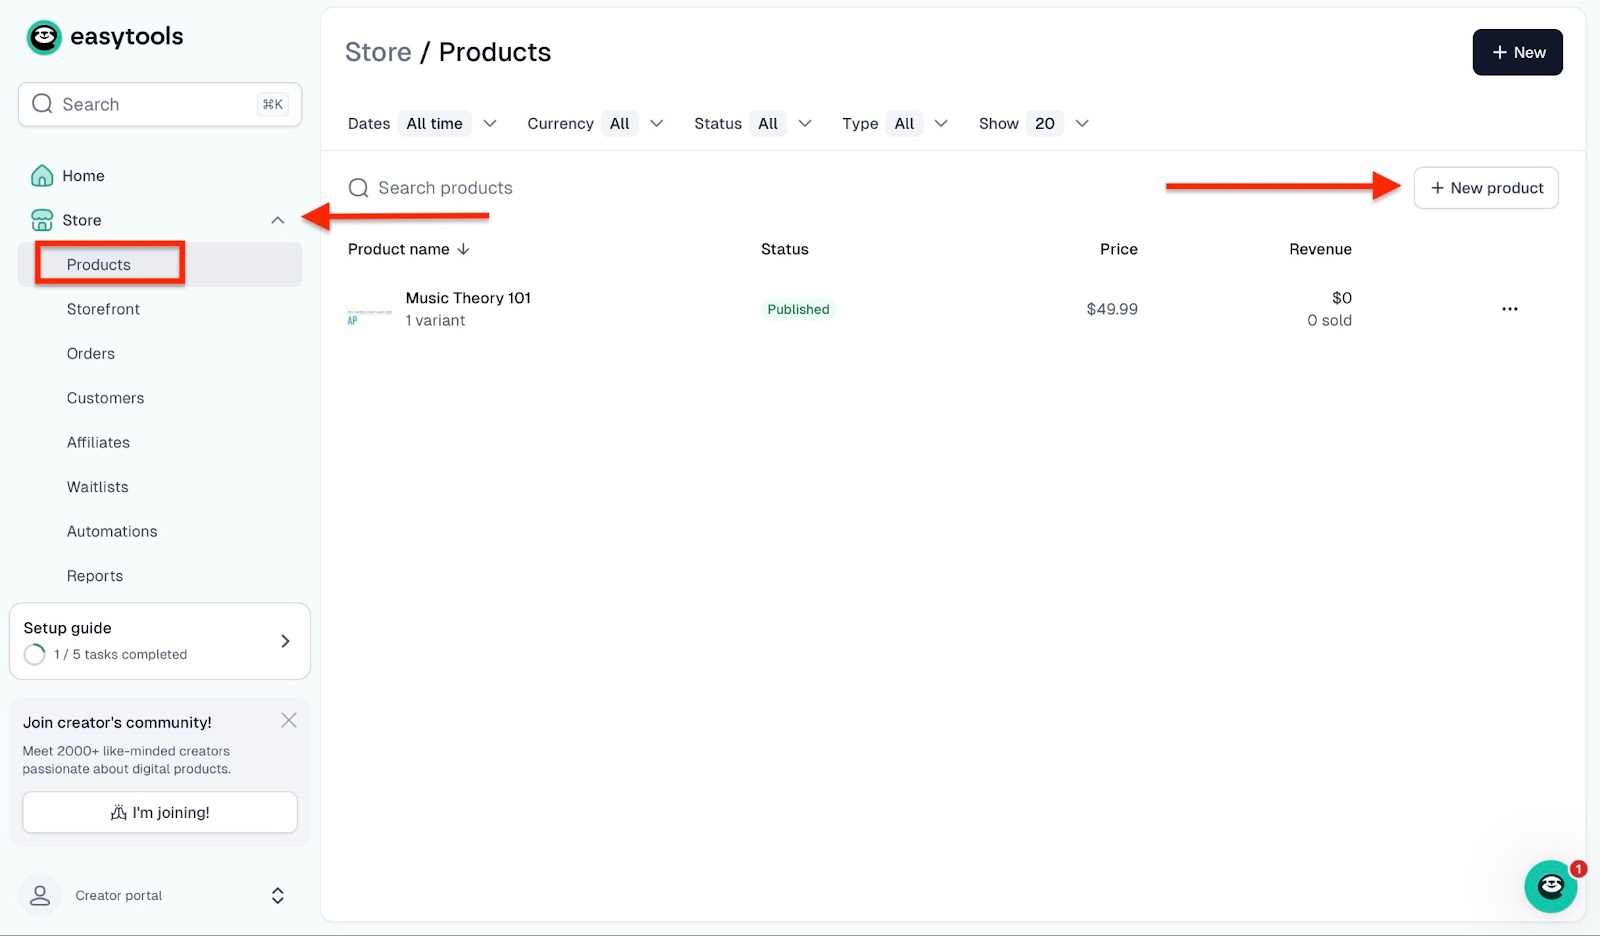
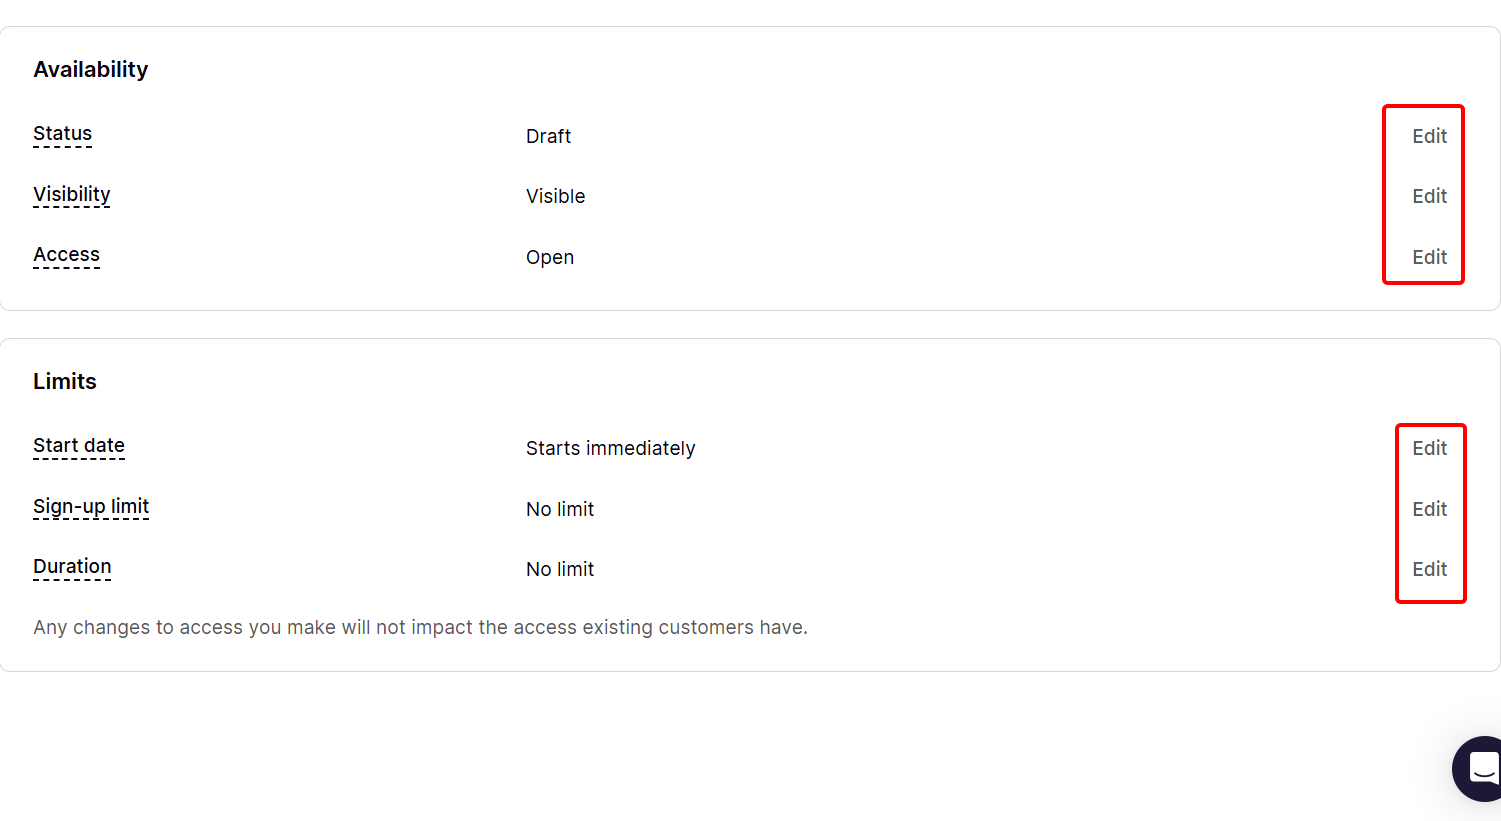
After you’ve signed up on Easy, select “Store.” Then, select “Products.” Now, click “+ New Product.”
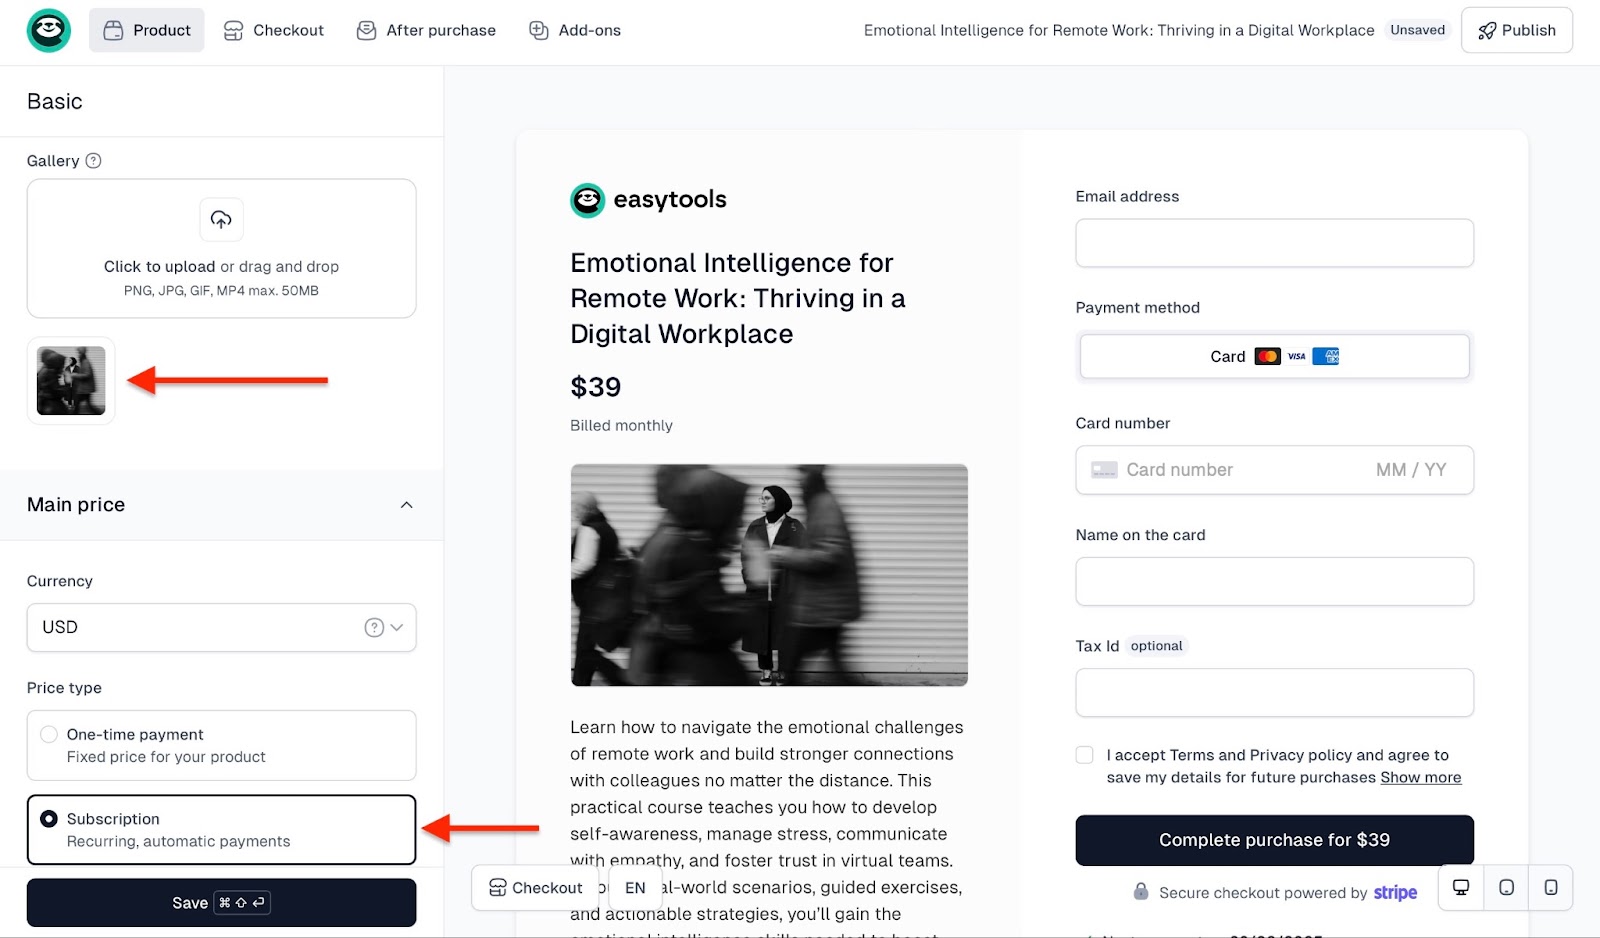
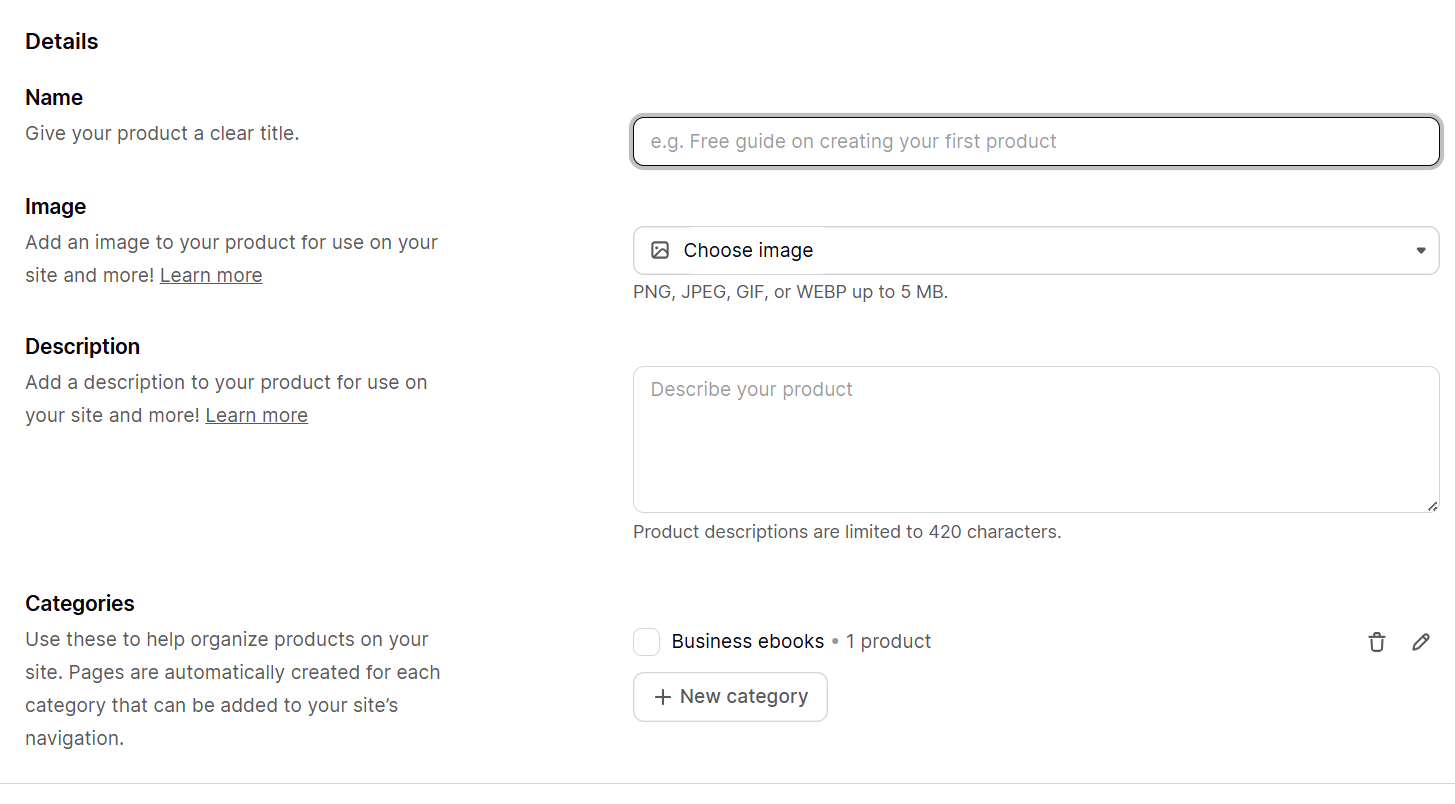
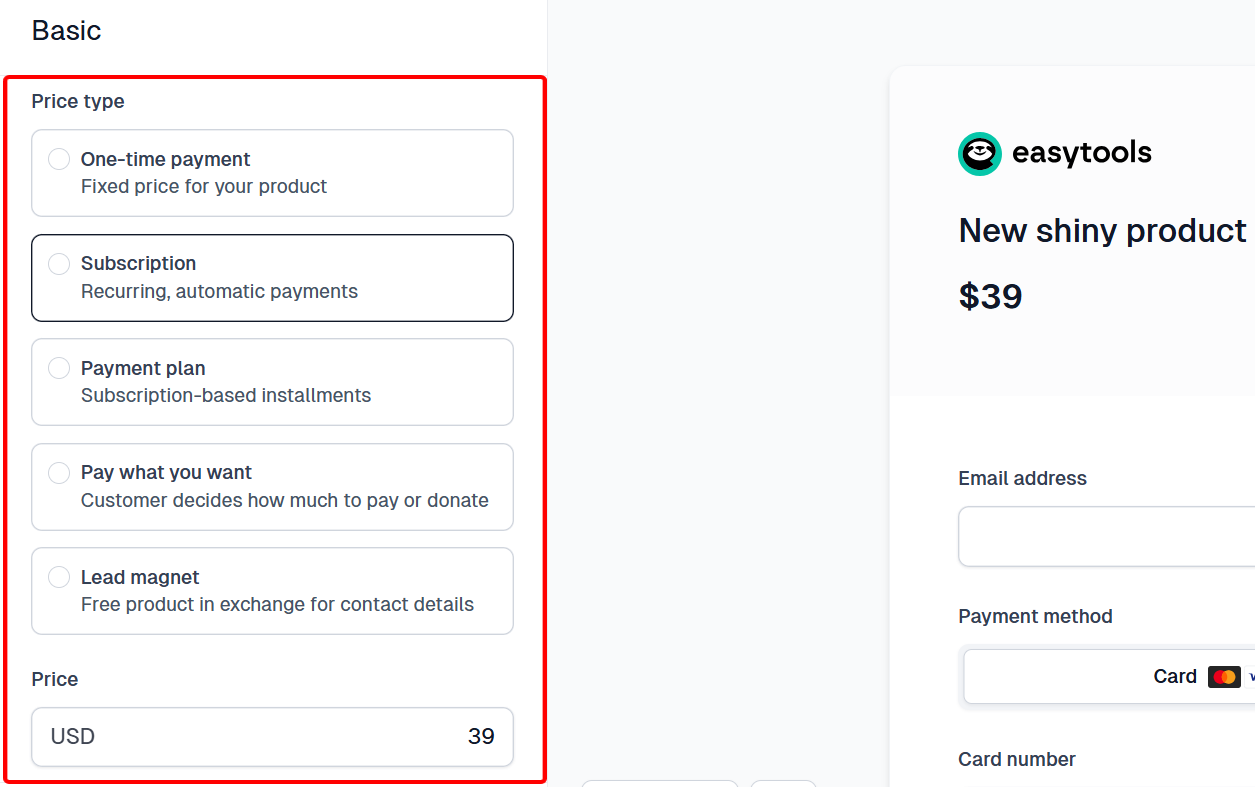
Enter the product name and description. Then, upload an image and set the currency type. Next, select subscription in the price type section.
Scroll further down and set the price. Then select the preferred category for tax purposes, billing period, and renewal frequency.
You may enable a trial or pick options that increase the chances of customer conversion.
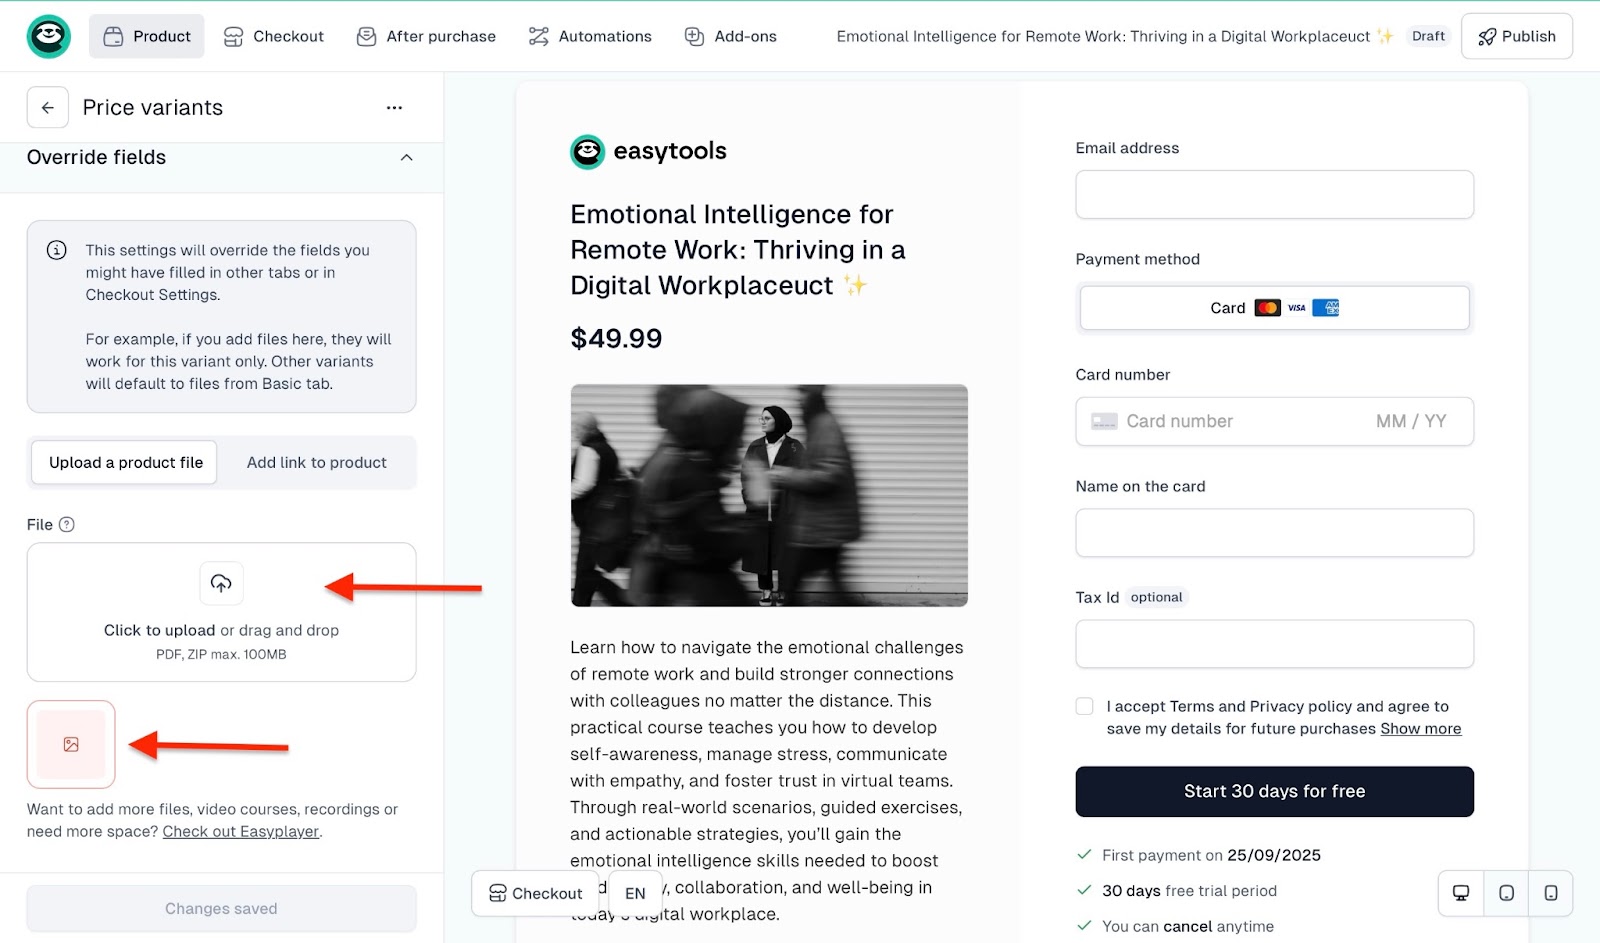
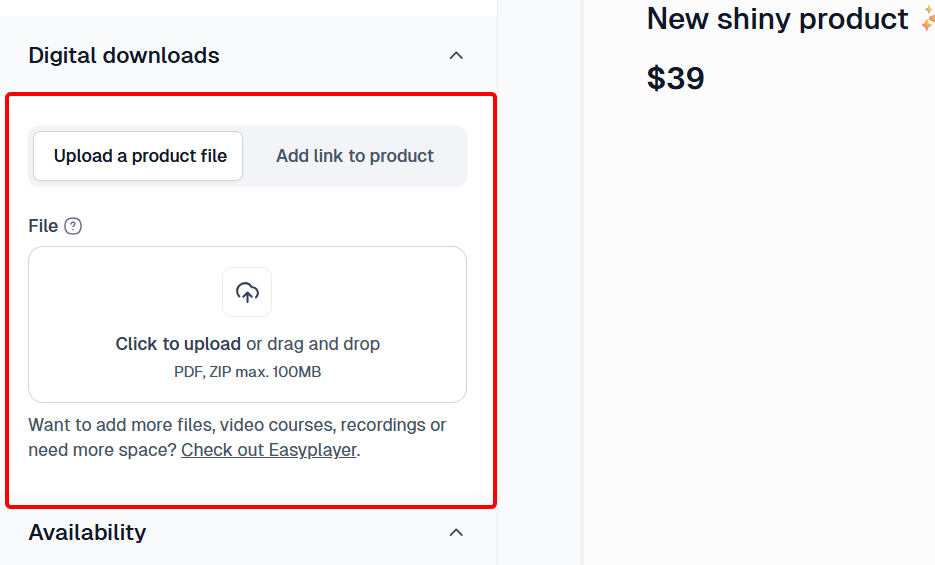
You may also click “price variants” to add another pricing plan to your products. Click on the upload field to add a digital copy or URL link of your product.
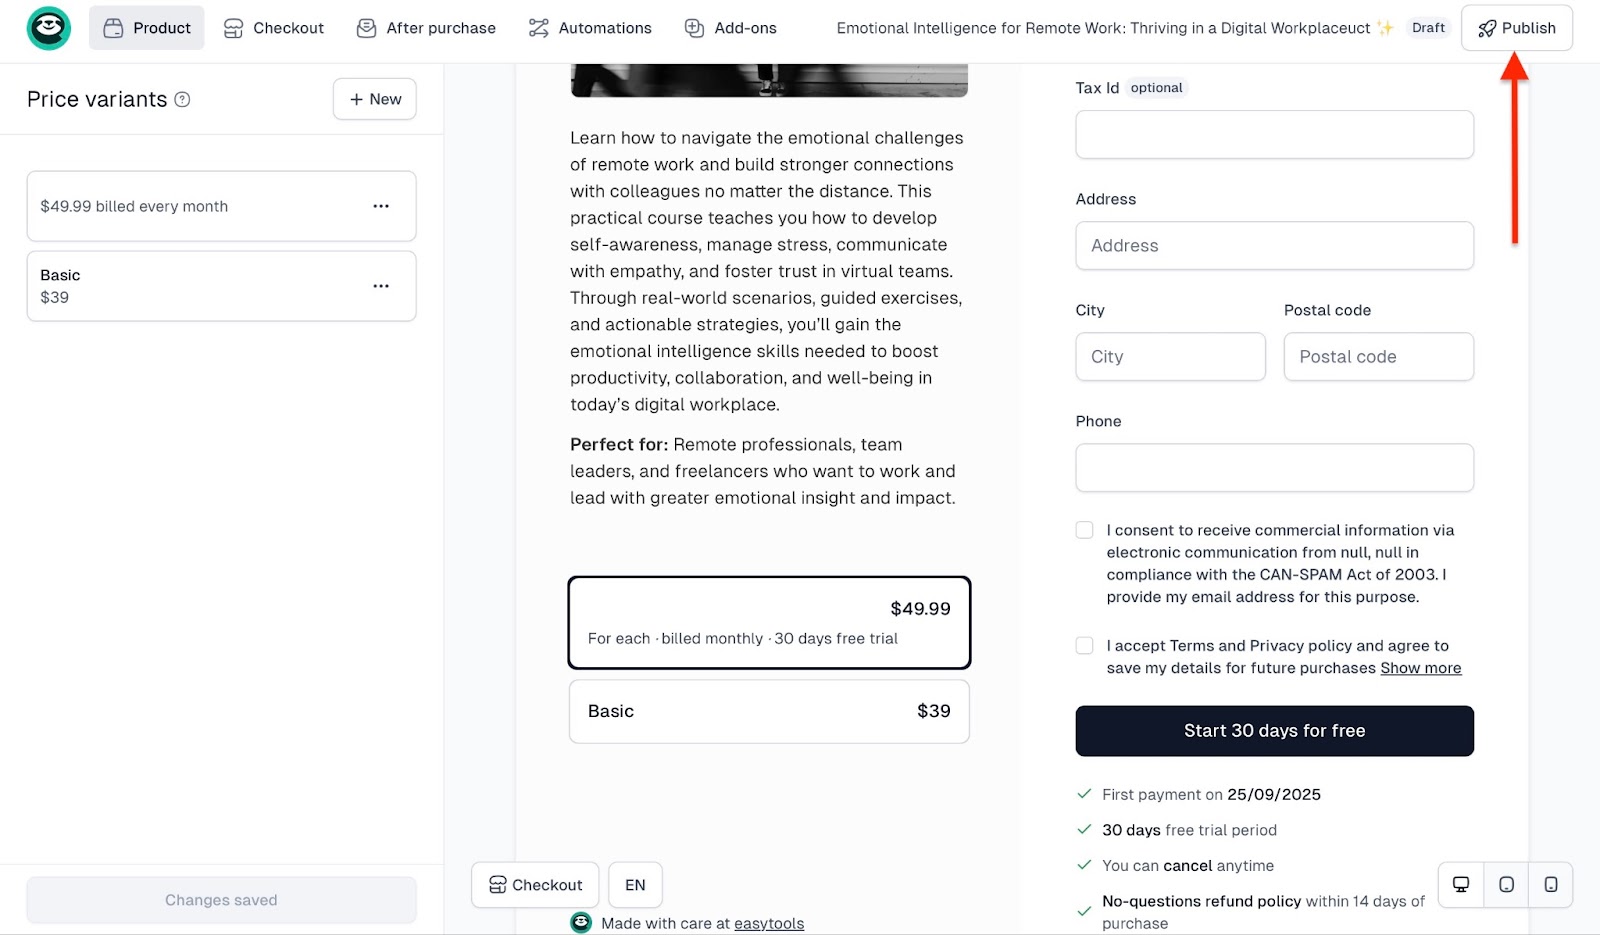
Now, add a description heading and content for customers after subscription. After that, you may choose some custom action buttons. Next, toggle the switches indicated to enable preferred fields, such as address, phone number, marketing content, and more. Finally, click “Save” to finish.

Now publish your product so it goes live.
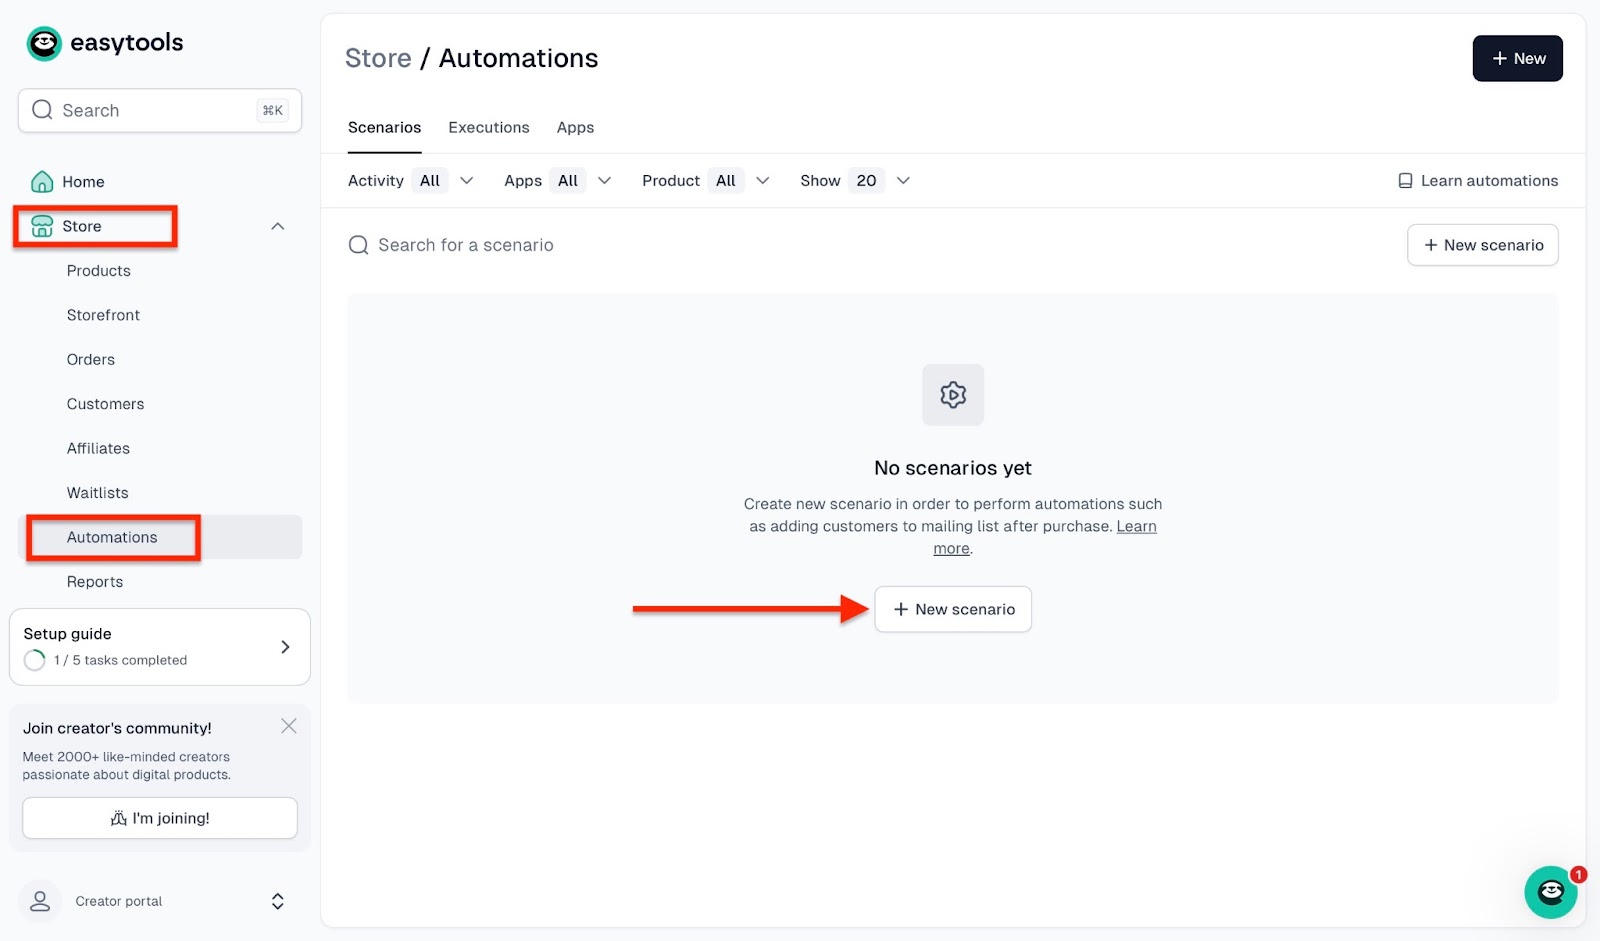
Now that you’ve created a subscription product, let’s integrate Easytools with Circle. I’ll assume you’ve already created an account on Circle and have a Circle API key. You will need that key for this integration.
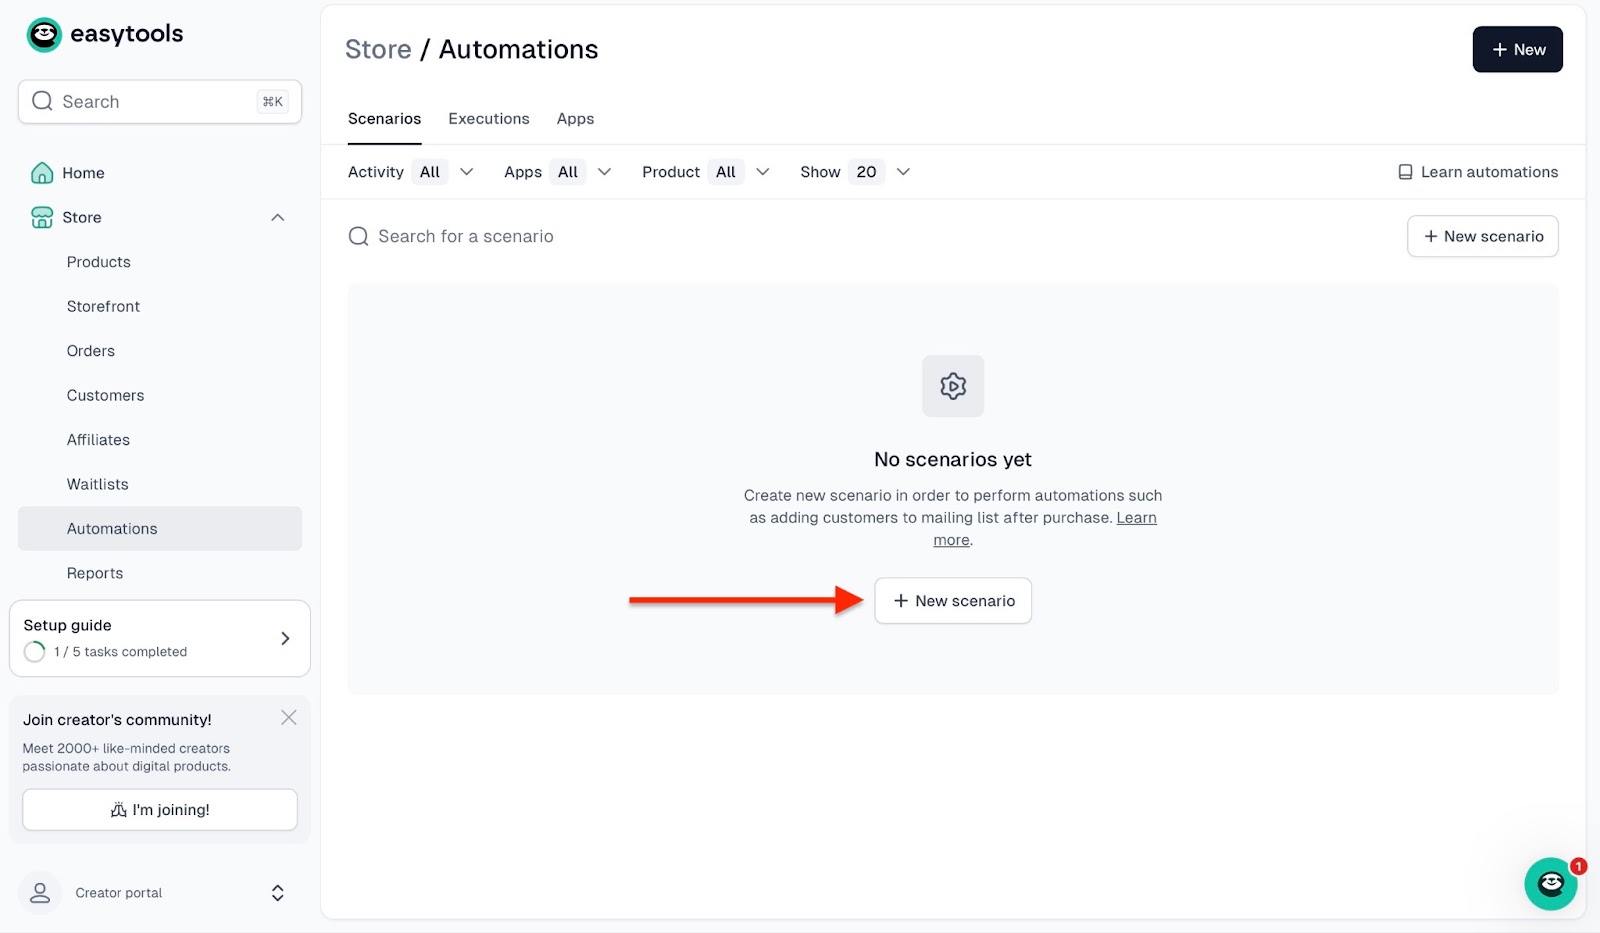
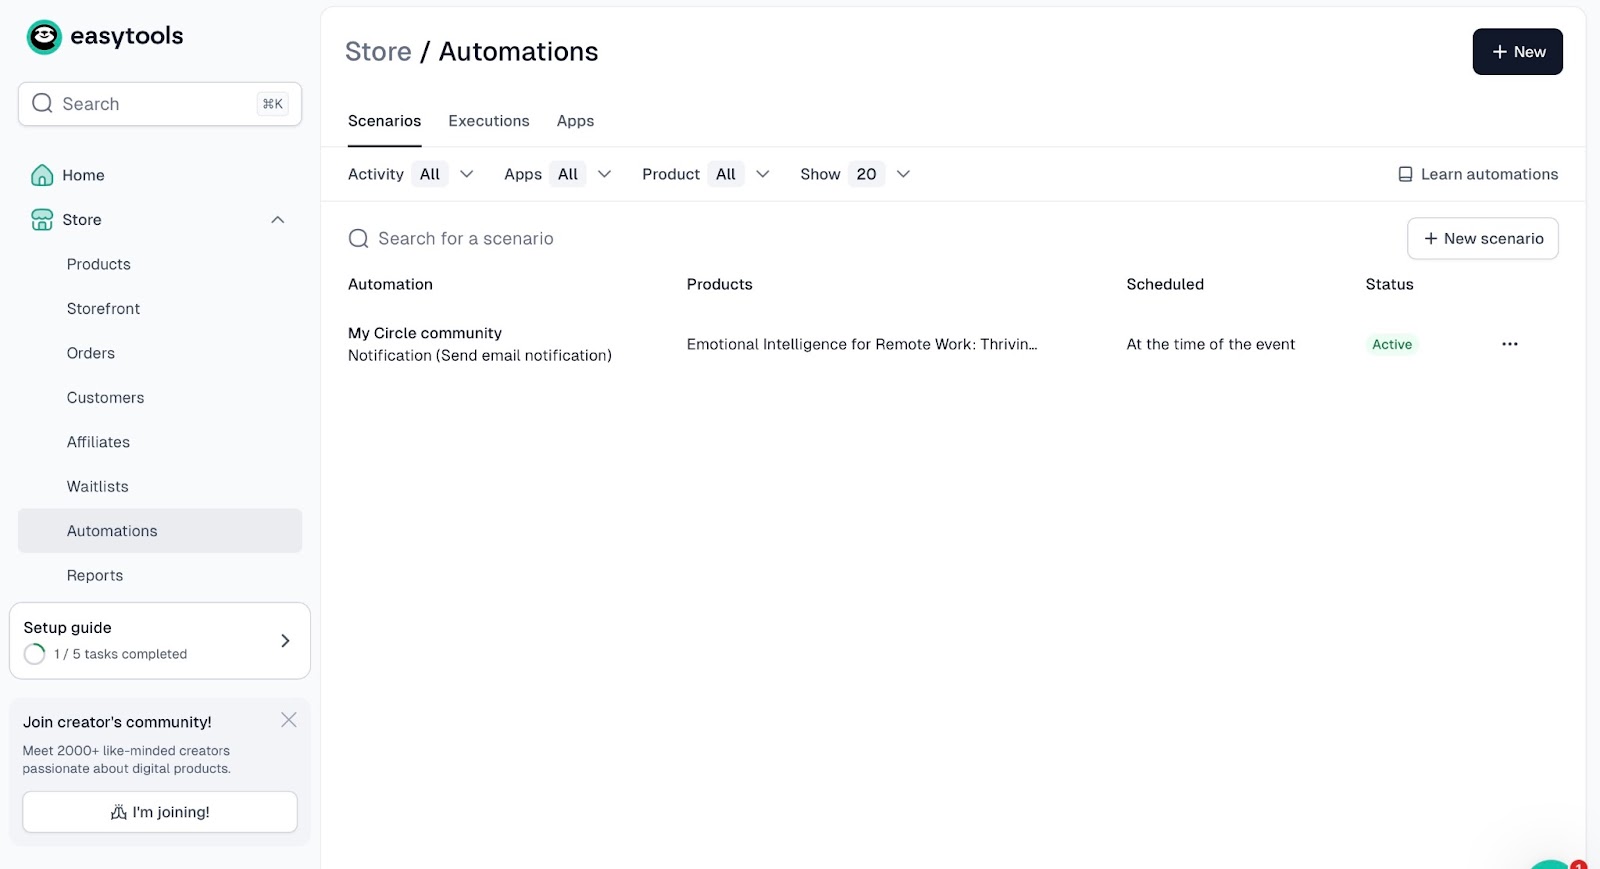
To start, click “Store” and select “Automation.” Then, choose “Scenarios” and click “+ New scenario.”
Now, fill in the required fields. Set the event to “Order Completed” to automatically add customers to your Circle community after they make a purchase.
Next, toggle the switches to set your preferred options, and select “Connect new app.” Then click “Create new integration.”
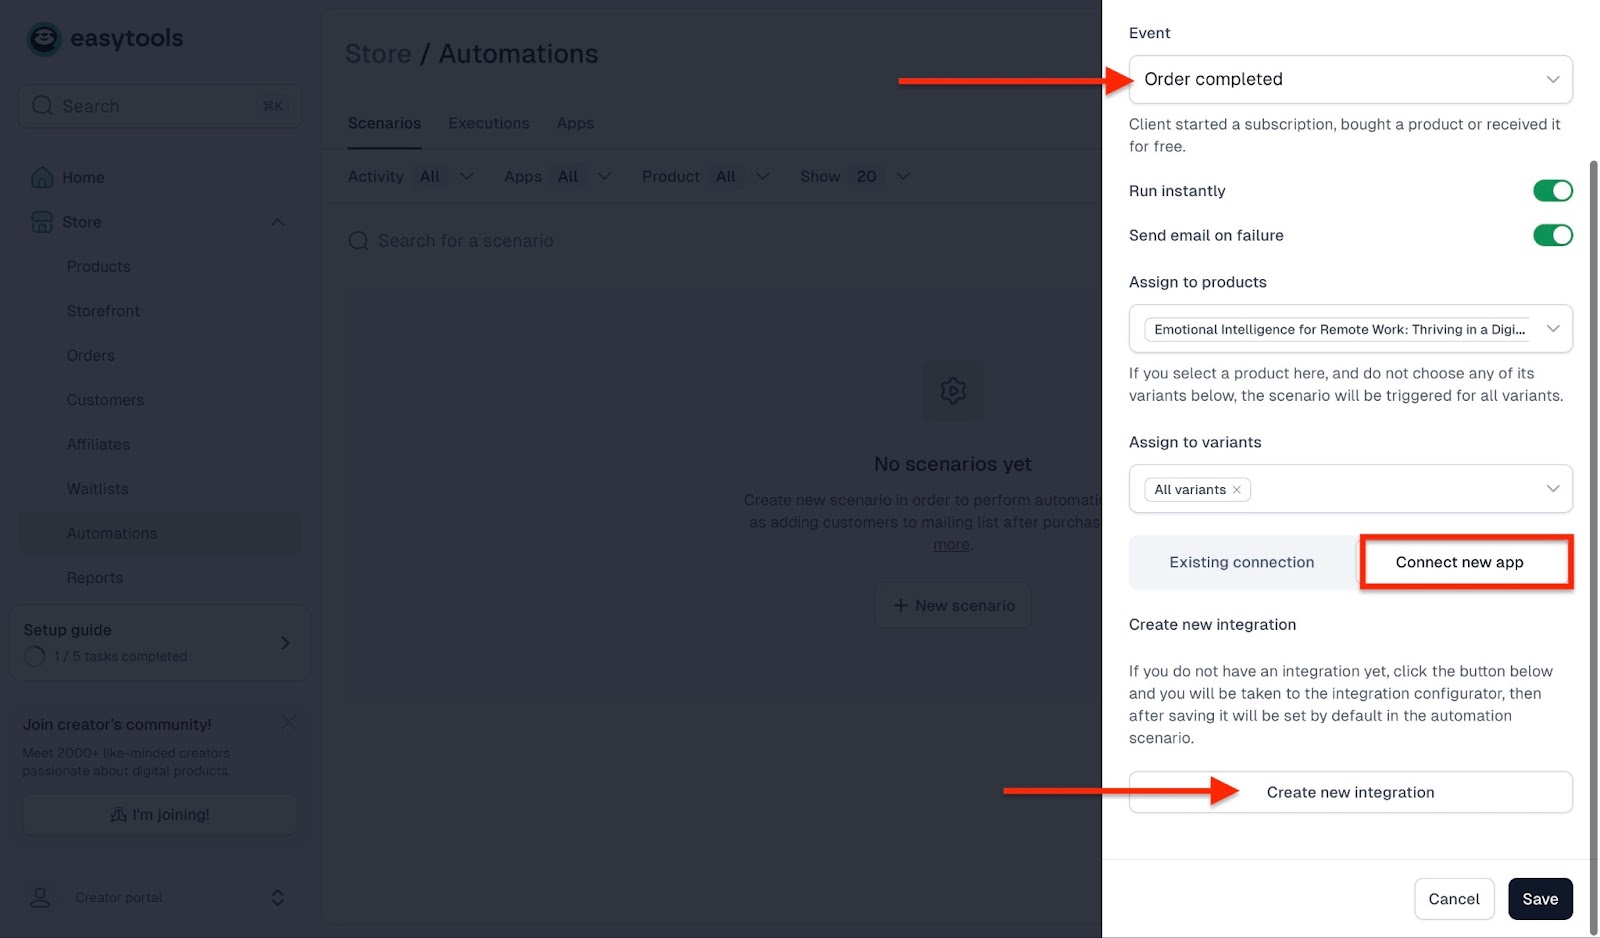
Fill in the fields, add your Circle API key, and click “Save.”

This will take you back to the previous step. Click “Save” to finish.
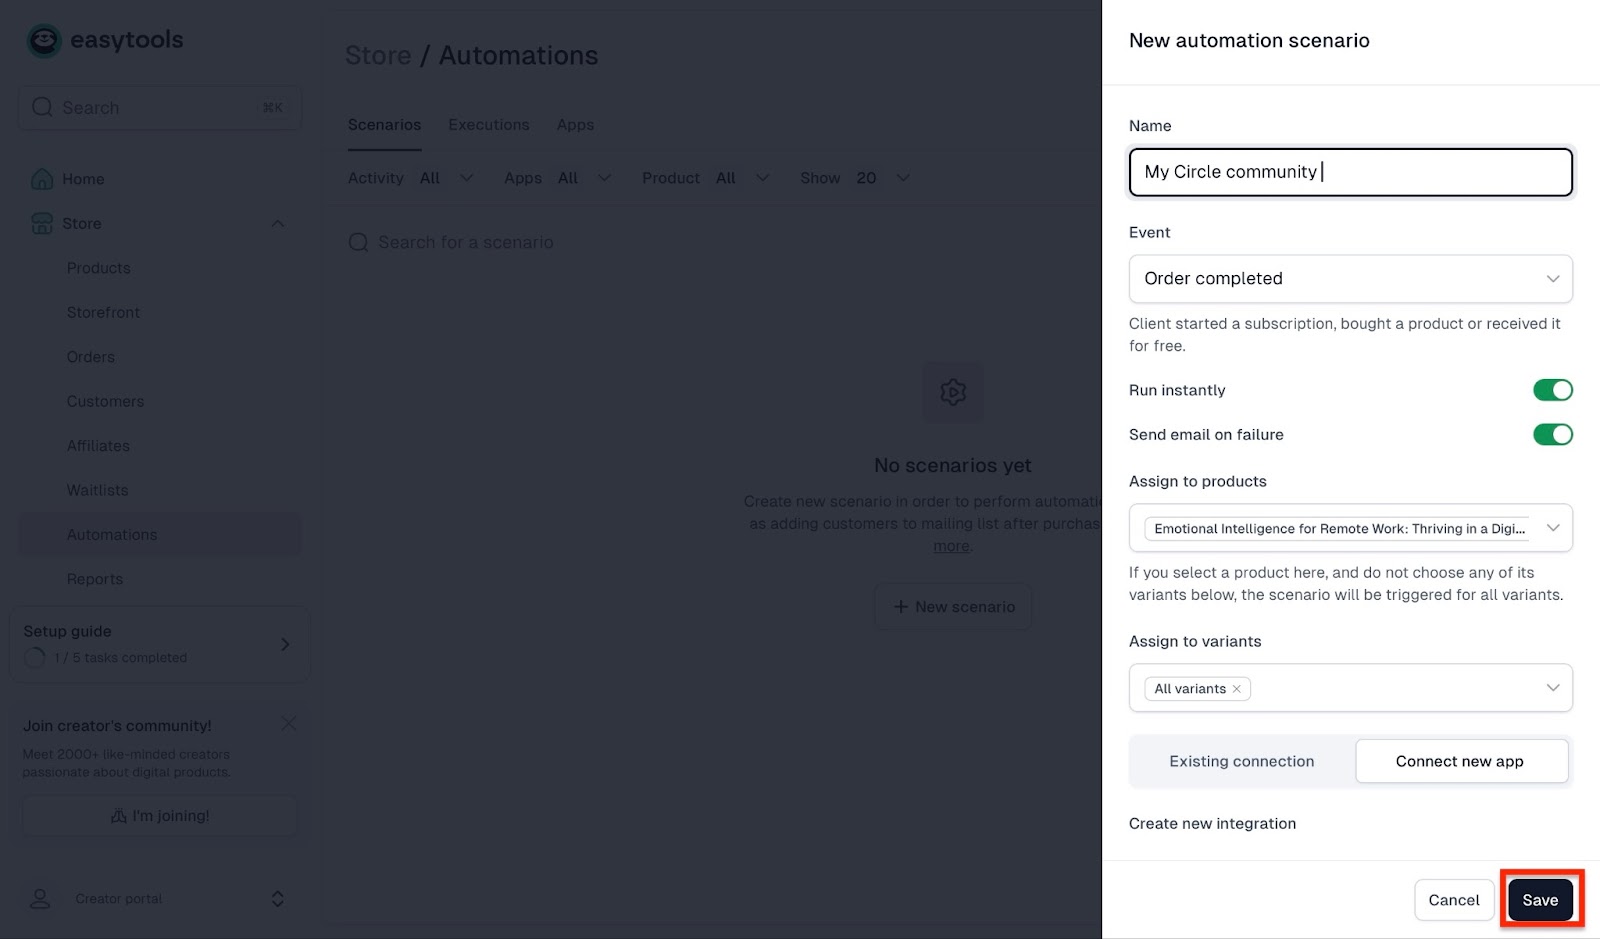
The scenario will be created, and after checkout, your new subscribers will be automatically added to your Circle community.
[Fs-toc-omit]Key features
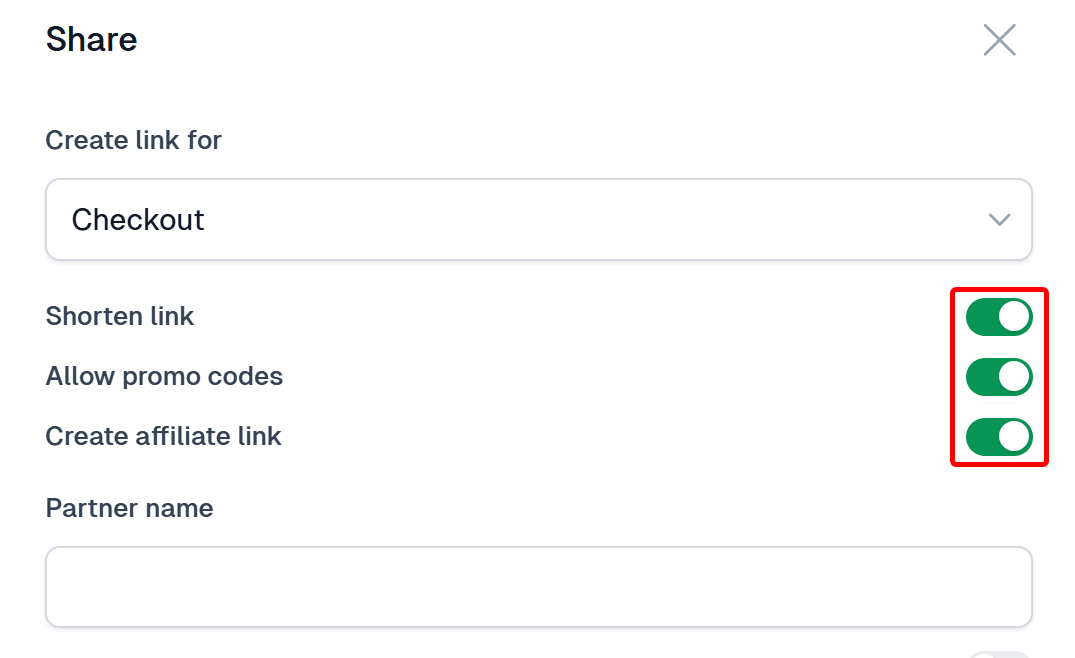
1. Affiliates
One thing I love about Easytools is its built-in affiliates feature, which allows you to manage referral programs where partners promote your membership platform and earn commissions from you.
You simply register affiliates, assign their commission rates, and the platform monitors their performance.
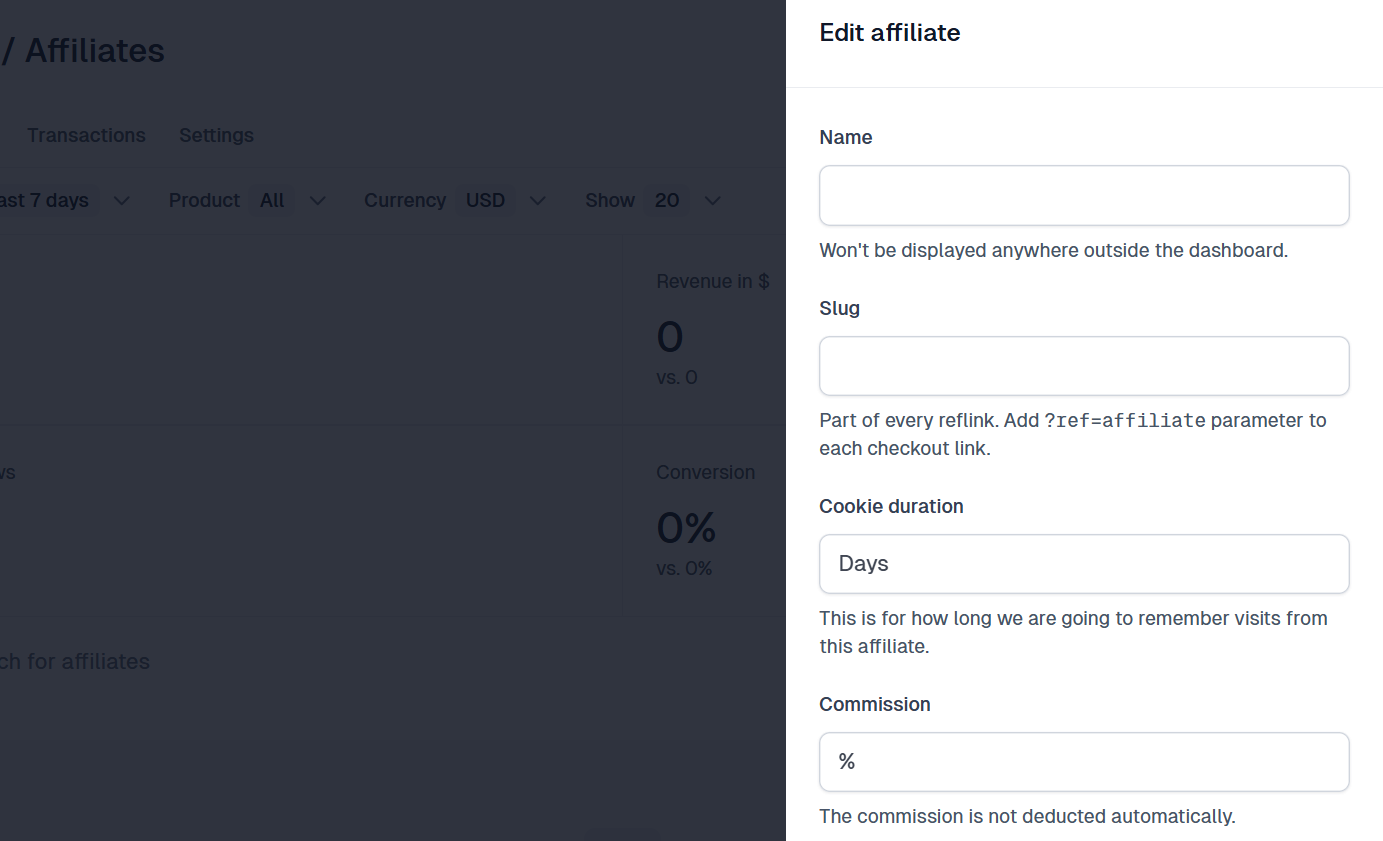
To add an affiliate, provide a name, enter a slug, and indicate its cookie duration.
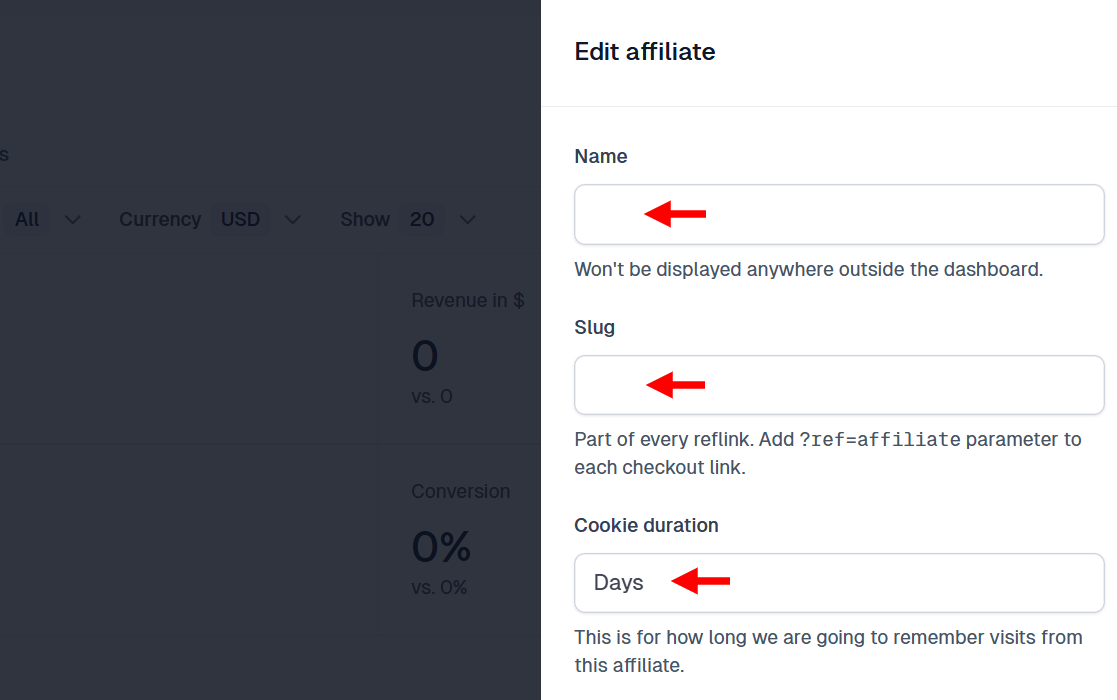
Then, enter the commission amount, the partner’s email address, and save it.

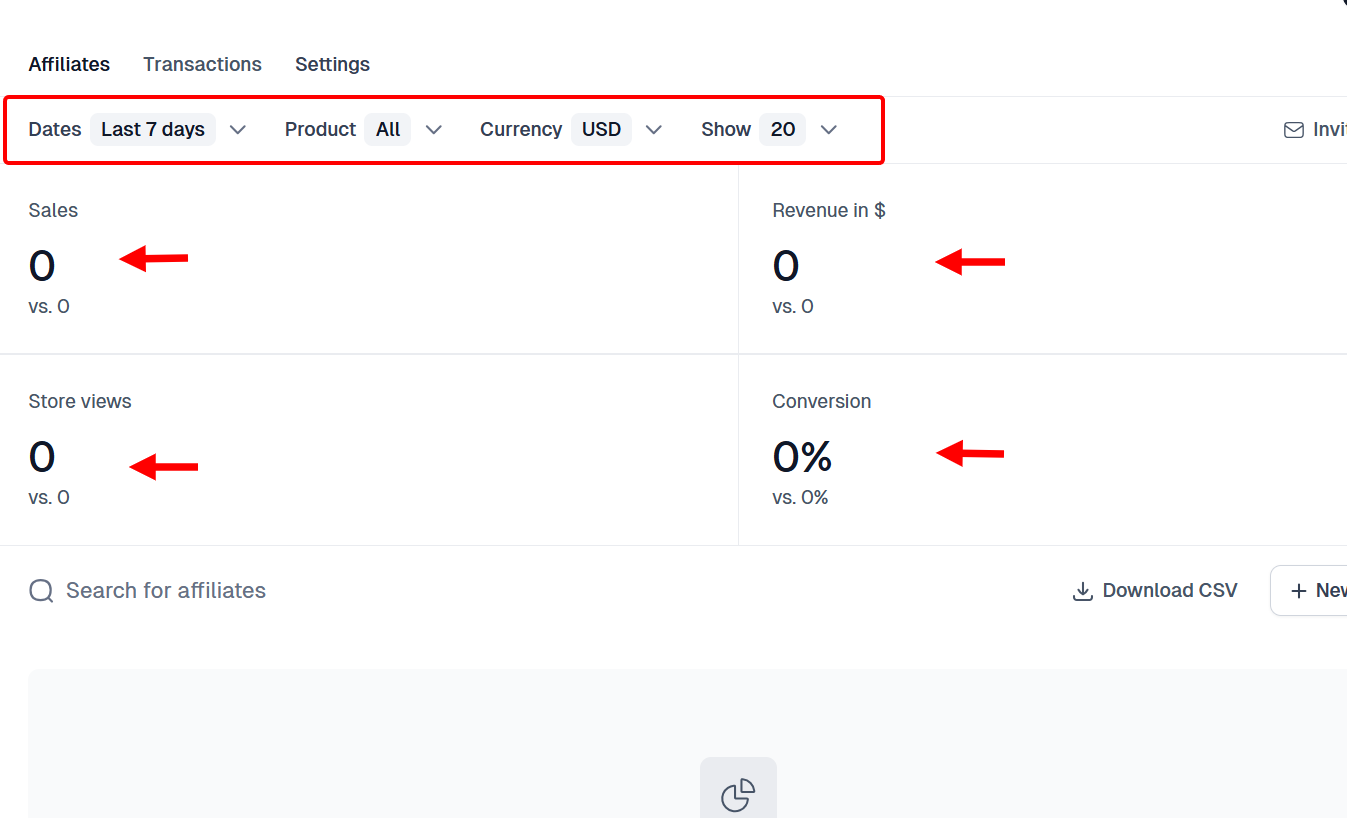
Easytools provides an affiliates dashboard where you can select a period and apply filters to track performance metrics, such as the number of sales, store views, revenue generated, and conversion rate.
This helps provide a way to expand reach and increase sign-ups through trusted partners who actively market your plans.
2. Wall of love
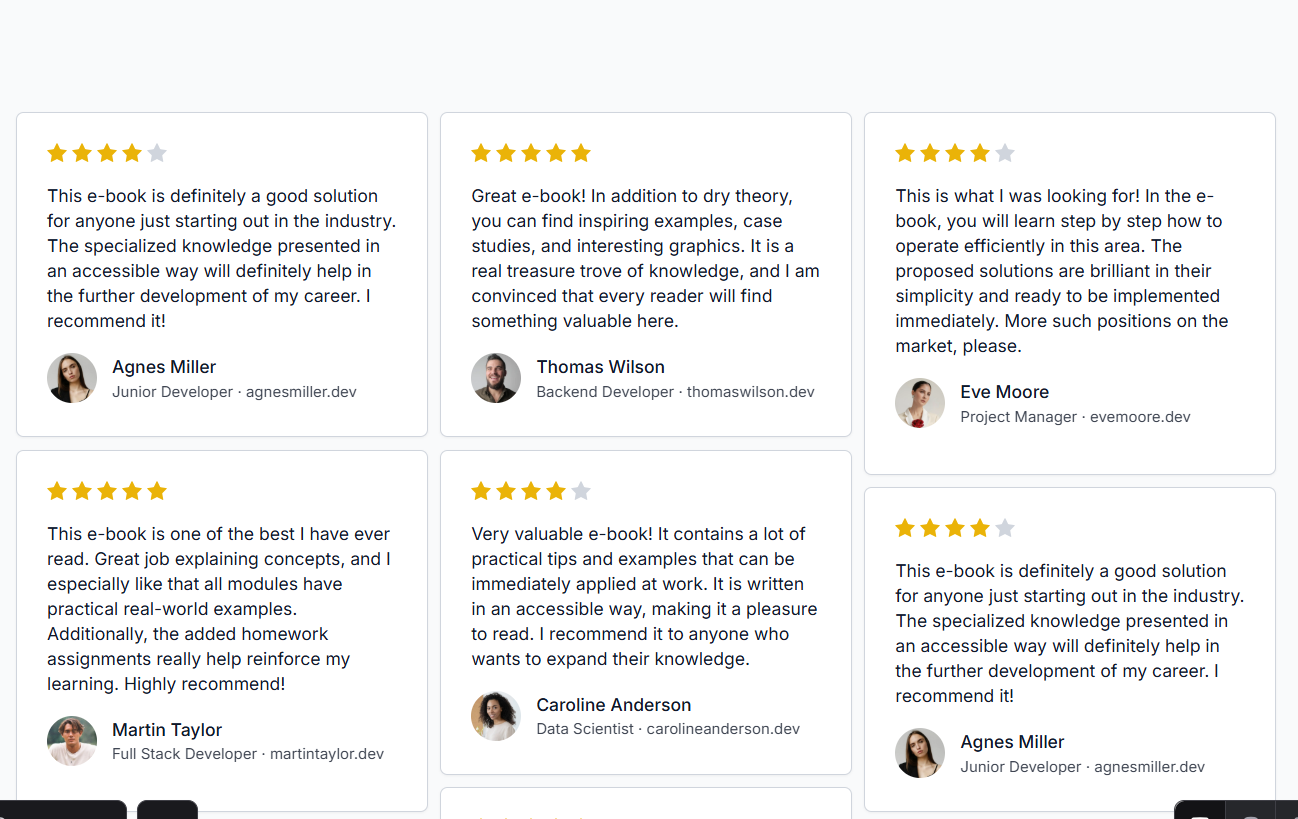
Another feature worth mentioning is the Wall of love, which allows you to create a public page to display testimonials and positive feedback from your members.
You can collect, approve, and showcase member reviews to build a visual feed of real experiences. Interestingly, you can do this with AI.
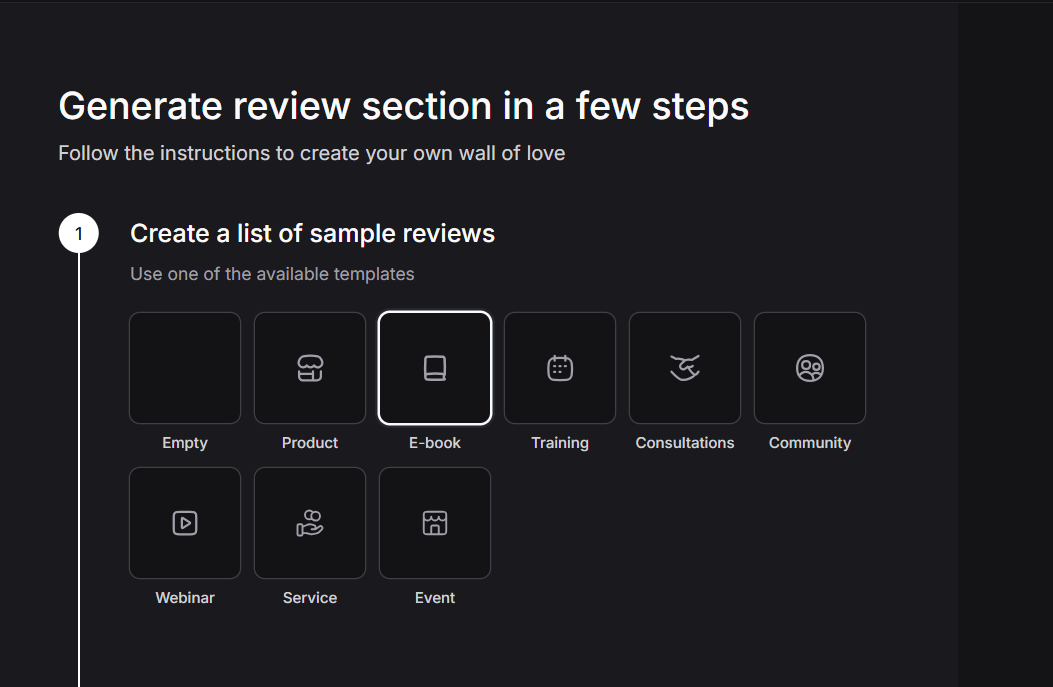
To create testimonials with AI, first provide a name.

Next, select the template that best suits your testimonial style.
Also, select your layout style and choose your preferred palette type.
Once you are satisfied with your choice settings, click “Generate”.
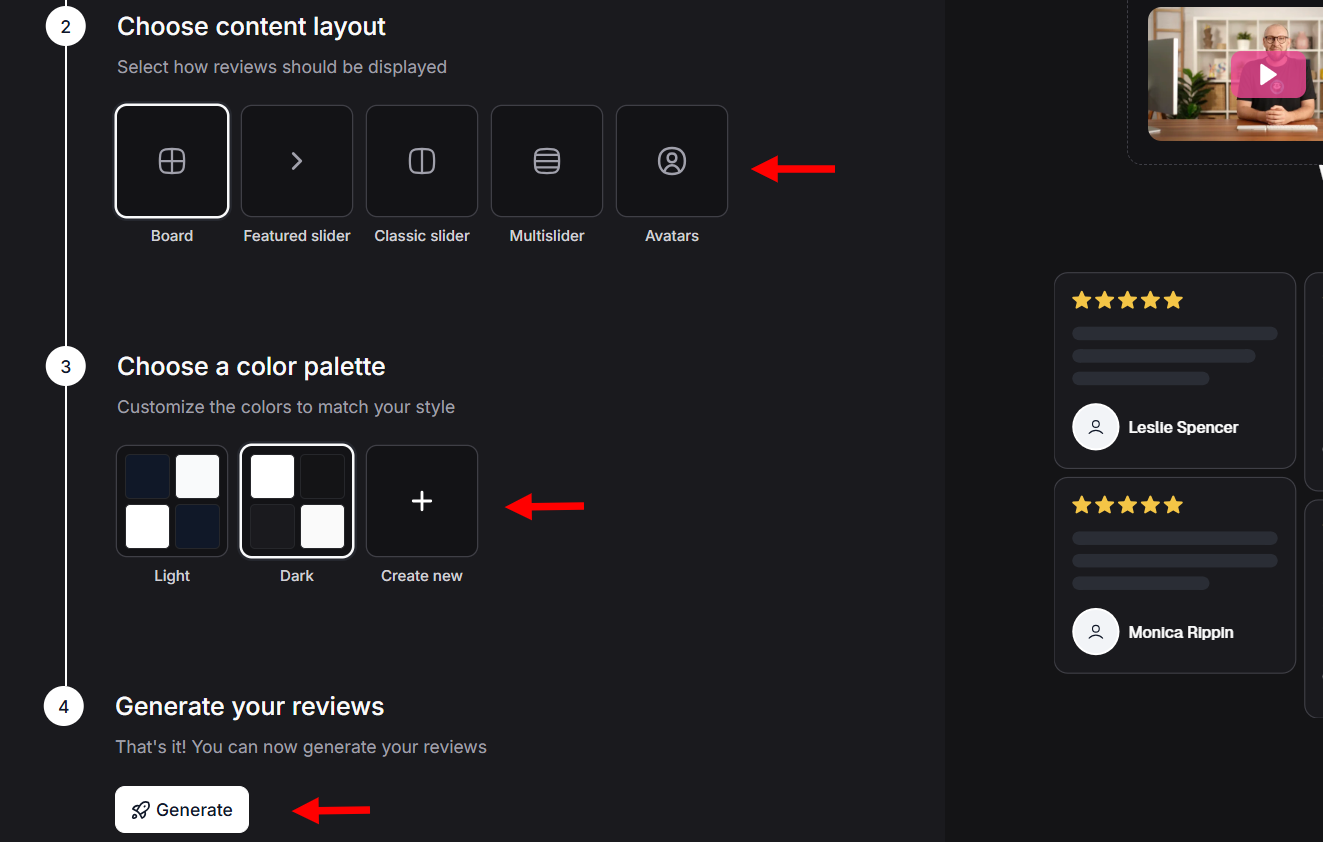
The AI will generate a testimonial wall that goes with your style. You can select each testimony, make changes to its content, or request that testimonials be added to the wall.
[Fs-toc-omit]Best for
Small brands selling digital goods that seek to automate sales, deliver content, and boost conversions using a single no-code toolset.
[Fs-toc-omit]Pricing
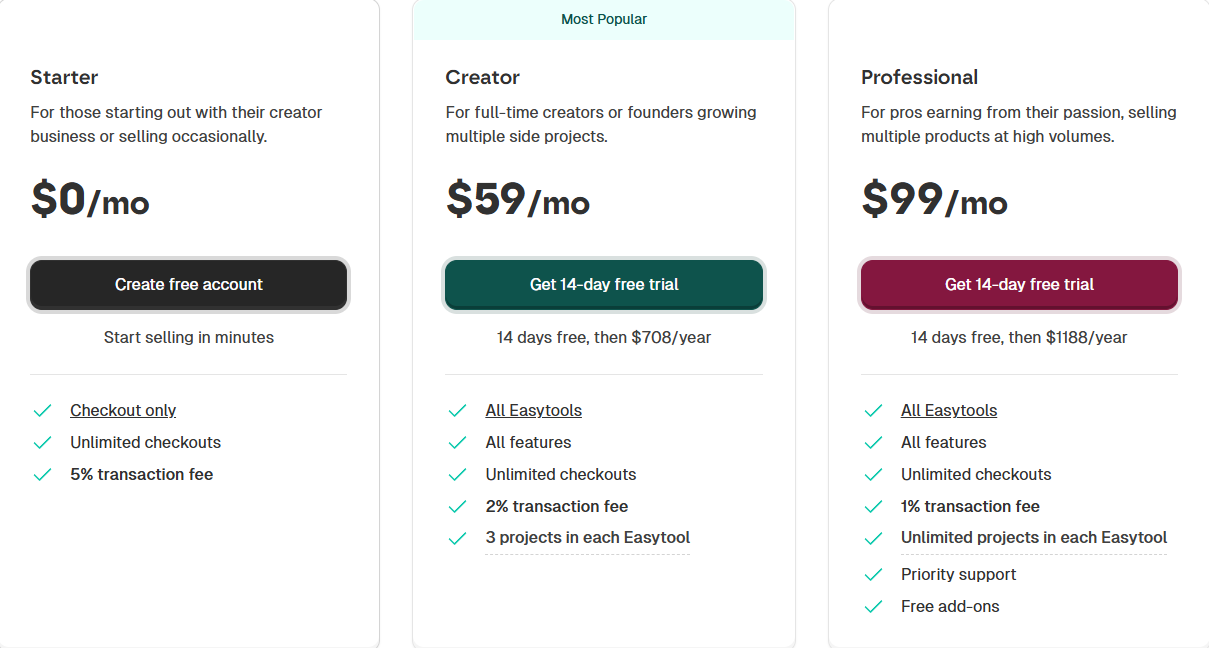
- Starter: $0/month + 5% transaction fee
- Creator: $59/month + 2% transaction fee
- Professional: $99/month + 1% transaction fee
2. Podia
Next on the membership platforms list is Podia, a digital storefront for creating digital products, like courses or memberships.
You can create digital products on Podia by uploading the product’s file, adding the title, image, and description, setting the prices, and indicating the product’s availability before publishing it.
When it comes to membership, Podia has a community feature that allows you to create a member space. You can add a new topic, enter a title and description, upload images or videos, set access levels, and notifications.
Furthermore, there is a website feature that allows you to design a site. To design your site, you select a template, edit fonts and themes, add sections like product listings or contact forms, structure them, and publish the pages.
That’s not all. You can also manage subscribers with Podia’s audience feature. In this feature, you can import a CSV list, tag contacts into groups, edit their info, create messages, view their spending analytics, and view their purchase history.
Regarding membership, Podia’s community is the core feature. This is a space where your customers can join, interact with you, and connect with other members.
Here you can create free or paid groups, share posts, videos, and files, and give members special access to your products.
To set up the community, you need to add members, create plans and topics, and so on. Come along as we explore the components of the community feature and what each tab has to offer.
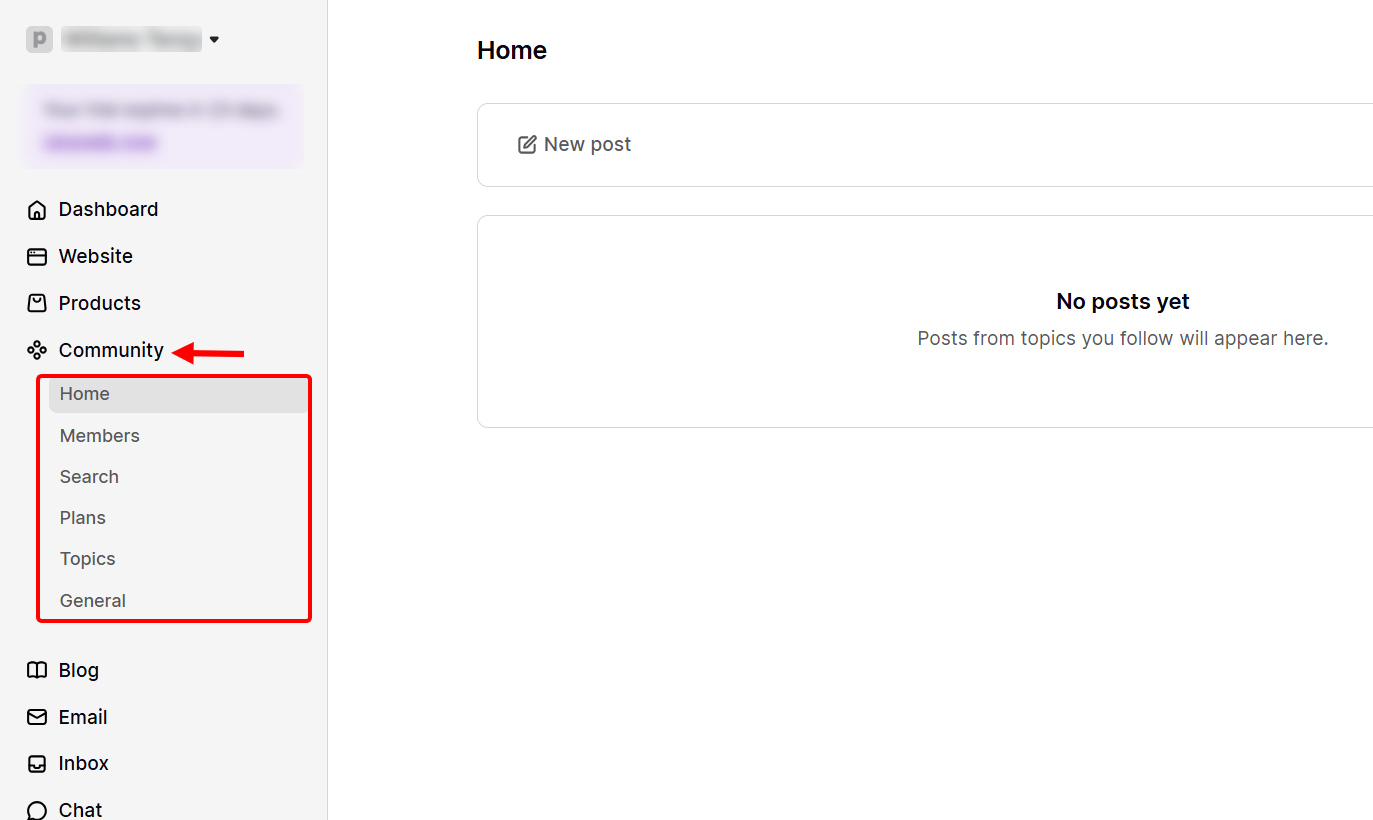
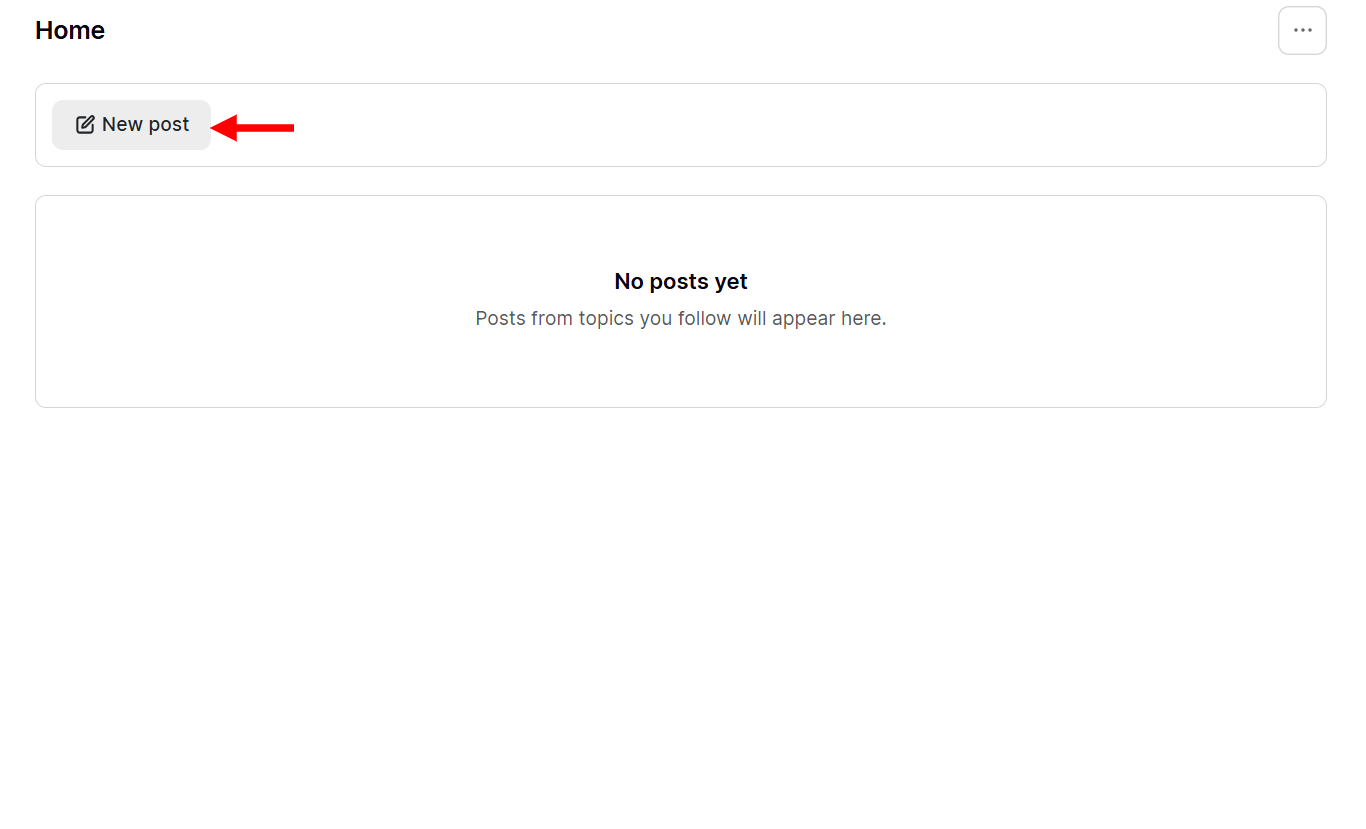
The home tab holds all your recent posts. You can create new content to post by clicking “New post”.
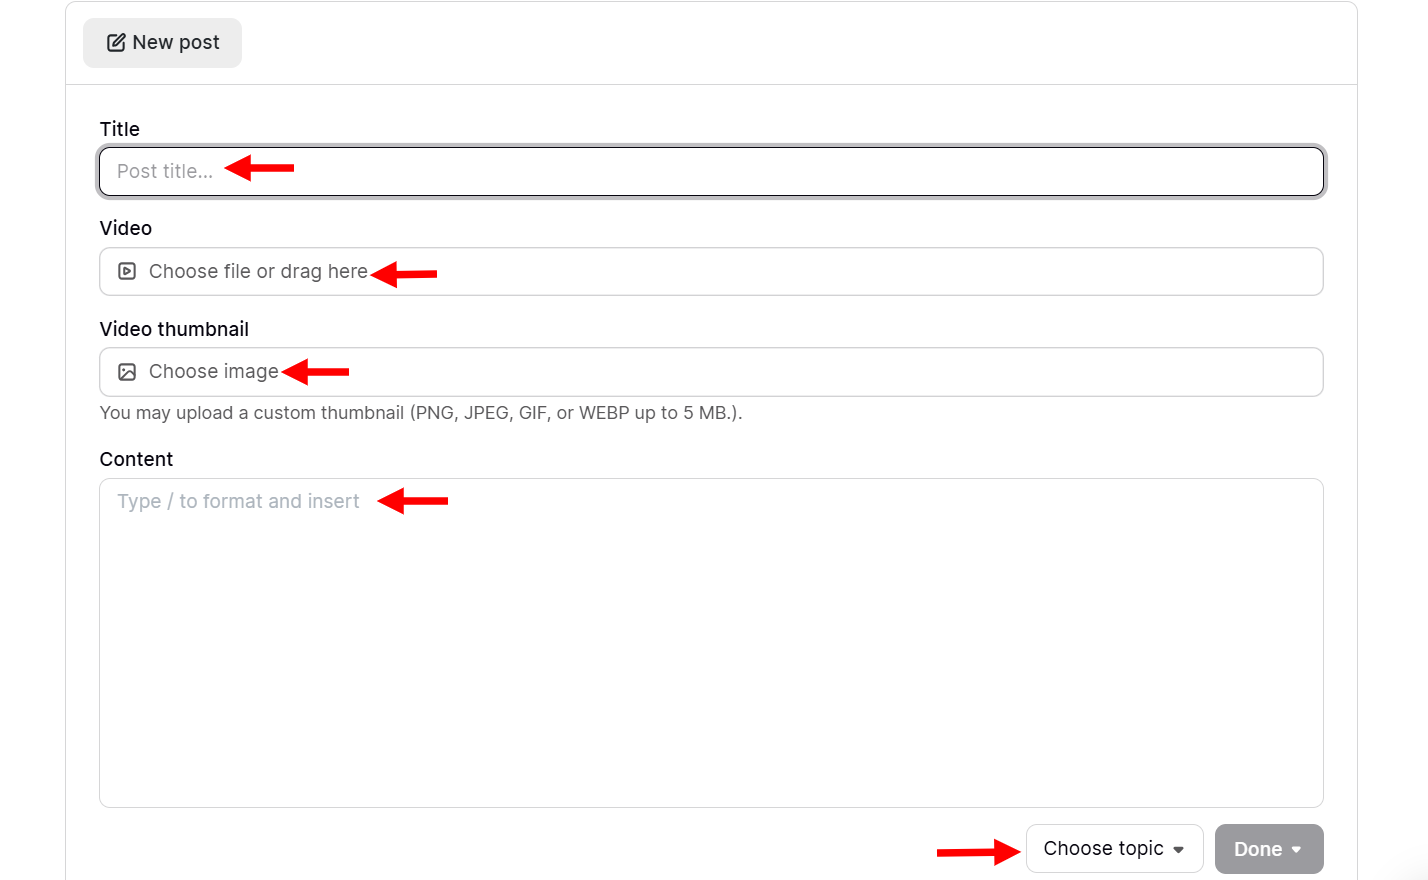
Now, enter the post’s title, upload a video and thumbnail, and then enter additional text content.
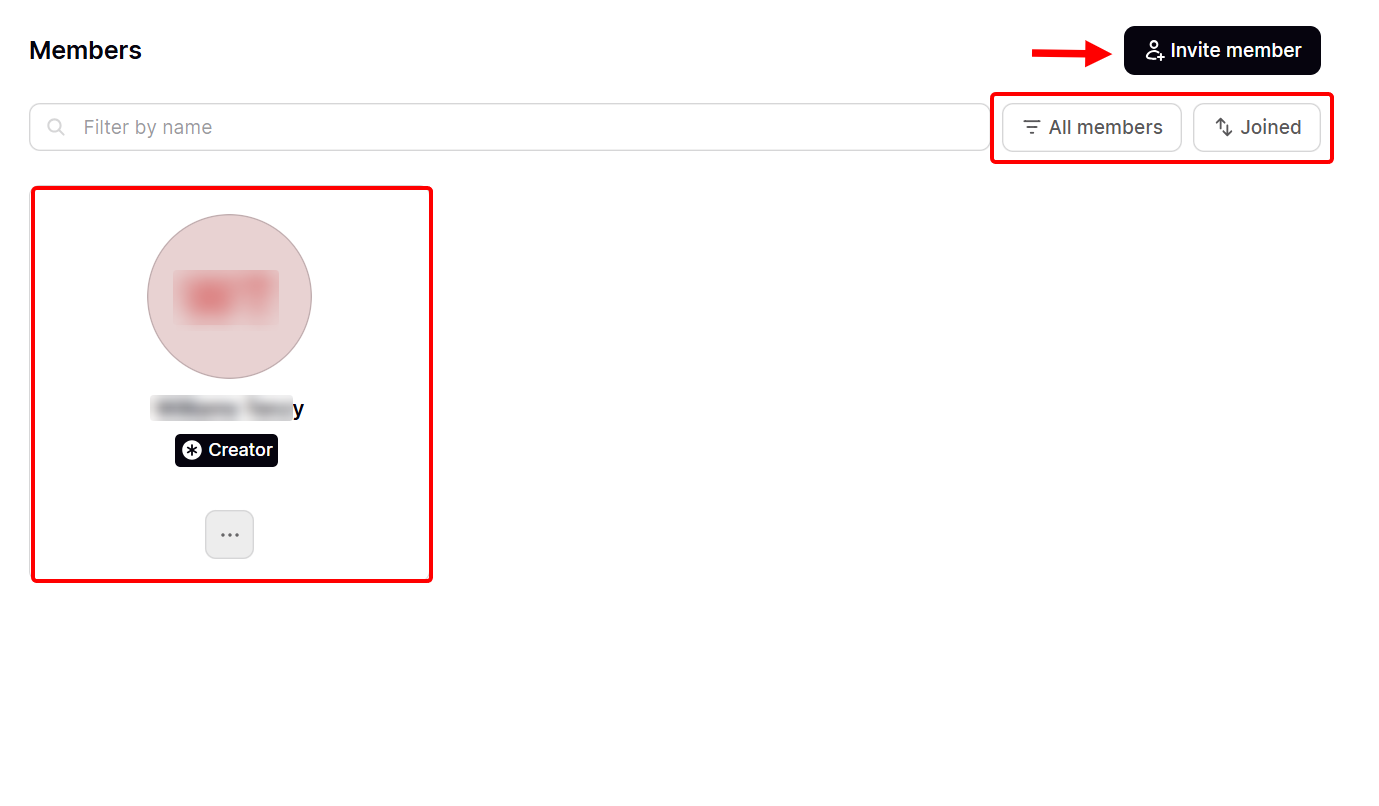
Switch to the members tab, and click “Invite member” to add members to the community.
You can also filter by the period or category to view matching members.
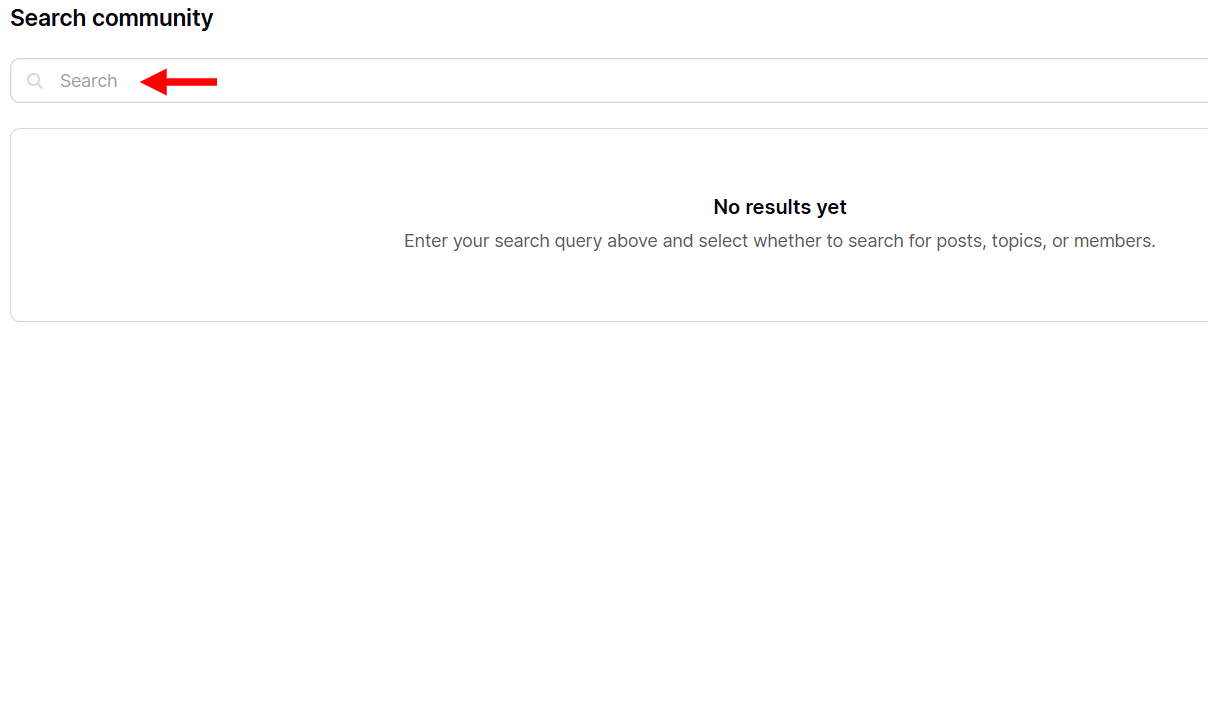
If you want to search specific members, posts, products, and other objects within the community, switch to the search community tab and enter your query in the search area.
To manage the membership tiers for your community, switch to the plans tab. Here, you can create plans or products when you select “New products” and then assign a tier to the members.
You can also search for added products.
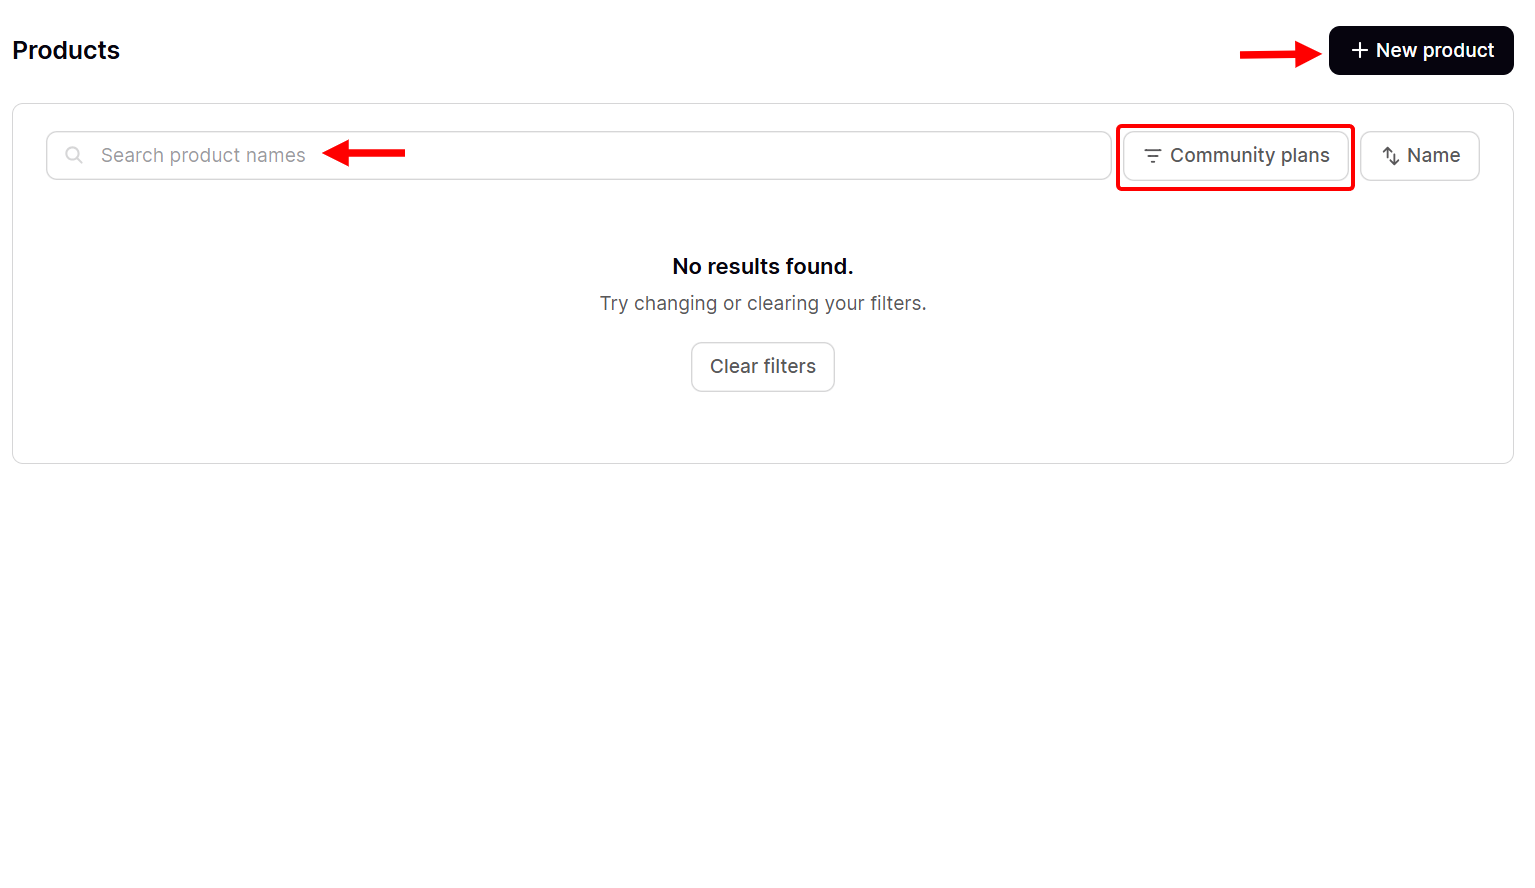
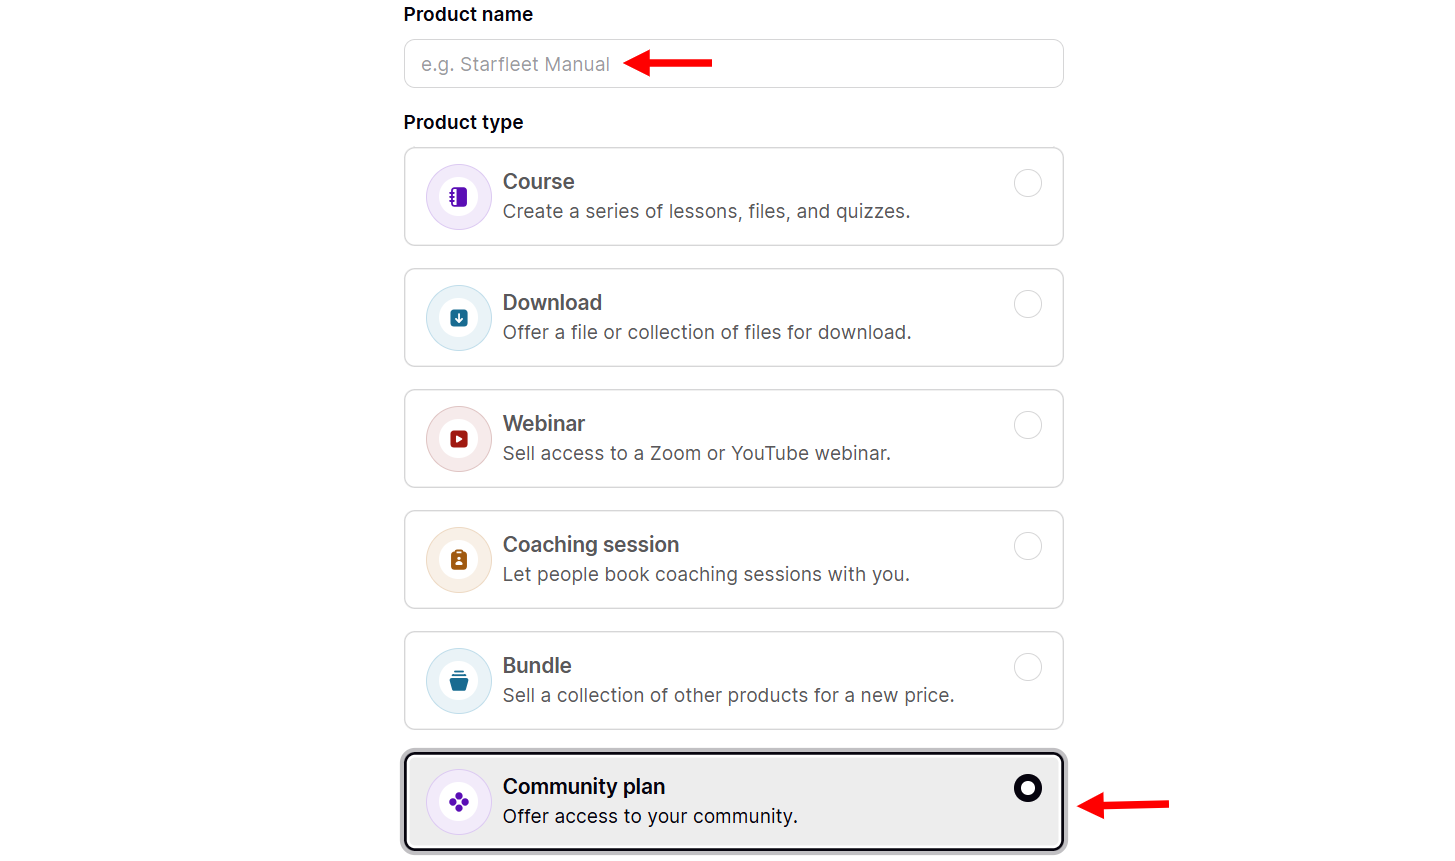
To add a product, indicate the product type, such as a webinar, bundle, course, or download, and then name it. I’ll go for the community plan product type in this illustration.
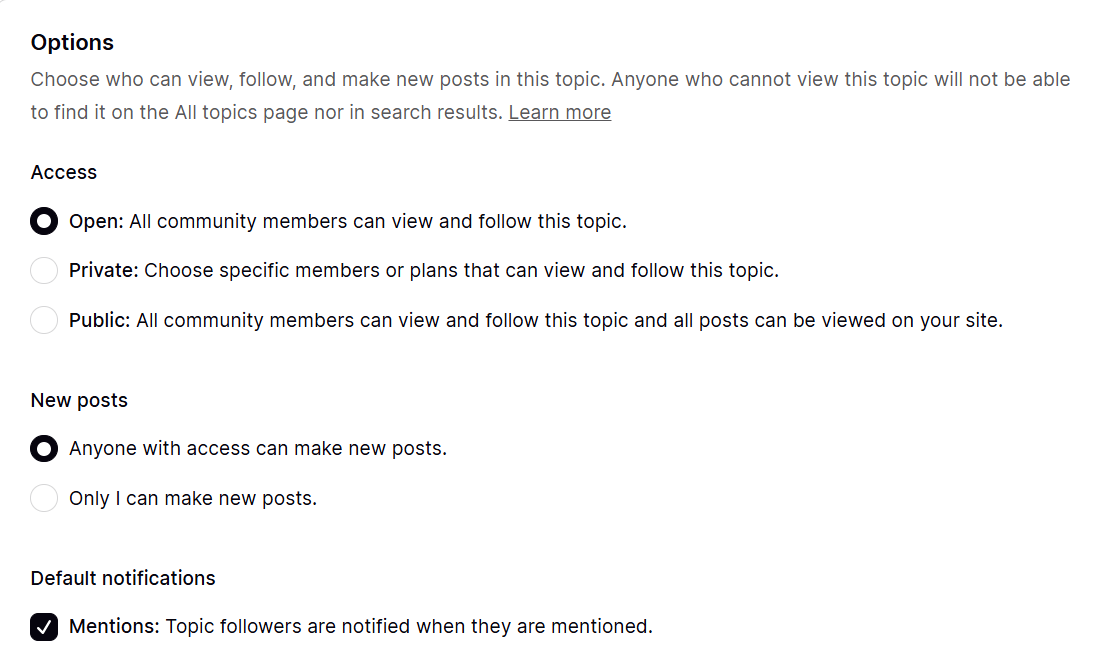
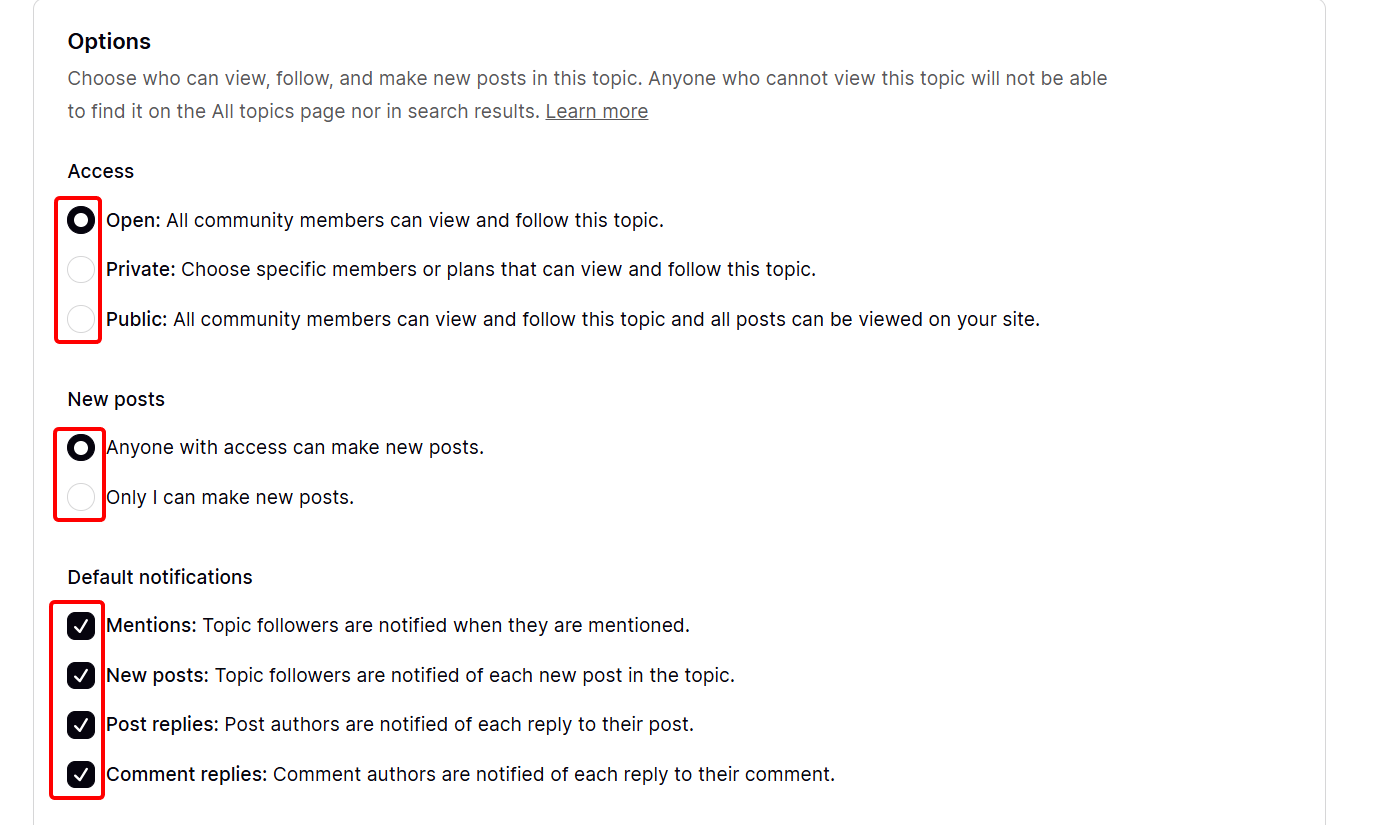
There is a topic tab where you can organize discussions and posts into different subject areas for members. To create a topic, provide a name, enter a description, and choose an image.
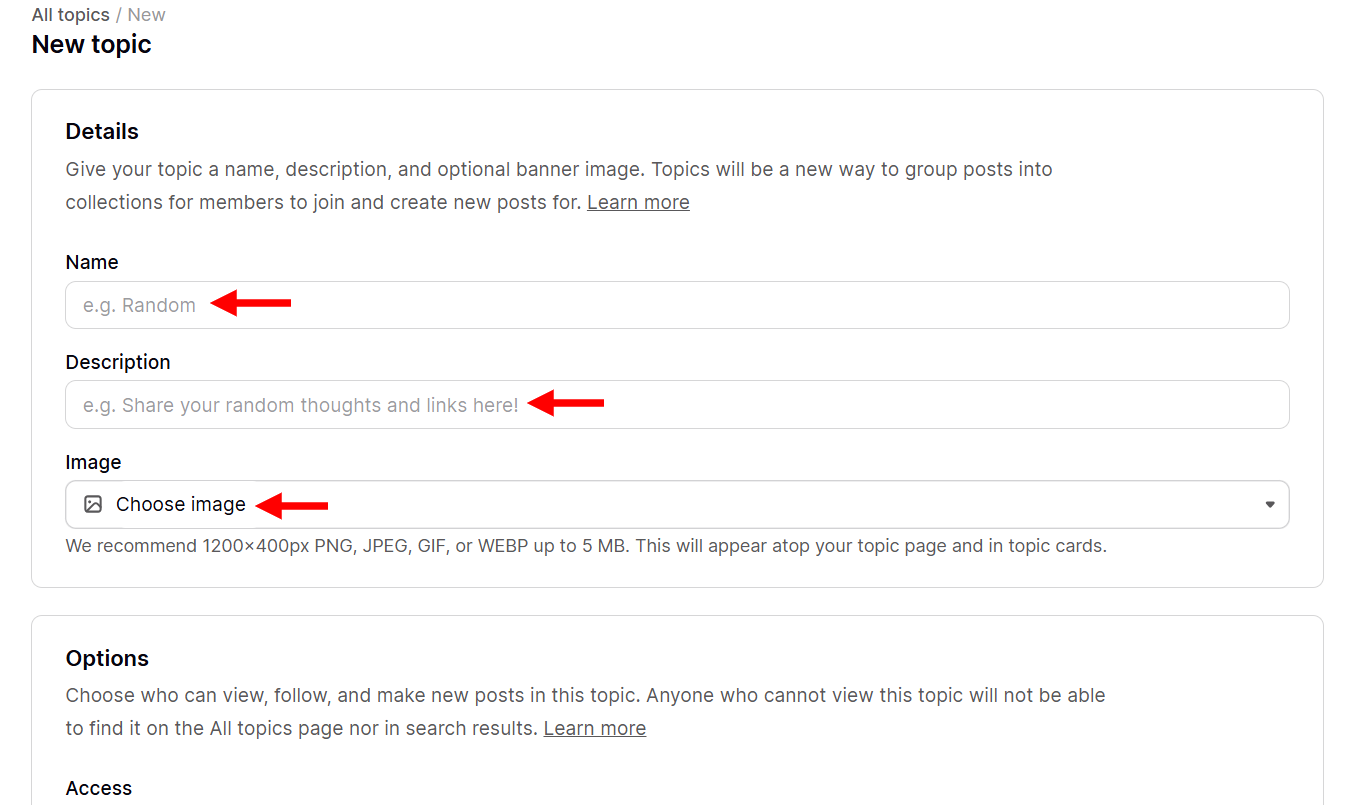
You can make your topic open, private, or public to the community, and also allow members to make posts.
Here you can also trigger notifications for mentions, new posts, replies, and much more.
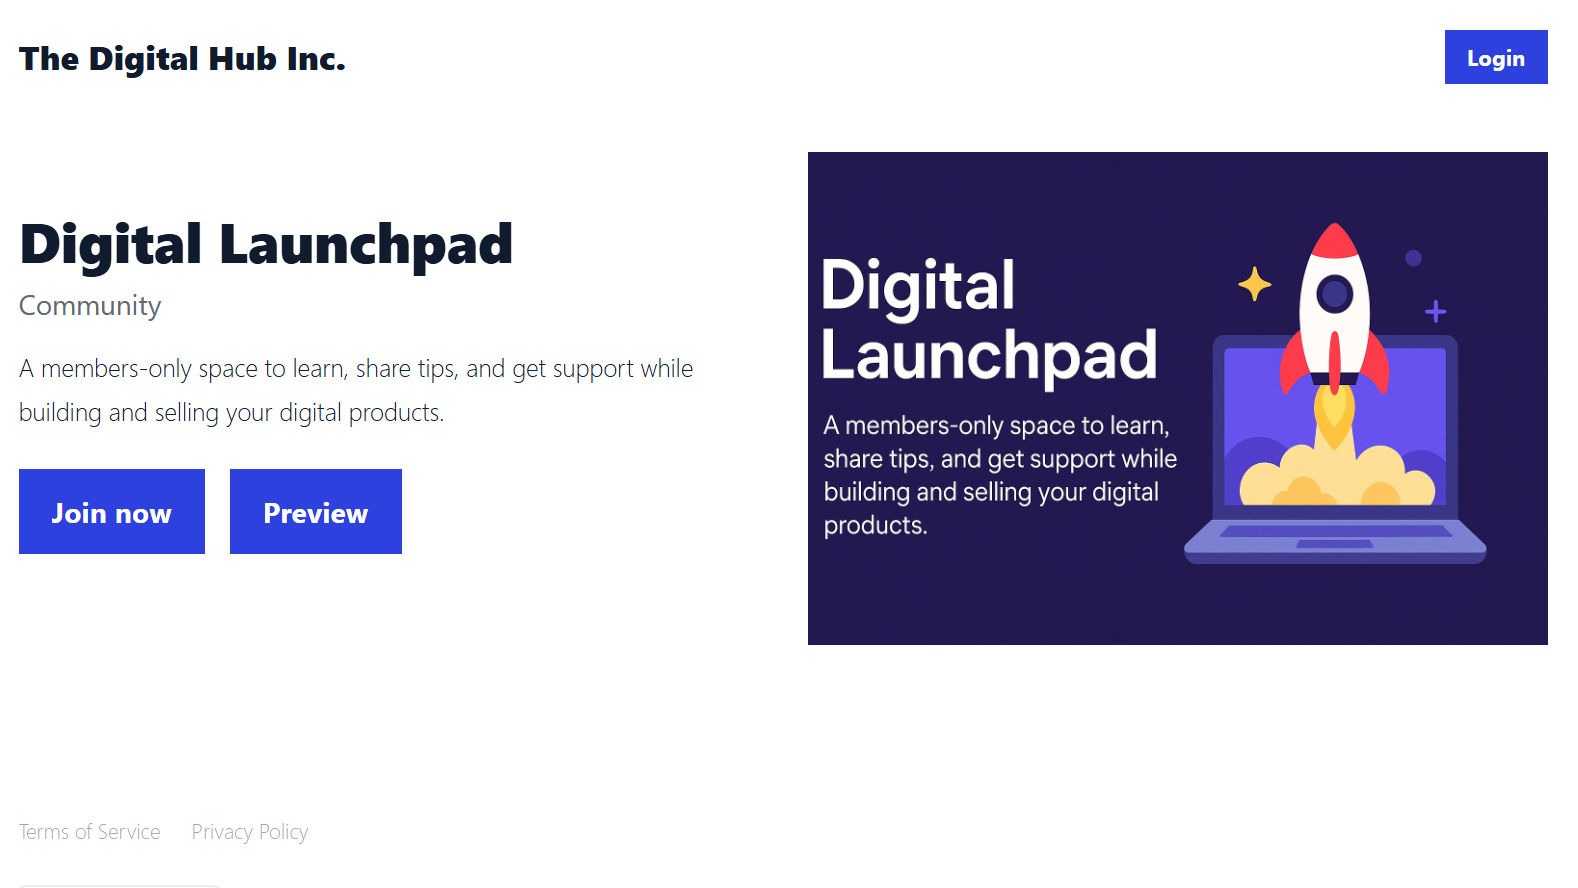
Members with a link can access the community’s landing page. As shown below, they can preview the community, log in to their account, or join as new members.
[Fs-toc-omit]Key features
1. Products
Podia’s products enable you to create your digital items, including courses, downloads, or coaching sessions.
When creating your product, you have to define its details on the storefront. You upload its image, add a description, give it a name, and assign it to a category.
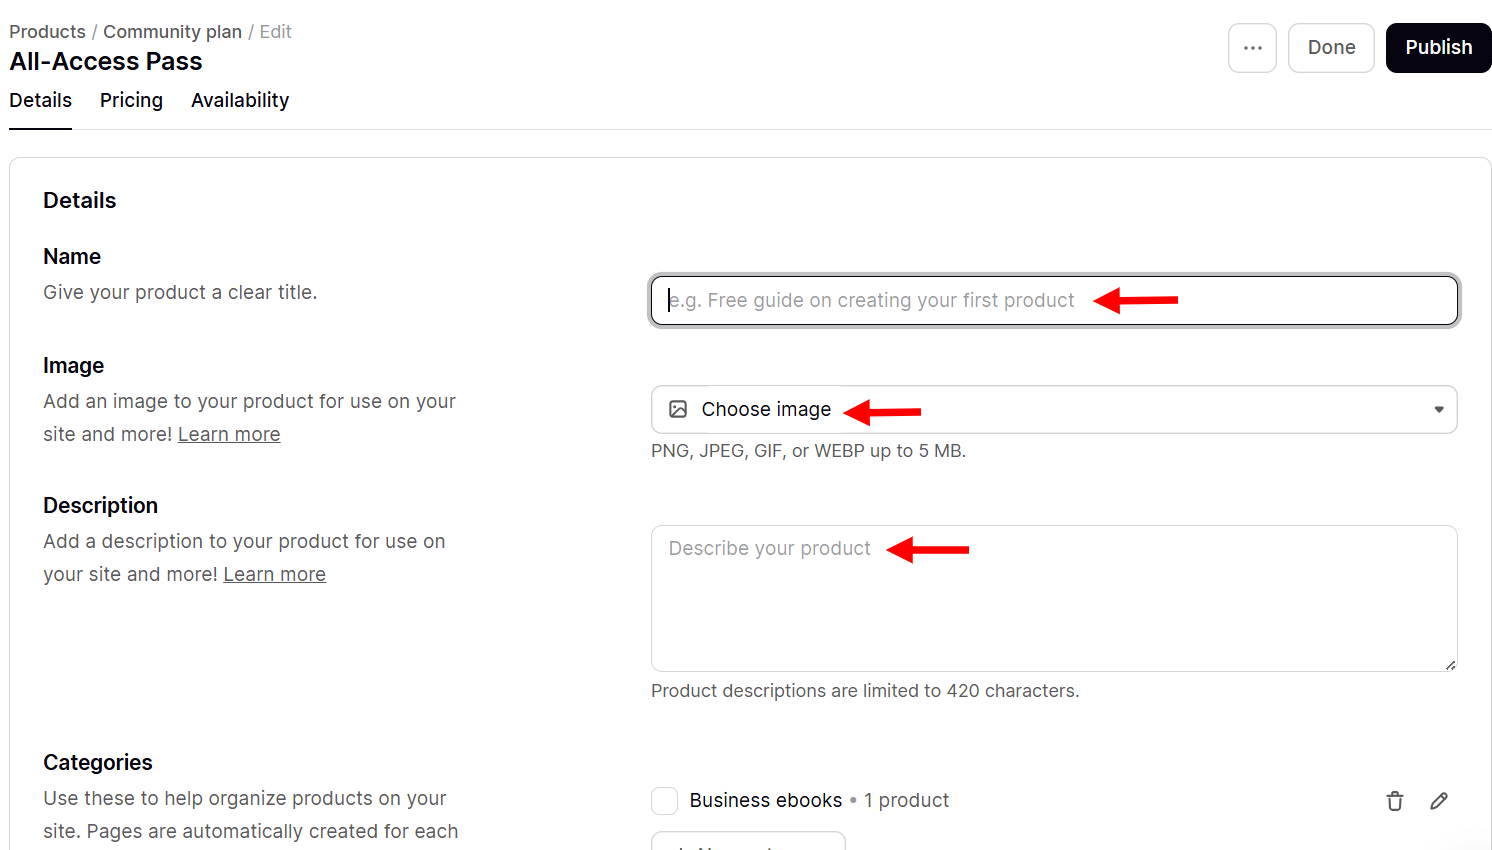
Then, select the pricing type from the available options.
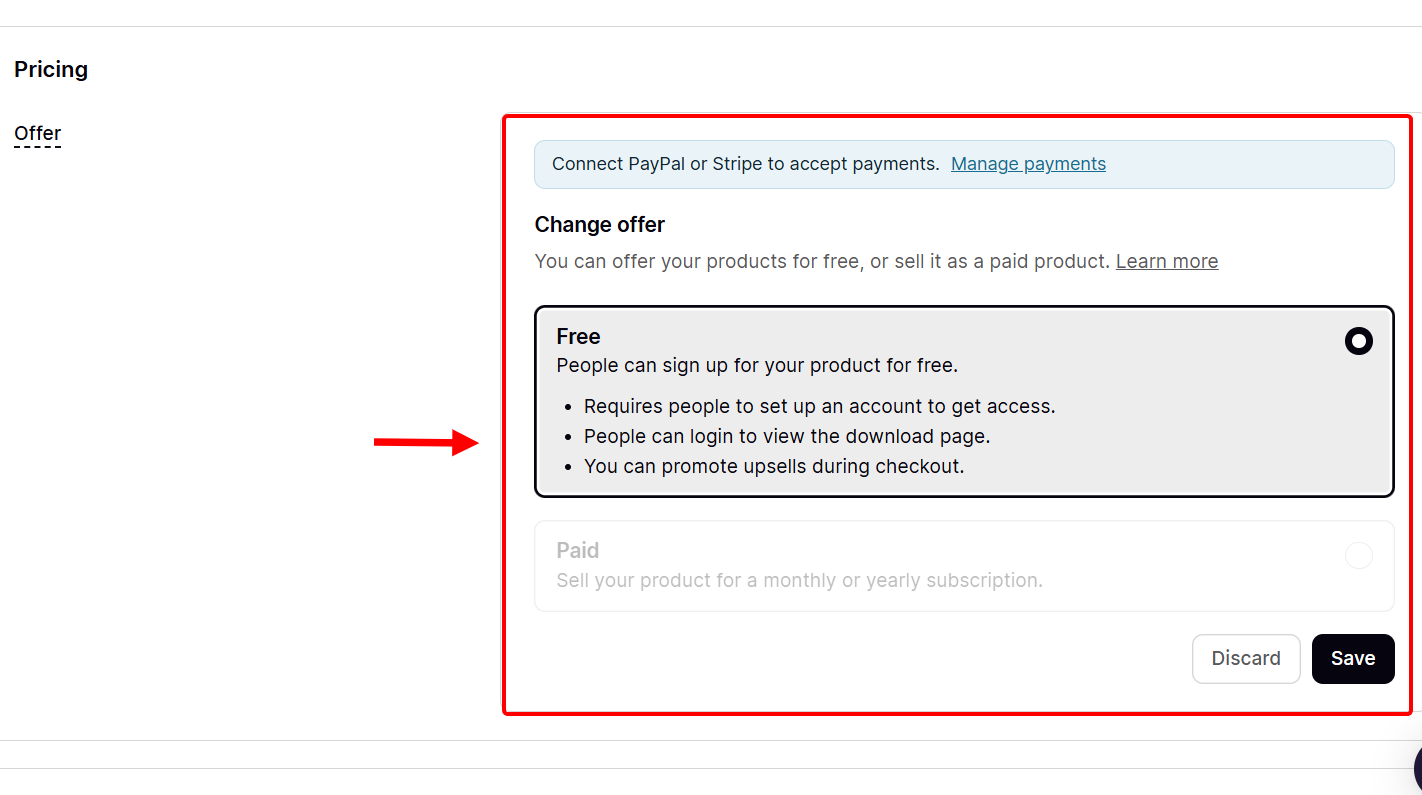
Next, you can limit the product period and set up its availability. There is an option to make it visible to everyone, or to open it to everyone, and vice versa.
2. Audience
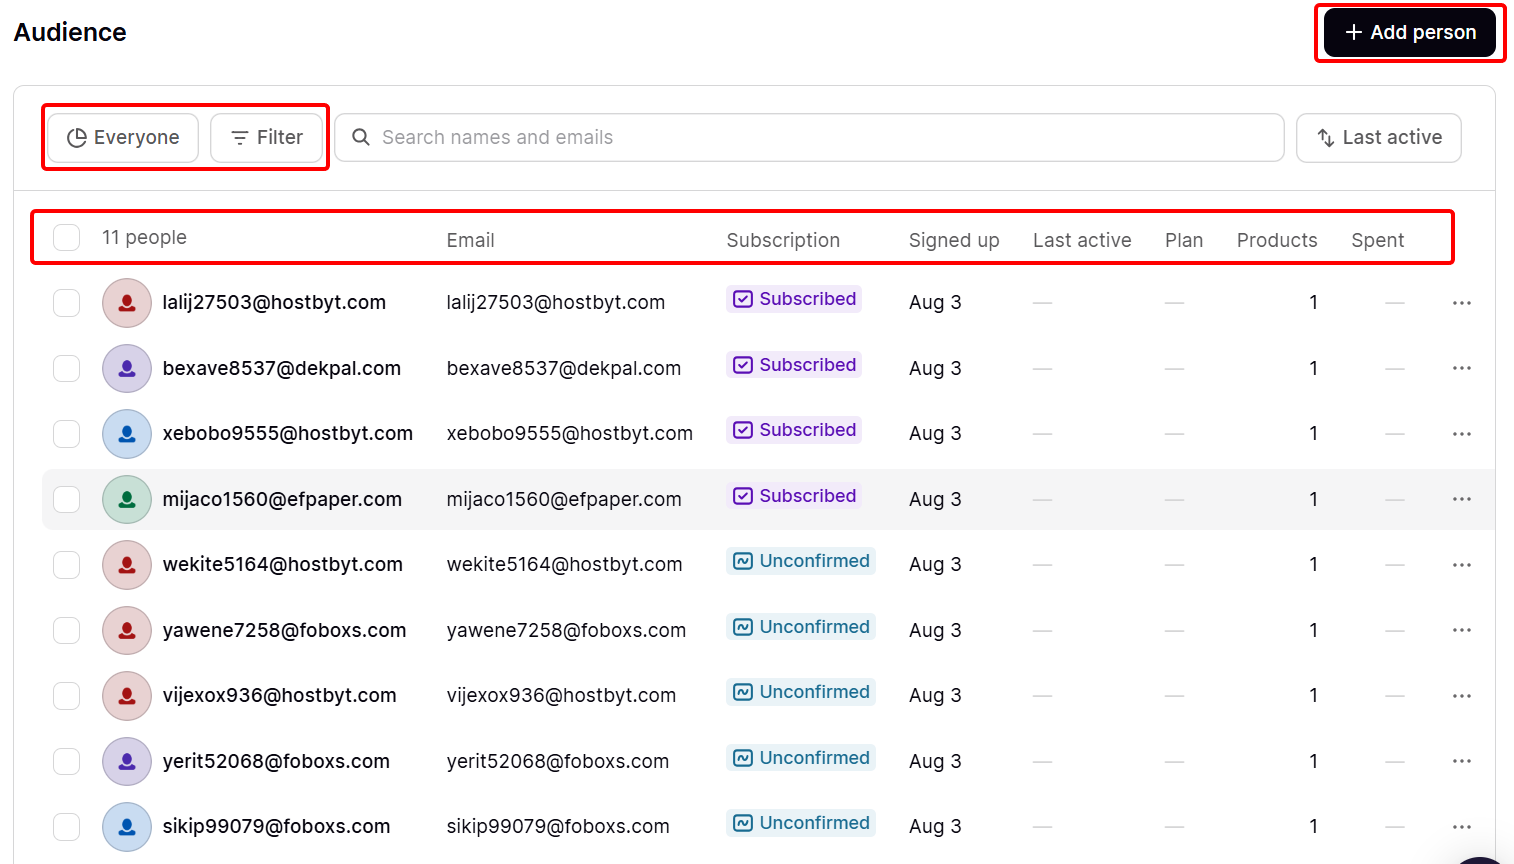
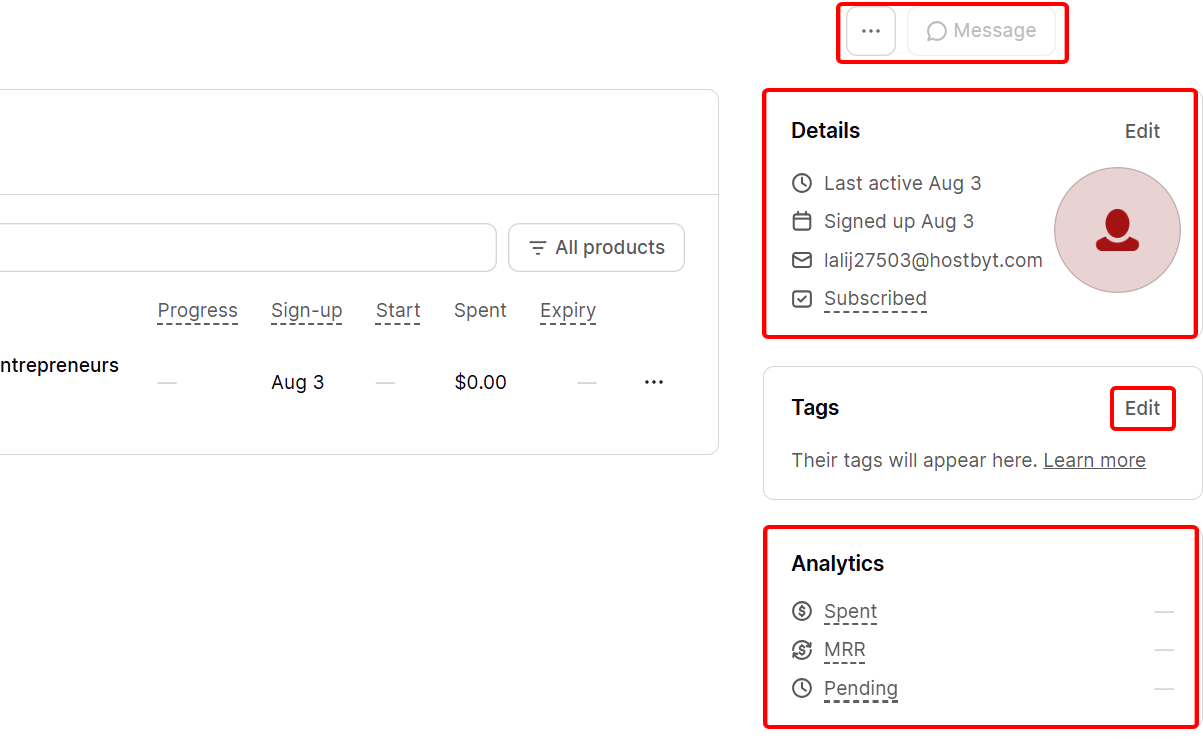
Podia’s audience feature allows you to view and manage the people who follow or purchase from you.
This feature allows you to view the members’ profiles, track their activity and transactions, and send messages or emails to them.
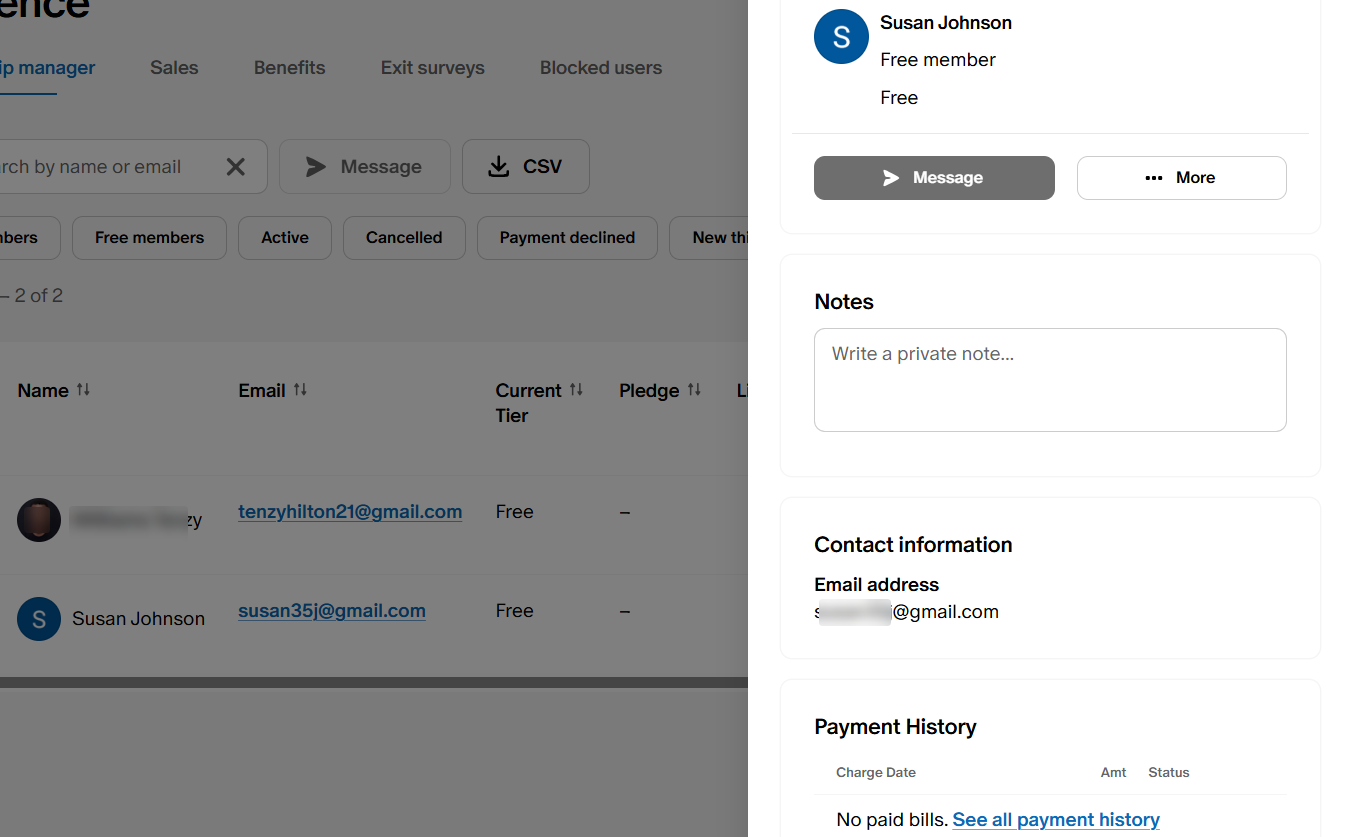
On the audience dashboard, you can choose the audience segment and apply filters. This will return a list of your members matching the criteria.
You can also view their details, including subscription status, emails, and spending history. There’s an option to add a member here manually.
Selecting a member reveals their purchasing history, along with details such as the price they paid and when they signed up.
You can also access the invoice from here.
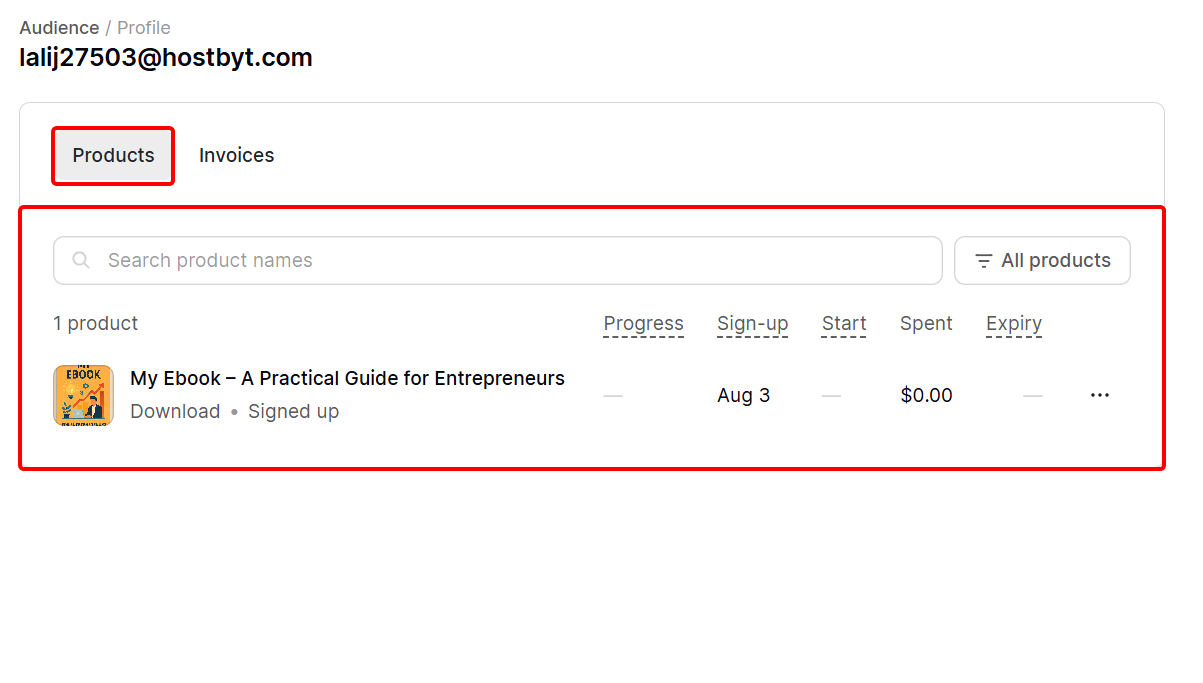
On the same page, Podia displays your members’ analytics, email, and sign-up date, which you can edit.
[Fs-toc-omit]Best for
Solo-run small businesses that seek to sell digital products like courses or memberships from one simple online platform.
[Fs-toc-omit]Pricing
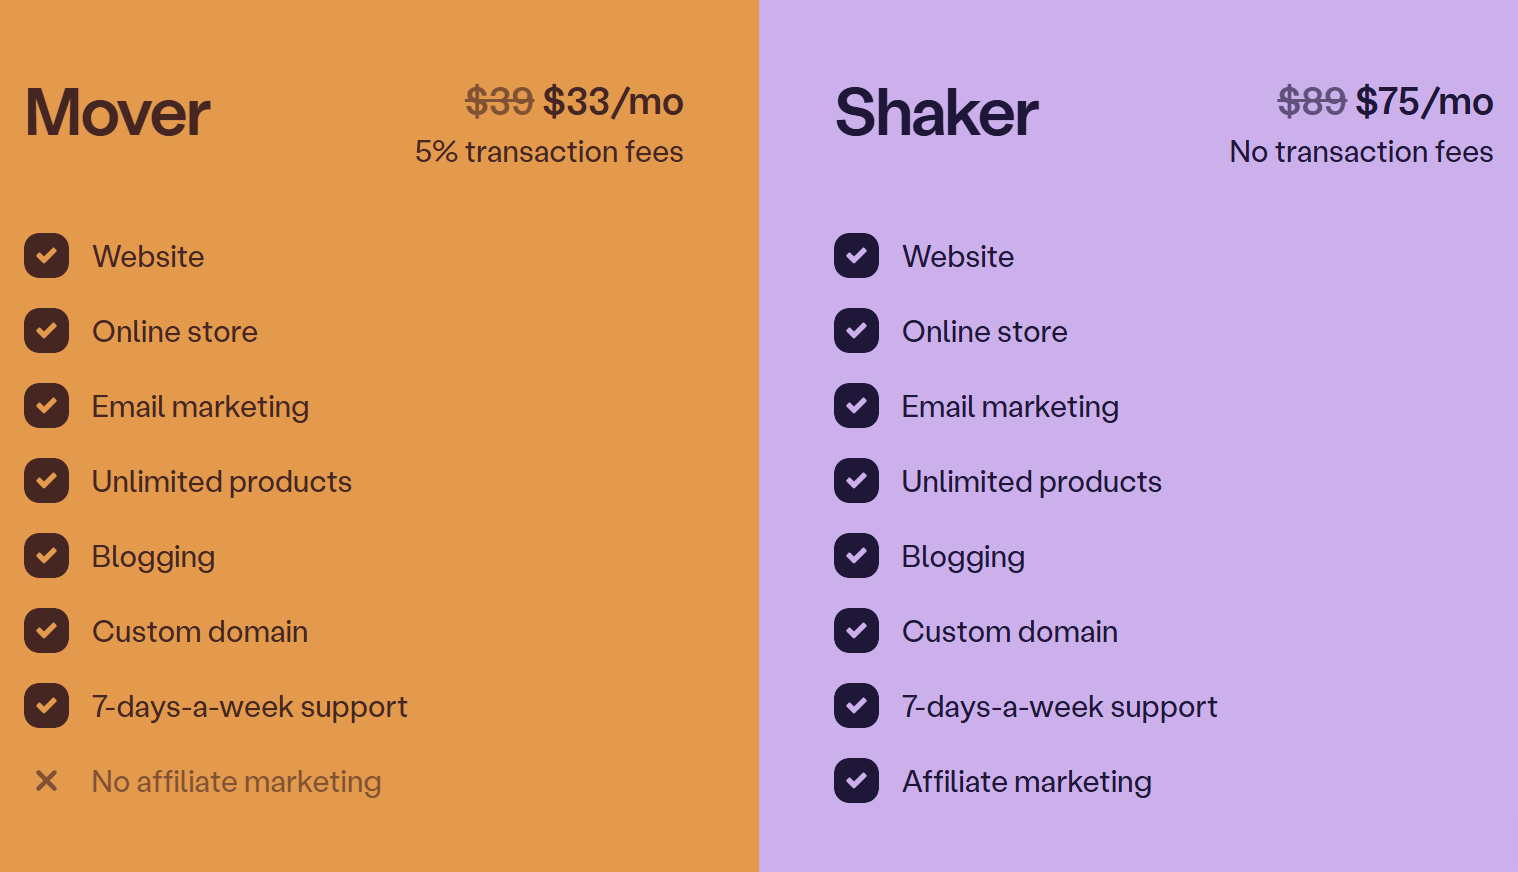
- Mover - $33/month + 5% transaction fee
- Shaker - $75/month + no transaction fee
3. Patreon
Next, let’s dive into Patreon, a membership platform designed for creators to run paid membership programs.

Patreon has a community management tool to help you engage with your members. Here, you can add chat spaces, name them, assign access levels, send messages, and invite members to engage in real-time conversations.
This platform allows you to manage supporters with the audience feature. It stores your members’ contacts, allowing you to tag them into groups, write direct messages to them, and view their details, activities, and payment history.
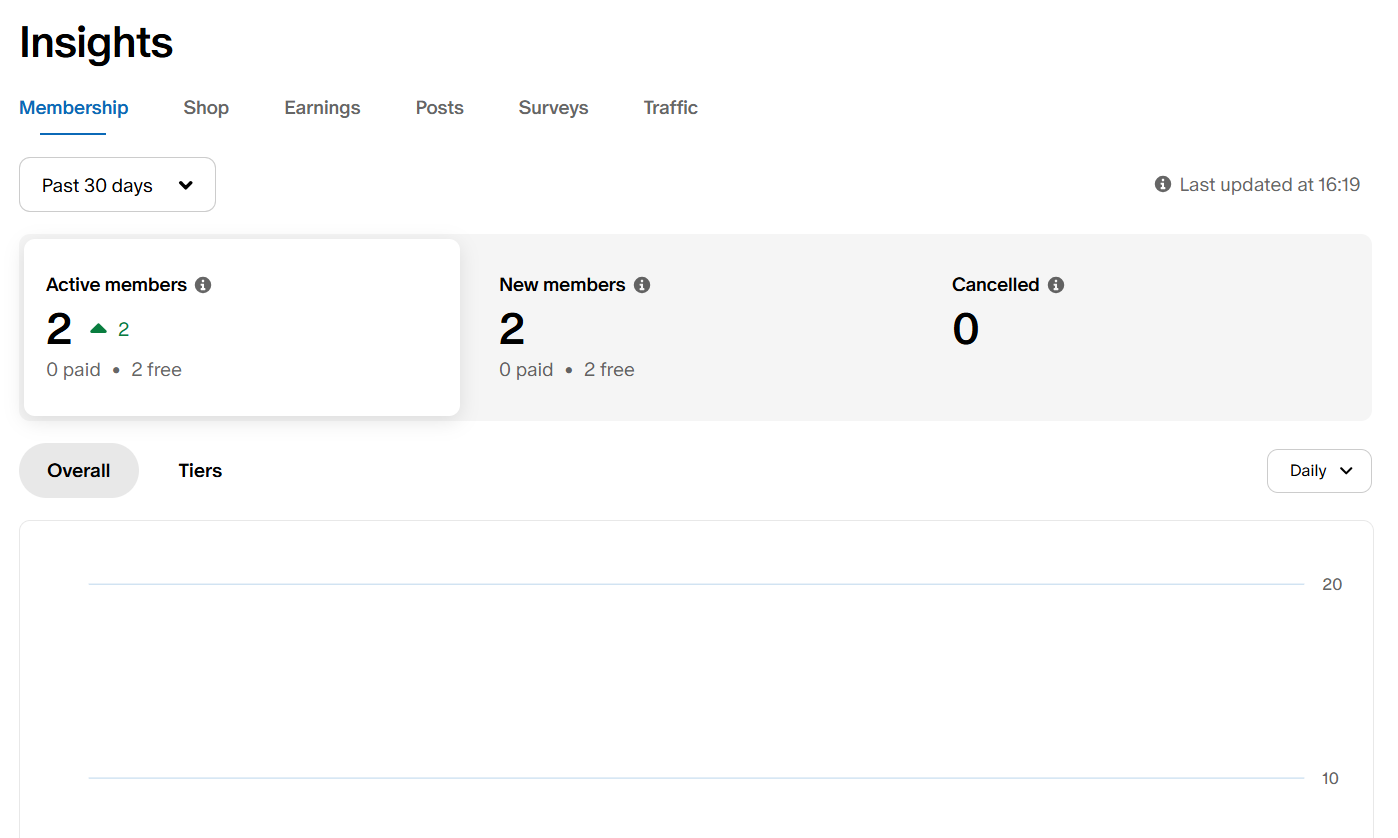
With the help of Patreon’s insight feature, you can review membership trends and performance. You can select a date range and category from the dashboard, and it’ll return data including active, new, and cancelled members, tracking conversions, and downgrades.
Patreon also sports a product feature you can use to sell digital items. All you need to do is upload the product’s file, such as a video, picture, or link, set its price, select delivery formats, and publish it in posts or collections.
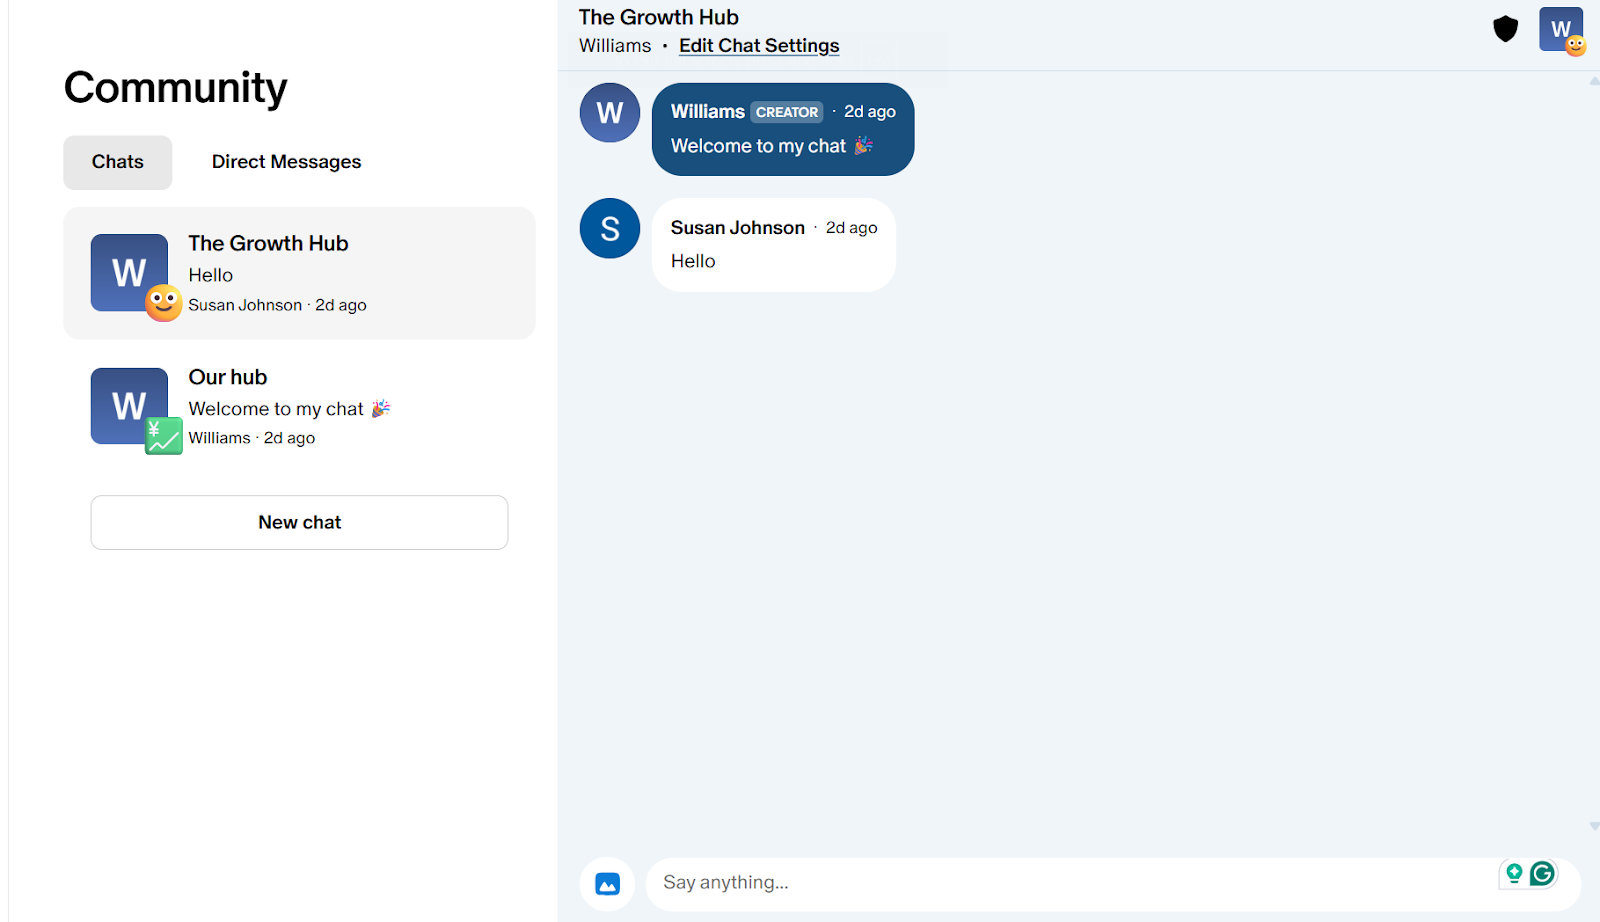
Patreon’s community is the core feature for membership. This is a members-only space where your supporters can interact and connect with you and each other. This allows you to chat and publish content to engage.
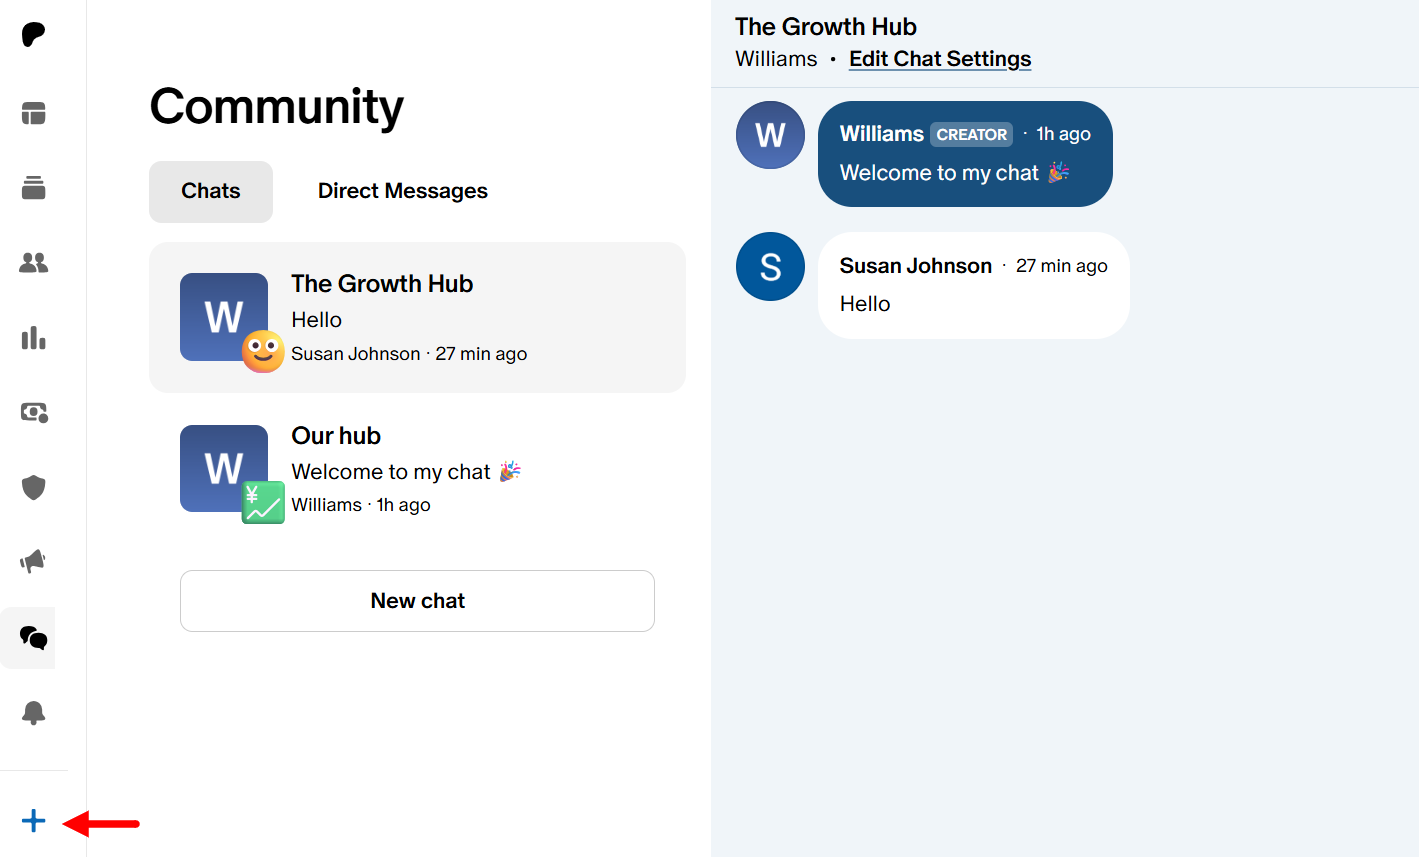
To access the chat, select “Community” on the main dashboard.
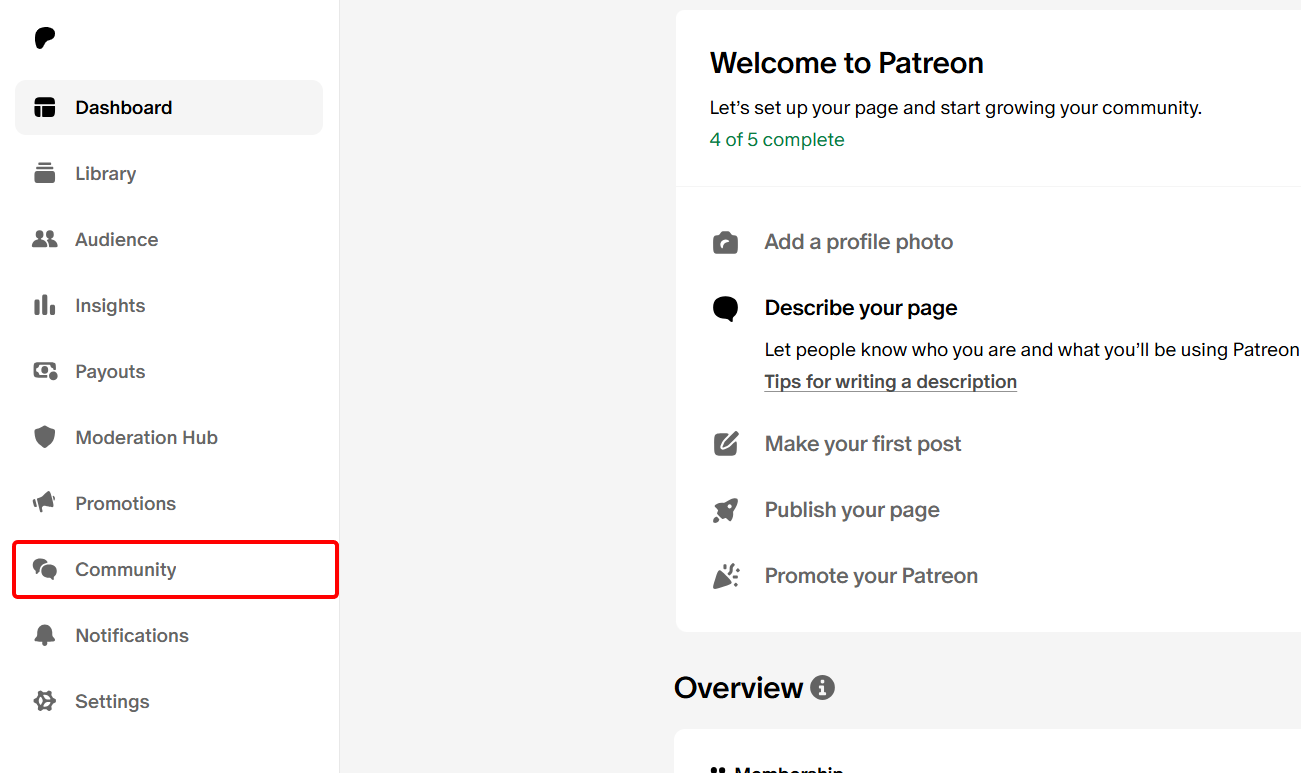
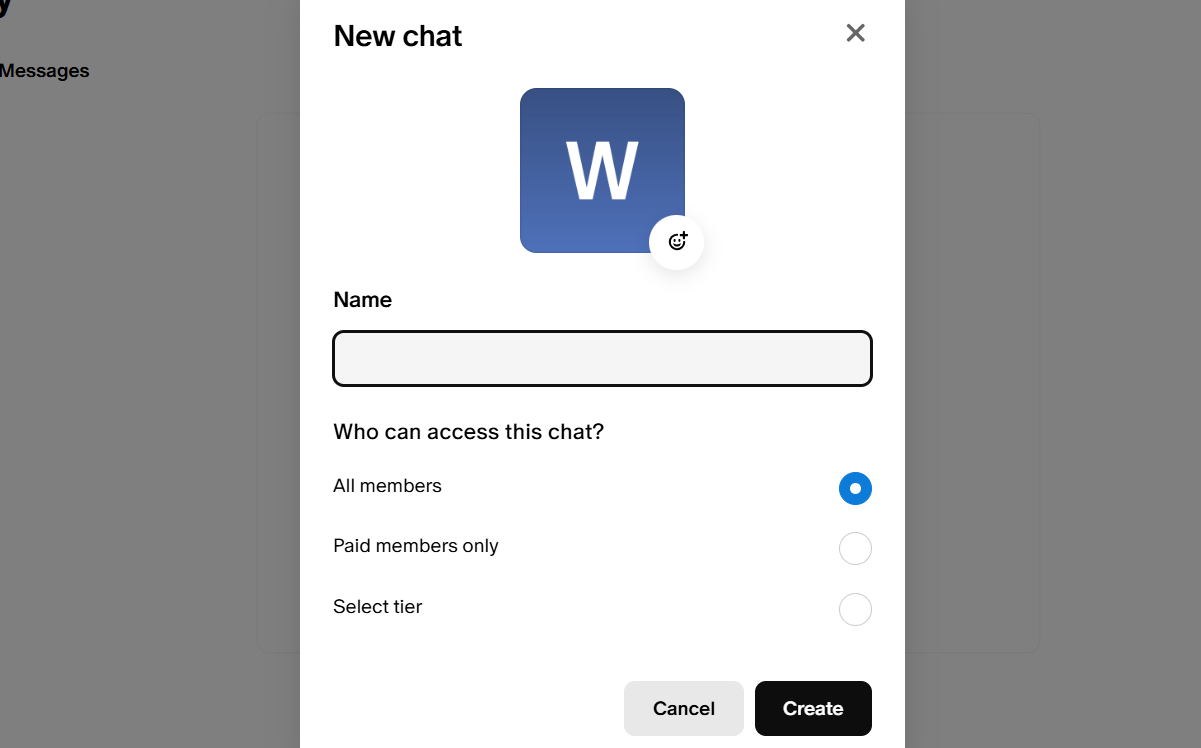
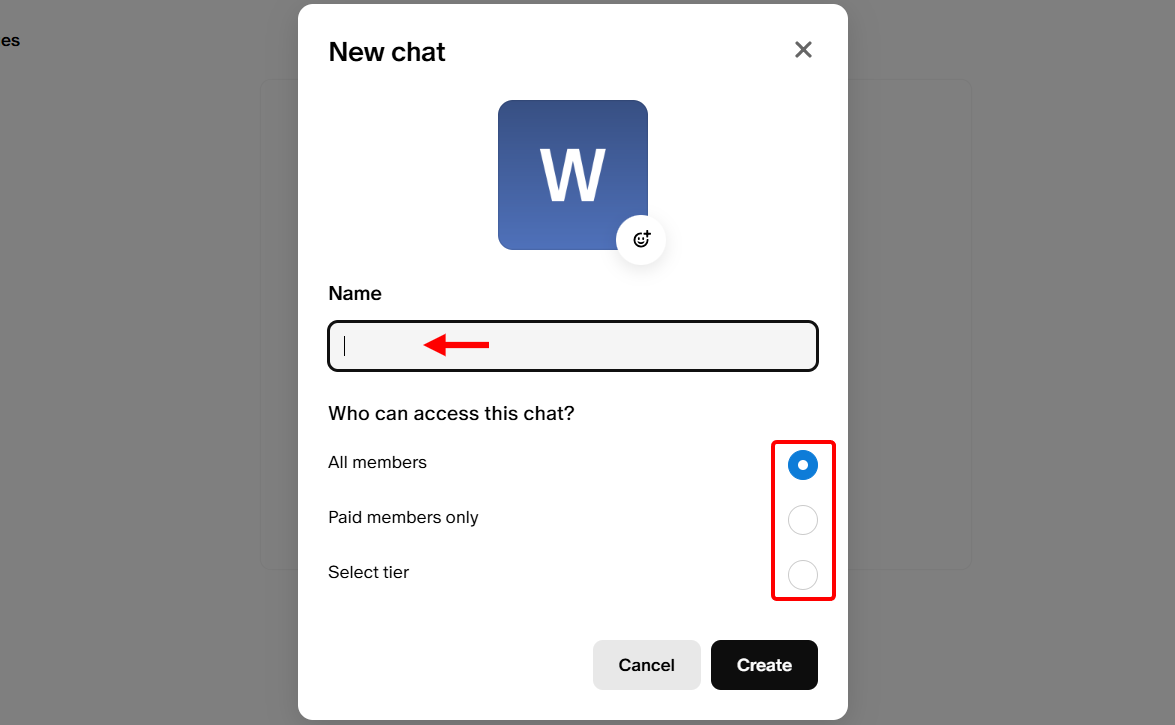
The community feature stores the chats you create, including both general and direct messages. Here, you can create another chat by selecting “New chat”.
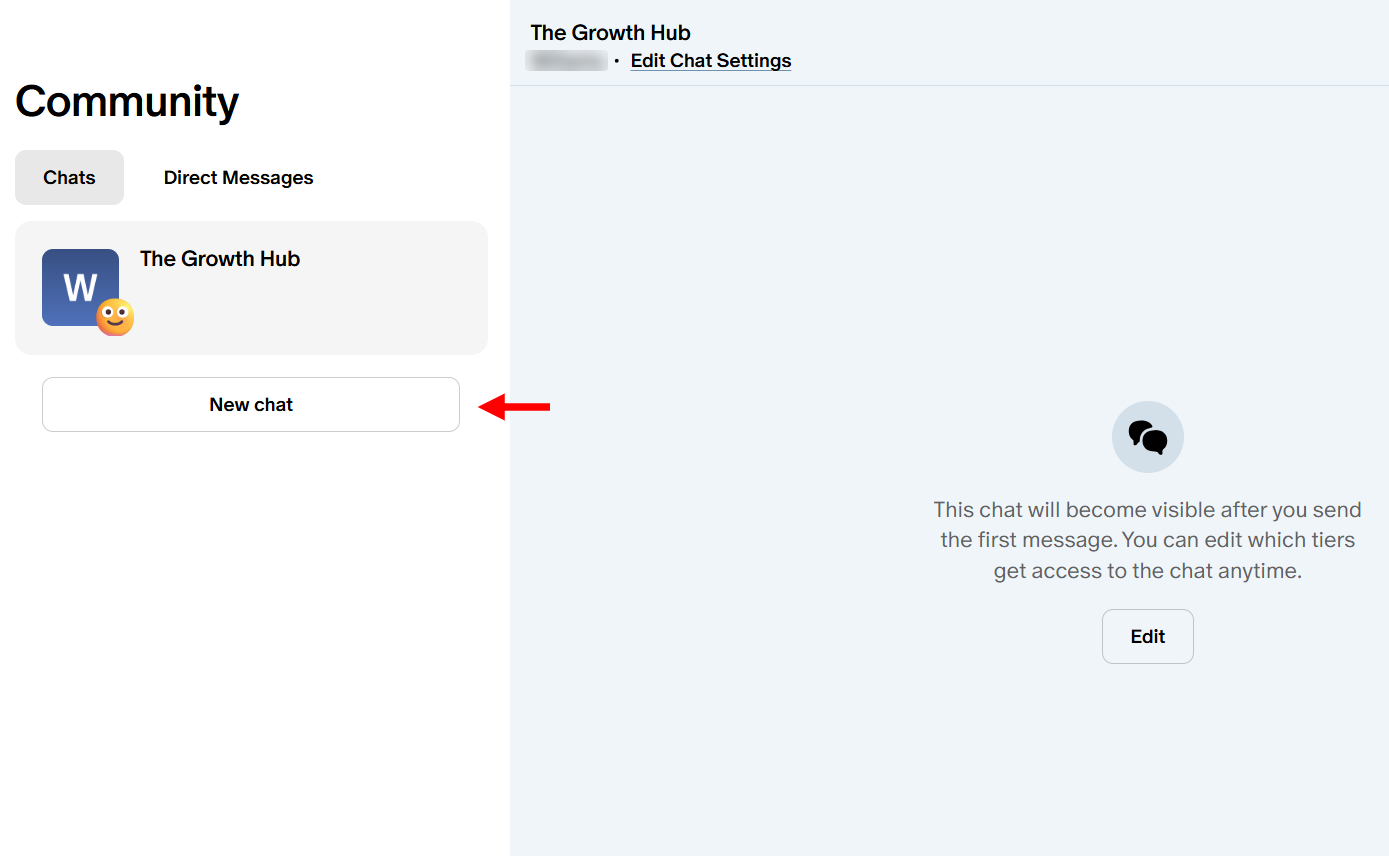
When creating a new chat for the community, you can make it available to only paid members, specific tier members, or all members, and then assign a name to the chat.
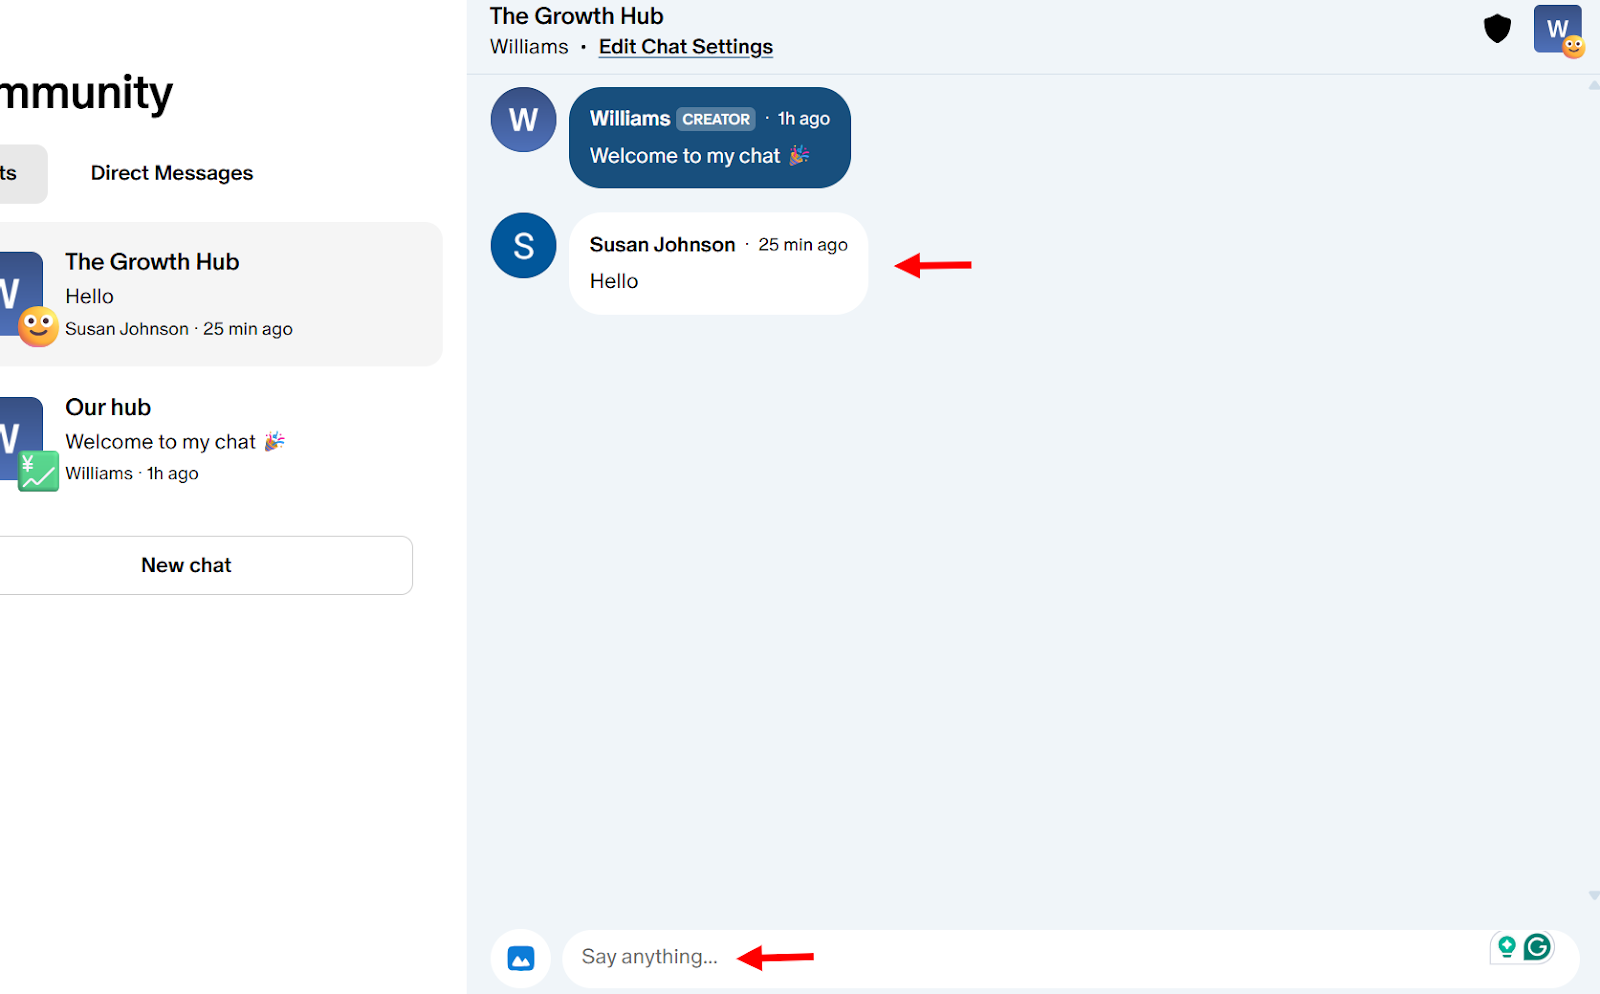
After creating your chat, you can send messages, attach media, and start conversations with the members.
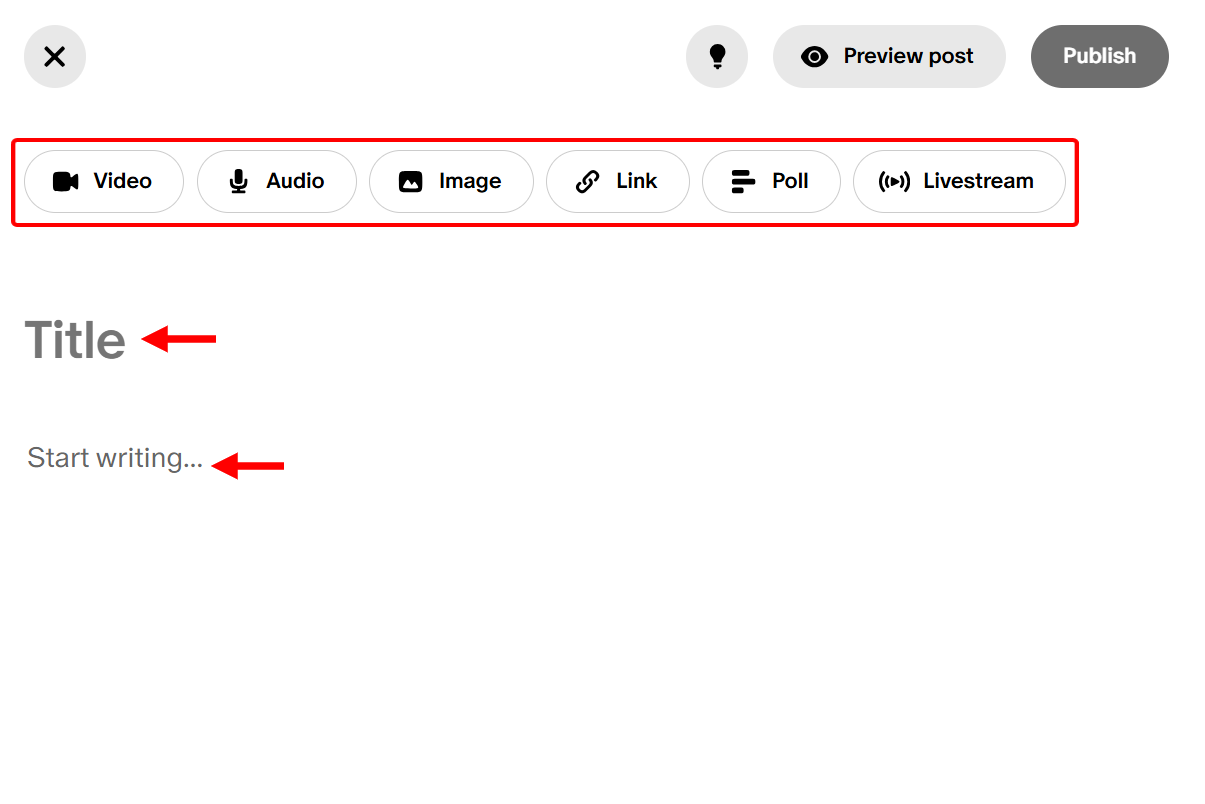
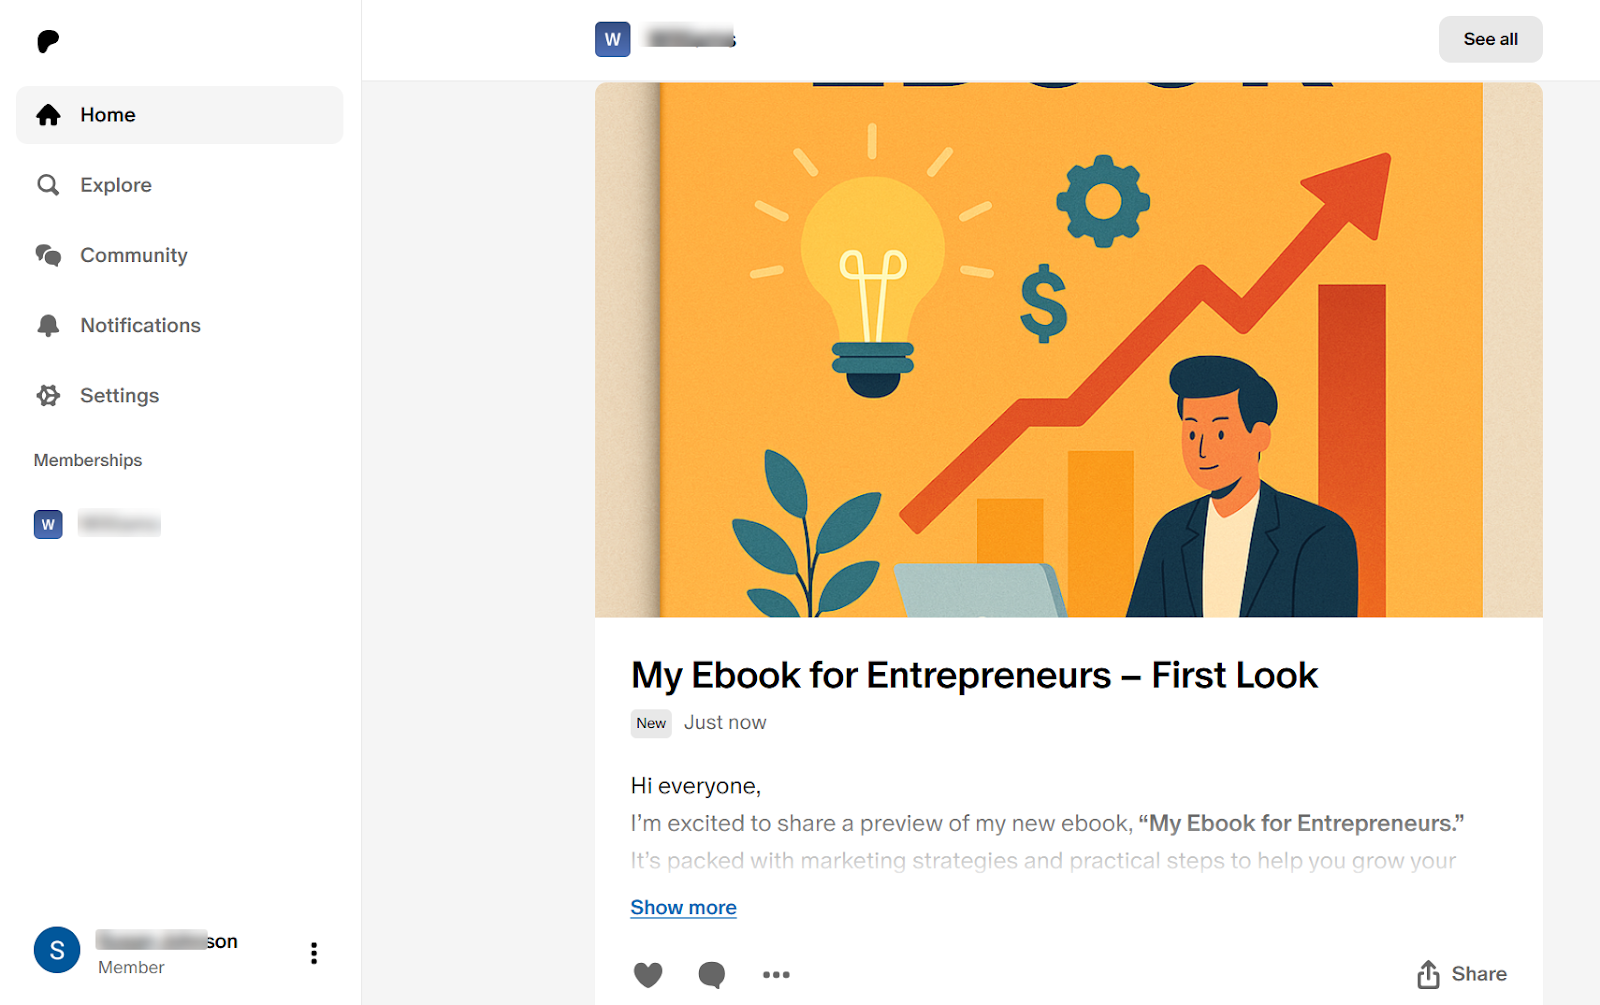
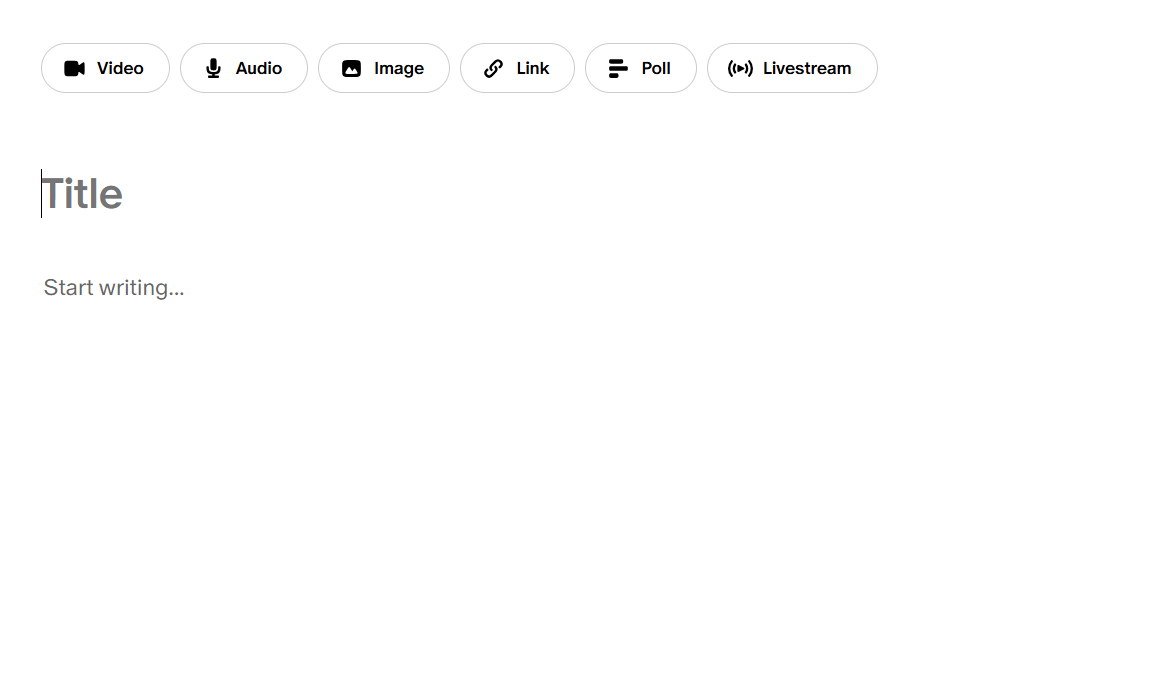
The community isn’t just for chatting. You can publish posts, such as updates, files, videos, or polls, to appear in members’ feeds.
To do this, click on the plus sign button in the bottom left corner of your screen.
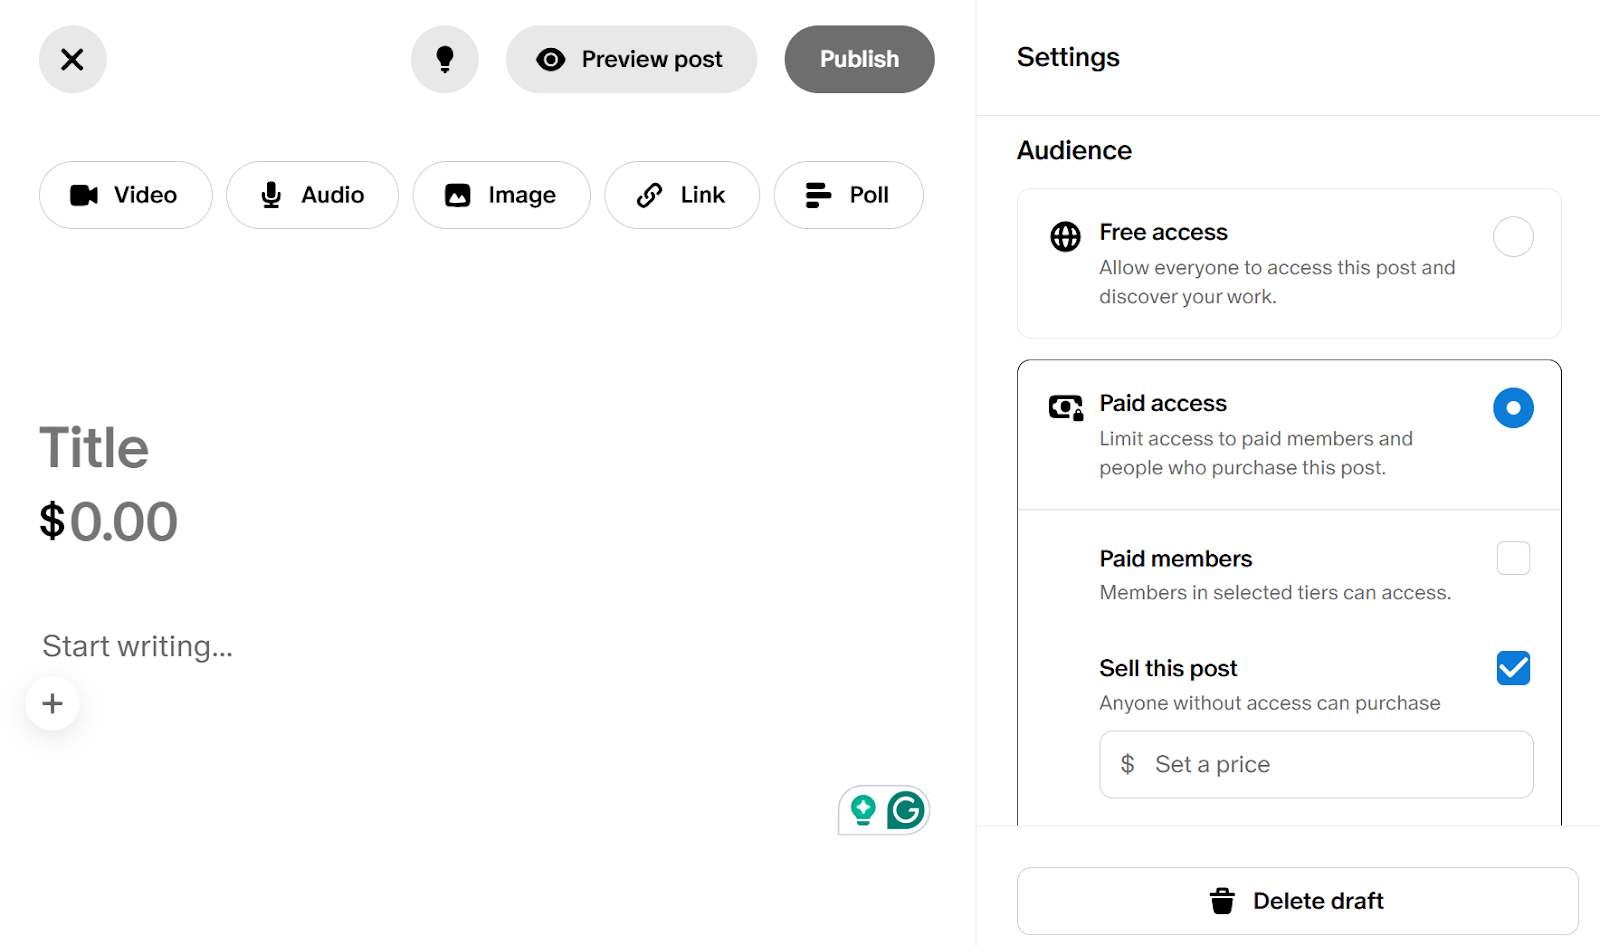
Next, select the type of content you want to publish. These include video, poll, image, and livestream content. Then give the content a title and body.
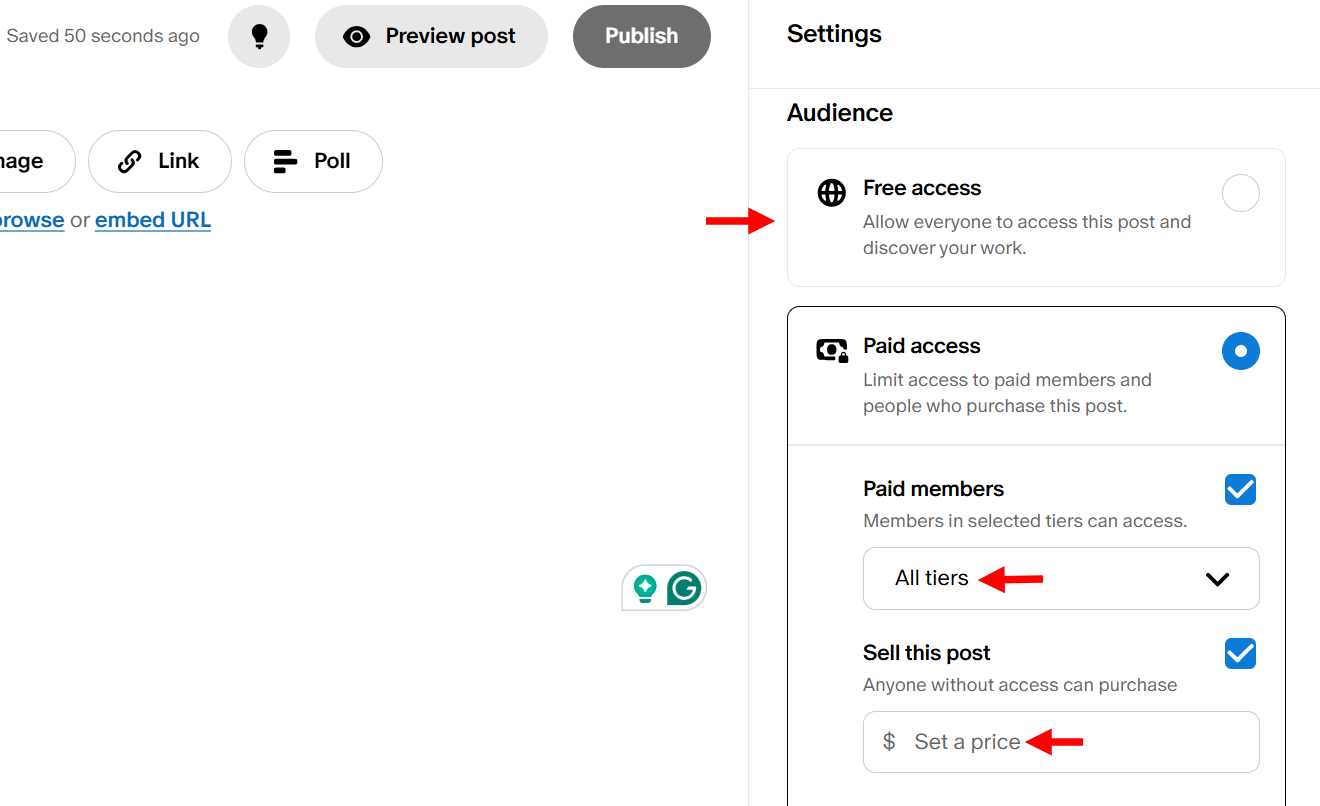
You can make the content freely accessible or charge for it. When you select paid access, you can make it accessible to members of a specific tier or set a price for it.
Now, you can upload the content’s image and add it to a collection.
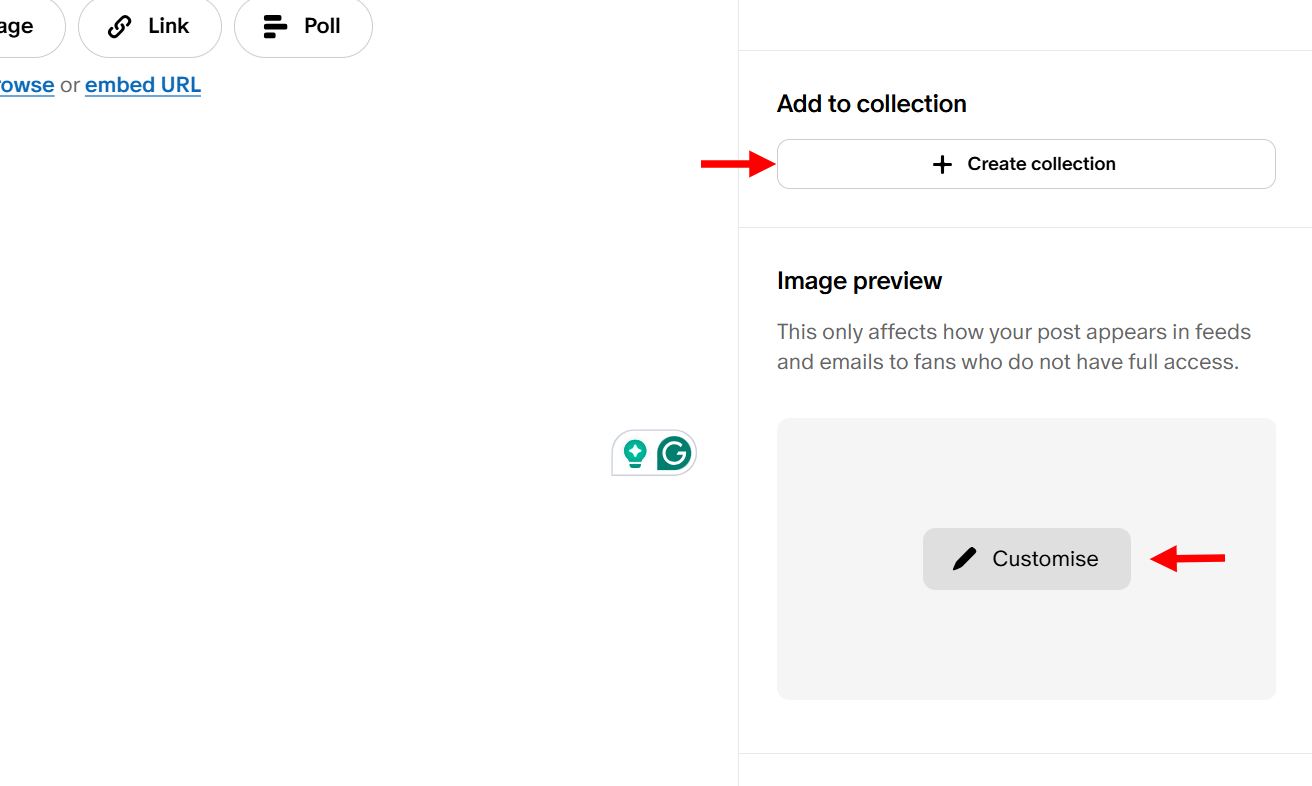
Members can now see and interact with your published content on their home feed.
Key features
1. Audience
Like other platforms, Patreon’s audience feature allows you to access and manage your members. You can track their details, payment status, and engagement. You can also interact with them here through messaging.
The audience feature takes you to the relationship manager tabs by default, where you can select an audience category. You can also apply a filter to view a list of matching members and their details.
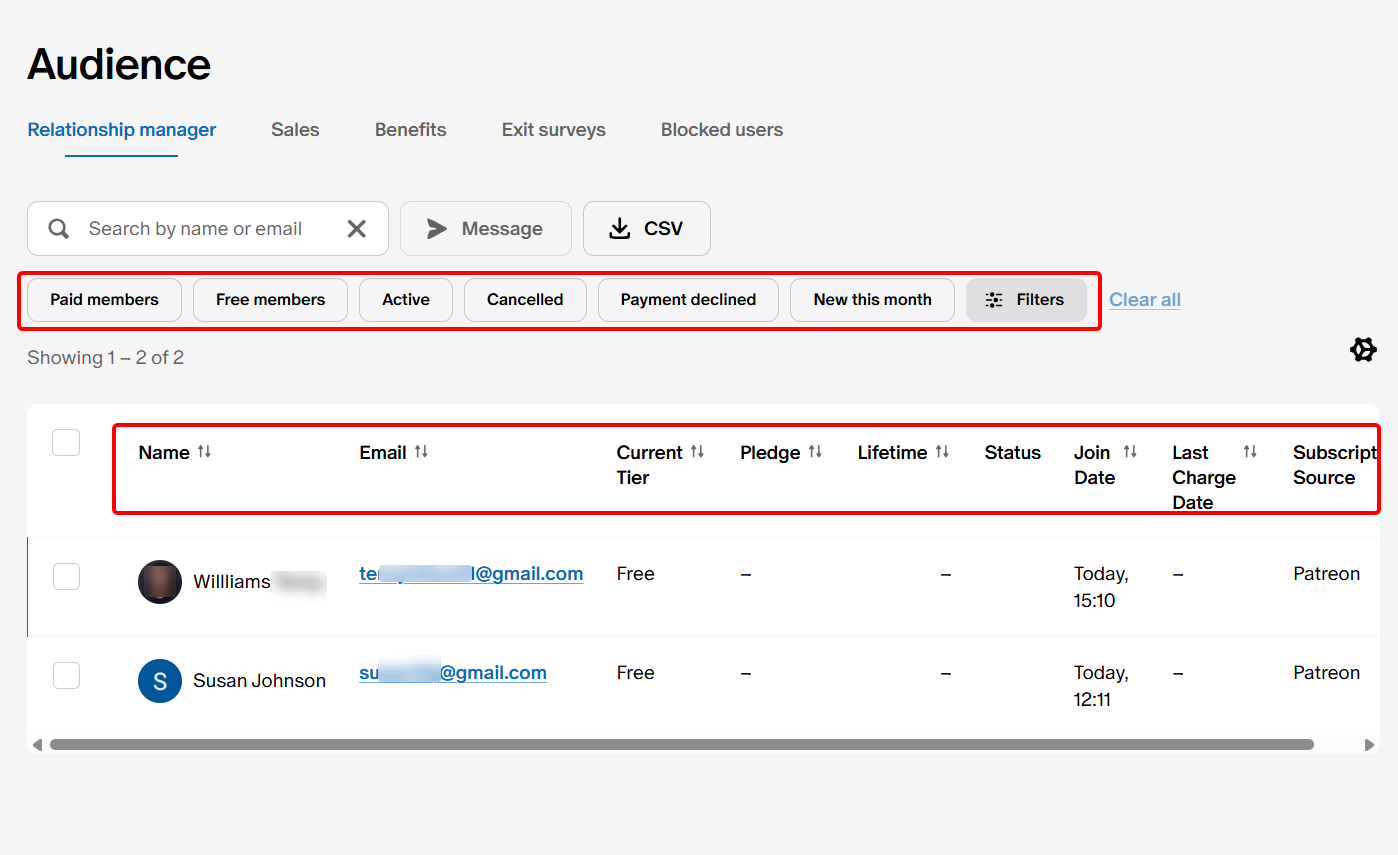
When you select a member, you can view their contact information, payment history, and much more.
Moreover, you can take actions like adding notes and messaging them.

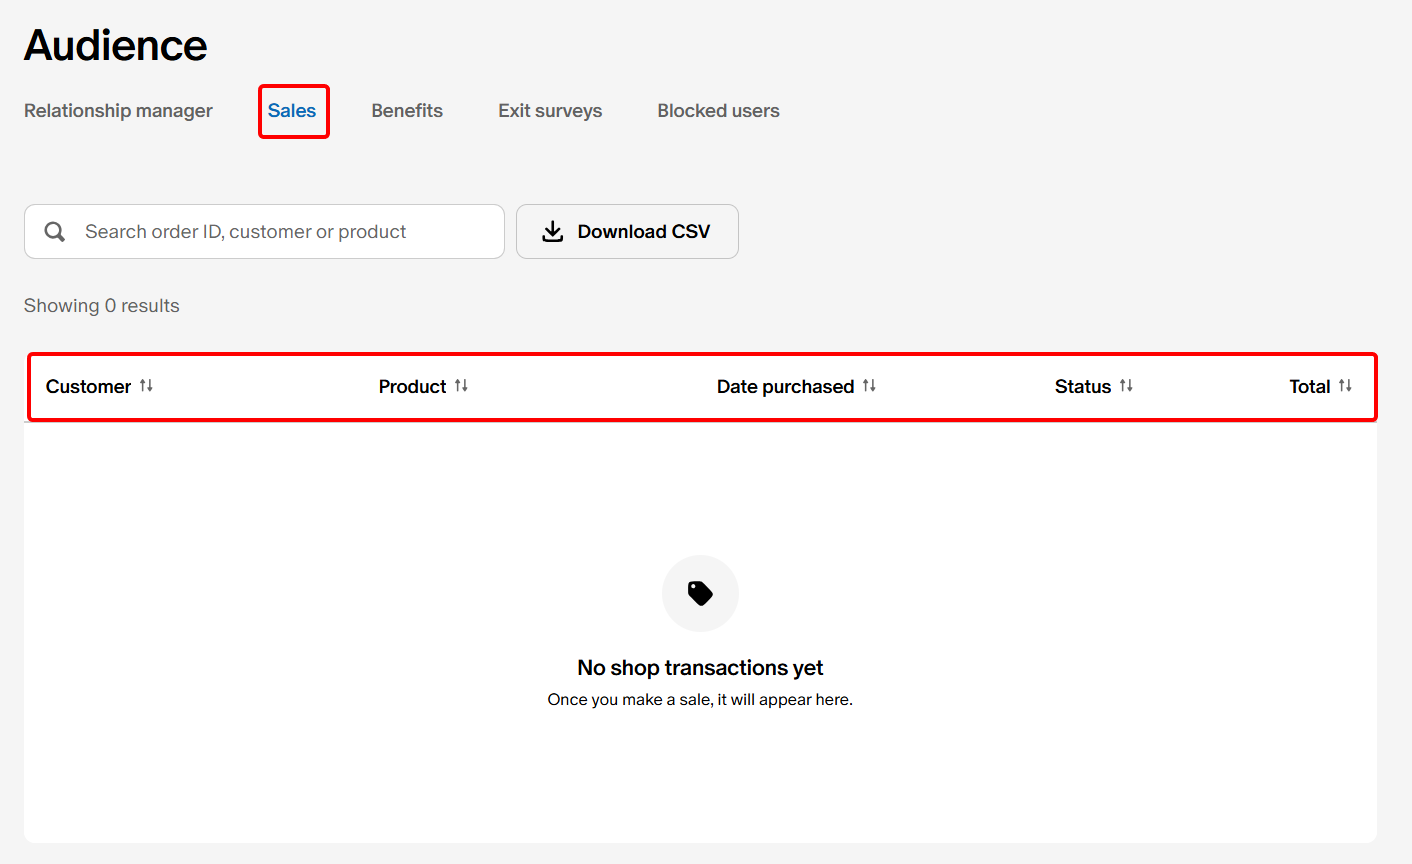
There is also the sales tab in the audience feature, where you can track the members’ transactions.
If there are existing transactions or sales, you can view the products your members purchased, the date of purchase, and the total sales.
2. Insights
The insights feature provides you with data about your members and earnings.
On this dashboard, you can track growth, understand member behaviour, and see which content works best with the help of key features and analytical charts.
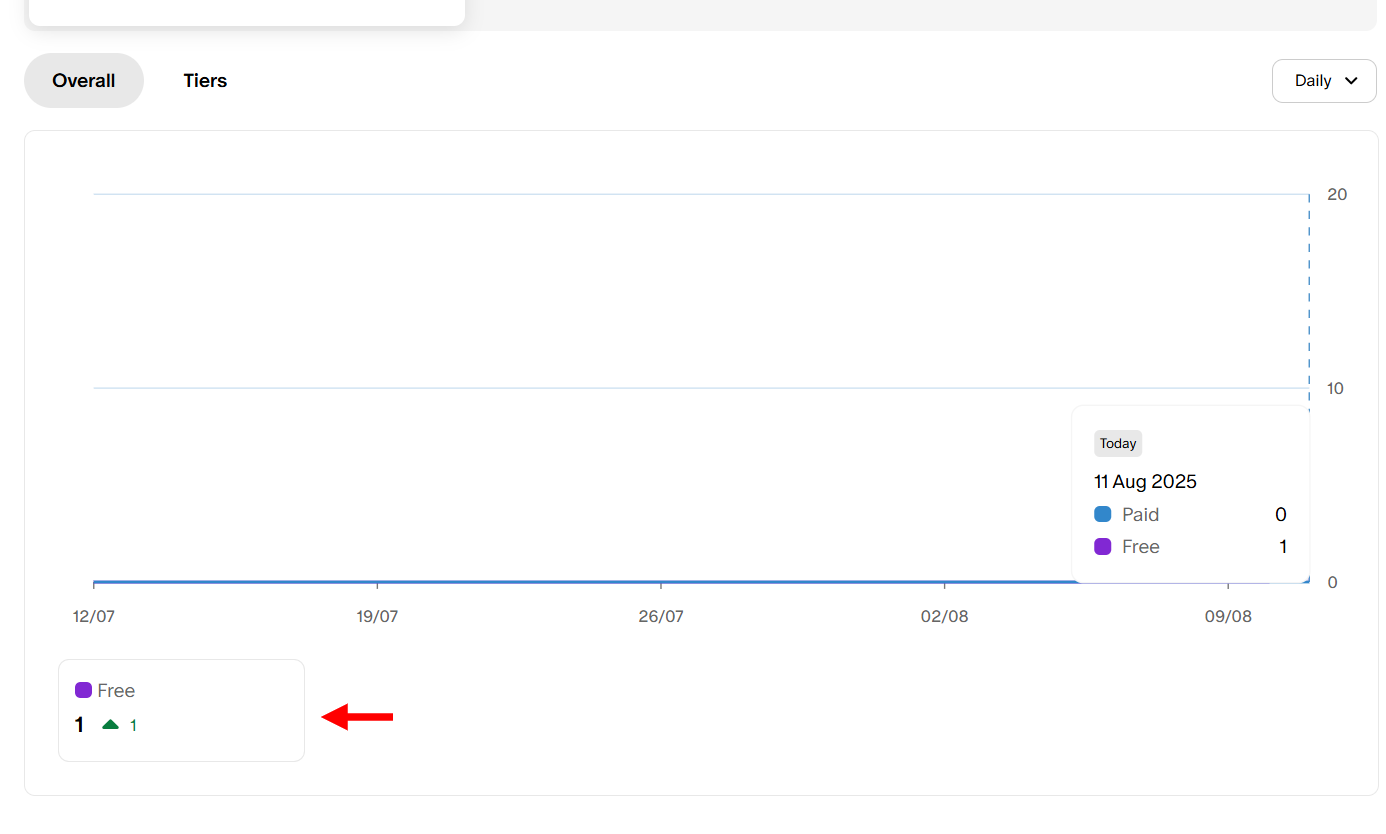
Within the insight feature, you have access to key metrics that show your members’ growth, such as active, new, and cancelled memberships.
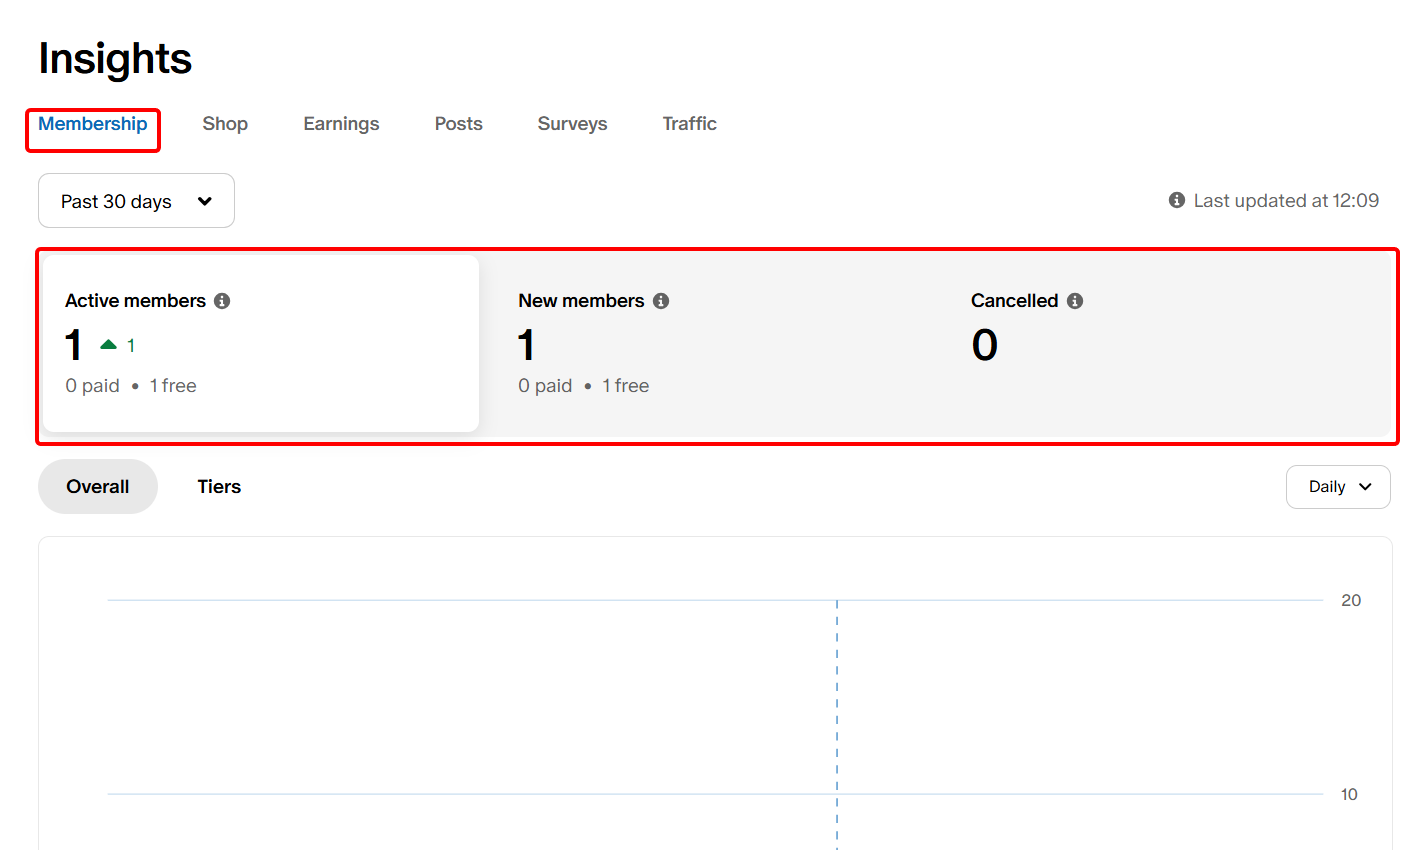
Also, the membership dashboard gives a line chart representation of your membership growth. For example, one member joined my community under the free tier on August 11.
You can also track your post engagements under the posts tab to view your content’s reach and conversions.

Best for
Creative small businesses that seek to gain recurring income by sharing exclusive content with loyal supporters.
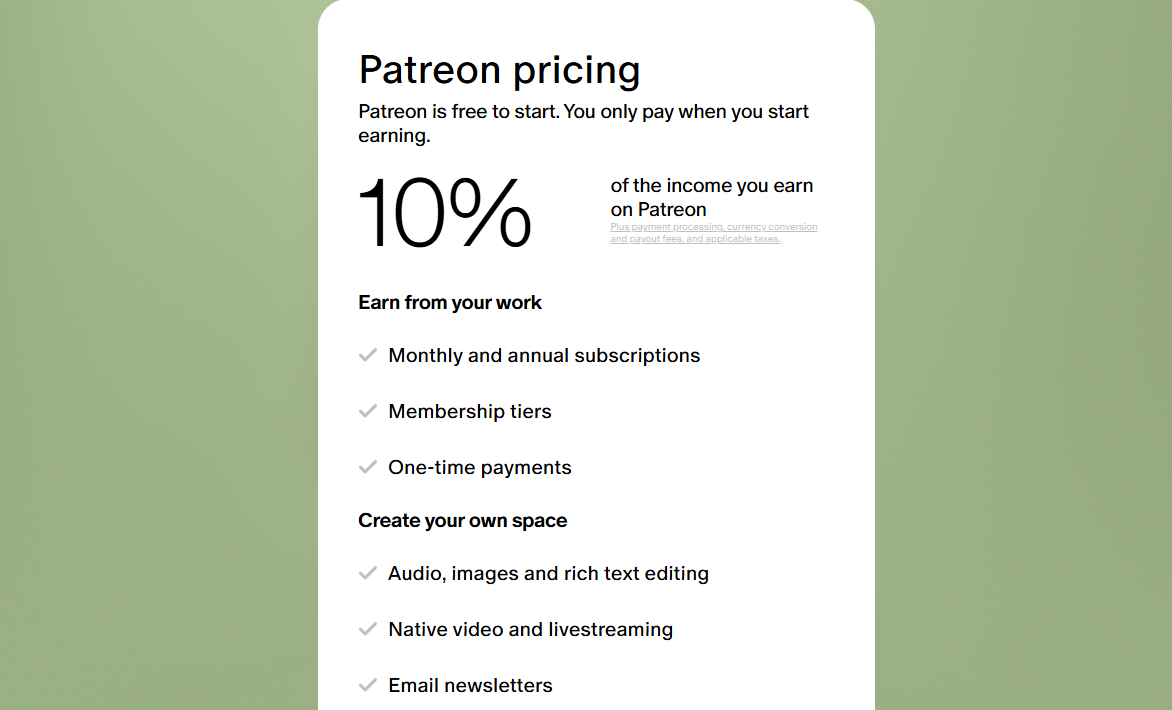
Pricing
- Default - Free until you start earning, then 10% transaction fee
4. Memberful
The next tool on our membership platforms list is Memberful, which targets creators and publishers.
Memberful has a plans feature, which allows you to build and manage plans by adding new tiers, specifying whether they are recurring, free, or one-time, naming each plan, and making them available to subscribers.
You can create membership-only content, like a Podcast or downloadable items. You simply upload the content file or URL, select the exclusive content, assign it to a membership tier, add gating rules, and set its control access for eligible members.
This platform comes with a members feature that lets you manage your subscribers. It saves the subscribers’ contacts or lets you add them manually. Then, you can view their subscription status, edit details, issue refunds, and create staff accounts with permissions.
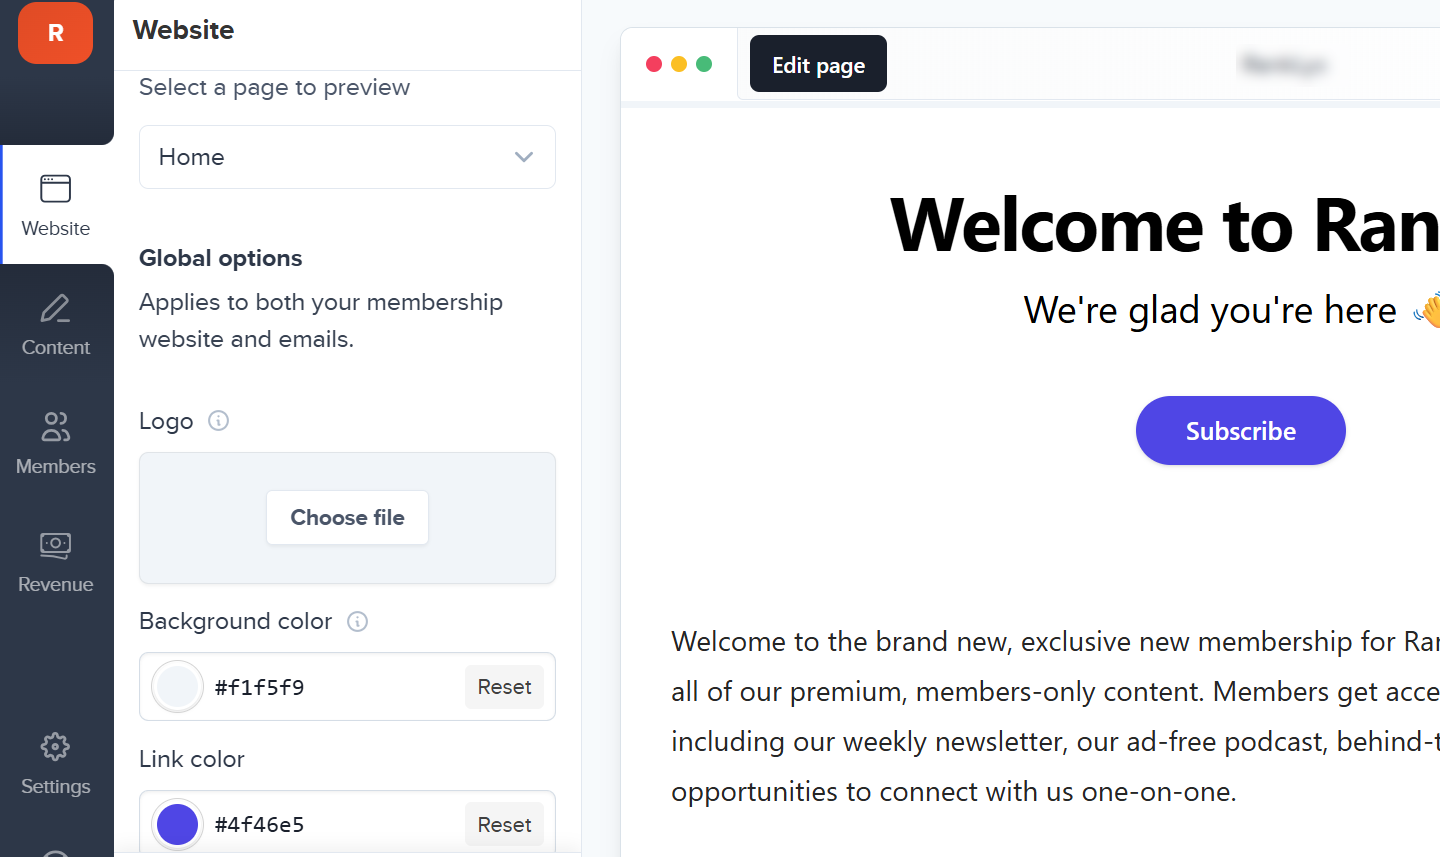
It does not end there. There is also a website feature for hosting your site. To set up your site, you can pick a layout, select a colour, add pages or posts, enable comments, and publish gated or open content.
Memberful’s plan is the core feature for membership, allowing you to create and manage membership tiers with specific pricing and access benefits.
It allows you to control who has access to exclusive content, downloads, and perks based on their subscription level.
Let me walk you through the plans feature and guide you step-by-step on how to set up a sample free trial plan.
To access the plans feature, head to the revenue section on the dashboard and select “All plans”.
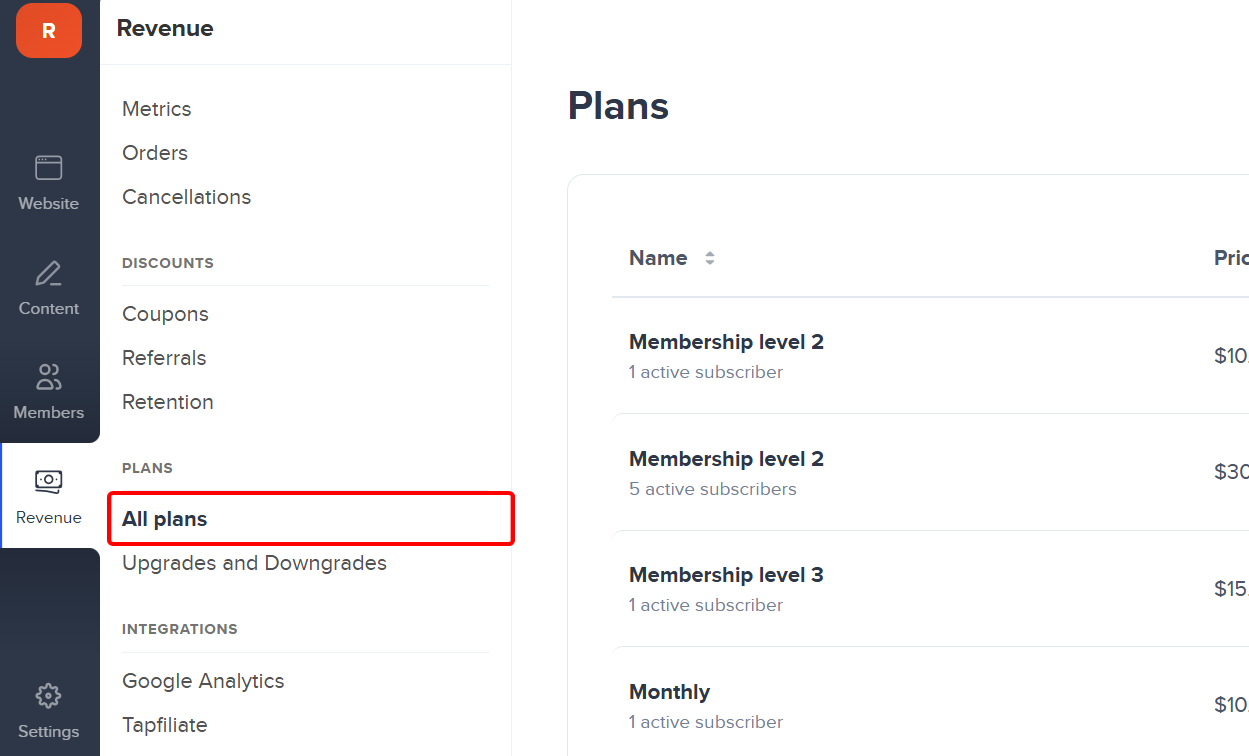
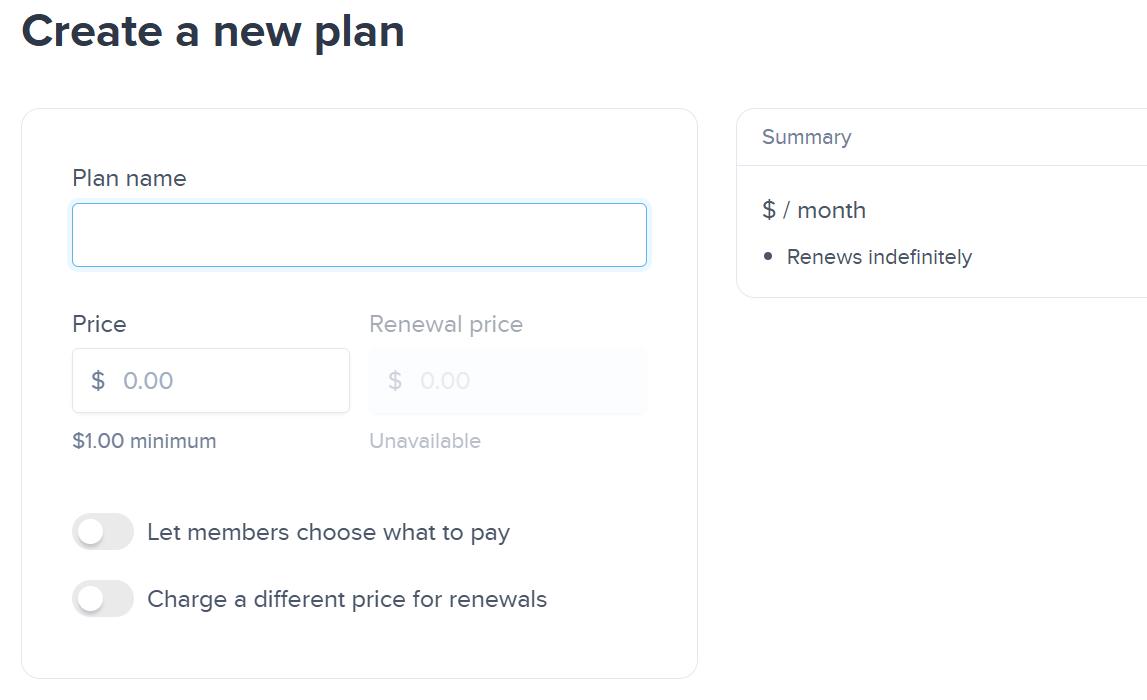
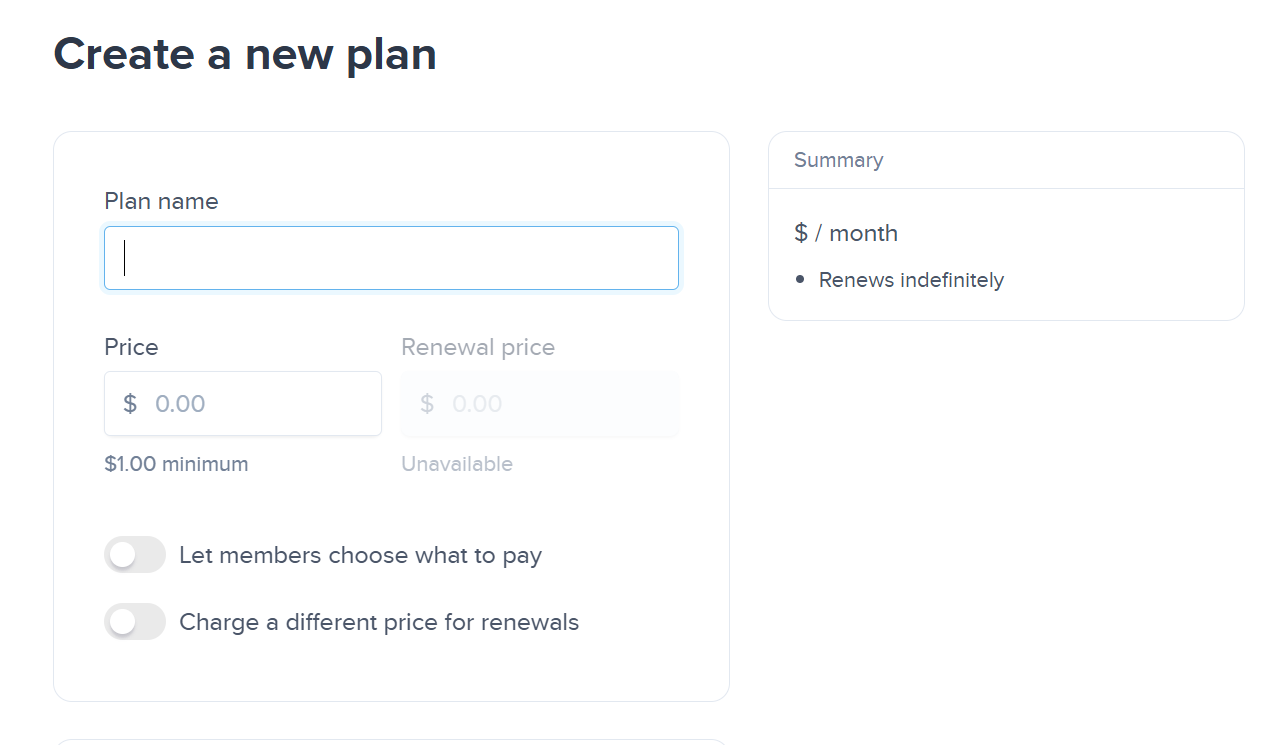
The plans section contains the existing plans and their availability. Select “New plan” to create another.
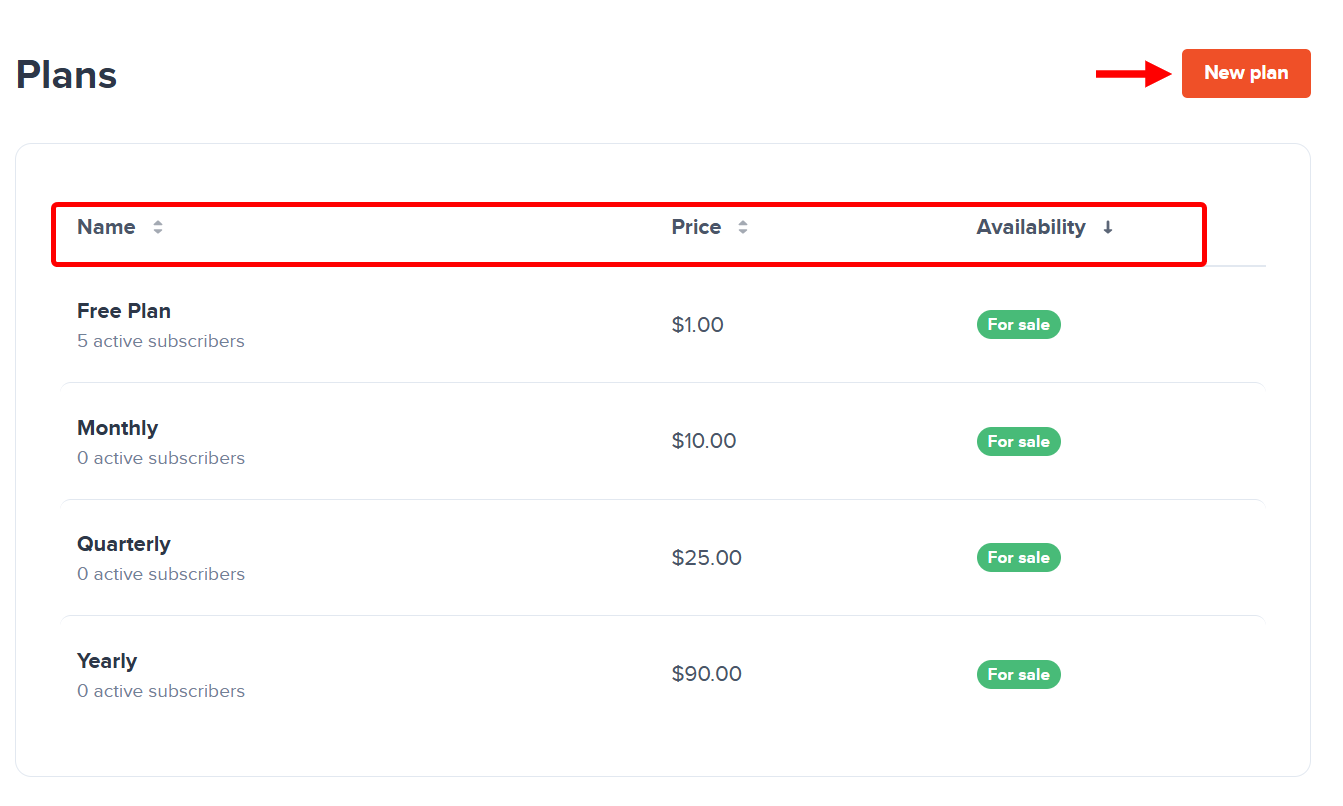
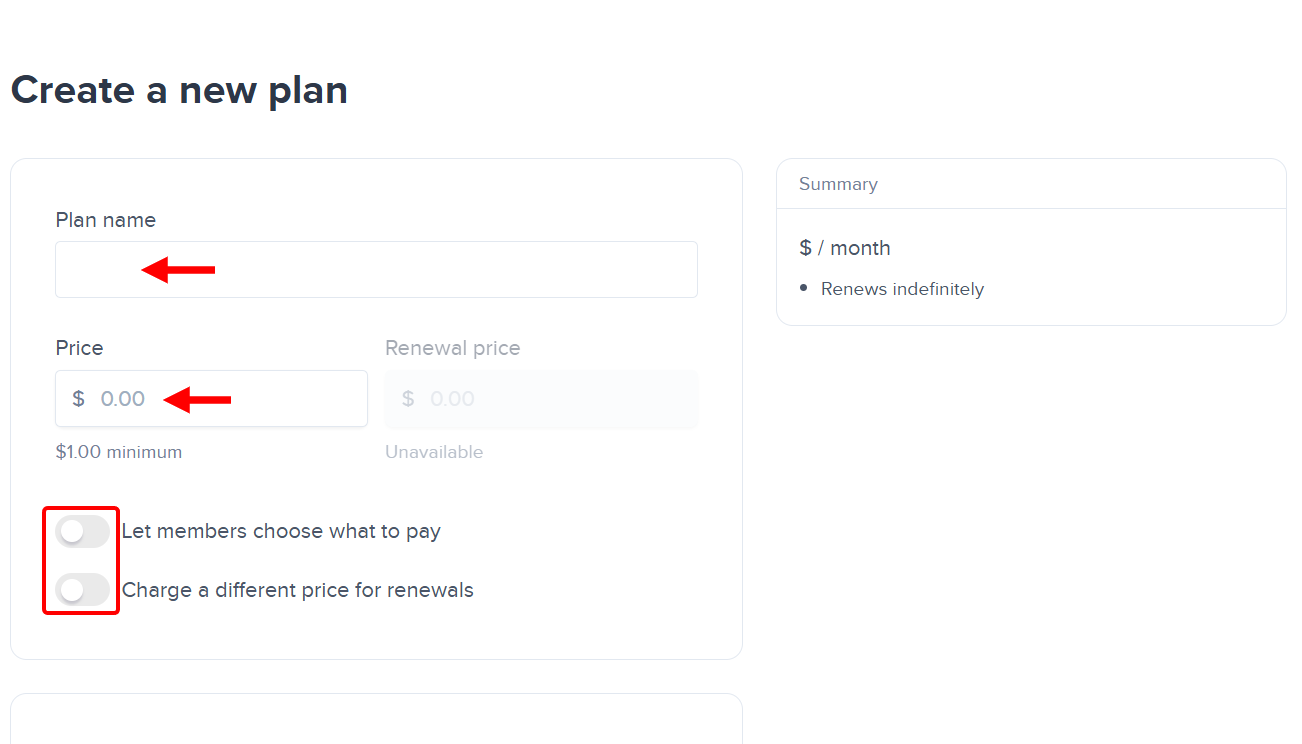
On the plan creation page, you can set a standard price or allow members to pay an amount of their choice and charge a renewable price. After that, name the plan.
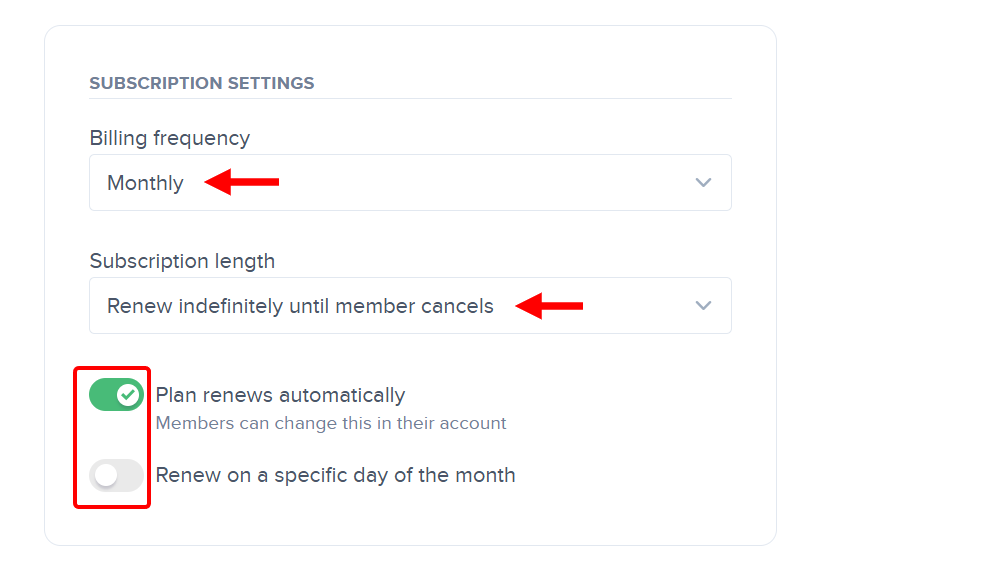
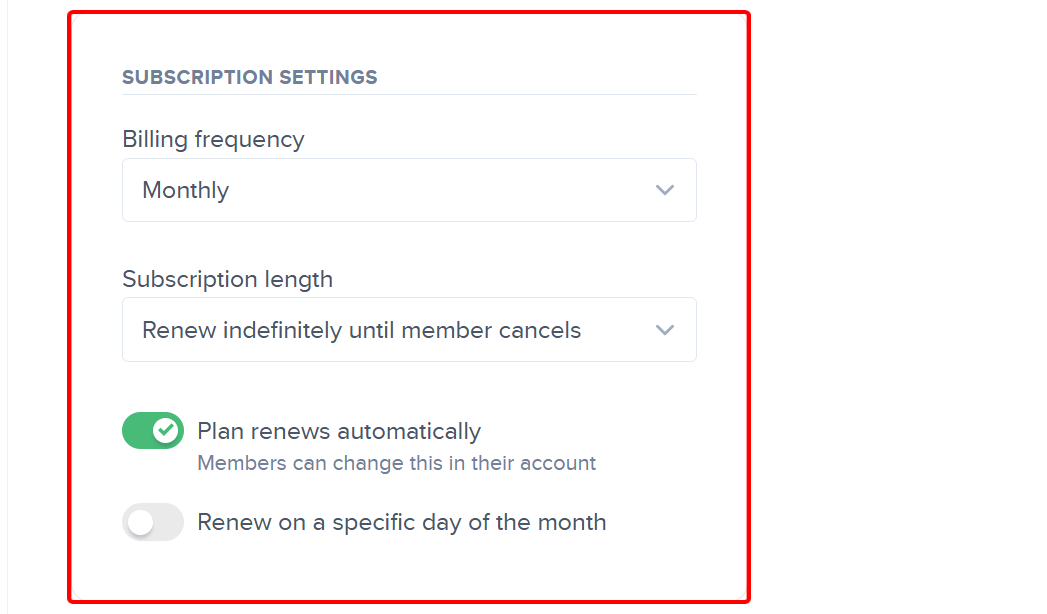
Next, go to the subscription settings, where you indicate the billing frequency (monthly or annual) and select its duration. You can allow the plan to be renewed automatically or on a specific day.
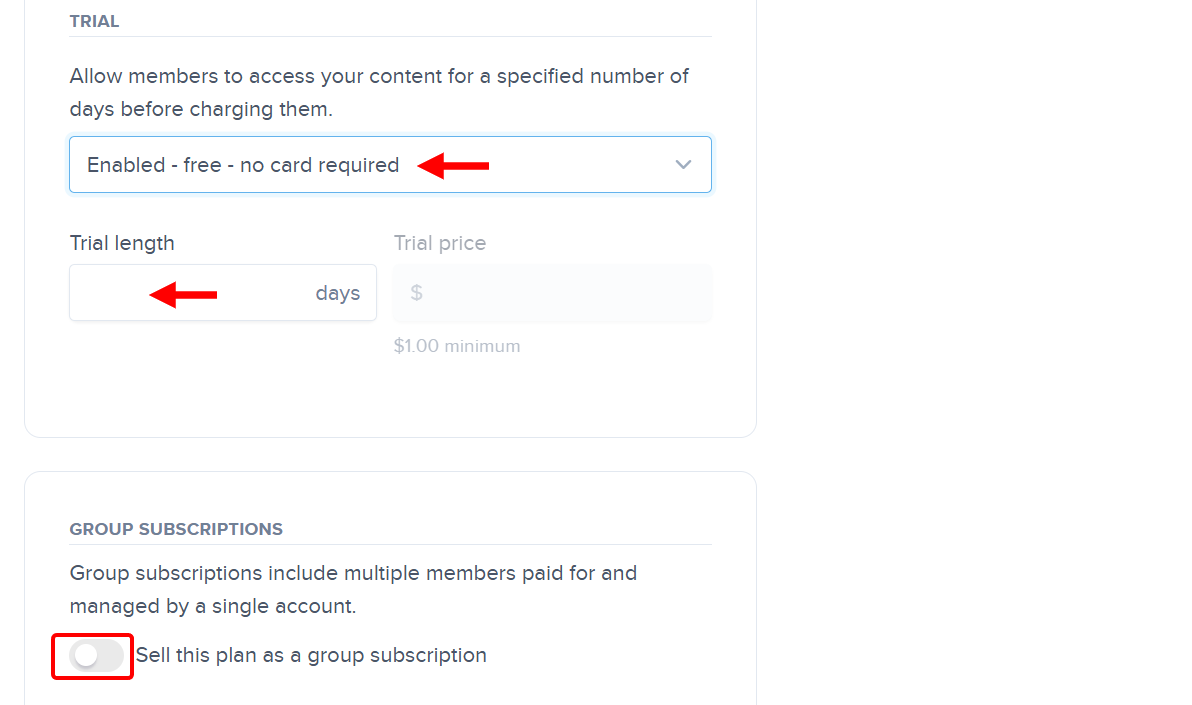
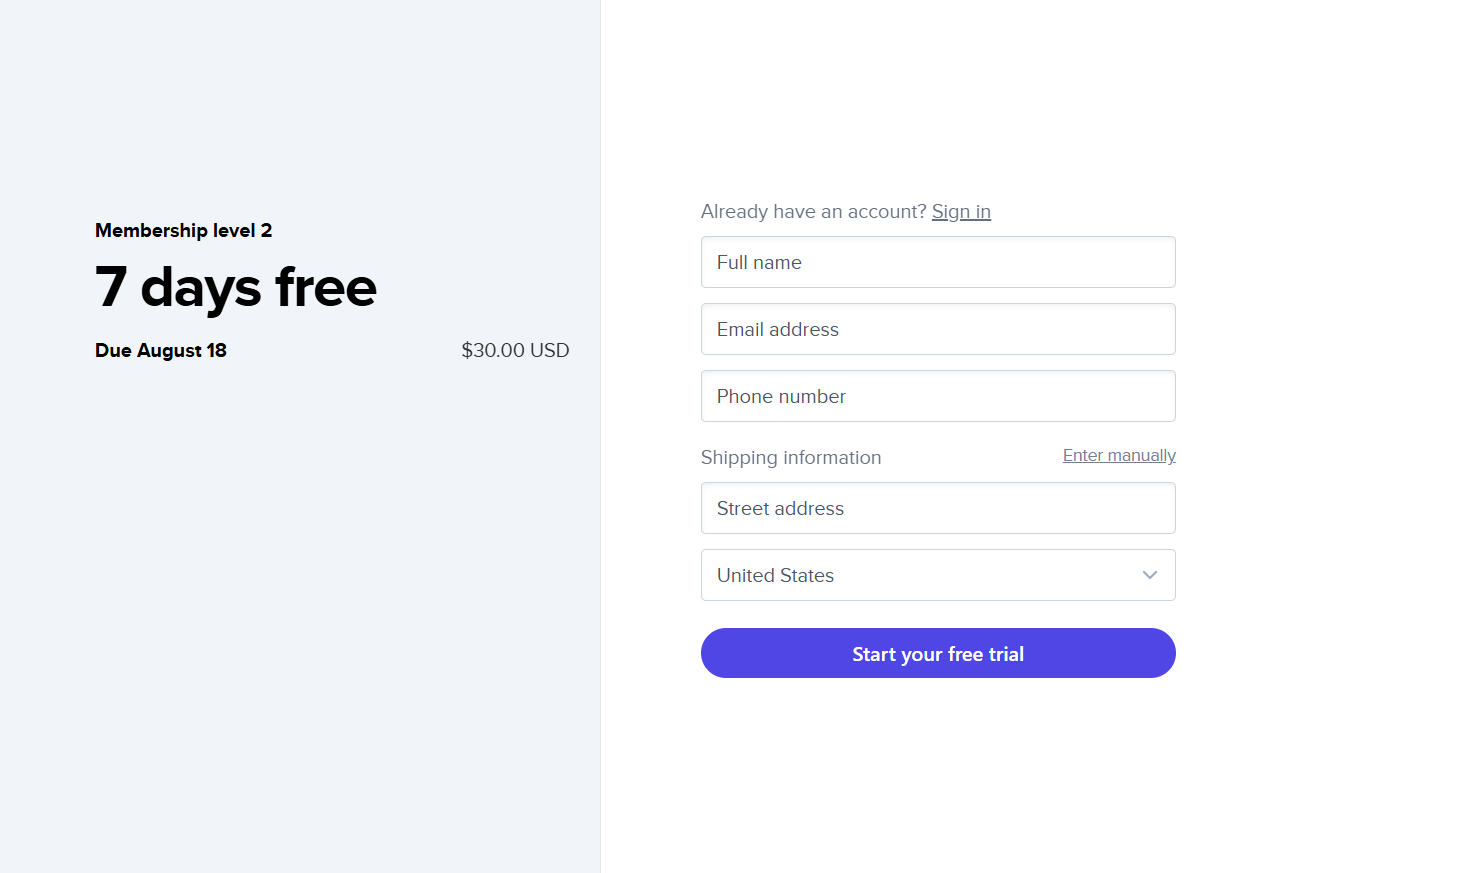
Next, scroll to the trial setup and indicate whether customers should have a free trial to the plan. Let’s enable the free trial that does not require a card and enter the trial period.
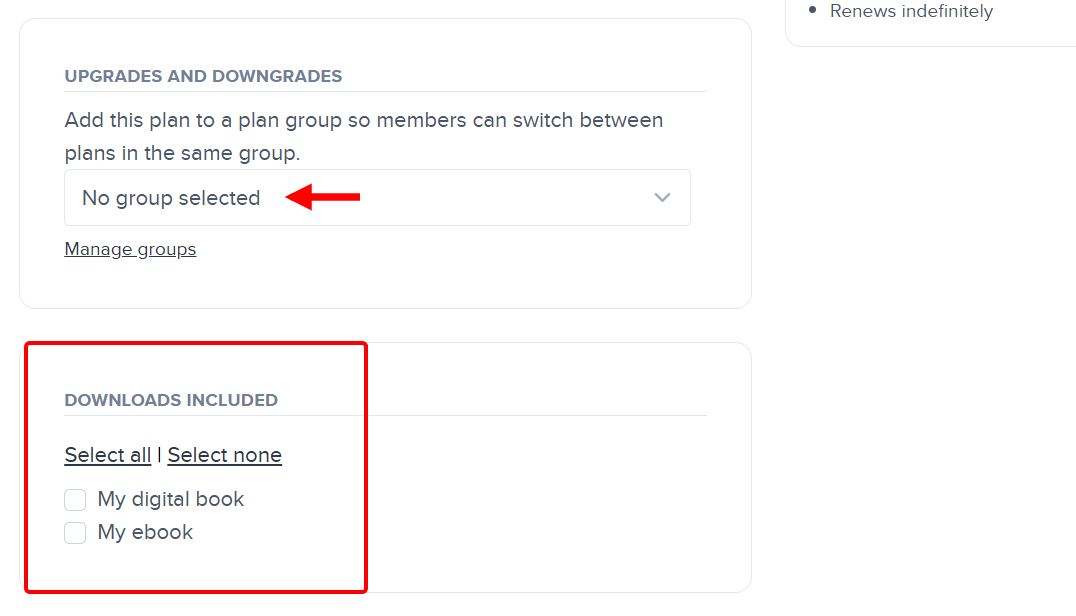
You can also make a group subscription plan.
More so, you can select the group to which you want to add the plan. Also, you can pick the downloadable content or products to be included in the plans.
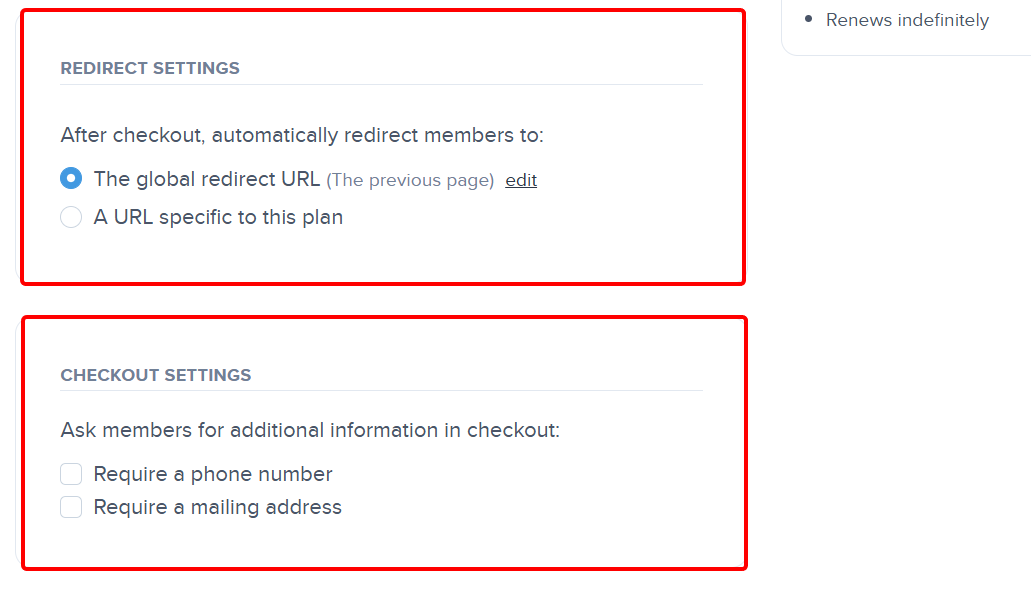
Scroll further to the redirect settings and indicate if your members are directed to a specific URL or the global one after purchase.
Also, you can require a phone number and mailing address at checkout.
Finally, make the plan available in the availability settings before you finish the plan creation.
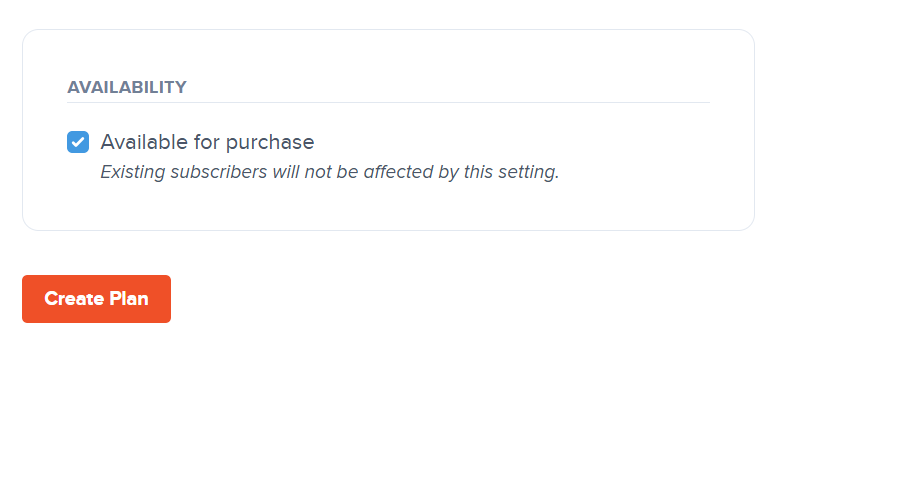
Customers can enter their details at the checkout before accessing the free trial or purchasing the plan.
Key features
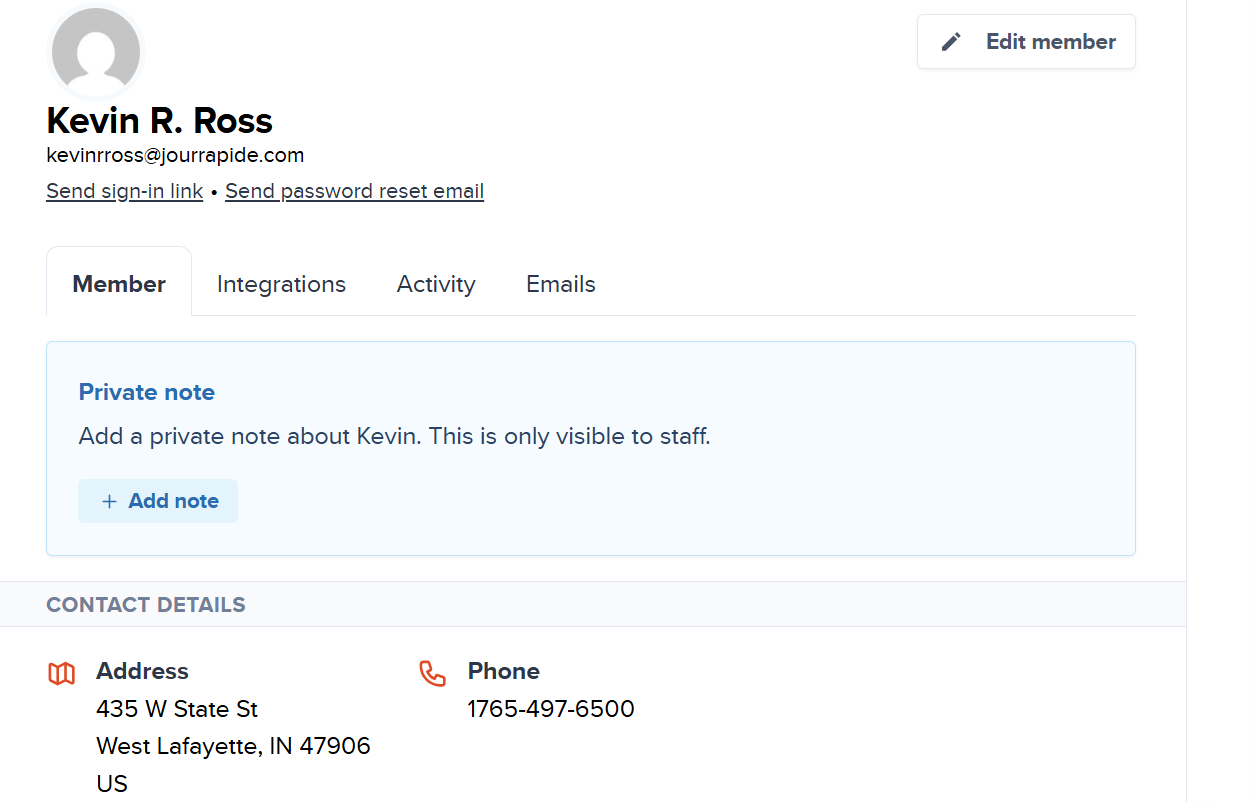
1. Members
The members’ space shows you all your subscribers in one place, where you can manage them. This page displays their details, subscription status, payment history, and activities.
Within the members feature, you can select a category, and Memberful will return a list of members that match.
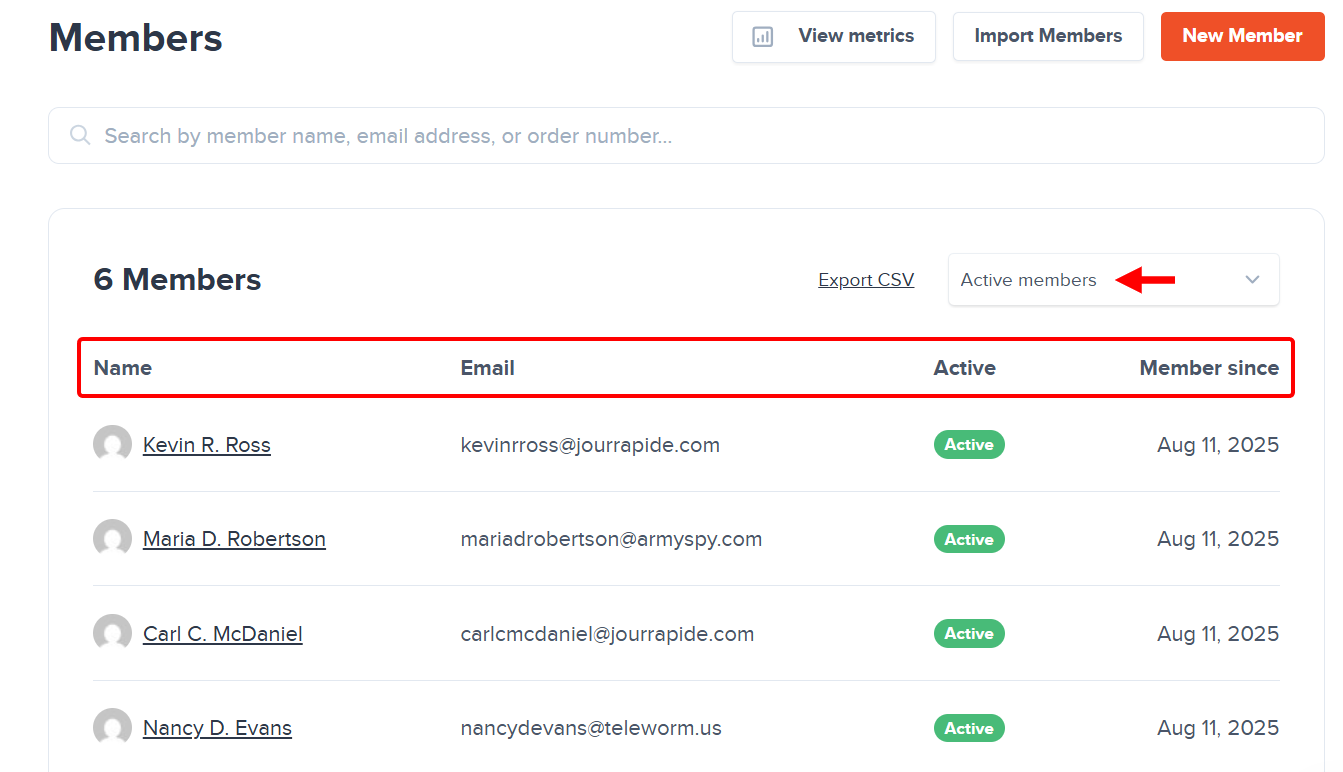
Click on a member to view their details, including their address, phone number, and stats, such as total spend and subscription status.
The platform allows you to edit the member’s details and add notes if necessary.

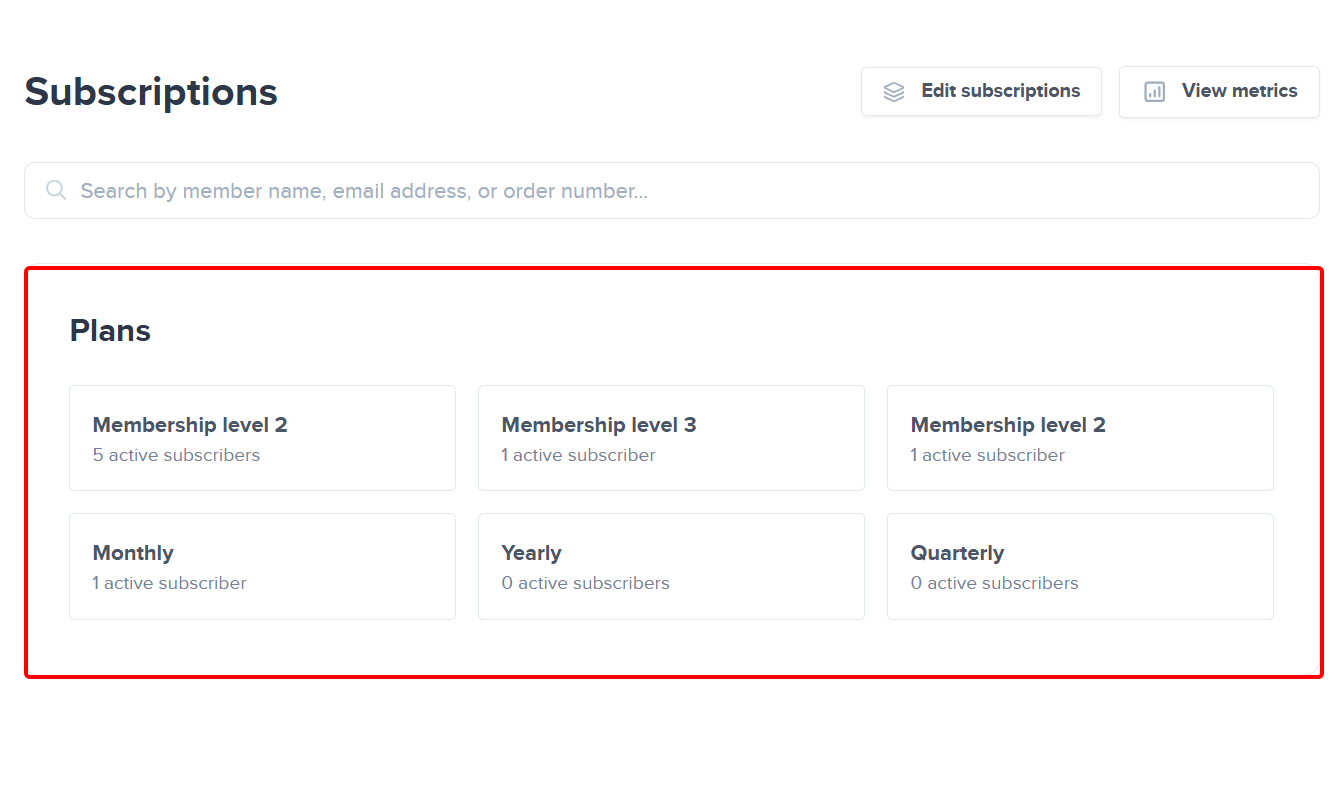
Within the members feature, you can access the subscriptions tab to view all your plans and the number of members each plan supports.
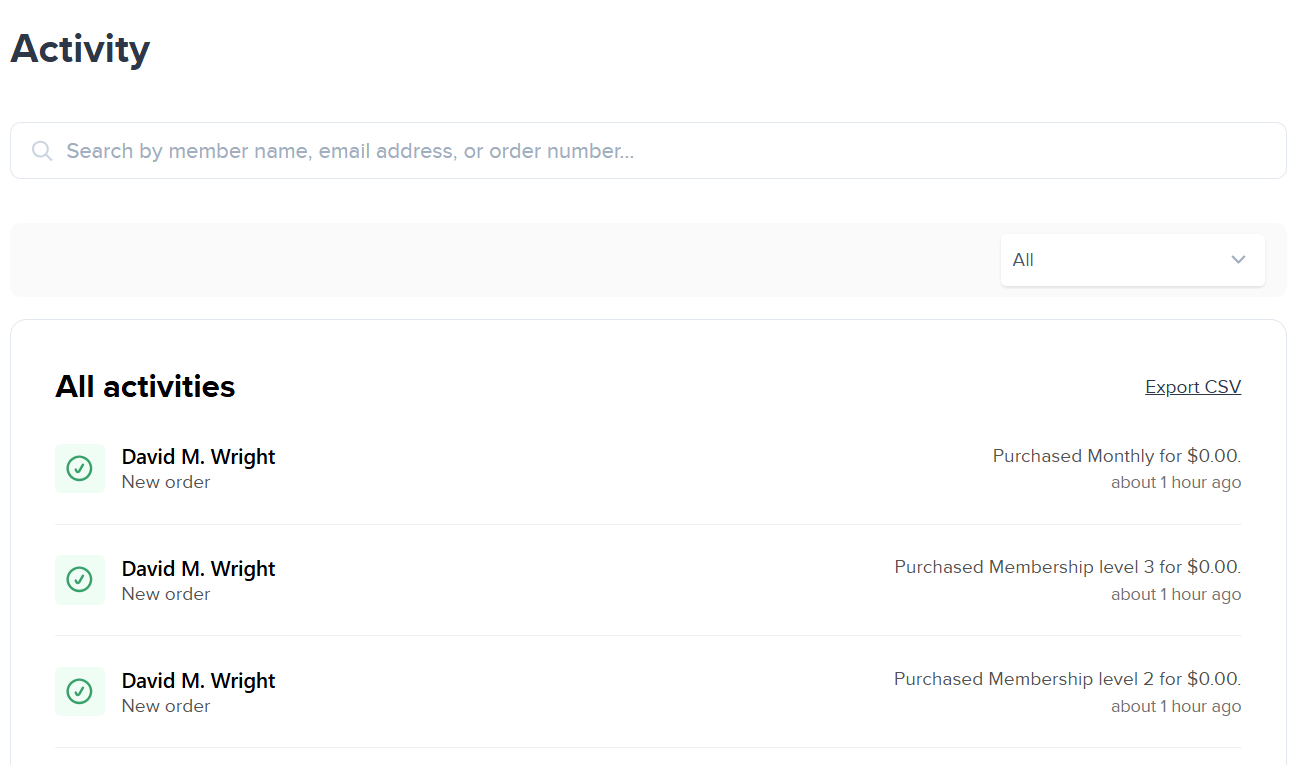
That is not all. You can also track your members’ actions with the activity tabs in the members feature. For instance, David purchased the tier 2 membership plan an hour ago.
2. Content
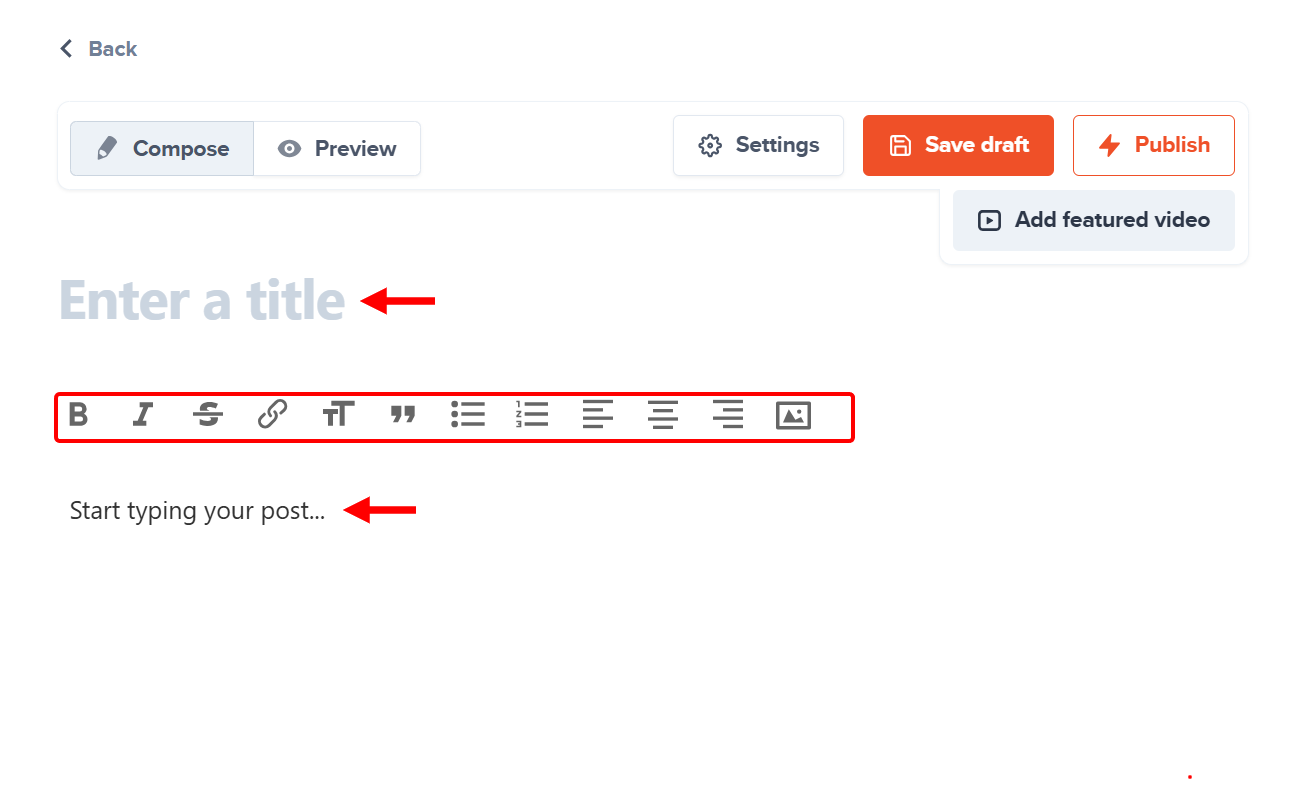
Memberful’s content feature enables you to engage your members by creating and managing exclusive content, including posts, newsletters, and gated pages.
You can publish this content directly to the Memberful-hosted website or send it via email to your members.
For example, you can use it to create posts by drafting the post’s title and content using the formatting toolbar.
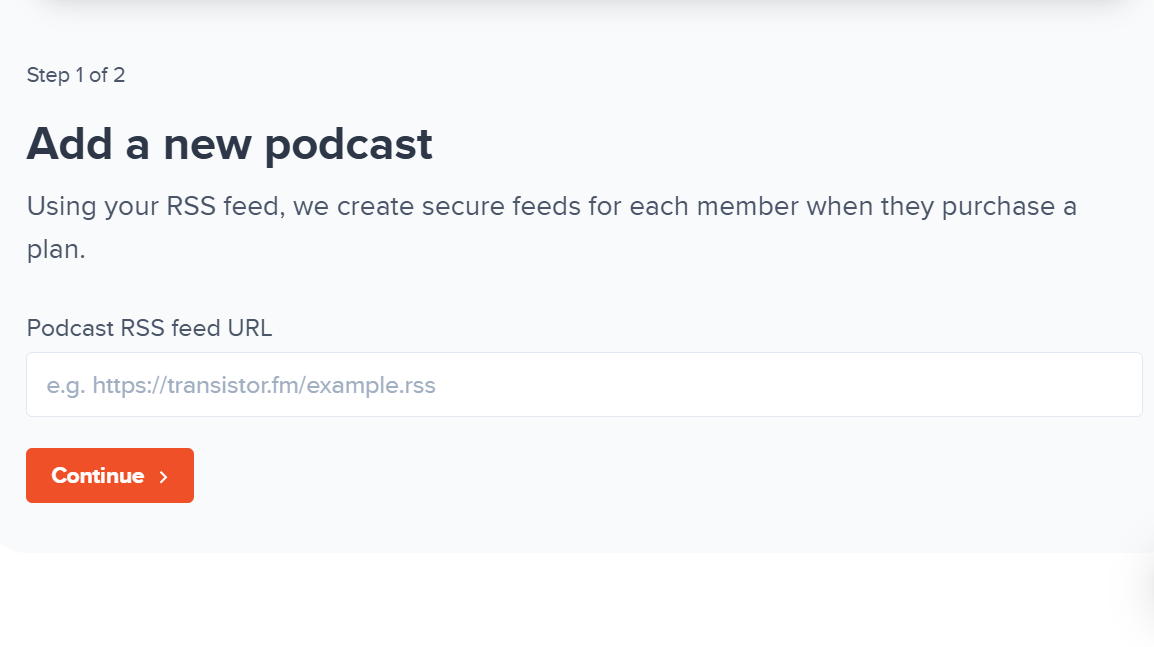
There is a podcast section for hosting your podcast content once you insert its URL feed.
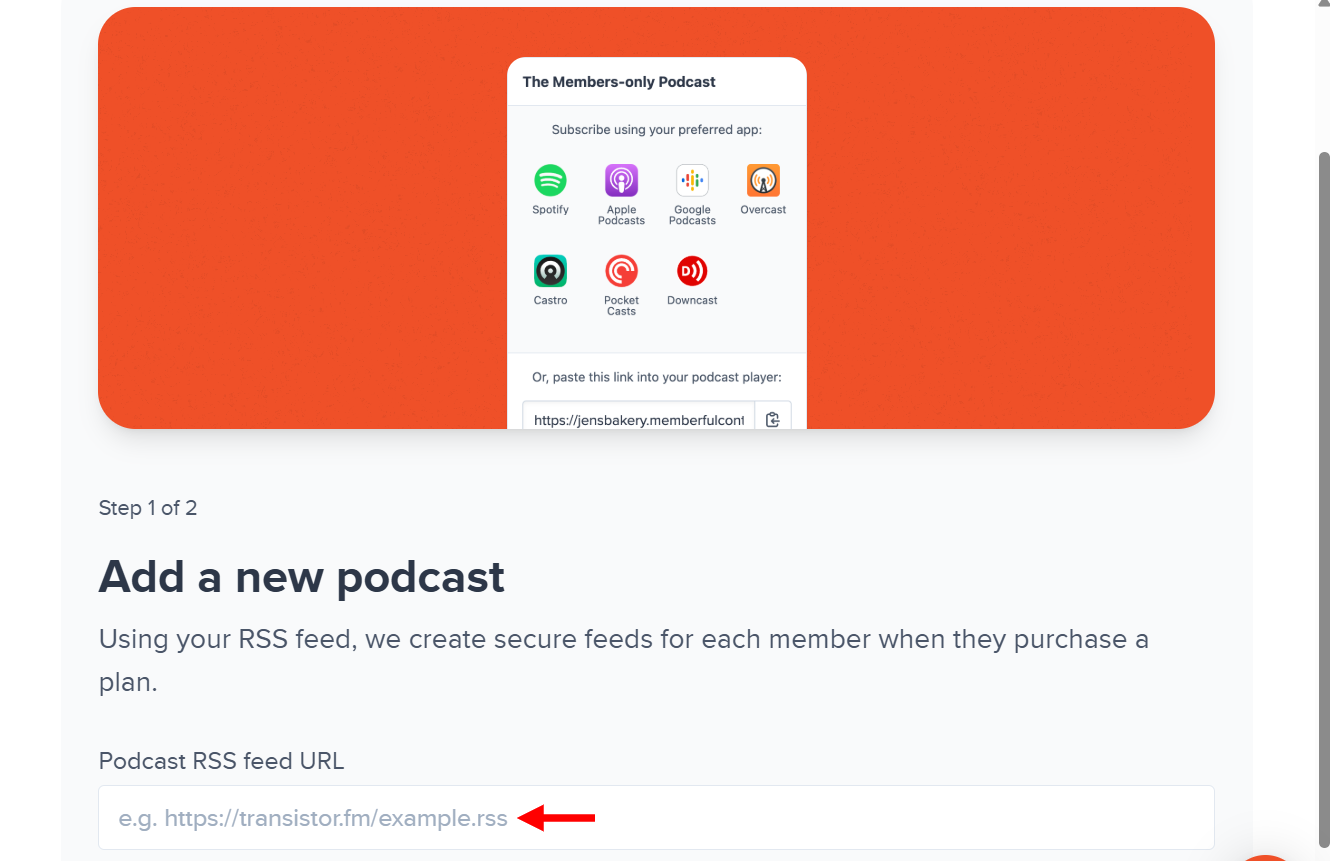
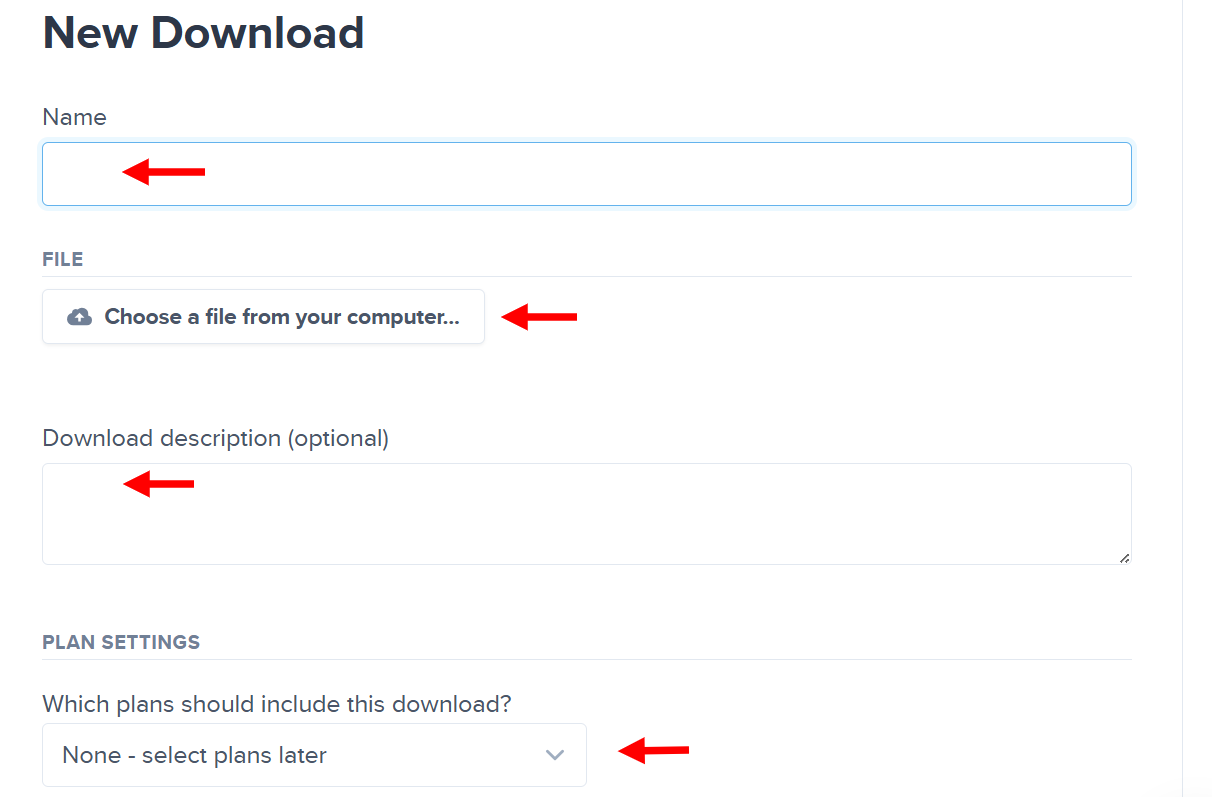
Moreover, you can create a downloadable file or content for your members. To create one, you upload the file, assign it to a plan, and describe it before giving it a name.
Best for
Small business owners who seek to sell and manage member-only content via a simple, recurring-revenue platform.
Pricing
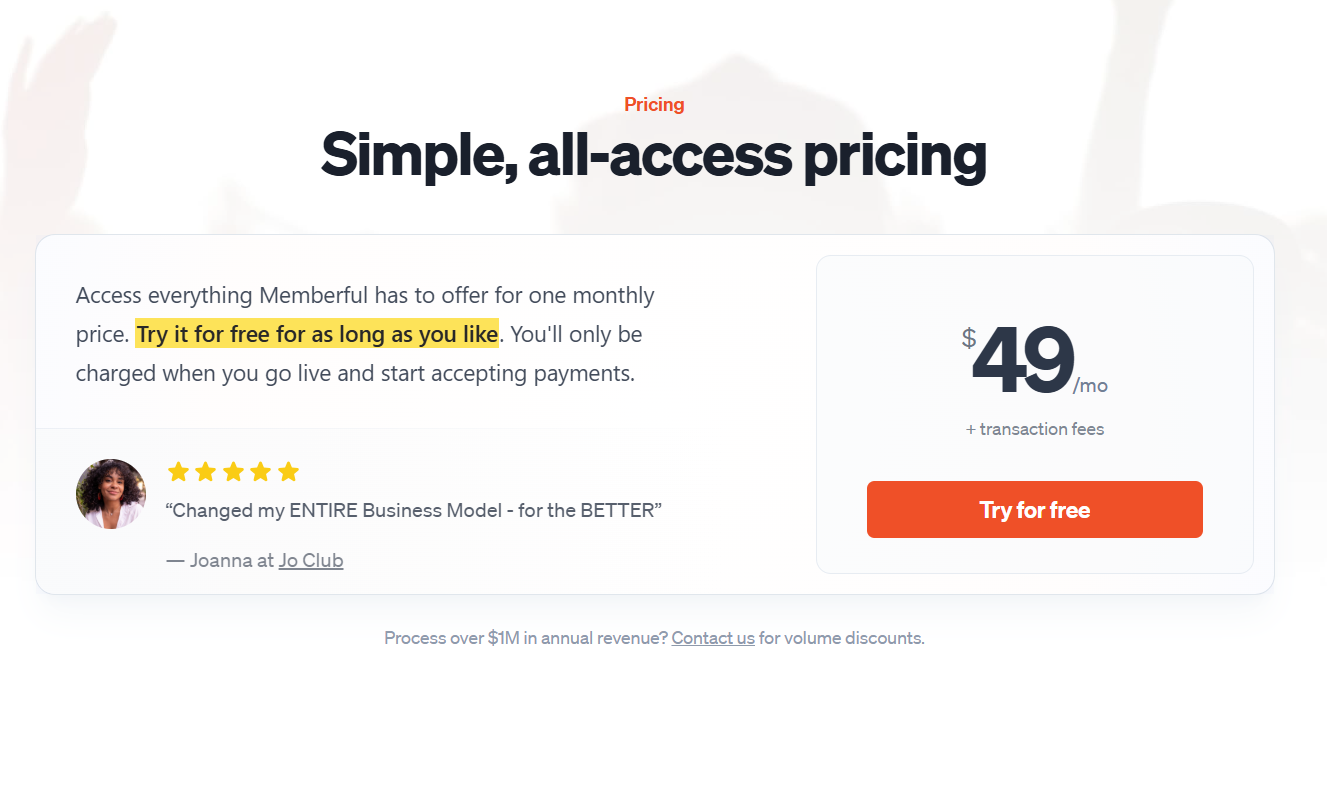
- Default - $49/ month + 4.9% transaction fees
5. Teachable
Last on the membership platforms list is Teachable, an online course platform that focuses on educators and coaches.
Teachable has a membership feature that allows you to set up a subscription plan by adding courses or digital products, naming the tiers, setting their monthly or annual prices, and publishing them as membership offers.
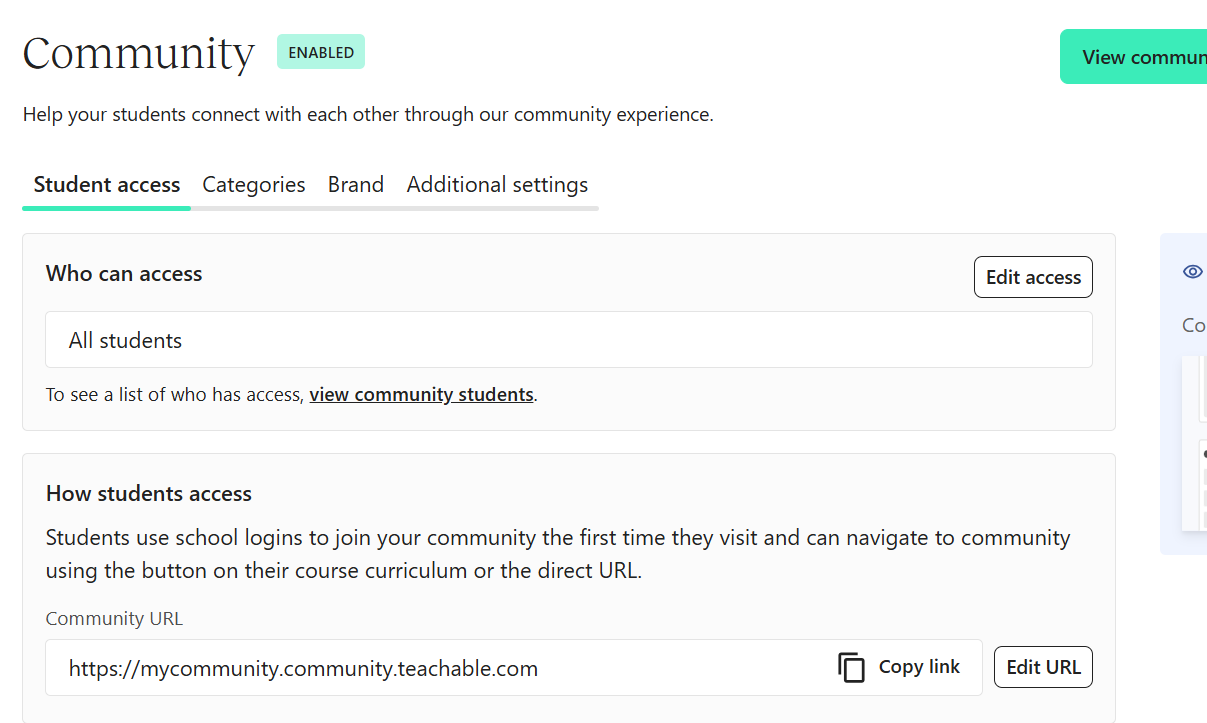
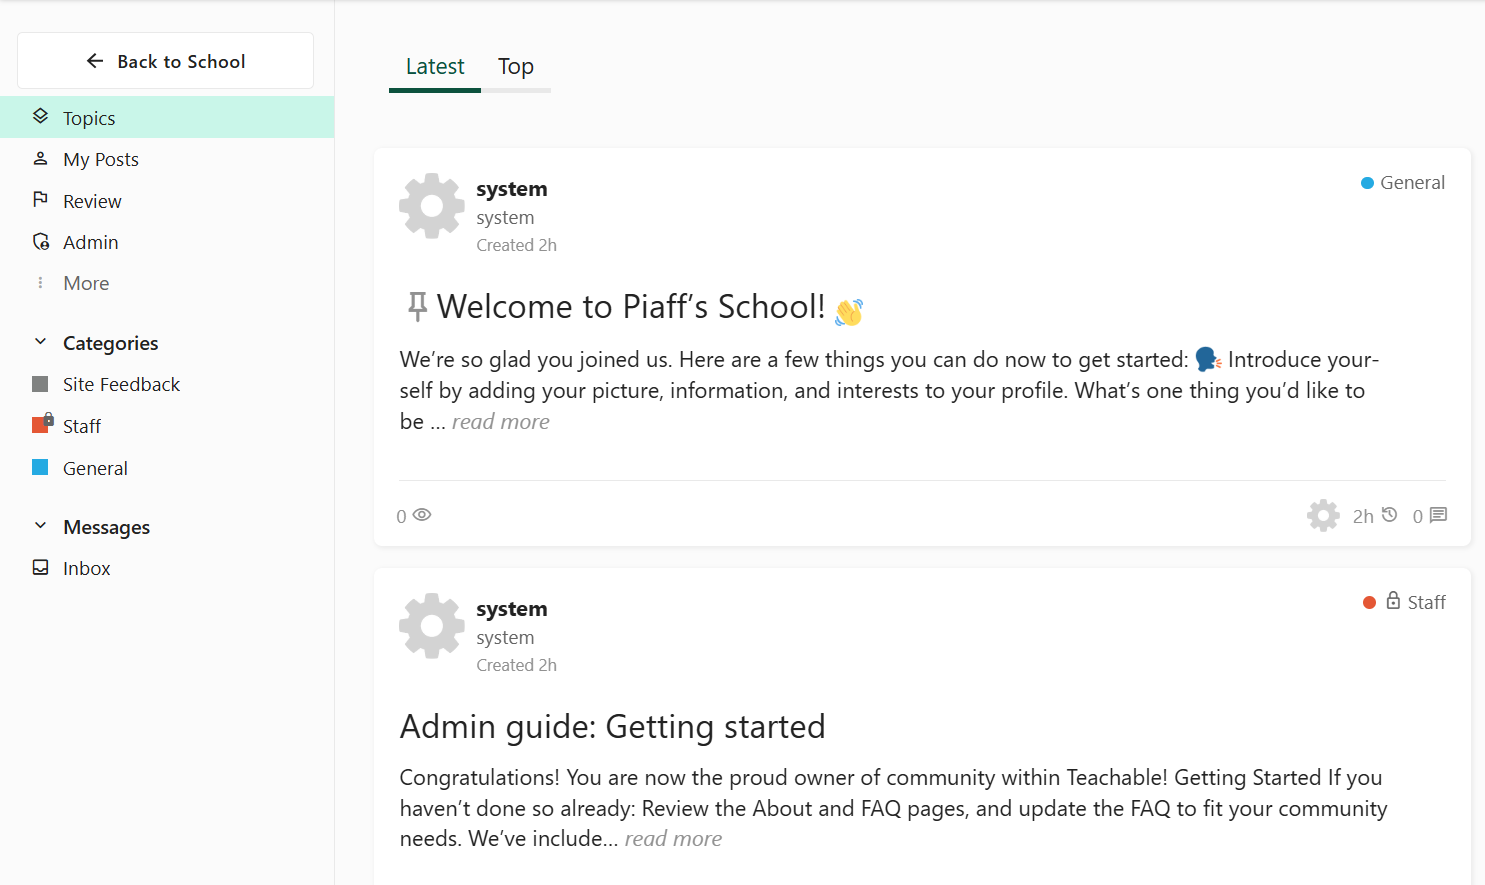
The community feature allows you to create a space for member engagement. To create it, you must enable the community tab, then create its category, set access, assign access per membership level, and publish its discussion areas.
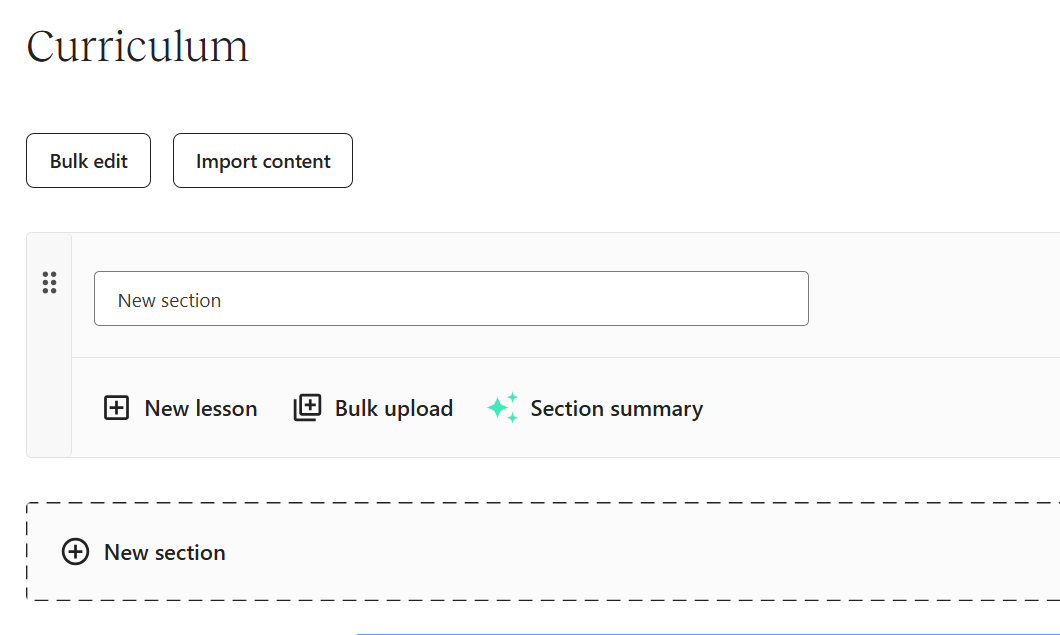
Teachable offers a course feature that enables you to build lessons. You simply add a new lesson, name it, and describe it, then add video or text lectures, and organize the curriculum.
Additionally, you can add lessons, set the pricing plans, and publish them for members to access.
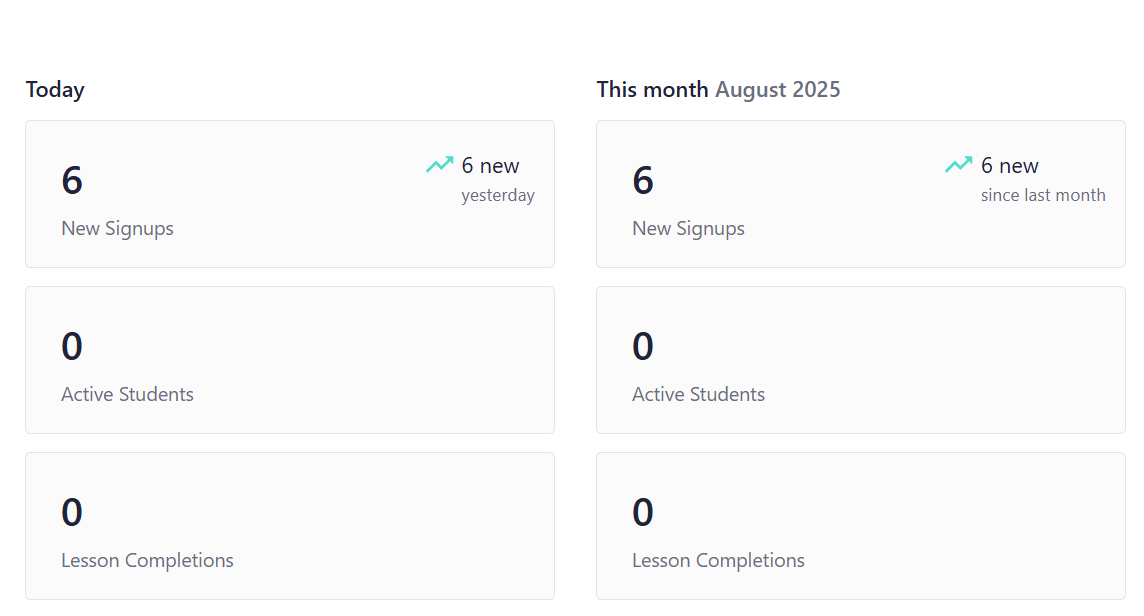
Furthermore, this platform lets you monitor performance and growth with the help of the dashboard feature. It showcases metrics like total sign-ups, active students, lessons, and course completions.
Teachable’s memberships feature space is where you sell access to your courses, coaching, or digital downloads for free or at a price. I can use it to create tiers that come with different pricing and benefits, offer a free trial, and provide multiple products.
Let me guide you through creating a membership plan in this section.
First, locate and access the membership feature on the main dashboard.
This takes you to the memberships section, where you can view existing memberships or tiers. Select “Create a new tier” to add a new membership.
On the membership setup page, enter the name for your new membership.
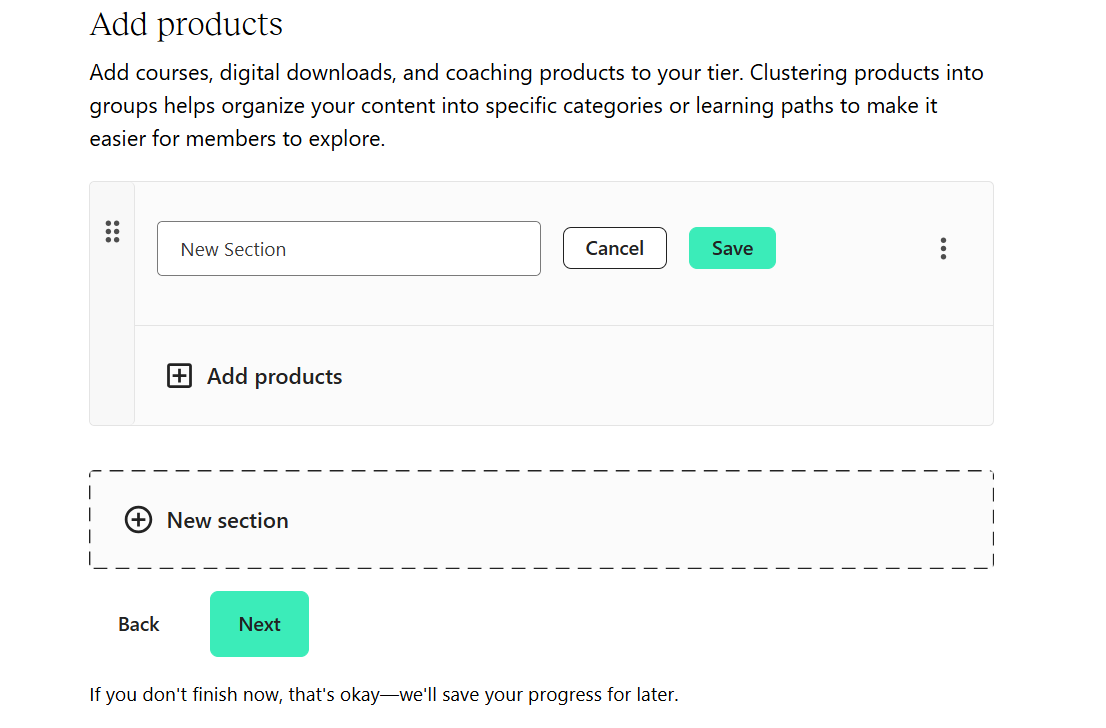
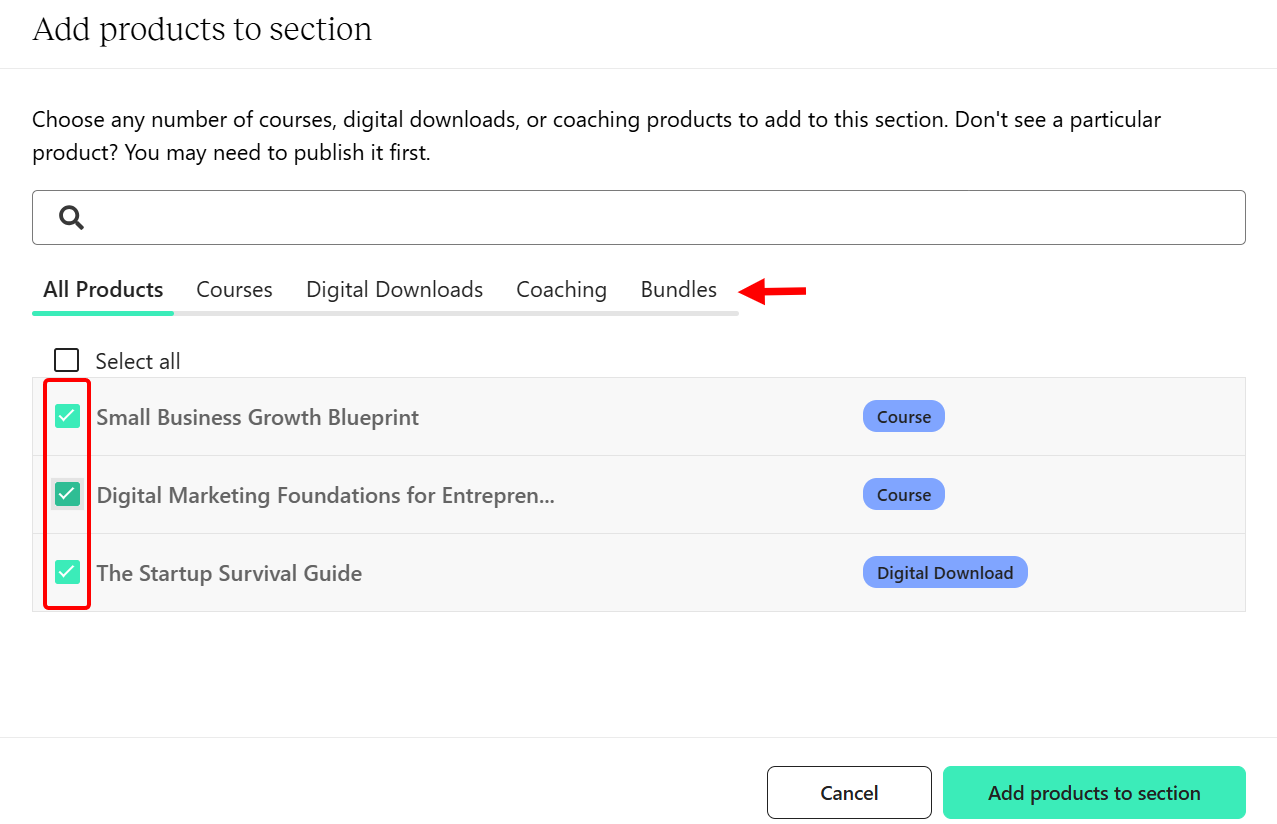
Next, add the products members will have access to in the membership, and name your collection or section of the products. You can add a new product collection by selecting “Add section”.
When you choose to add products, for instance, Teachable lets you select products from categories such as courses, digital downloads, and bundles.
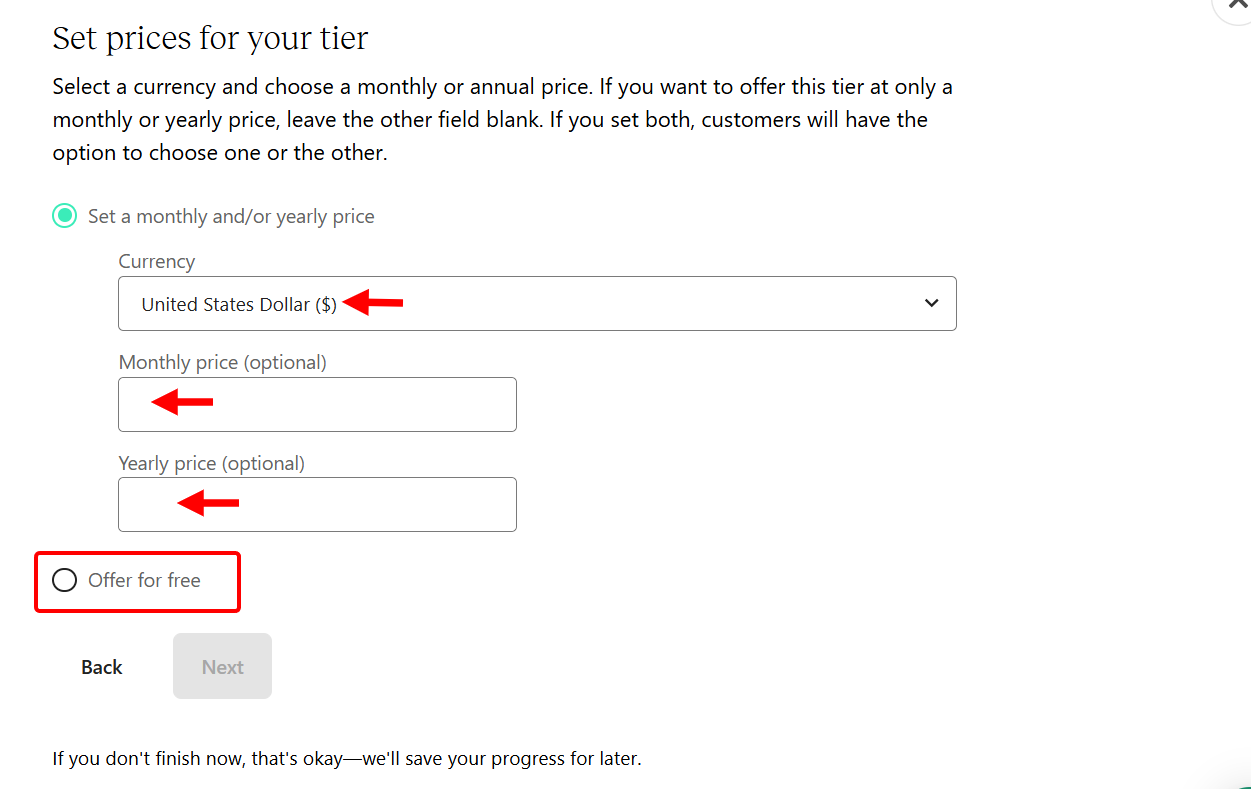
After the products section, set up pricing for the membership. You can choose to make it monthly, yearly, or receive it for free.
If you choose to make your membership a paid one, you will need to enter the monthly and yearly prices, and then select the currency.
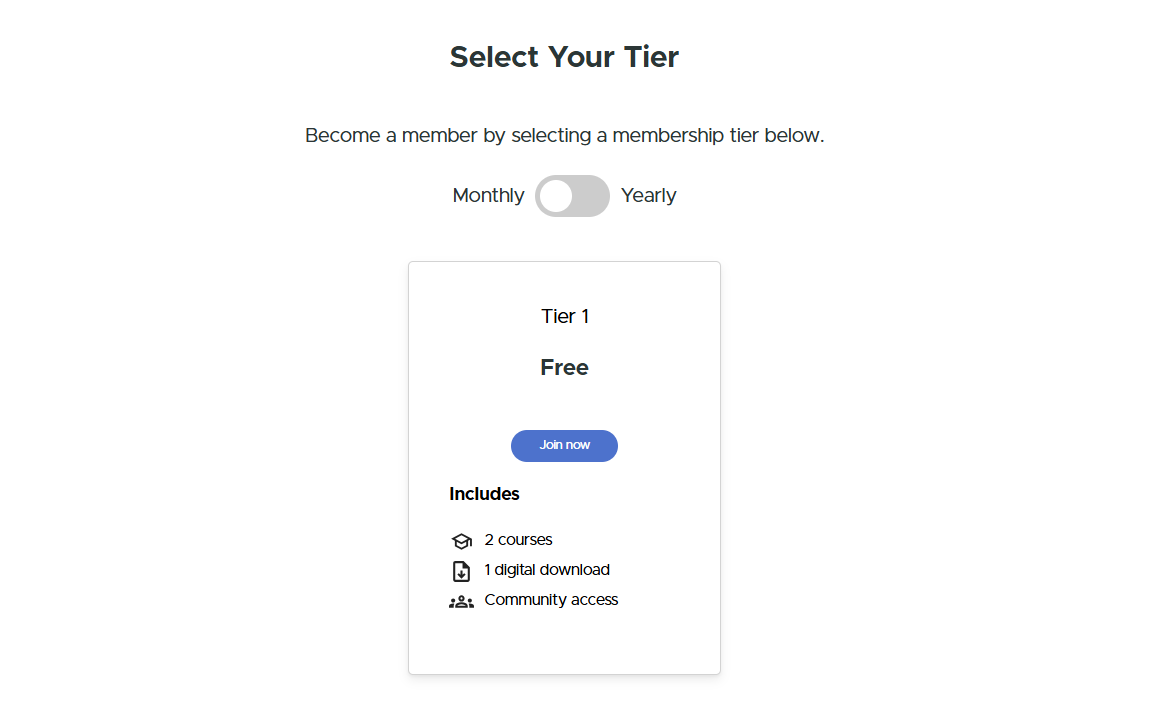
Buyers can view the membership details and choose a payment plan on your membership page.
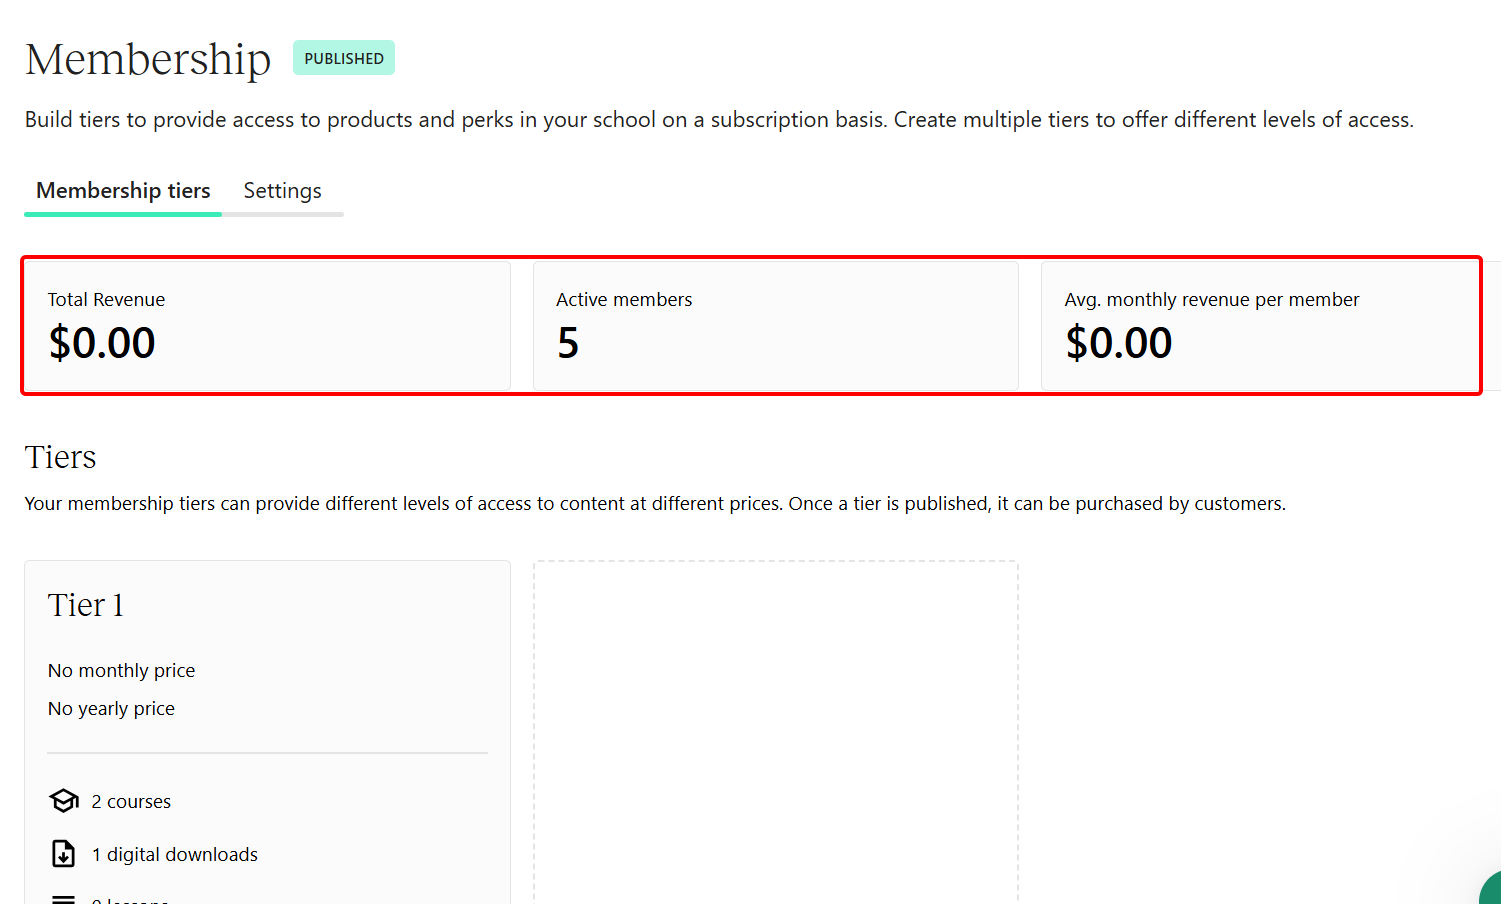
Additionally, you can track your membership’s performance on the membership dashboard. You can view the total revenue, the number of active members, and the average monthly revenue per member.
Key features
1. Courses
You can use Teachable’s courses feature to create and add structured lessons as part of a membership package. This feature allows you to bundle multiple courses into a membership plan and control which tiers get access.
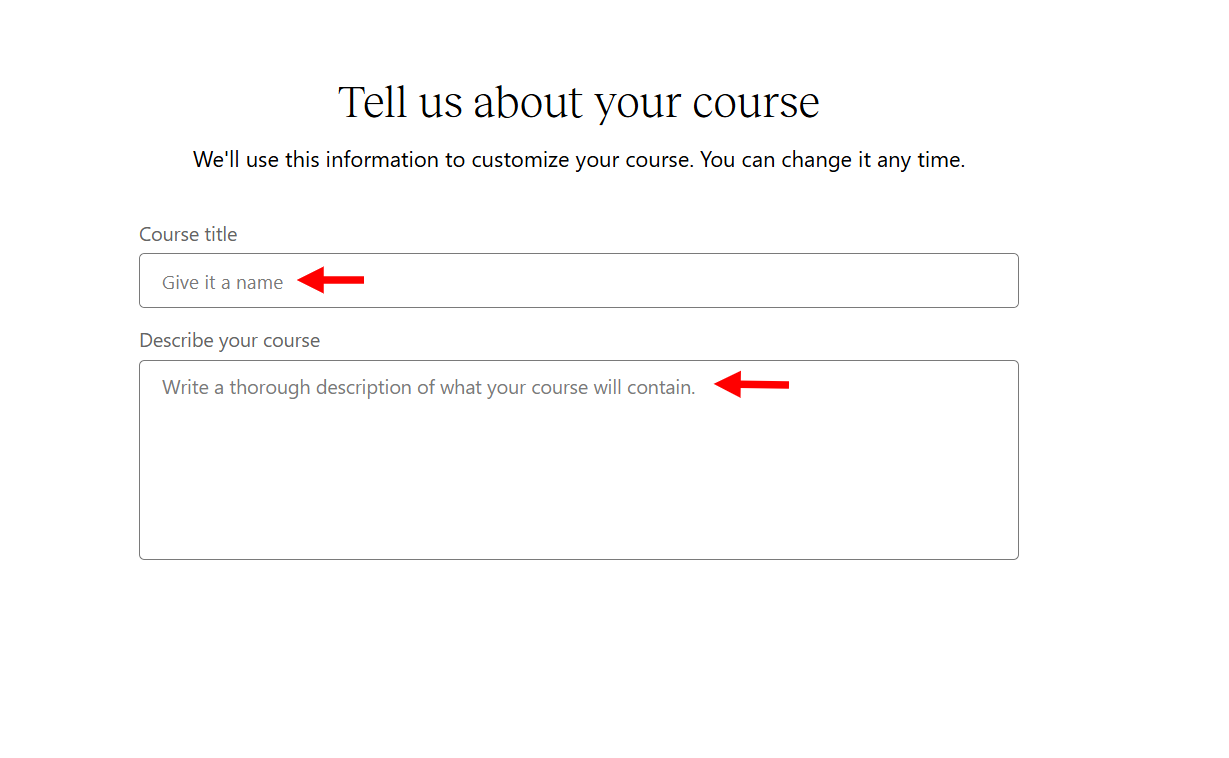
When setting up a course, you can describe it and provide a title.
Next, select the pricing type. I could be free, a one-time purchase, or a subscription. Once you choose the subscription type, you have to indicate the frequency, amount, and currency.
Also, you have to name the pricing plan and describe it.

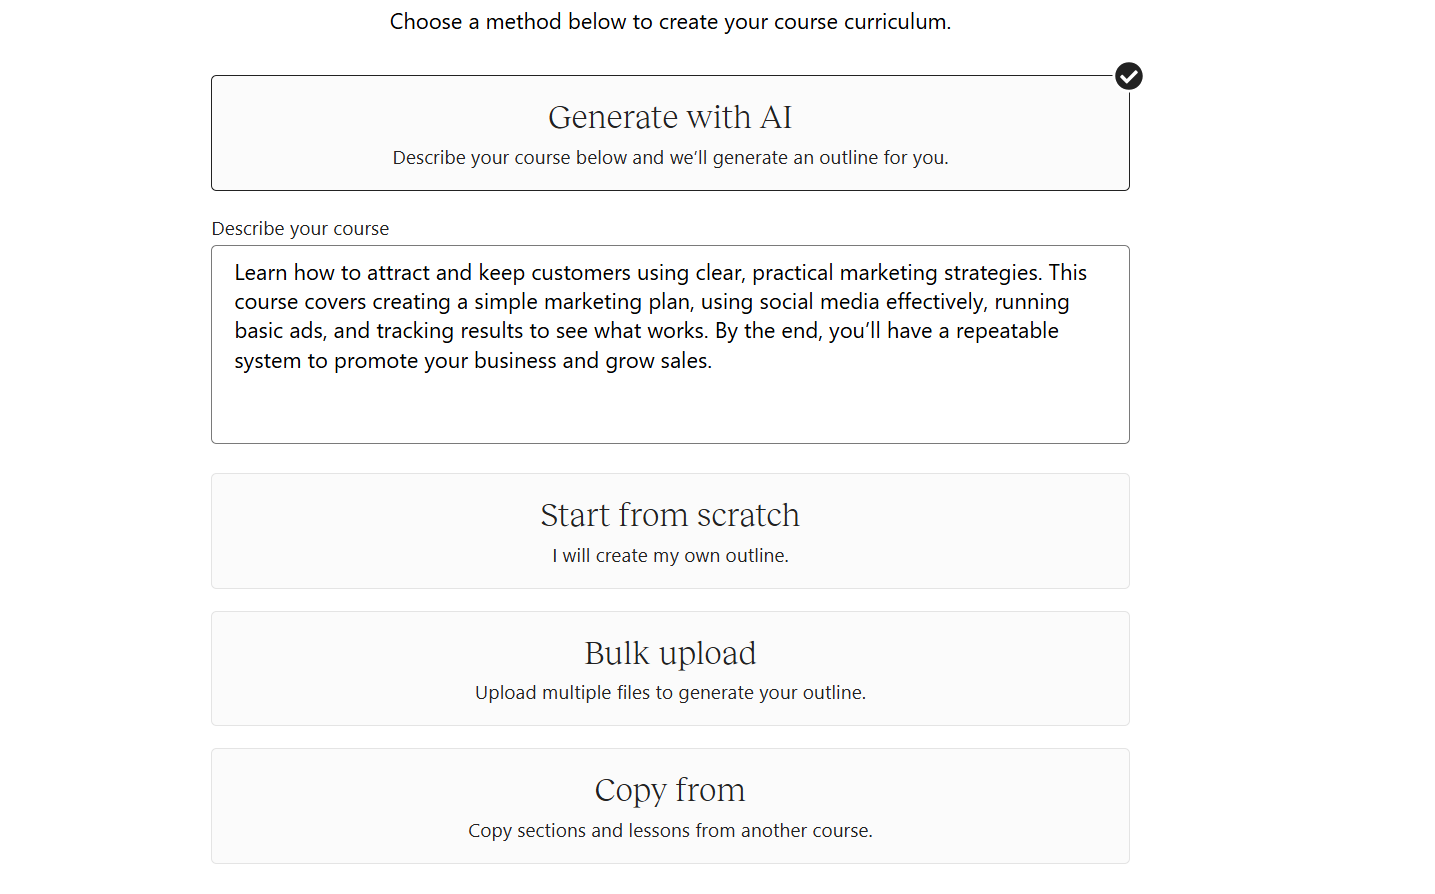
Teachable lets you structure the course’s curriculum with AI, bulk upload, or from scratch.
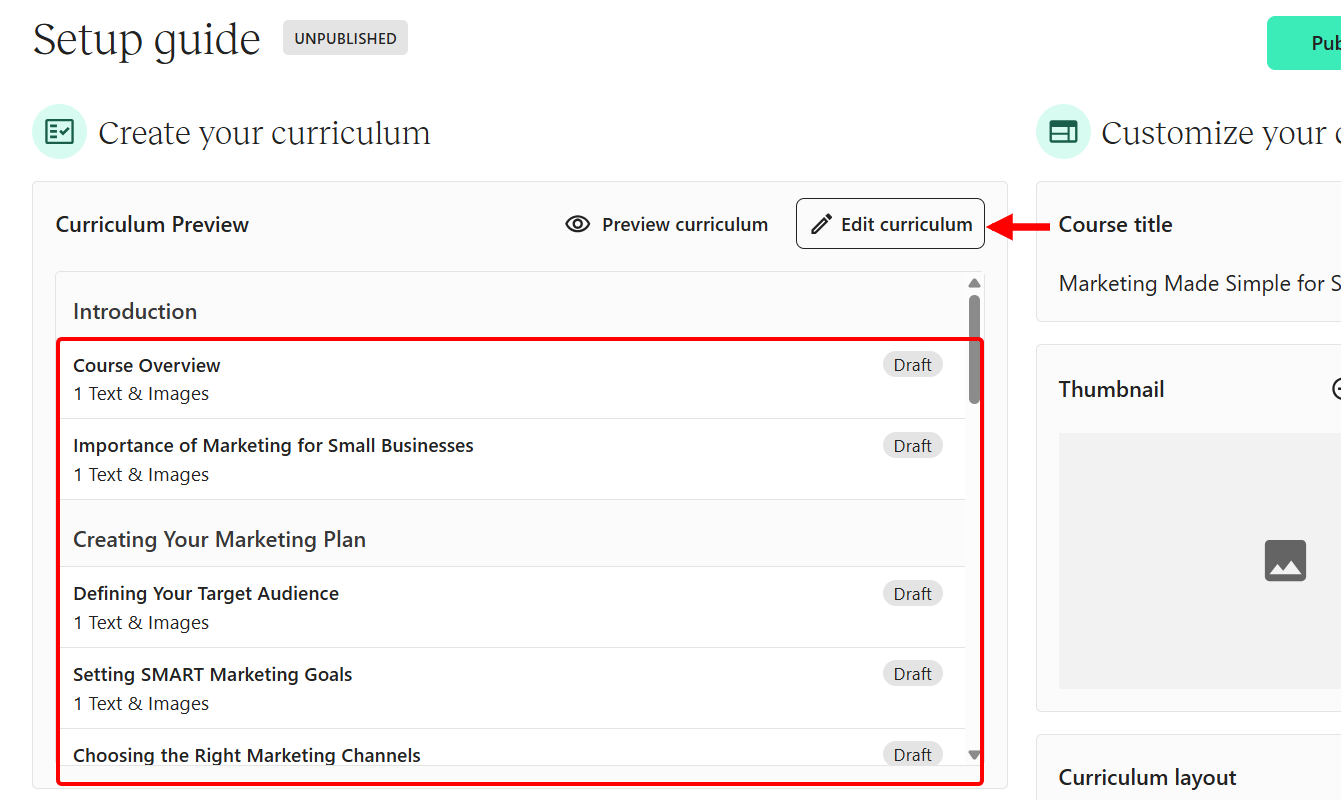
You can access the course’s curriculum manually to draft and edit it.
2. Community
With the community feature, you can support and engage with members, as it allows you to create a private space where they can connect, share, and interact.
If you want to engage, use the space to set up topics, post updates, and allow threaded discussions to keep conversations organised.
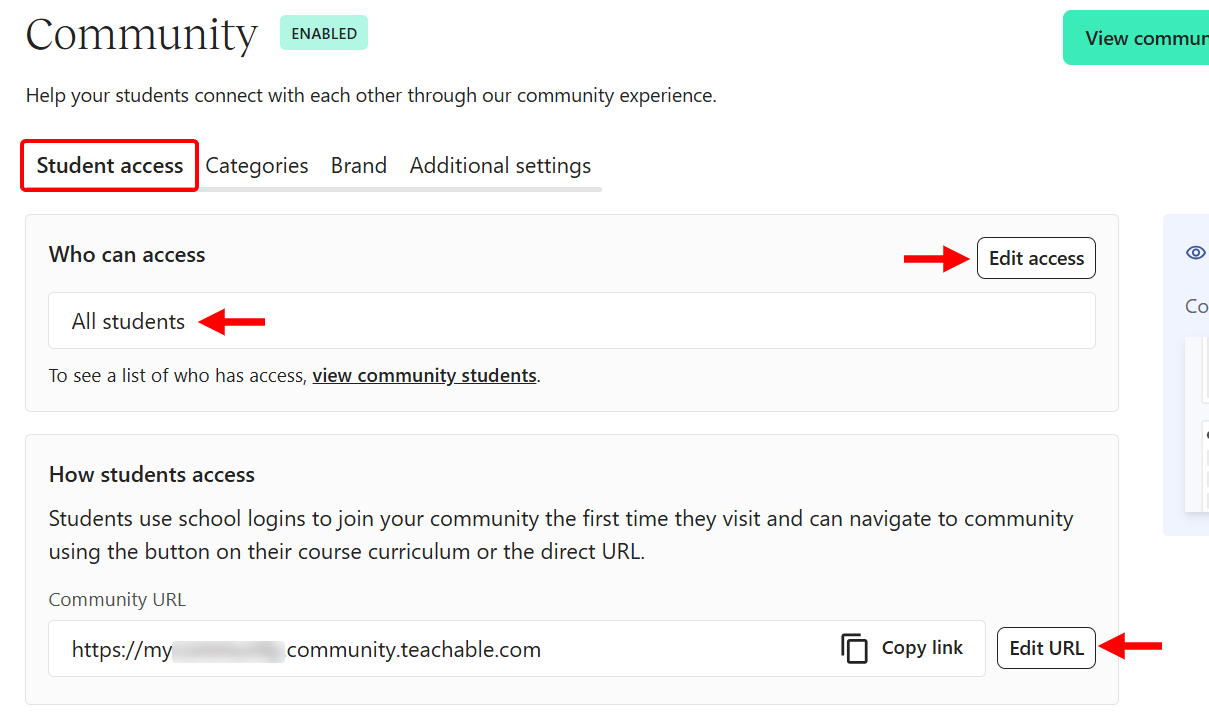
In the community setup, you can specify who has access to it. You can also edit access and select the category of members, as well as create a custom link to the community.
The category tab is where you can add more categories to the community. You can edit and delete existing pages and add new ones.
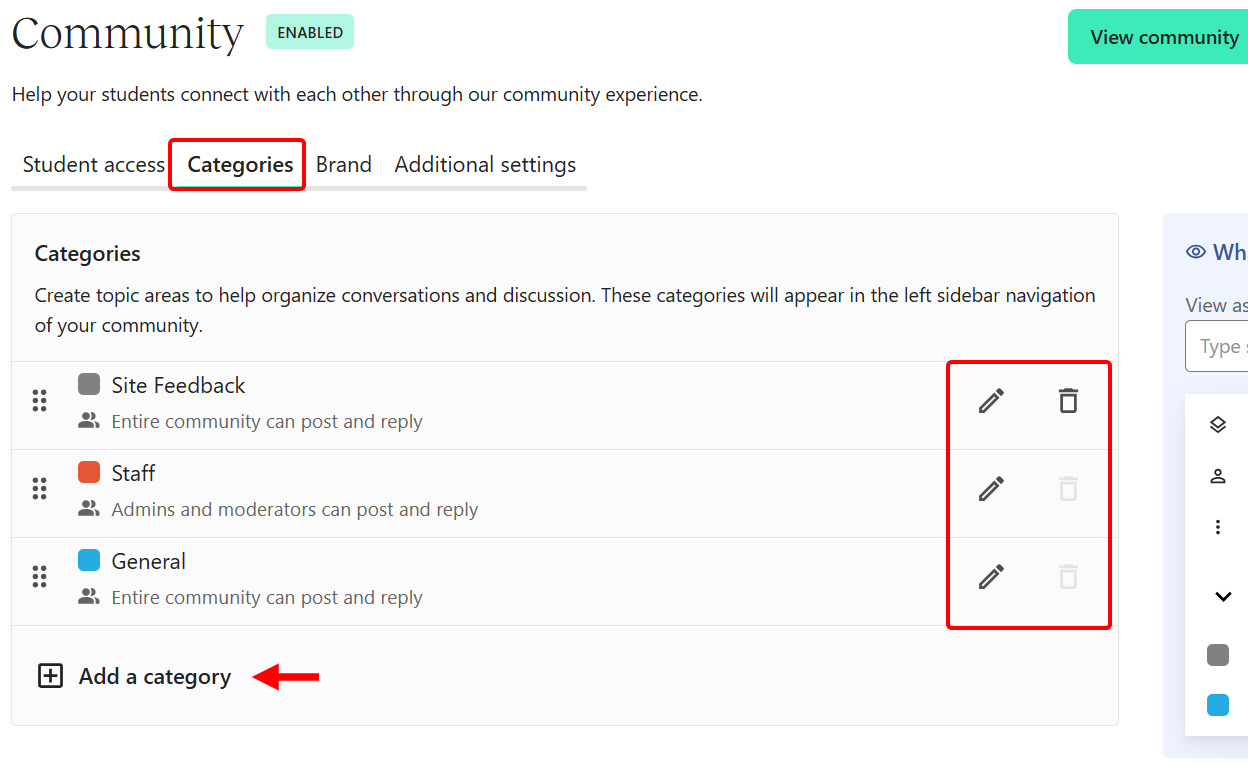
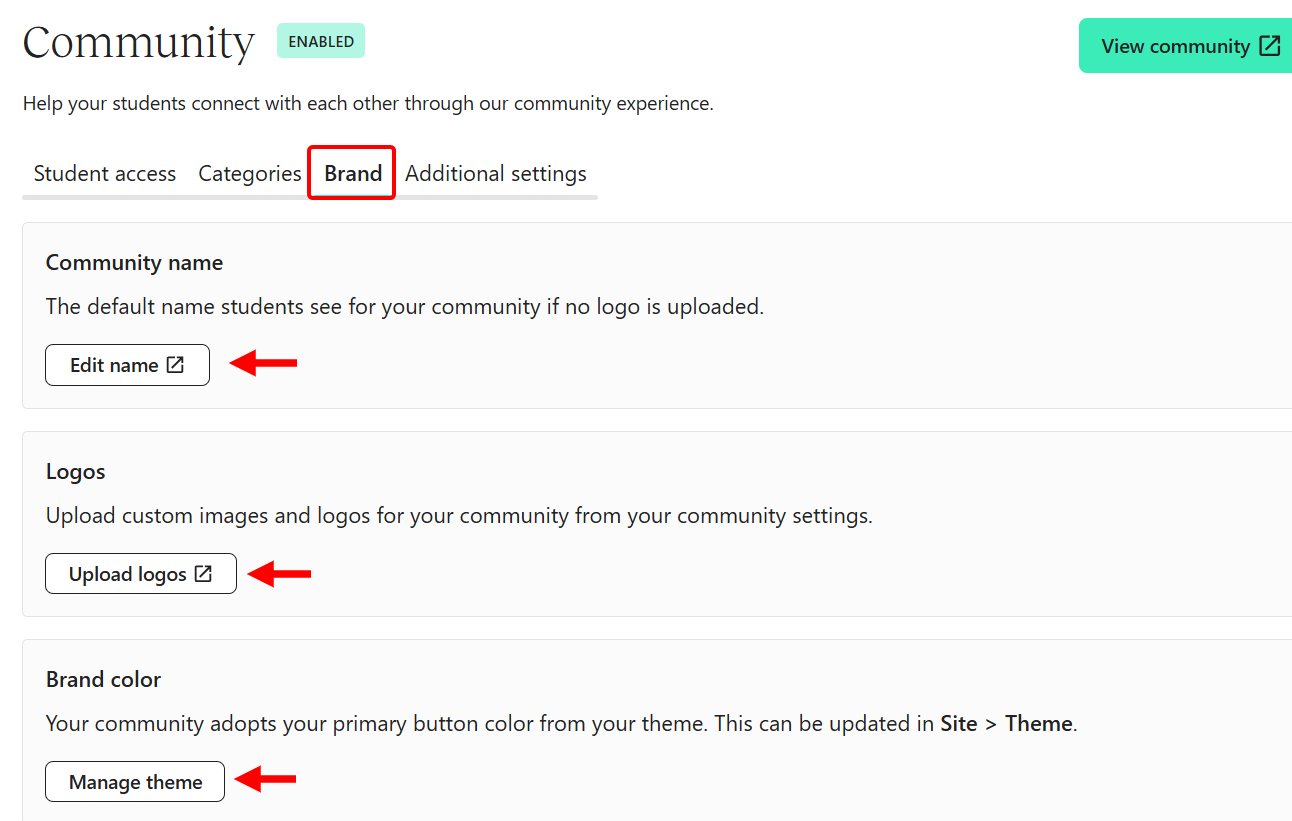
Also, when you switch to the brand section, you can change the community page’s name, add its logo, and select its theme, all to suit your brand.
After launching your community, members with access can view and interact with the pages and topics, and comment on posts.
[Fs-toc-omit]Best for
Solo small business owners who seek to build and sell branded online courses with simple tools and recurring revenue.
[Fs-toc-omit]Pricing
- Starter - $39/month + 7.5% transaction fee
- Builder - $89/month + no transaction fee
- Growth - $189/month + no transaction fee
- Advanced - $399/month + no transaction fee

What to look for when choosing a membership platform
Selecting the best-fitting membership site for your brand or business is one of the most important decisions you can make. The goal is to find the one that aligns with your plans and goals.
Choosing the wrong platform can slow you down, limit your growth, and frustrate your members. Below is a guide worth paying attention to when deciding which platform you’ll go for:
- 1. Ease of use
- 2. Customisation options
- 3. Payment processing
- 4. Marketing tools (Email, Coupons, Upsells)
- 5. Integrations with other tools (email, CRM, etc.)
- 6. Support and community
Let’s take each point after the other and discuss it.
1. Ease of use
Ease of use should be the primary consideration. You should target a platform that allows you to set it up quickly, without requiring special skills or technical expertise.
During my test, I was able to create plans on Memberful, upload products in a few steps on Podia, and manage members on Patreon. Others, like Teachable, have flows, editors, and dashboards, which I was able to learn in the time I expected.
But what stood out to me was how Easytools made everything feel natural. It did not leave me stranded on my first try or guessing what to do next.
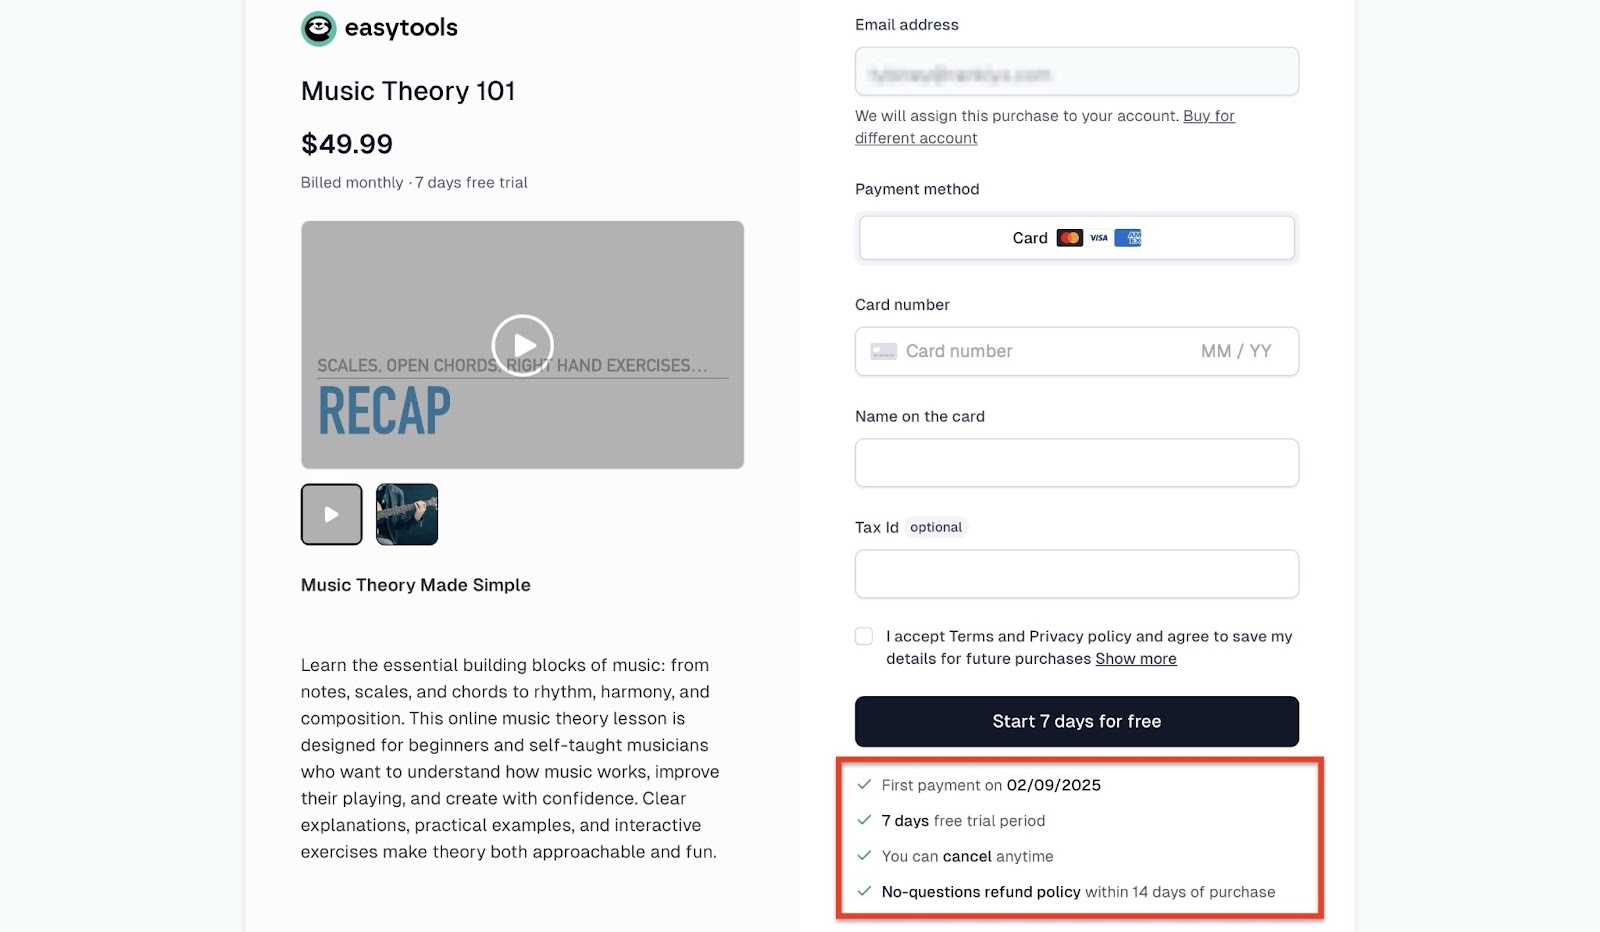
With Easytools, you can easily create a membership product, set the price, add gated content, and connect to Stripe at once without needing to learn payment acceptance.
Easytools offers a clean dashboard, and its contents are correctly positioned where you expect them.
You can easily manage your subscribers, offer free trials, or set up affiliate links with minimal effort.
2. Customisation options
Customisations in a tool or platform are the center of flexibility. If a platform or a tool does not give you control over how your product or membership outlook should feel and function, it’s probably not the one you want to go for.
The membership platform you seek should come with customisation options. These include branding your pages, determining who sees what content, creating different pricing tiers, and controlling how members access your products.
From the list of tools above, Podia allows you to design landing pages and set the access levels. On Patreon and Memberful, you can add custom tier memberships with their perks.
These features provide your members with an experience that suits them and your brand.
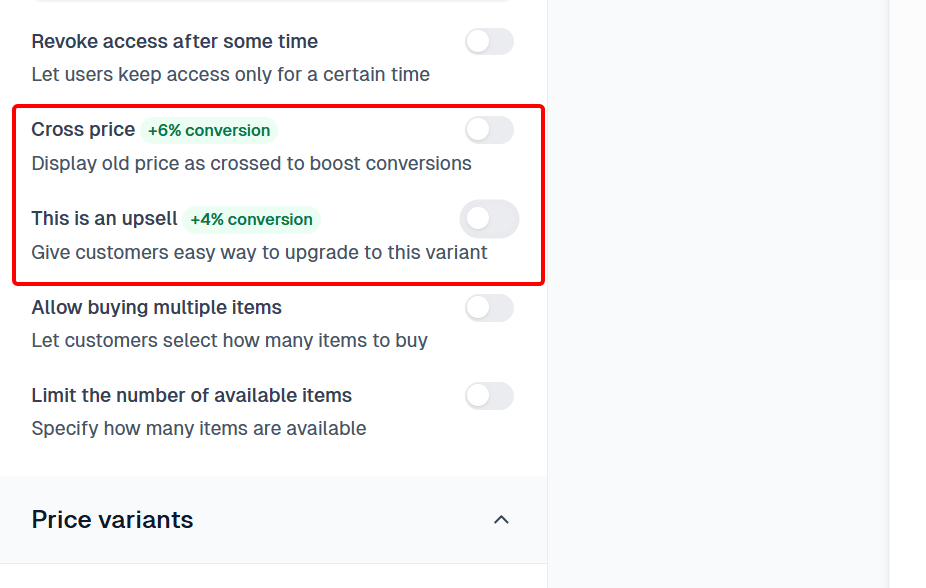
The most important thing is to make these changes without getting stuck. And this is where Easytools offers what the other tools have, and more. It gives you enough room to create custom plans and exclusive plans, or add cross-price and upsells, all from its clean dashboard.
3. Payment processing
Revenue is what drives a business, which is why payment processing is one of the most crucial features to consider if you run a membership-based business.
It’s where transactions take place, allowing you to collect revenue, manage subscriptions, and handle aspects such as refunds, upgrades, and cancellations.
Membership sites typically support Stripe or PayPal and often include built-in checkout pages. When I tested Teachable or Podia, I could set monthly or annual pricing as well as offer bundle pricing.
Patreon had a recurring tier membership payment feature.
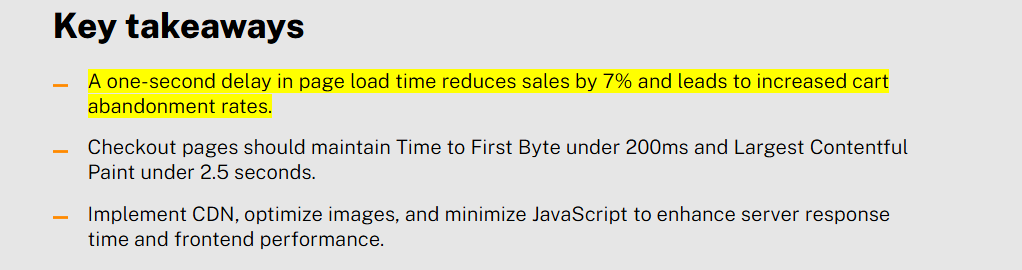
But what matters is how smooth the experience is for you and your members. Even a slight delay in checkout page load time is likely to reduce your sales by 7% and lead to increased cart abandonment rates.
This is why you should go for a platform that is fast, secure, and requires no additional setup or plugins.
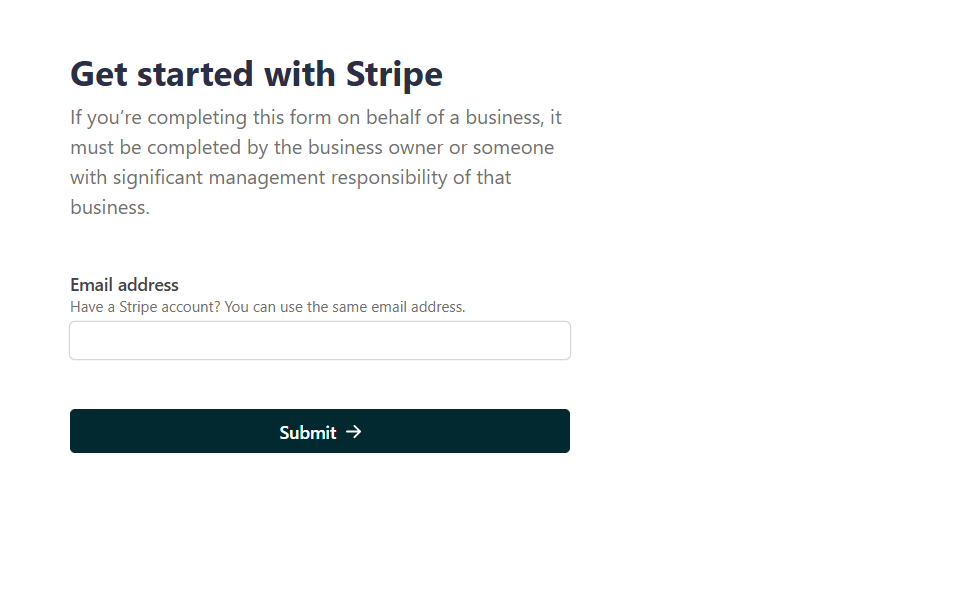
Easytools ticks these boxes easily. It has an inbuilt payment system where you just connect your Stripe account in minutes, set your pricing type and payment option to run your business.
You can also enable features like tax and refunds before publishing.
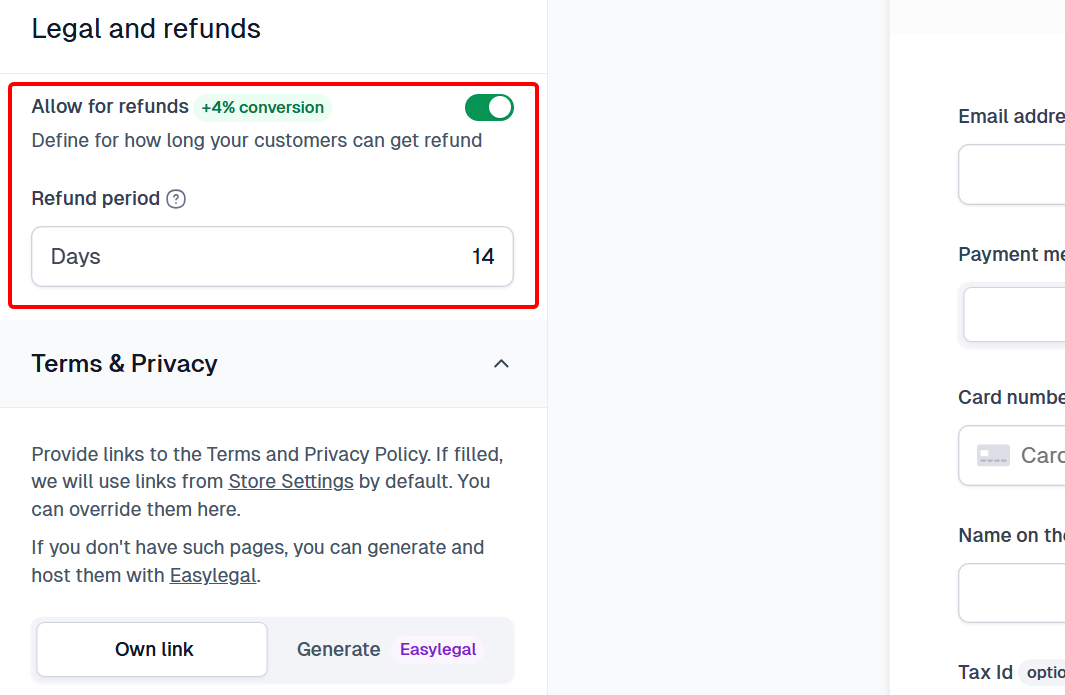
The checkout system makes it easier for your members to pay smoothly and manage their subscriptions. Easytools lets you customize it to fit your brand.
There is more; it offers a dashboard to track your transactions, view revenue, and issue refunds. If you want payment processing that just works without delays, it’s Easytools.
4. Marketing tools
Once your membership becomes active, you need the tools to turn visitors or leads into members. They have to discover your products, sign up, and stay engaged. This is where you should consider a platform with marketing features.
Some platforms offer basic marketing features, such as email broadcasts, coupon codes, and landing pages. During my experience with Podia, for instance, I was able to run email campaigns and build funnels.
With Patreon, I made updates and created member-only posts to engage them.
But you should ask yourself how easily you can use these marketing tools without needing a separate marketing stack.
Easytools is the answer to this question. It provides all-in-one marketing tools to reach and engage your members, and our guide includes proven tactics to increase online sales.
Using Easytools, you can draft outreach emails, offer discounts, create affiliate links, and even engage inactive members from the same dashboard.
Unlike other platforms, you don’t need any integrations or extra plugins for these tools. They are clean, built-in features that help you grow.
5. Integrations with other tools
Next, consider the tool’s ability to integrate with other platforms. Not just any other platform or app, but the ones that align with your workflow or what you already use.
This could be your email marketing software, payment processor, analytics tool, file storage, CRM, or an online community tool. The goal is for these tools to work together, allowing you to save time, automate tasks, and provide members with a smoother experience.
Some of the tools I tested offer solid options in this area, but are mostly third-party apps.
Podia features email tools like Mailchimp and ConvertKit, which let you connect and send updates automatically. It also works with Zoom and Google Analytics, which I connected to create events and track performances.
Patreon also offers third-party tools, such as Discord, Vimeo, and Shopify, in the integration store, allowing you to deliver perks or content in various spaces.
You can also sync with email platforms, analytics tools, and payment gateways in Memberful to manage across channels without extra steps.
Easytools brings all of this into one simple system, which favours all your workflows, whether you run a course, a private group, or a digital library. You just need to upload the product.
It allows you to connect Stripe for payments in minutes without any 3rd party app, link your members to its inbuilt mailing lists, and use webhooks to send data to almost any app.
This platform keeps these tools connected so you can focus on creating instead of moving data around.
Tip: You should map out the tools you already use for payments, emails, content delivery, and analytics, then check which platforms connect to all of them before you decide.
6. Support and community
Finally, look for a platform that can build and engage a community to help you build strong connections with your members and offer guidance. This is one of the most important aspects of running a membership program.
It involves creating a space where members can interact, share ideas, and stay engaged, and also have access to help and resources when something isn’t clear.
Membership platforms like Patreon offer features such as member chats, posts, polls, and creator support.
Also, Memberful enables you to create private member areas and gated content with email support and helpful guides.
However, Easytools offers all these features. It allows you to share members-only updates, set up private pages, manage member access in minutes, and set up pages like an FAQ for support.
It’s worth knowing that Easytools has a support team that responds fast, with answers and guides right inside the dashboard.
Choose the best membership platform
Factually speaking, there’s no one-size-fits-all platform. One platform could be the best option considering your business model, your goals, and needs. That same platform may not be ideal for another brand.
Regardless, once a platform aligns with your goals, workflow, and the way you serve members, it is worth considering. Think about the content you offer, the type of members you have, how they should engage, and the tools you use.
Ultimately, the right tool will be the one that aligns with your vision. Comparing your options to see which one fits your needs best, and picking the one that will help you most on all fronts, is the way to go.