Selling online
28 min read
6 Best Teachable alternatives in 2026
Looking for a Teachable replacement? Here are the 6 best Teachable alternatives with better tools, pricing, and features to grow your digital business in 2026.

Written by
Marta JagoszReviewed by
Katarzyna Chmielniak
Updated on
December 31, 2025
Published on
November 27, 2025

Teachable, as a platform, sounds like an offer you can’t refuse. Like other platforms in its niche, it allows new users a 7-day free trial. Transaction fees are also reasonable on its pricing plans.
But after doing some research, I came across Teachable’s Trustpilot review.
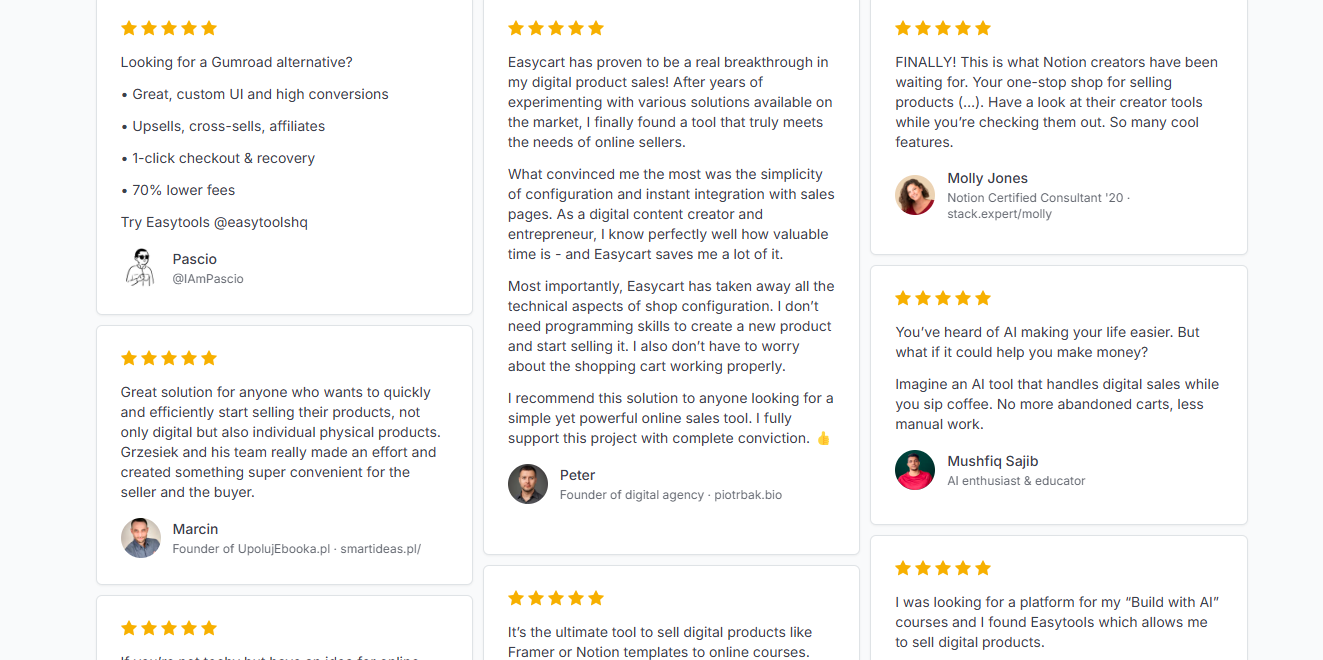
Teachable has a 3.2-star rating from 936 users on Trustpilot.
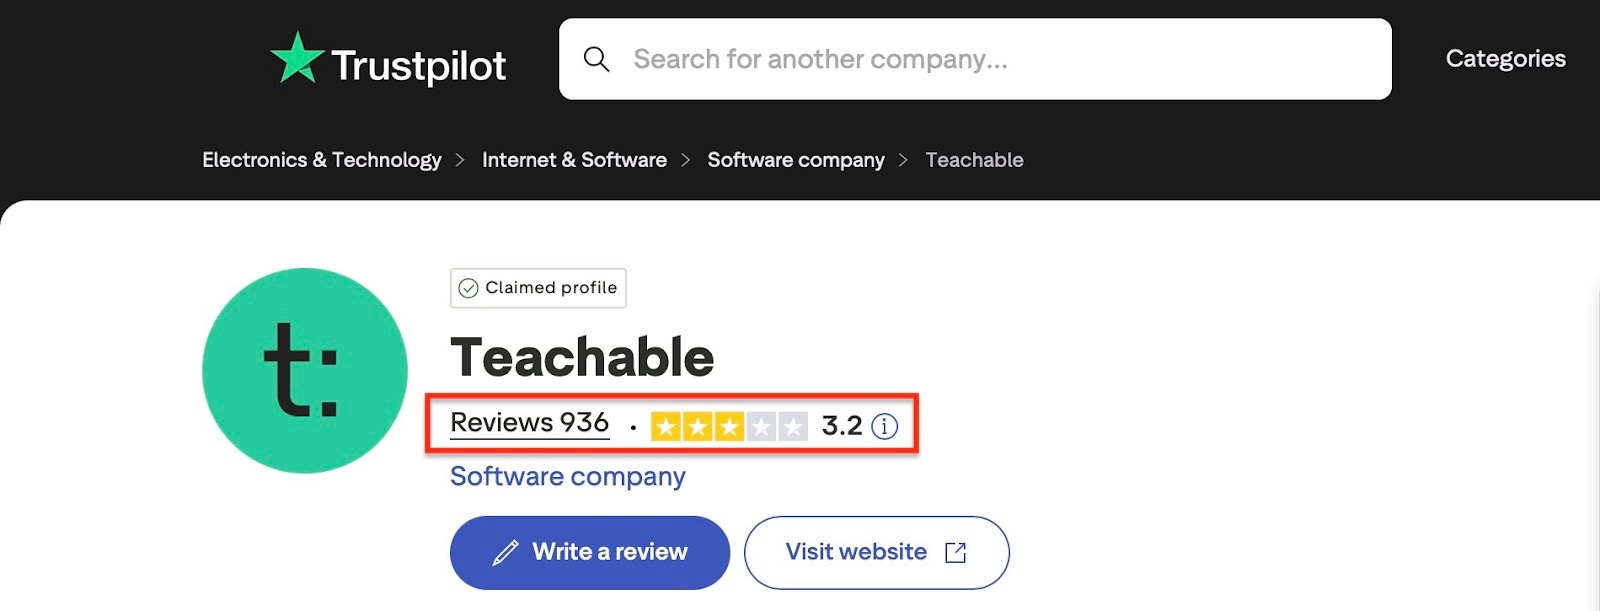
The reason? The reviewers have shared concerns about Teachable’s customer service, limited support, and other deal breakers. In fact, if you are reading this article, you may have had a similar experience.
After these findings, I set out to test 15 Teachable alternatives. I weighed the pros and cons.
I compared transaction and platform fees. I also checked their features and every nook and cranny.
After weeks of testing, I narrowed it down to the six best Teachable alternatives worth your time.
In this article, I’ll walk you through each of these Teachable alternatives. Then, I’ll show you how to choose the best one.
Keep reading.
Key takeaways
- The best Teachable alternatives are 1. Easytools, 2. LearnWorlds, 3. Skillshare, 4. Podia, 5. Mighty Networks, and 6. Teachery.
- A good Teachable alternative should let you sell online courses, offer and sell ebooks, create a membership program, and more.
- When choosing an alternative to Teachable, define your goals, check necessary features, compare prices, and assess integration.
Best Teachable alternatives compared
6 best Teachable alternatives
The best Teachable competitors are:
- Easytools
- LearnWorlds
- Skillshare
- Podia
- Mighty Networks
- Teachery
Let’s take some time to review each tool.
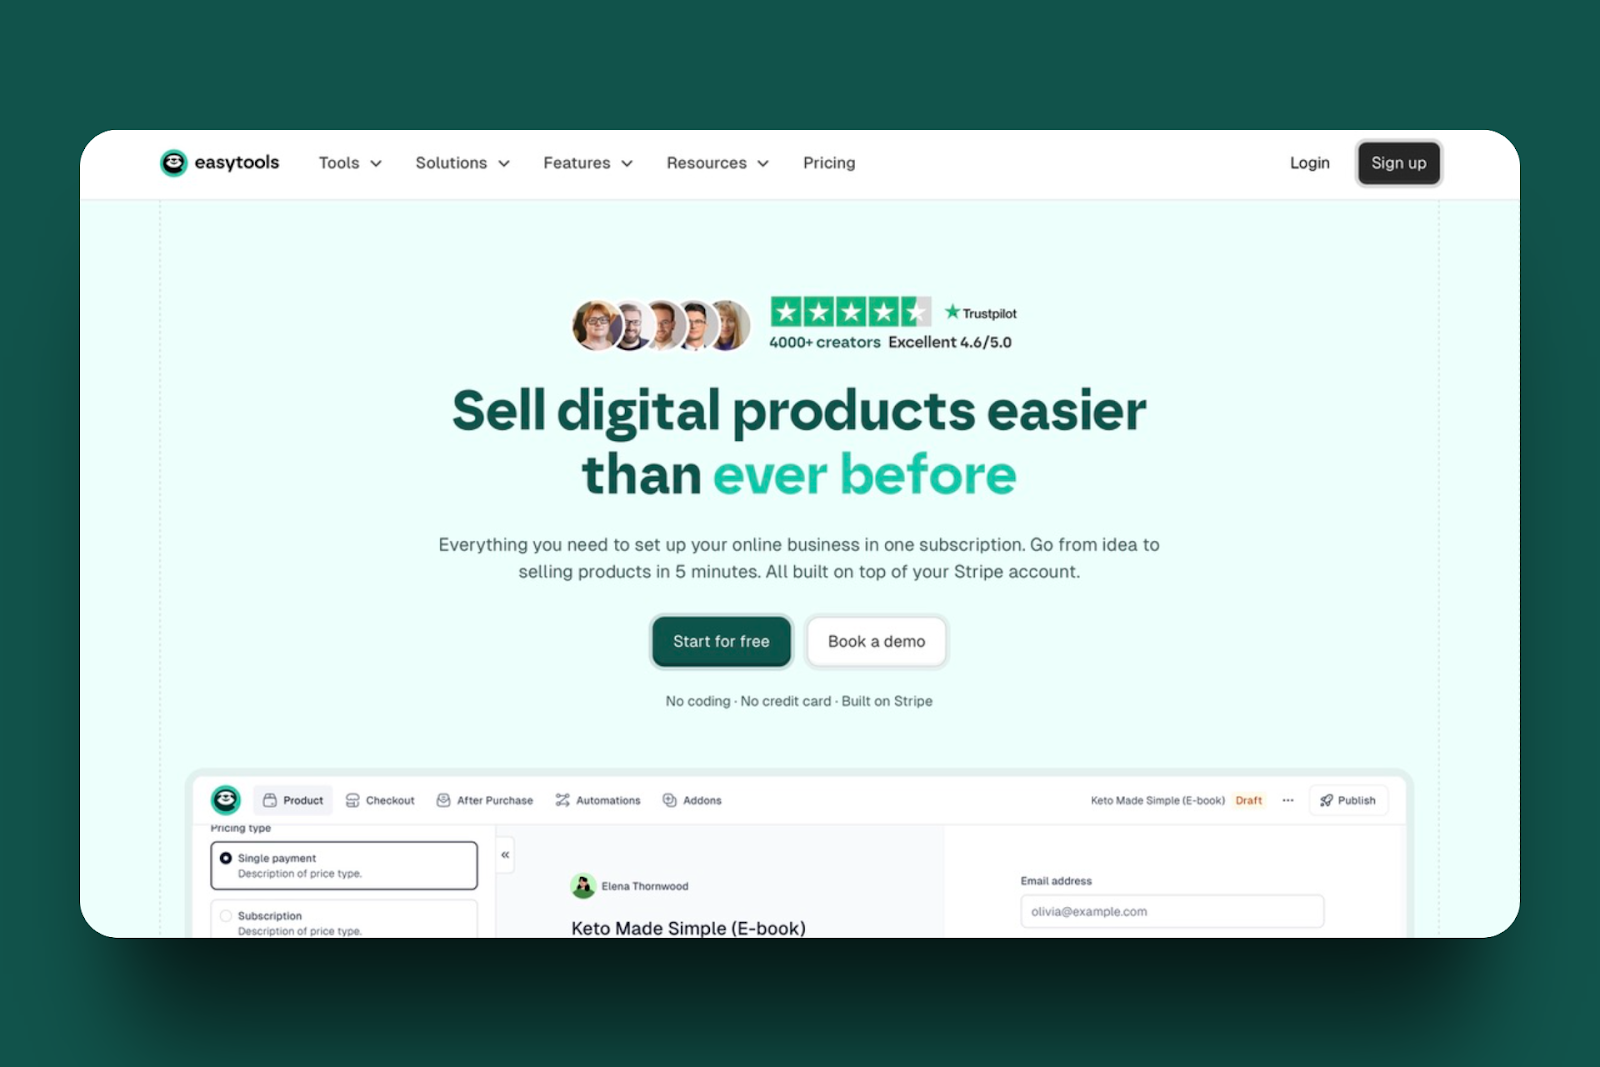
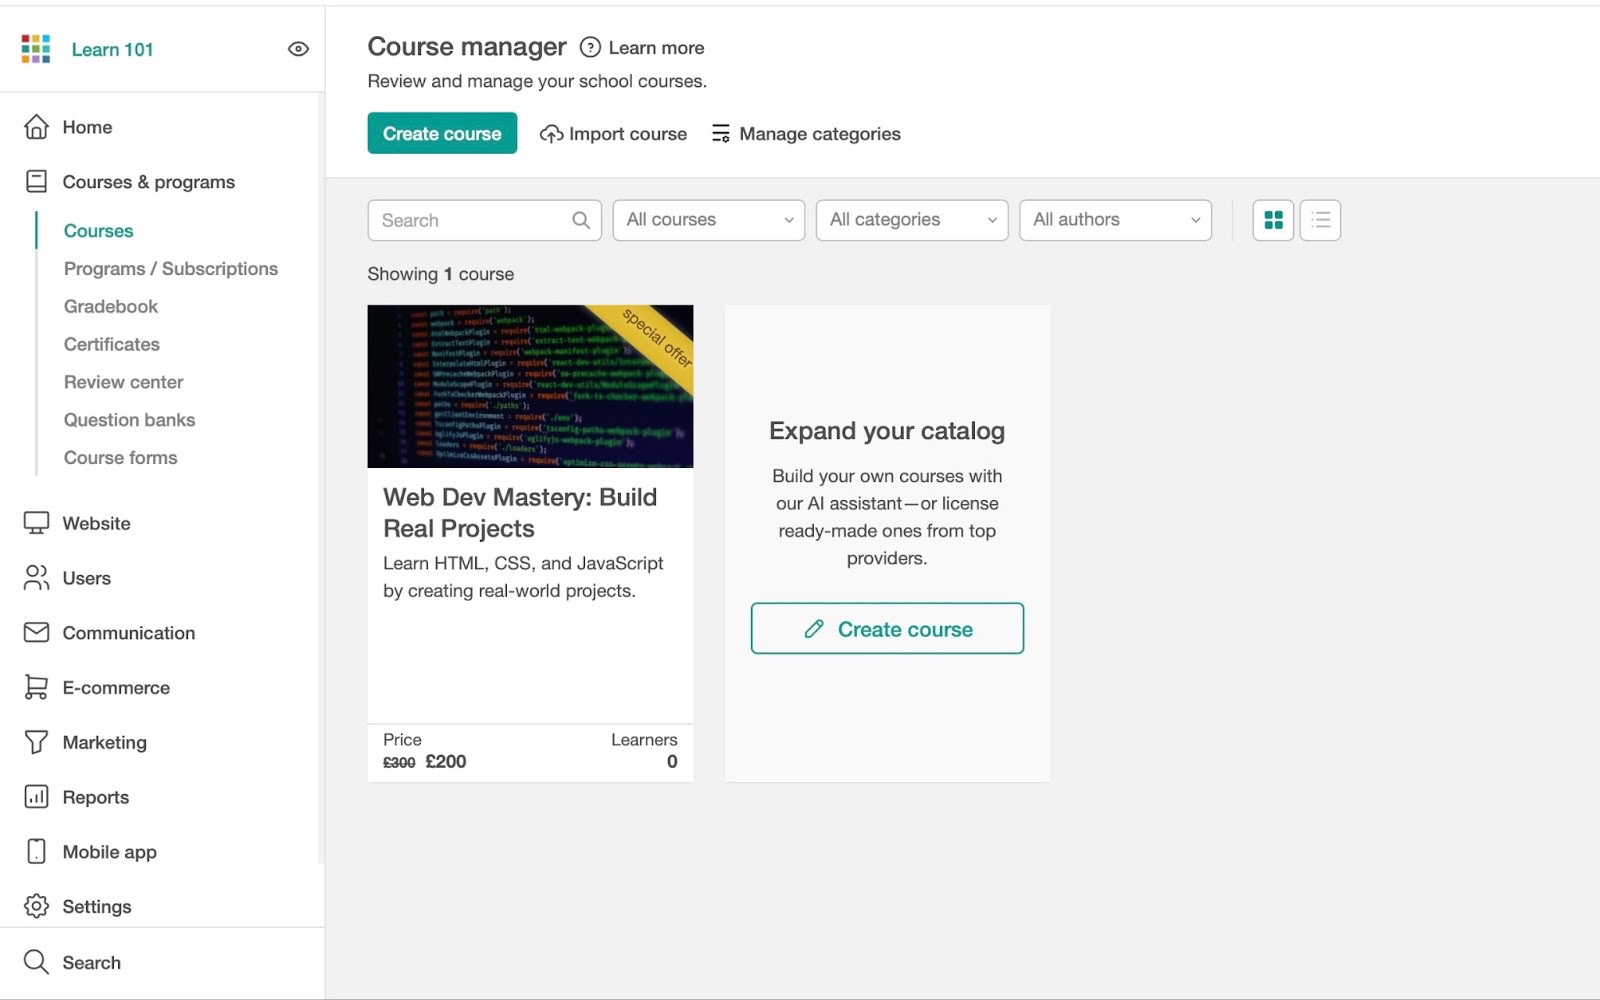
1. Easytools
Rating: ⭐ ⭐ ⭐ ⭐ 4.7/5 stars | Starting price: $0 (with 5% transaction fee) | Integrates with: Circle, Zapier, Discord, Kajabi, Make, Zencal, WooCommerce, HubSpot, Airtable | Best for: Independent course creators, non-technical creators, educators, influencers, entrepreneurs, and coaches
First on my list of the best Teachable alternatives is Easytools. It’s an all-in-one platform for creating, marketing, and selling digital products like online courses, e-books, templates, and more.
Easytools has tools and features like Easycart, Easylove, Easypage, Easycoffee, Easyplayer, Easyoffer, Easyfaq, and Easycookie.
Let’s talk about a few of them.
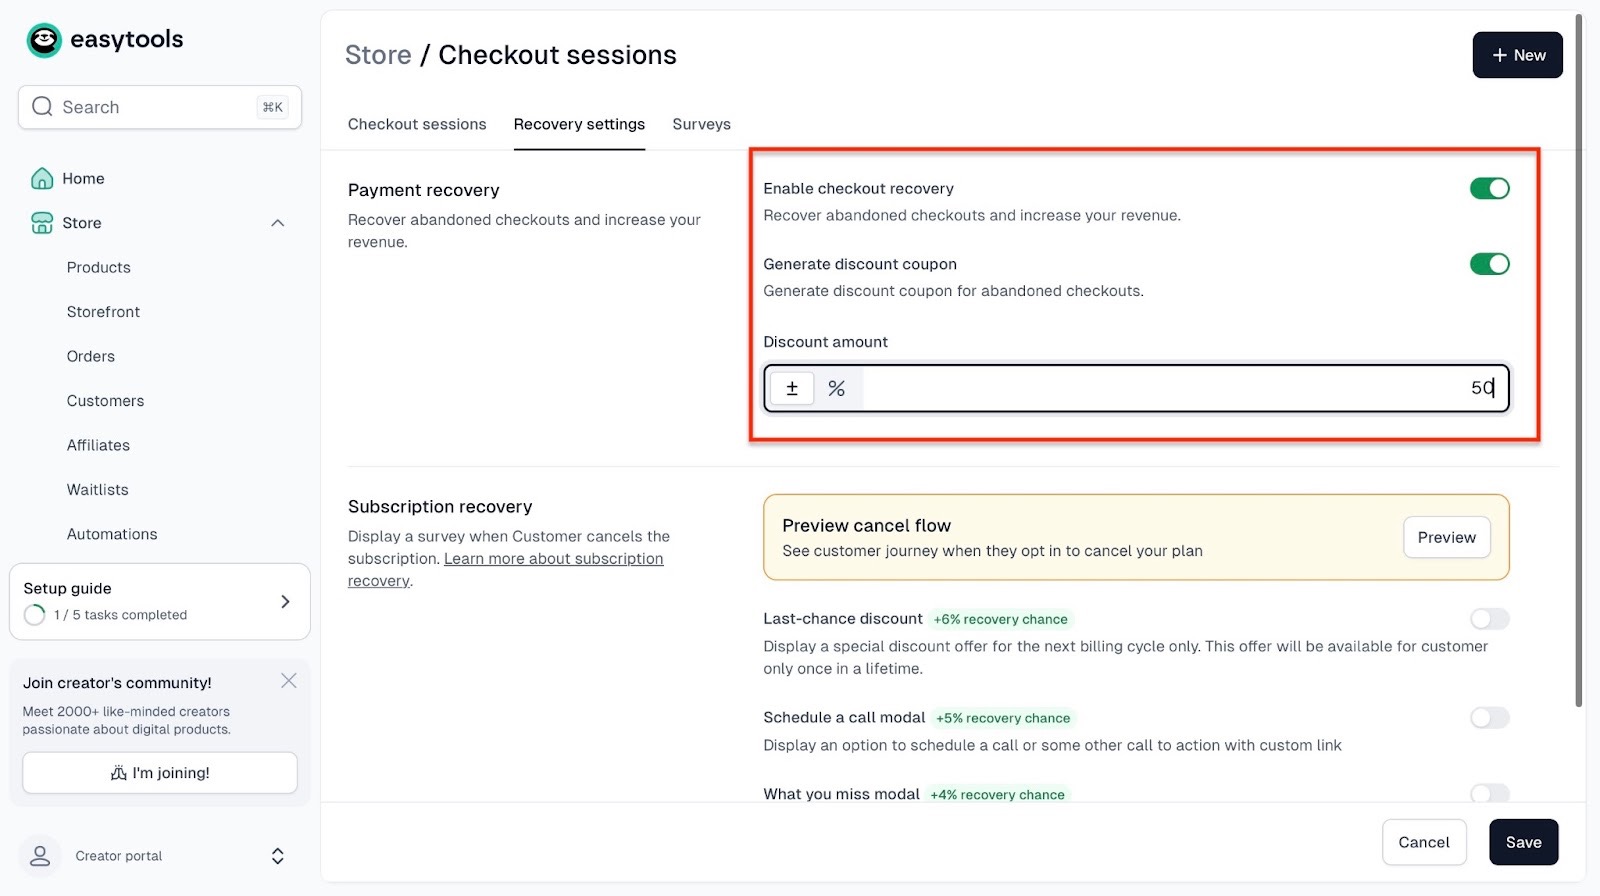
Easy allows you to recover abandoned checkouts so you can increase lead conversion rates. You just have to turn this feature on.
Plus, you can take it further by automatically generating discount coupons to encourage potential customers to proceed with their purchase.
Our customers can also create online courses from scratch. Easytools can generate course modules for you based on your title.
You can then add the actual video files and activate certificates, which means that upon course completion, your students will be awarded a certificate.

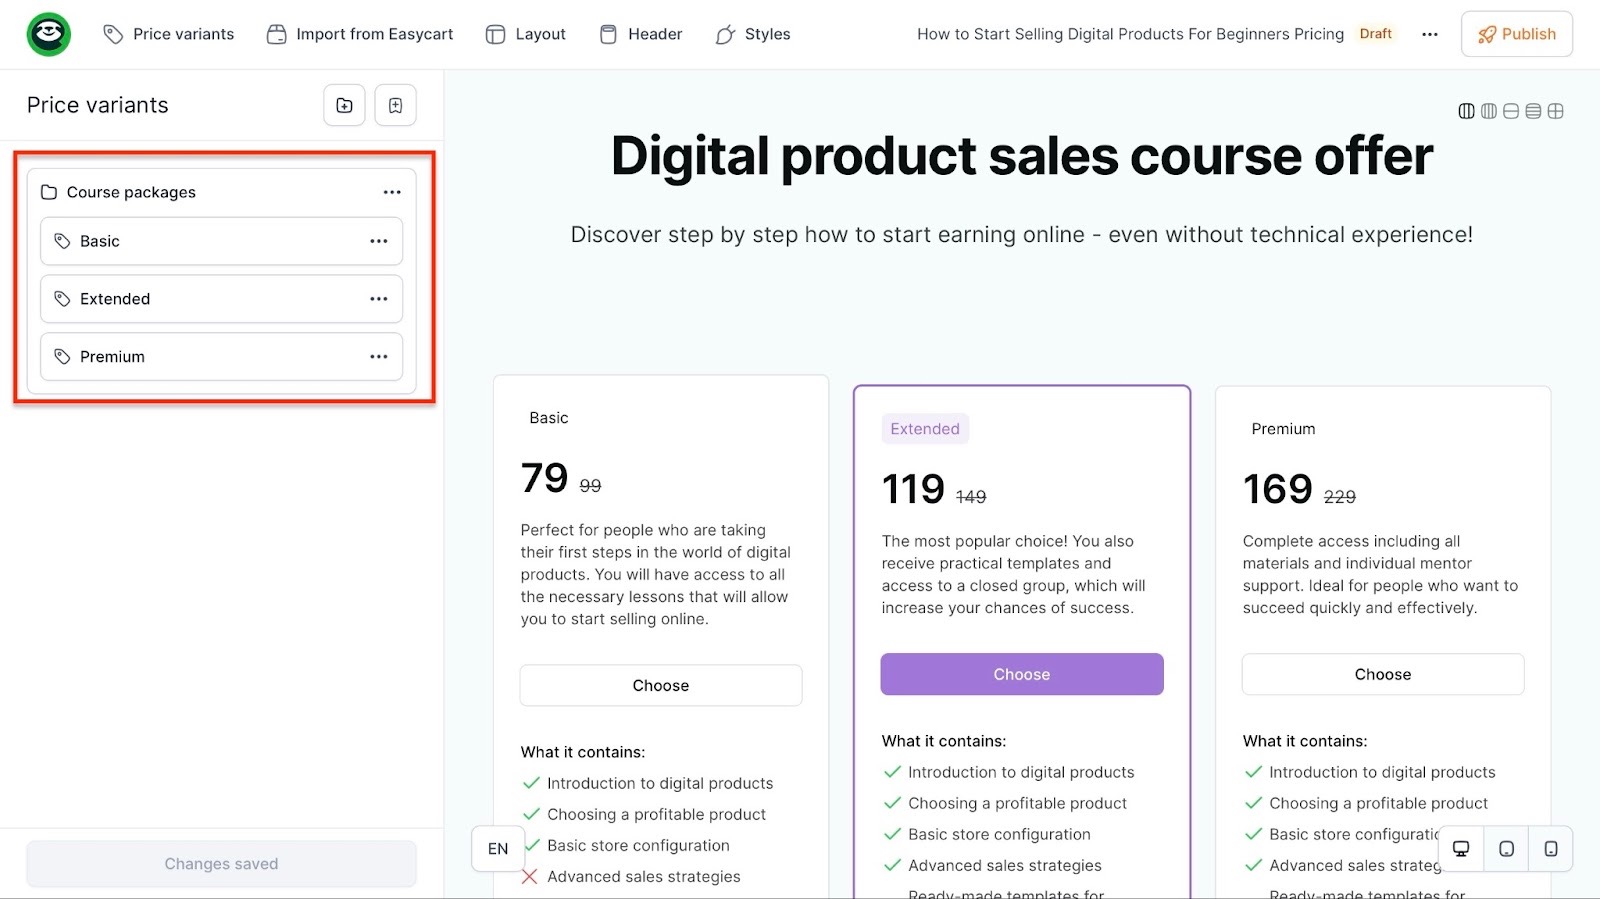
That’s not all. You can also create landing pages (Easypage) for your digital products with no technical skills. You can add testimonials (Easylove), legal disclaimers, FAQs, cookies, and even a donation button.
Our platform also lets you add dynamic pricing sections to your own page. That will come in handy if you want your customers to choose from different offers and price variants of your products.
If you're a course creator, you may want to sell other digital products along with your courses. Easytools lets you sell e-books, templates, webinars, subscriptions, and more.
Adding all these digital products to your online course is a great way to increase its value and earn you more money.
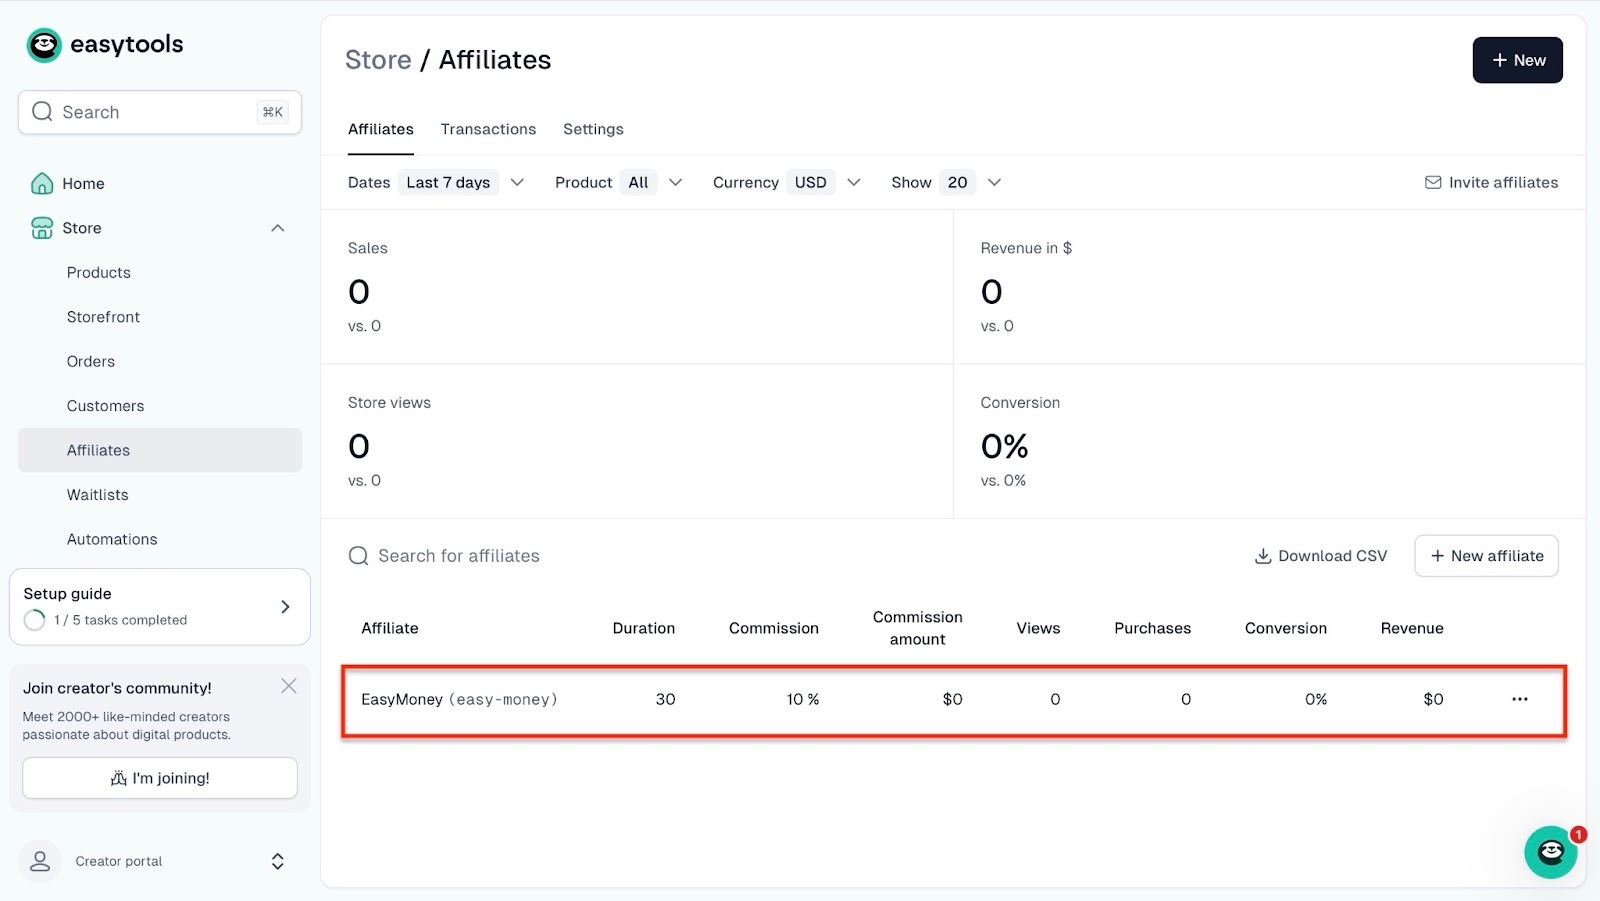
Finally, you can set up donations (Easycoffee) to maximize your earnings. Beyond that, you can also create affiliate links.
Your customers just have to share them online and earn commissions every time someone buys through that link.
[fs-toc-omit]What I loved about Easytools
1. Courses
Easy’s courses feature lets you create online courses either from scratch or by generating them through AI.
Let me show you how to do that.
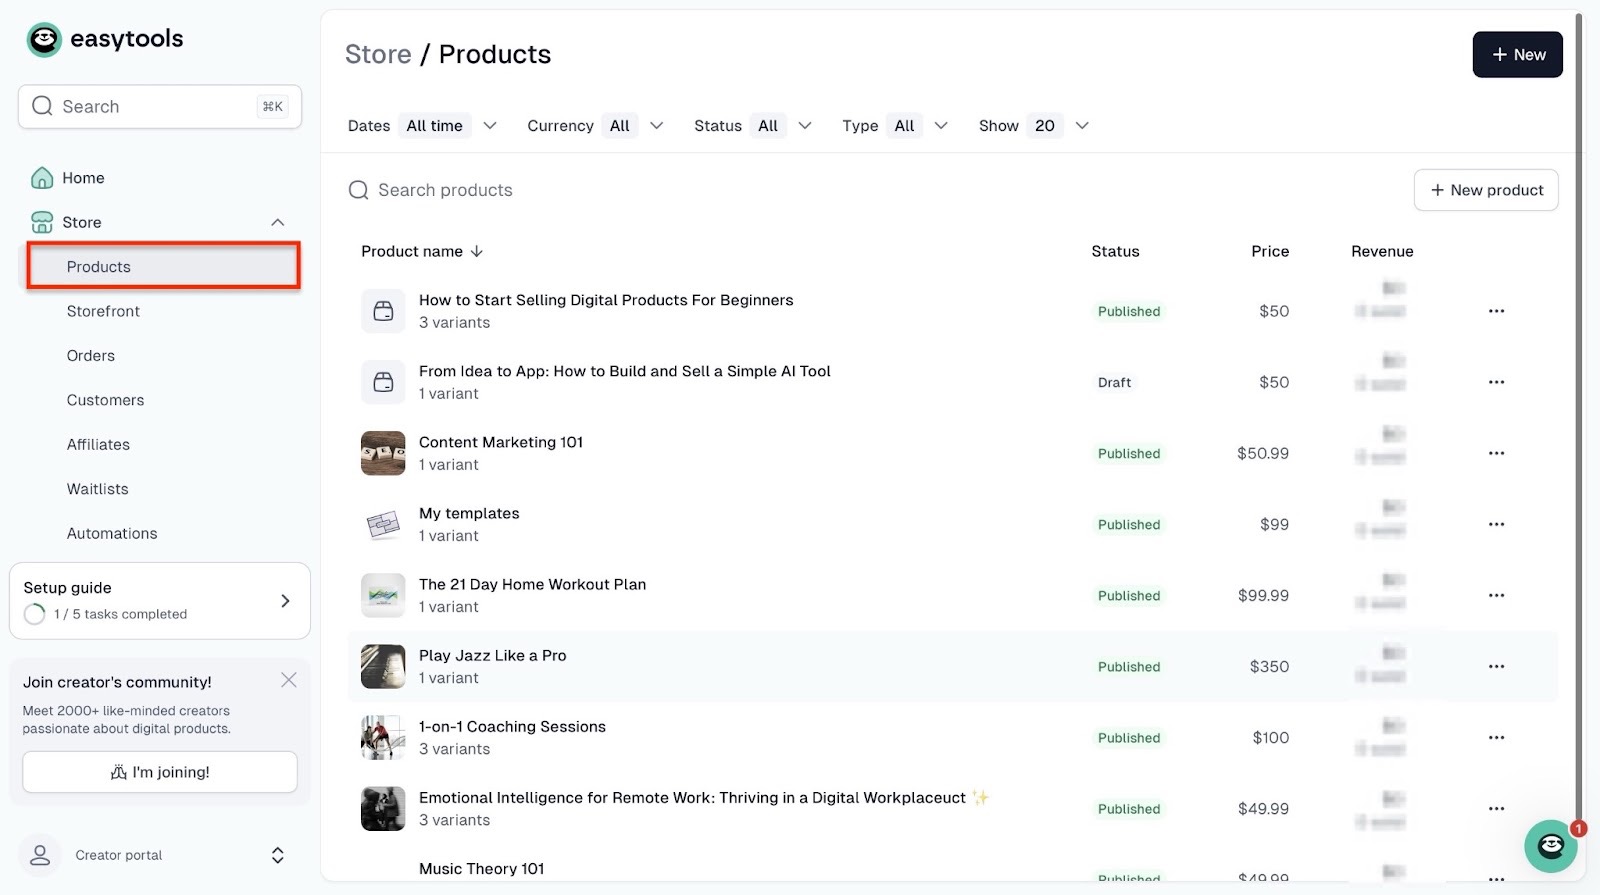
Right from the homepage, scroll down and select “Course” under the section “Create a product from template.”
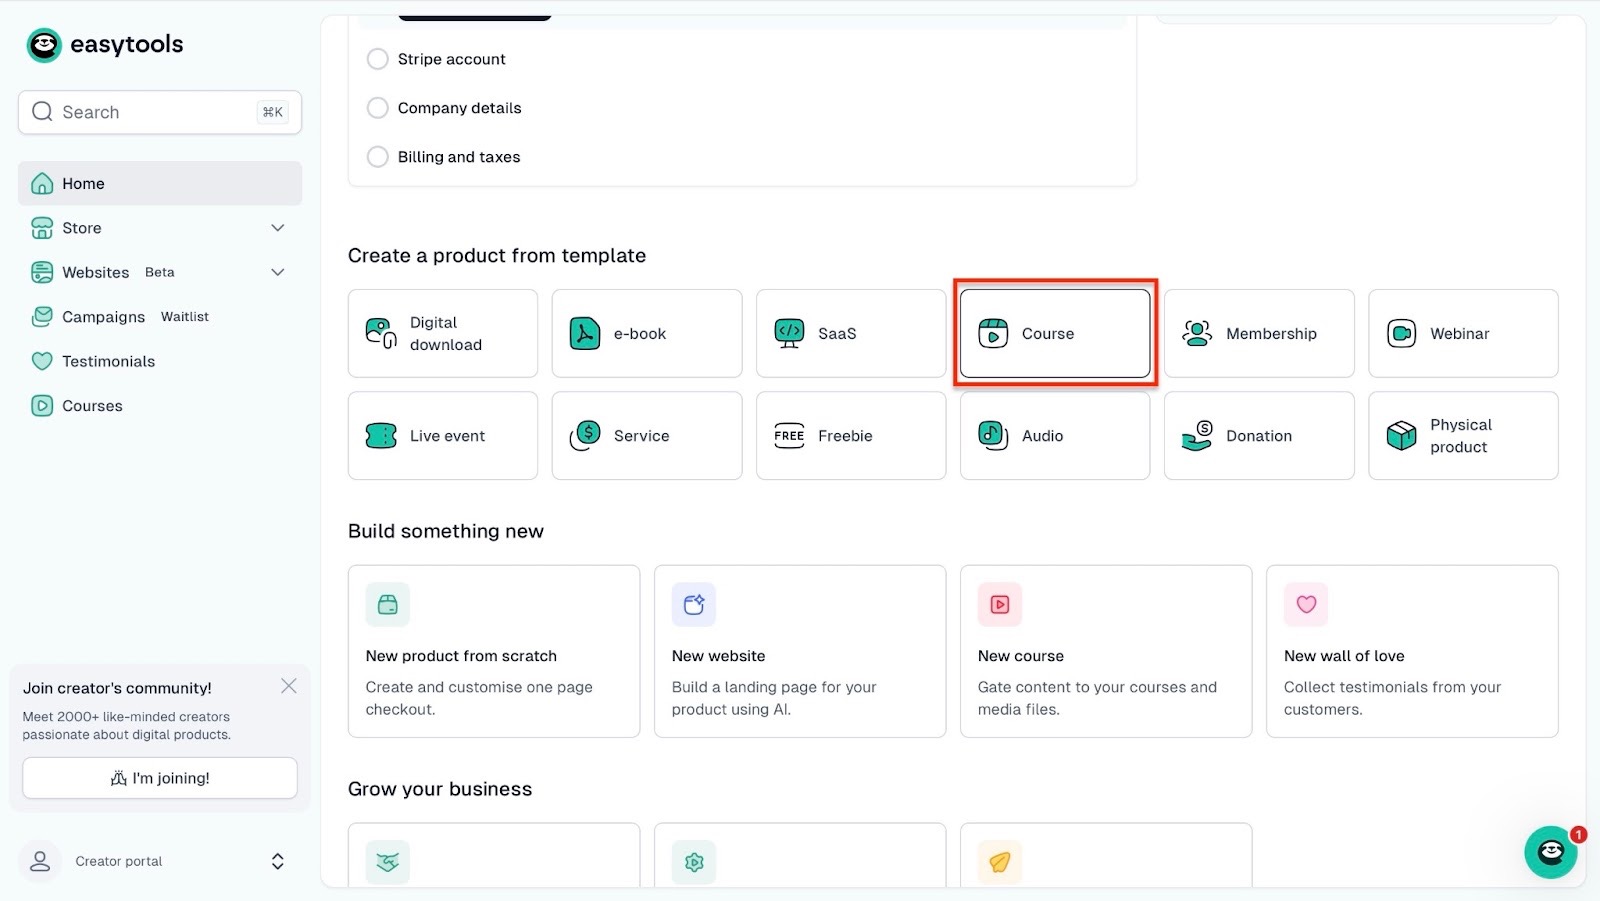
In the new window, enter the product name. You’ve already selected the product type, but you could go right ahead and click on it just to be sure.
After that, click “Continue” at the bottom of the window.
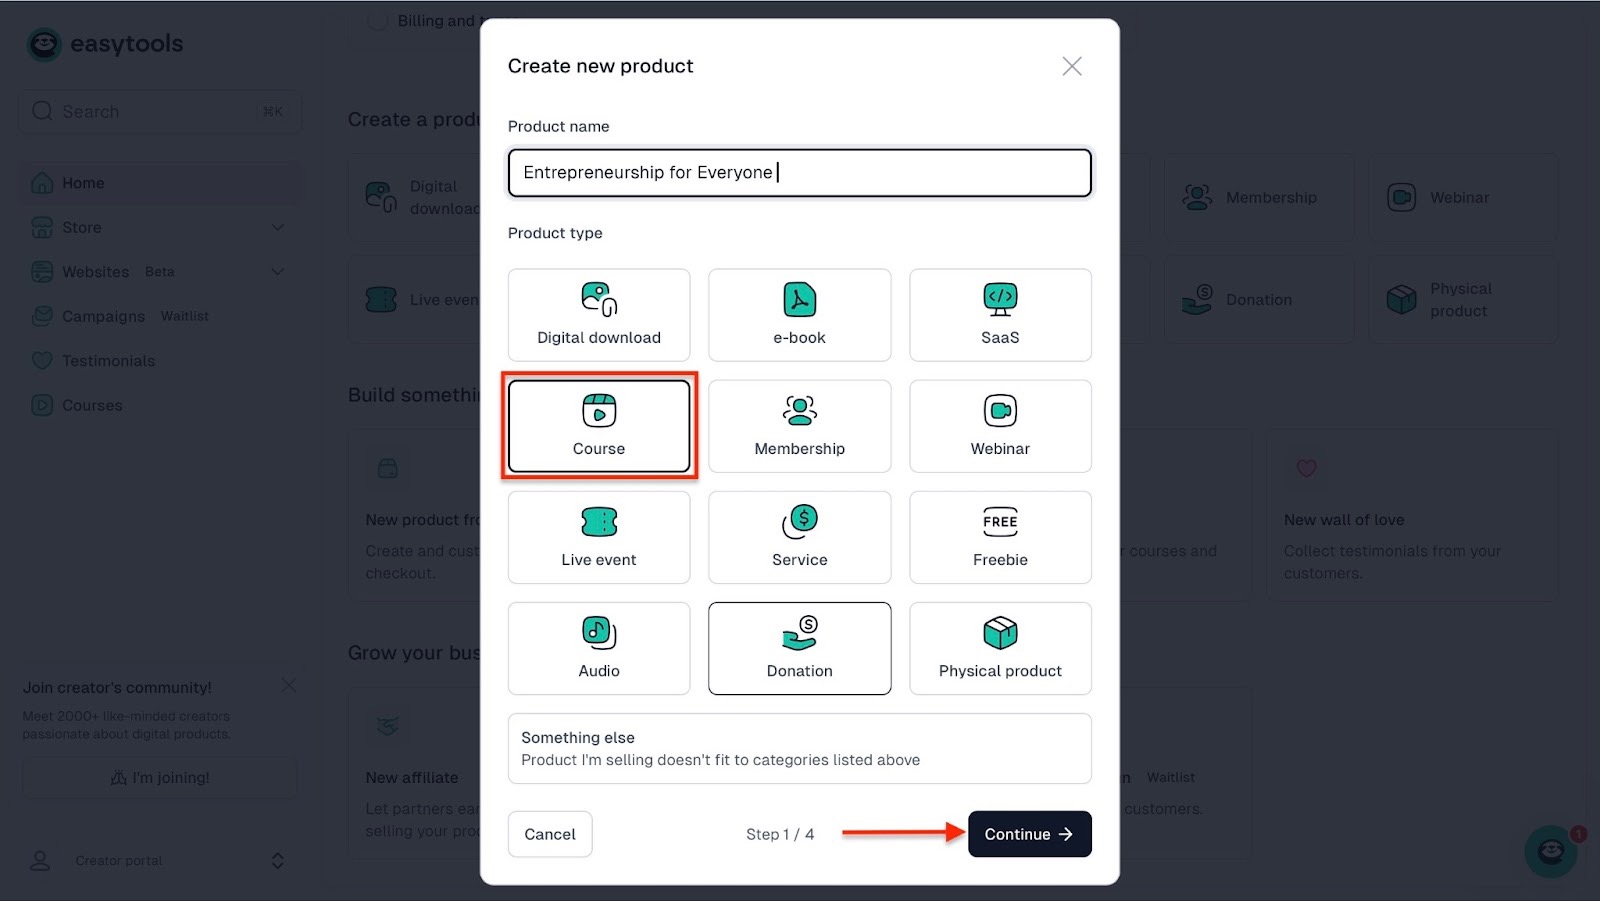
Now, add currency, price, and tax handling in the next window. Then hit “Continue.”
In the new pop-up window, Easytools will generate your online course description based on your title.
Once you’re satisfied with it, click “Continue.”
After that, select “Upload your images” to add cover pictures from your computer. You can let AI generate them for you by selecting that option.
So let's hit the “AI-generated” button, and once it’s done, click “Create product.”
After the product/course is published, click “Edit in Easyplayer.”

This will open a new window. From here, select the course you just created.
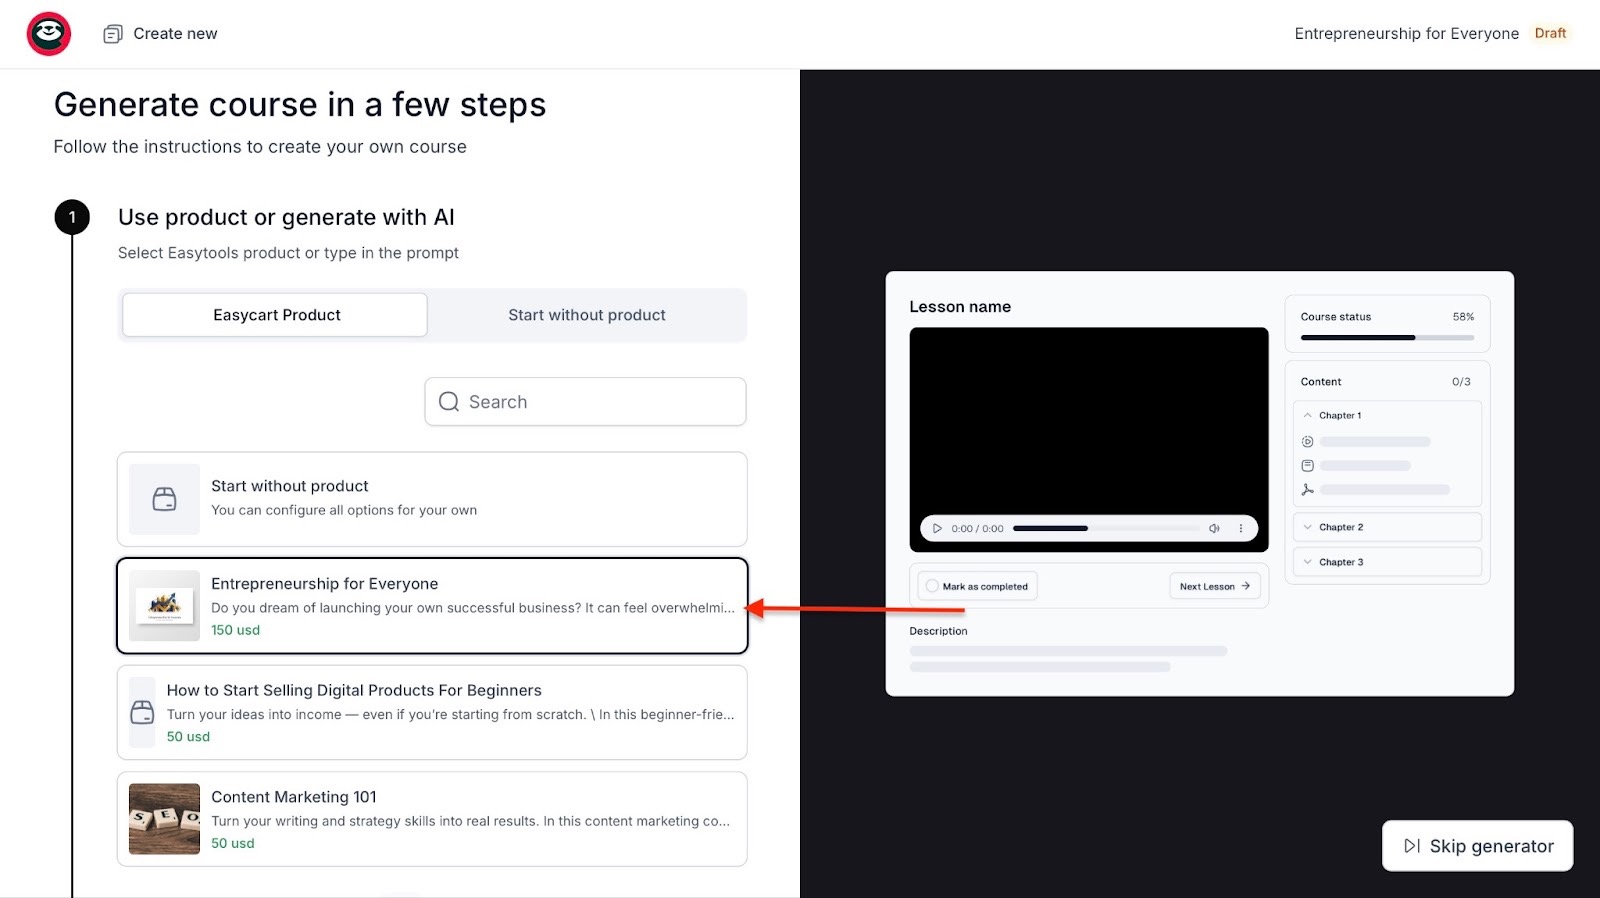
Then scroll down to select a color palette and hit “Generate” to finish.

AI will generate your course and recommend some modules you can use. Click on each tab in the navigation bar, add files, and make the necessary changes.
Once you’ve done that, hit “Publish” at the top right corner of the window.
2. Websites
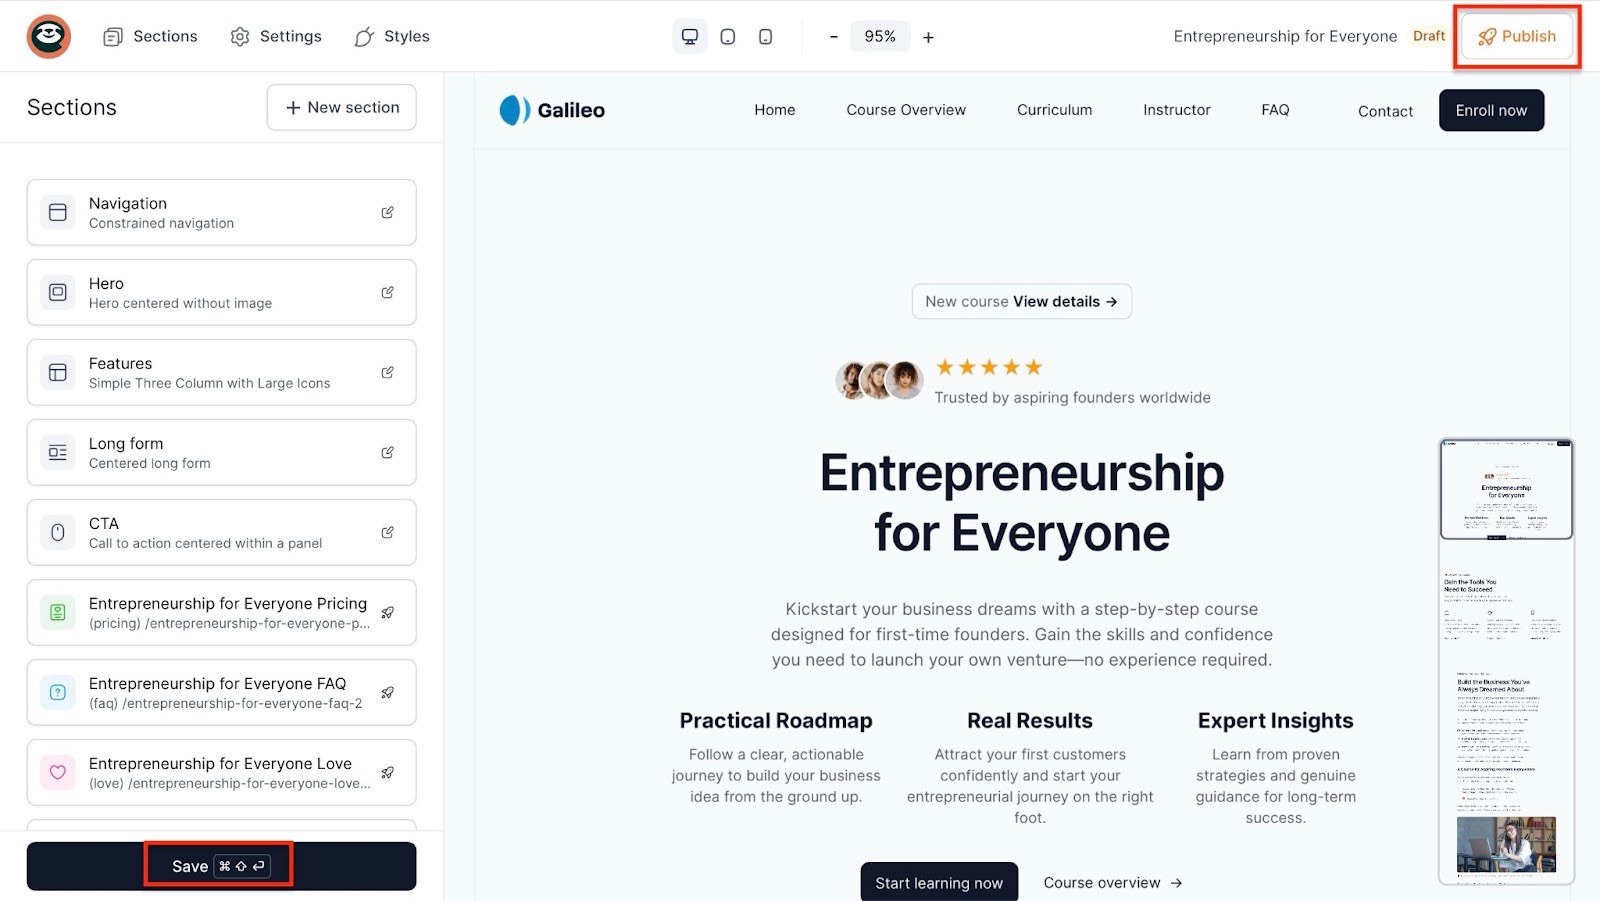
The websites feature lets you create landing pages. It’s essential for both your brand and the courses you market and sell on Easytools.
You can generate it with AI and then add items like pricing sections, legal pages, social proof, FAQ sections, cookies, and donation buttons.
Here’s how you create a landing page on Easytools.
Select “Websites” in the sidebar. Next, choose “Landing pages.”
Now, click “+ New landing page” at the top right corner of the window.
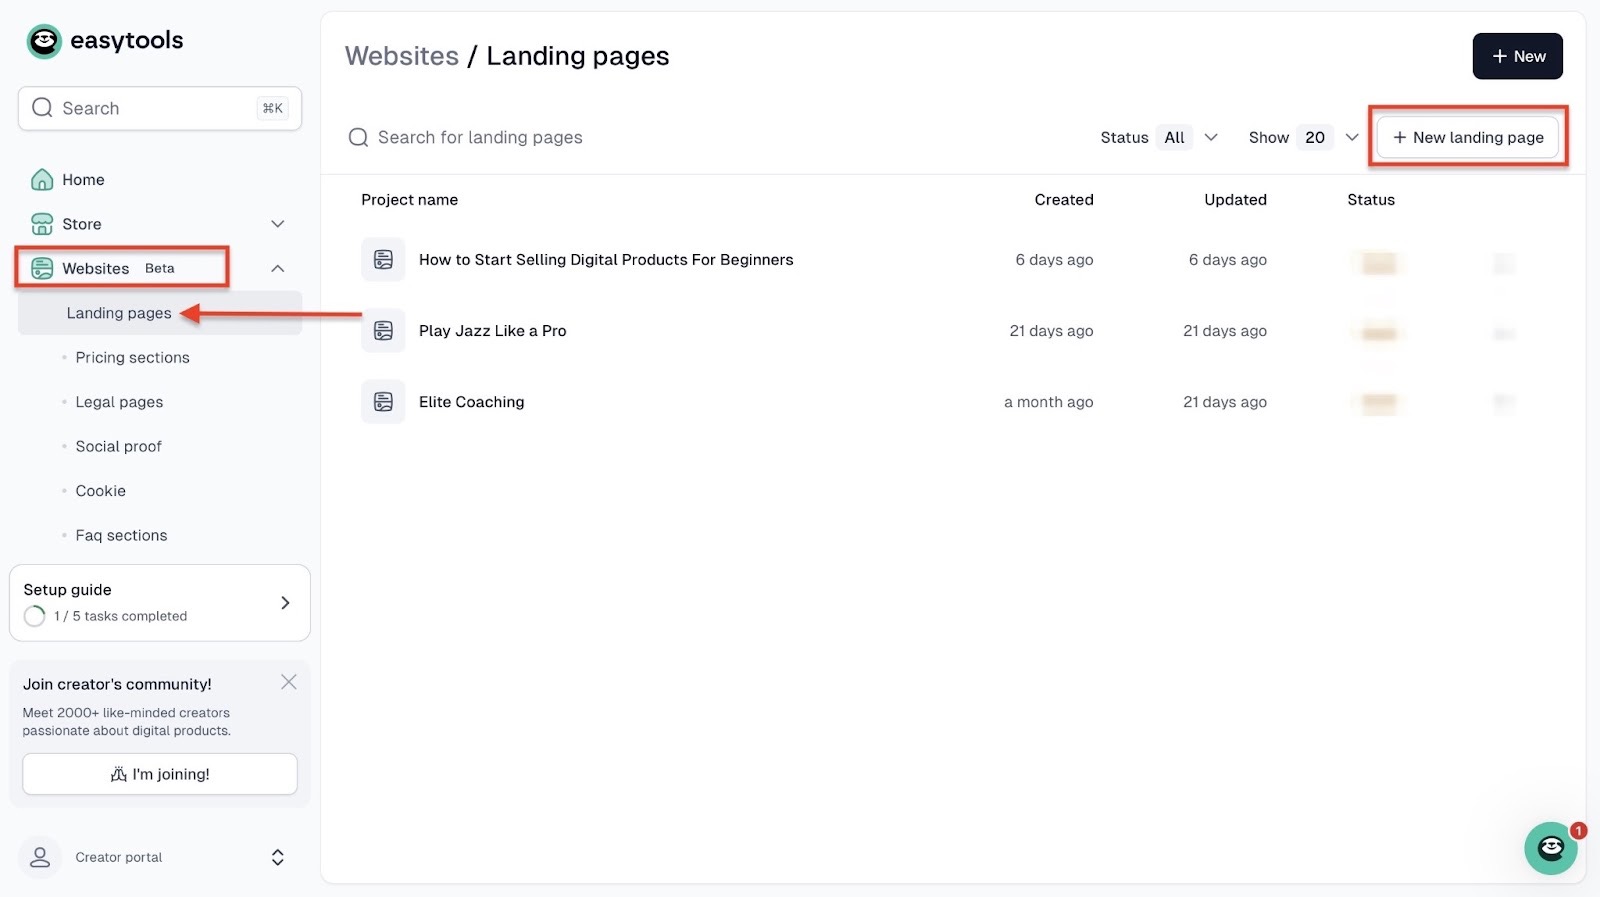
Next, enter the name of your landing page and then click “Create.”

After that, select an Easycart product you already created. It could be the course we published.

Continue by scrolling down and selecting a color palette. From here, hit “Generate.”

In the new window, choose any of the items in the sidebar to make changes. You can edit everything on your landing page, from the navigation bar to CTA buttons.
Once you've done that, hit “Save” and click “Publish.” Your landing page will go live.
3. Contact (Support)
Unlike other platforms, where customer support could leave you frustrated and waiting days for answers, Easytools' customer support is fast and reliable.
Say you’re setting up a digital product and your upload isn’t processing, for instance. You can get help from the support chat by clicking the icon in the bottom right corner of the page.
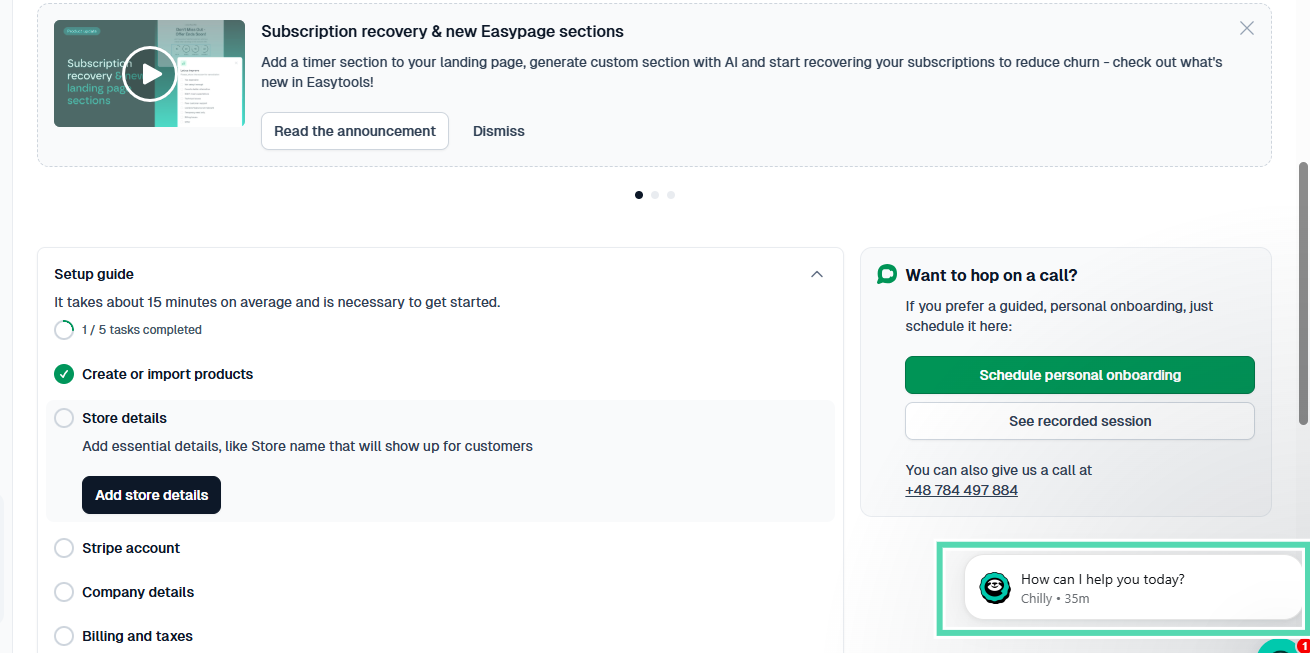
This will open our AI assistant, Chilly, which provides quick, helpful responses.

When I asked Chilly, “What is the current cost of Easycart?”, it immediately sent me a link to the Easytools pricing page and asked me if the response was helpful. That is the exact response I wanted!

You can also contact a human support agent directly at hello@easy.tools or by phone using the number provided on our website.
If you’re processing large transactions, you can schedule a meeting with our founder. He will guide you personally through setup and help you get the best out of Easytools.
This is a level of direct access that other platforms simply do not offer.

We even have a growing Circle community, which is updated regularly with feature releases, product updates, new integrations, and even success tips or case studies. These elements always keep our customers informed.

This level of support is a big reason why Easytools gets such amazing reviews both from creators and business owners.
[fs-toc-omit]What I loved and what I didn’t like
What I loved 👍
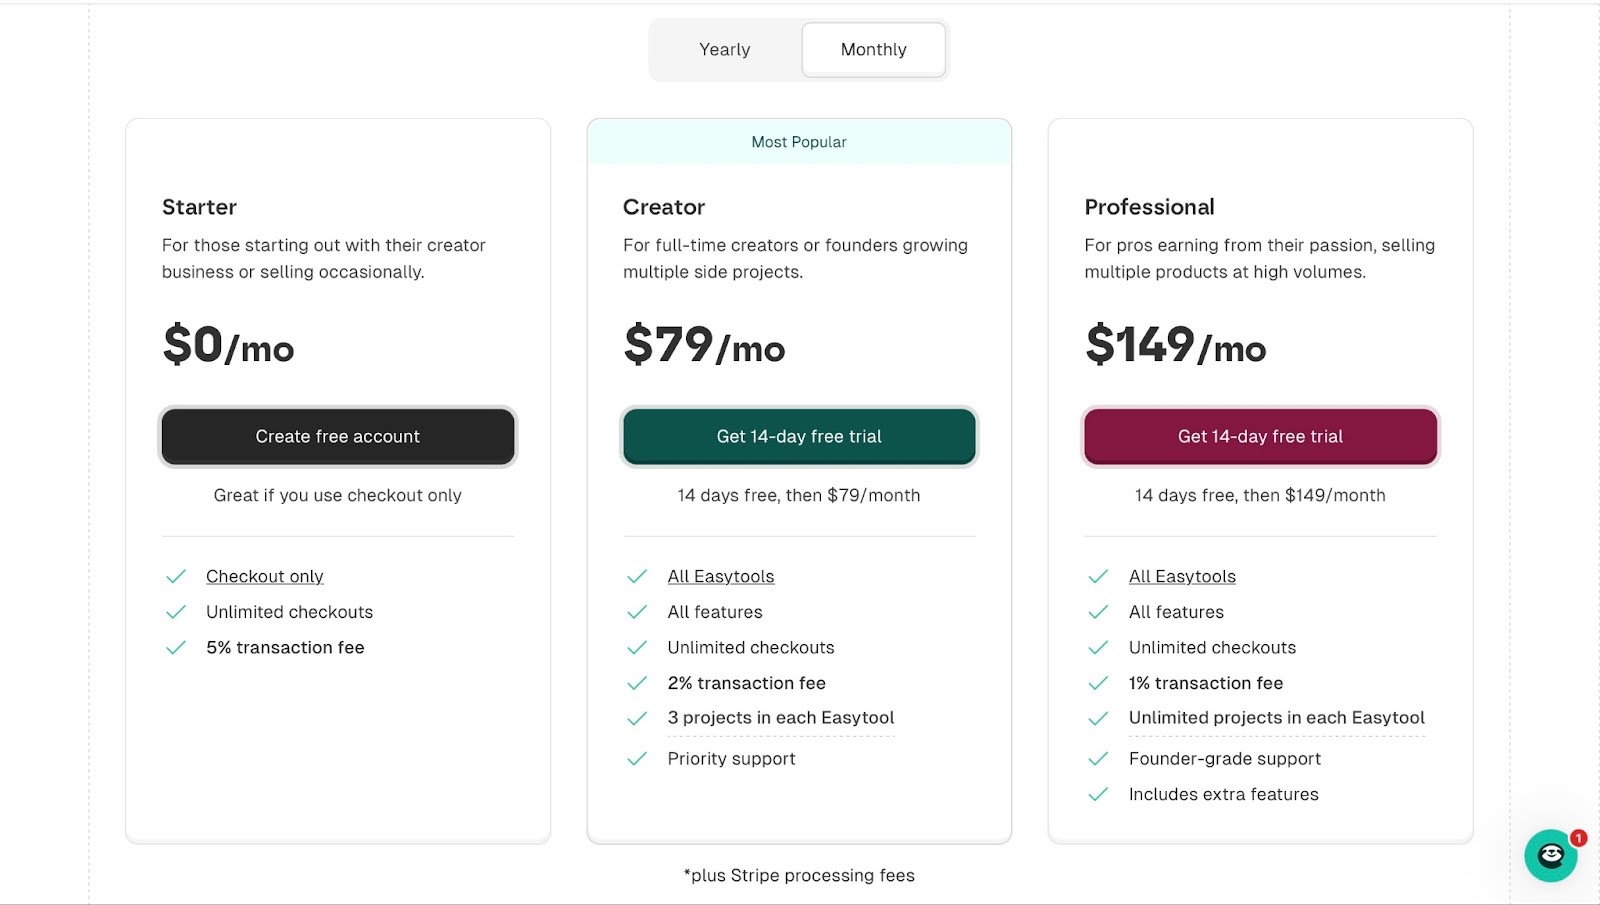
✅ Easytools transaction fees start from 5% to 1% depending on the plan, and that’s affordable for most creators.
✅ Allows you to sell different types of digital products, like online courses, e-books, templates, subscriptions, memberships, webinars, and more.
✅ You can sell online courses from other platforms like Kajabi using Easytools
✅ Easytools integrates with tools like HubSpot, Mailchimp, Make, Zapier, Zencal, and many more.
What I didn’t like 👎
❌ Easy’s website feature is in beta, but it works perfectly fine.
[fs-toc-omit]Best For
- Creators wanting a no-code all-in-one platform to sell online courses and other digital products.
[fs-toc-omit]Pricing
- Starter: $0/month
- Creator: $79/month
- Professional: $149/month
2. LearnWorlds
Rating: ⭐ ⭐ ⭐ ⭐ 4/5 stars | Starting price: $29 (with 5% per-sale transaction fee) | Integrates with: Google Meet, Freshchat, Stripe, ActiveCampaign, Zendesk, Shopify | Best for: Coaches, course creators, medium to large organisations, teachers, entrepreneurs, and professionals like lawyers and accountants
LearnWorlds is second on my list of the six best Teachable alternatives.
It's an AI-powered platform for creators and businesses that want to build, host, and sell online courses under their brands.
LearnWorlds reminds me of Easytools’ website feature. It’s like a no-code approach to building a professional landing page.
LearnWorlds focuses more on educational institutions and professionals. It made my list for a couple of reasons.

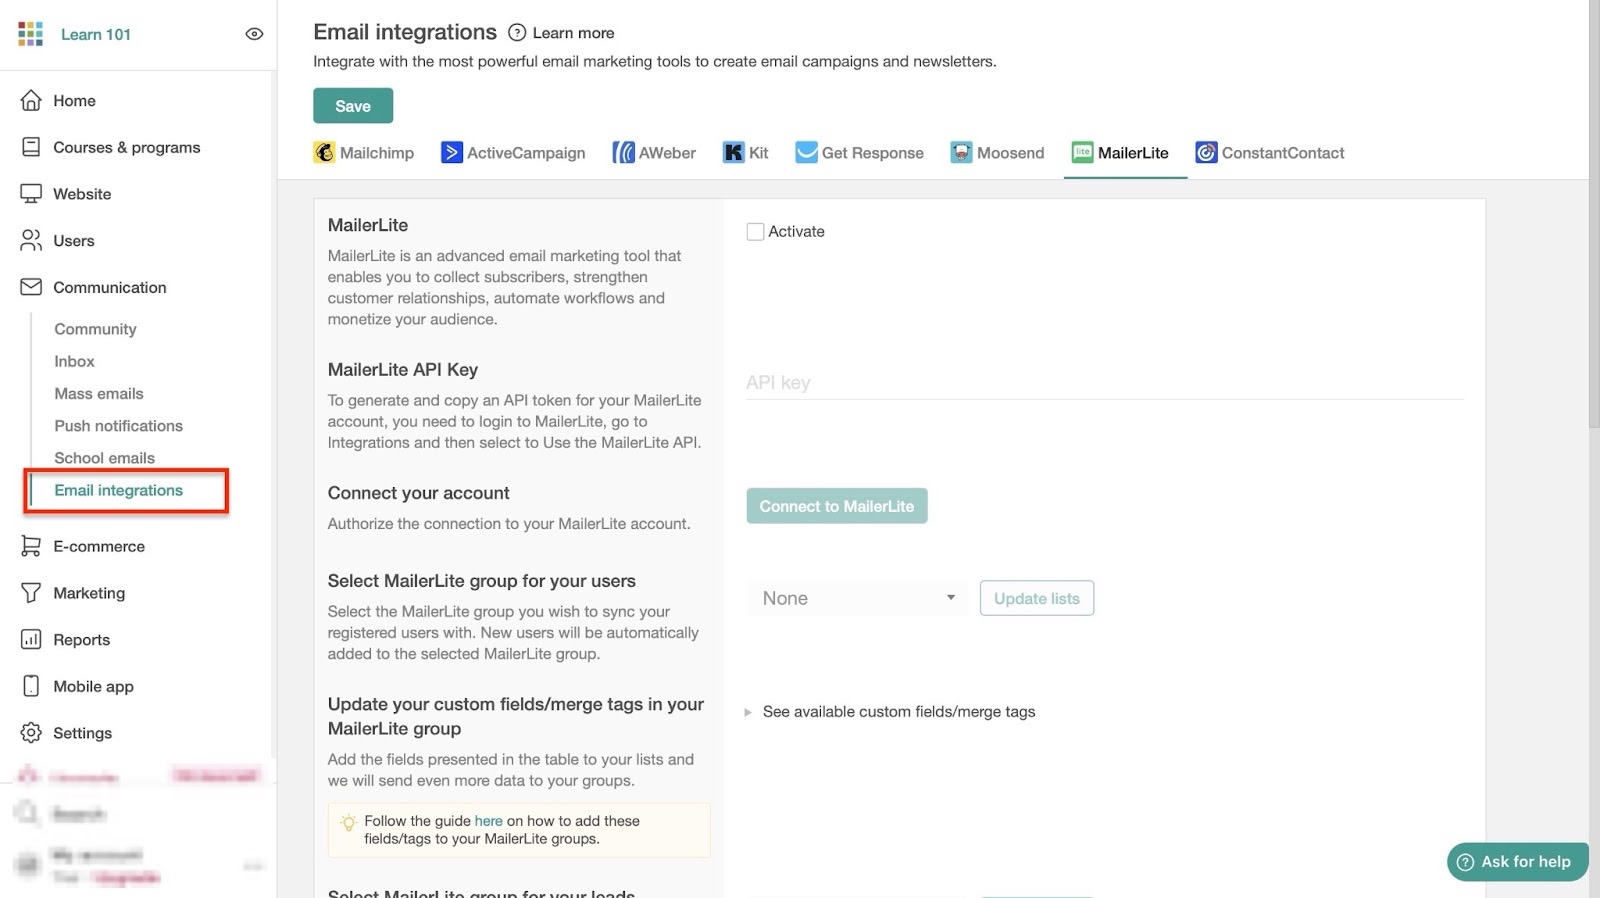
It has email integrations similar to what we have on Easytools. So connecting LearnWorlds with MailerLite, GetResponse, ActiveCampaign, and Mailchimp is simple.
And this is all for selling your online courses through email. MailerLite, for example, lets you send newsletters and promotions to your audience.
The courses & programs feature is not just for creating lessons. It also allows you to import your own pre-made lessons.
For example, you can add prerecorded courses from your computer. Then, complement that with gradebooks, question banks, course forms, and certificates.
That’ll simply add more value to your online courses.

LearnWorlds helps you cater to users of your platform.
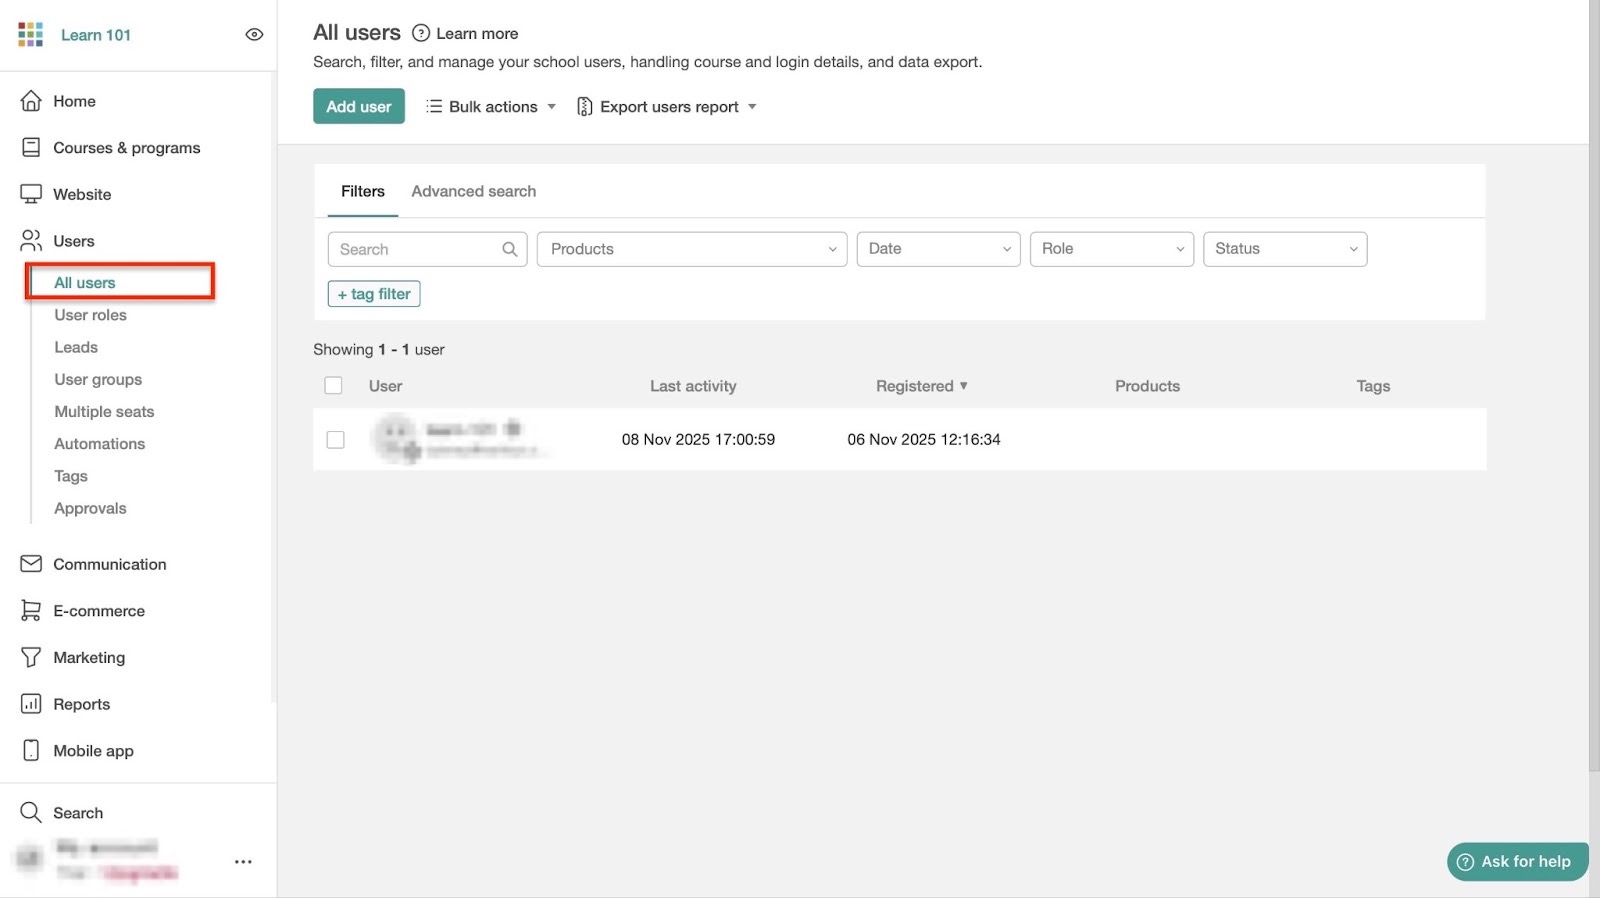
Adding users and enrolling or importing them is just a few clicks away. You can also tag, unenroll, suspend, and delete users.
And if you already have a list, click “Export users report” to download the list as a CSV or XLS file.
Of course, you'll need a marketing feature to sell online courses on your landing page.
Educators can check marketing and qualification forms, affiliate programs, and net promoter score (NPS).
They’ll understand what's working and find new ways to attract students and sell their courses faster.

[fs-toc-omit]What I loved about LearnWorlds
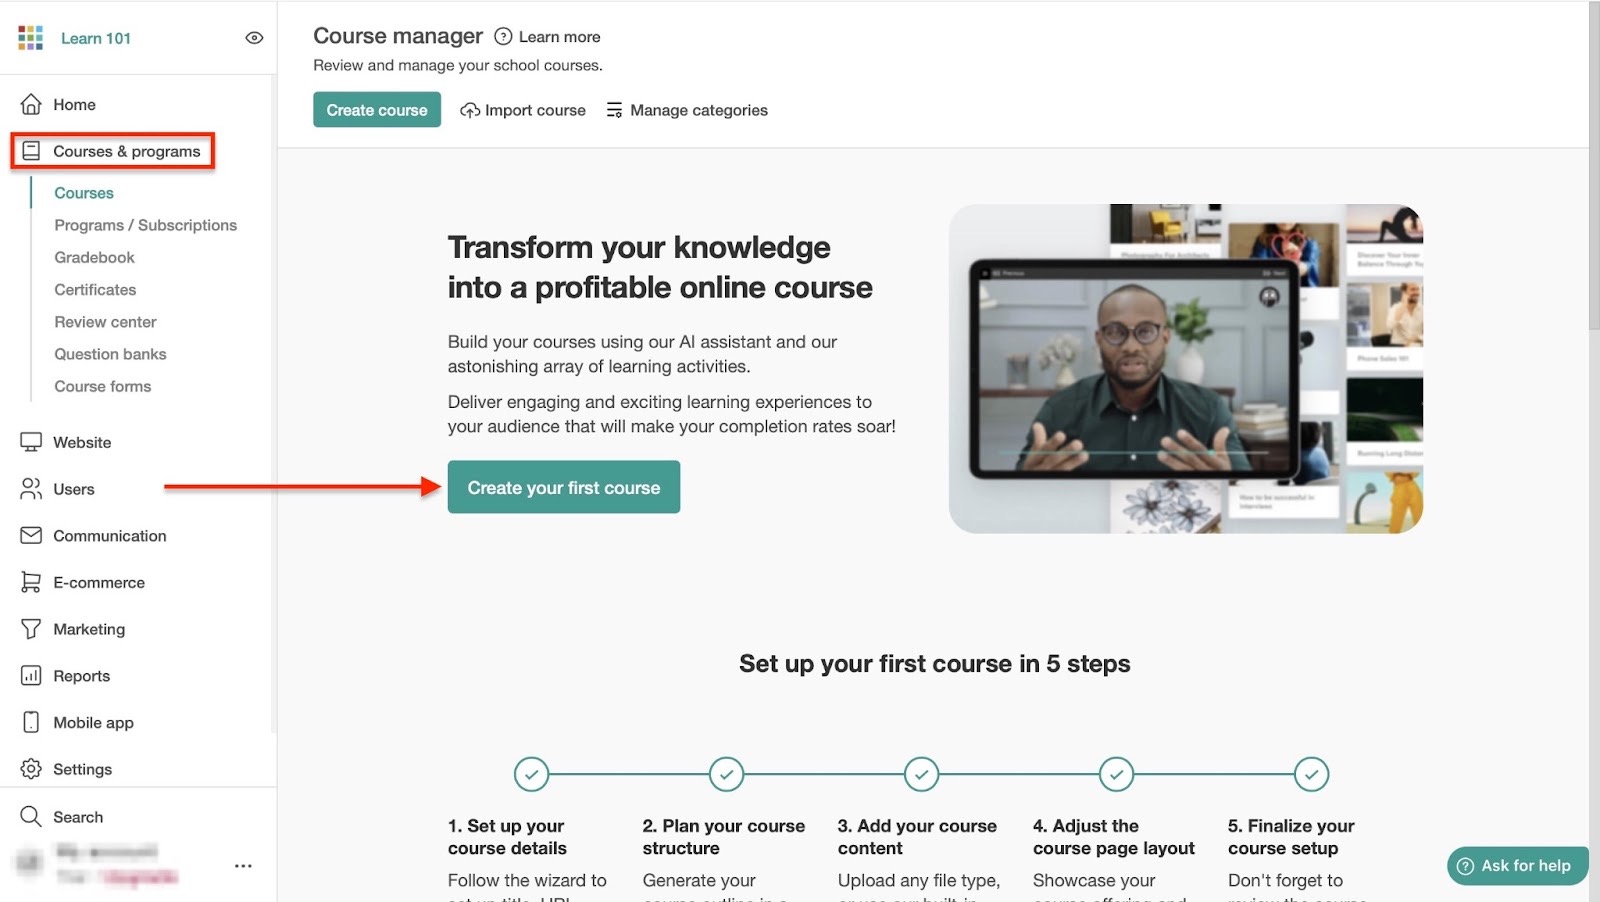
1. Courses & programs
LearnWorlds’ courses & programs feature lets you create online courses with videos, PDFs, quizzes, and live lessons.
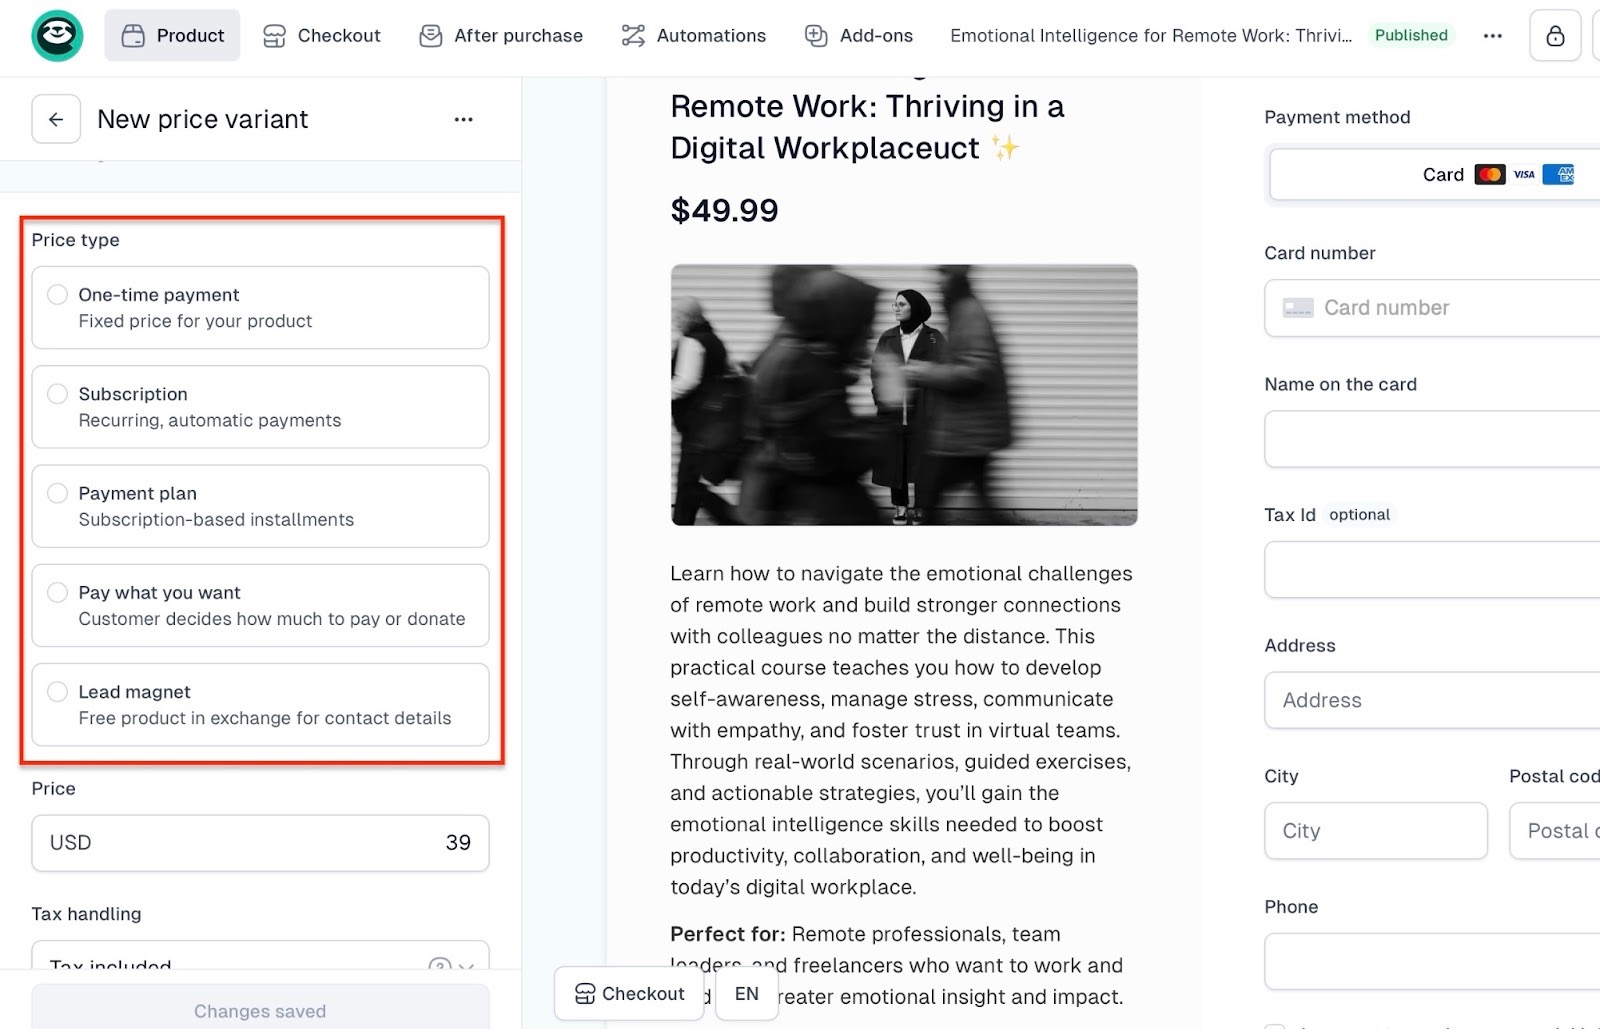
And like most Teachable alternatives, you can set pricing and access. For example, you can set it to a one-time payment or subscription.
You can also track learners’ progress and award them with certificates. But you’d have to create a course first.
This is how:
Select “Courses & programs” in the sidebar and then click “Create your first course.”
In the new window, click LearnWorlds’ “AI Assistant” for suggestions. In the pop-up window, add a prompt. Now, click “Generate” at the bottom of the window.
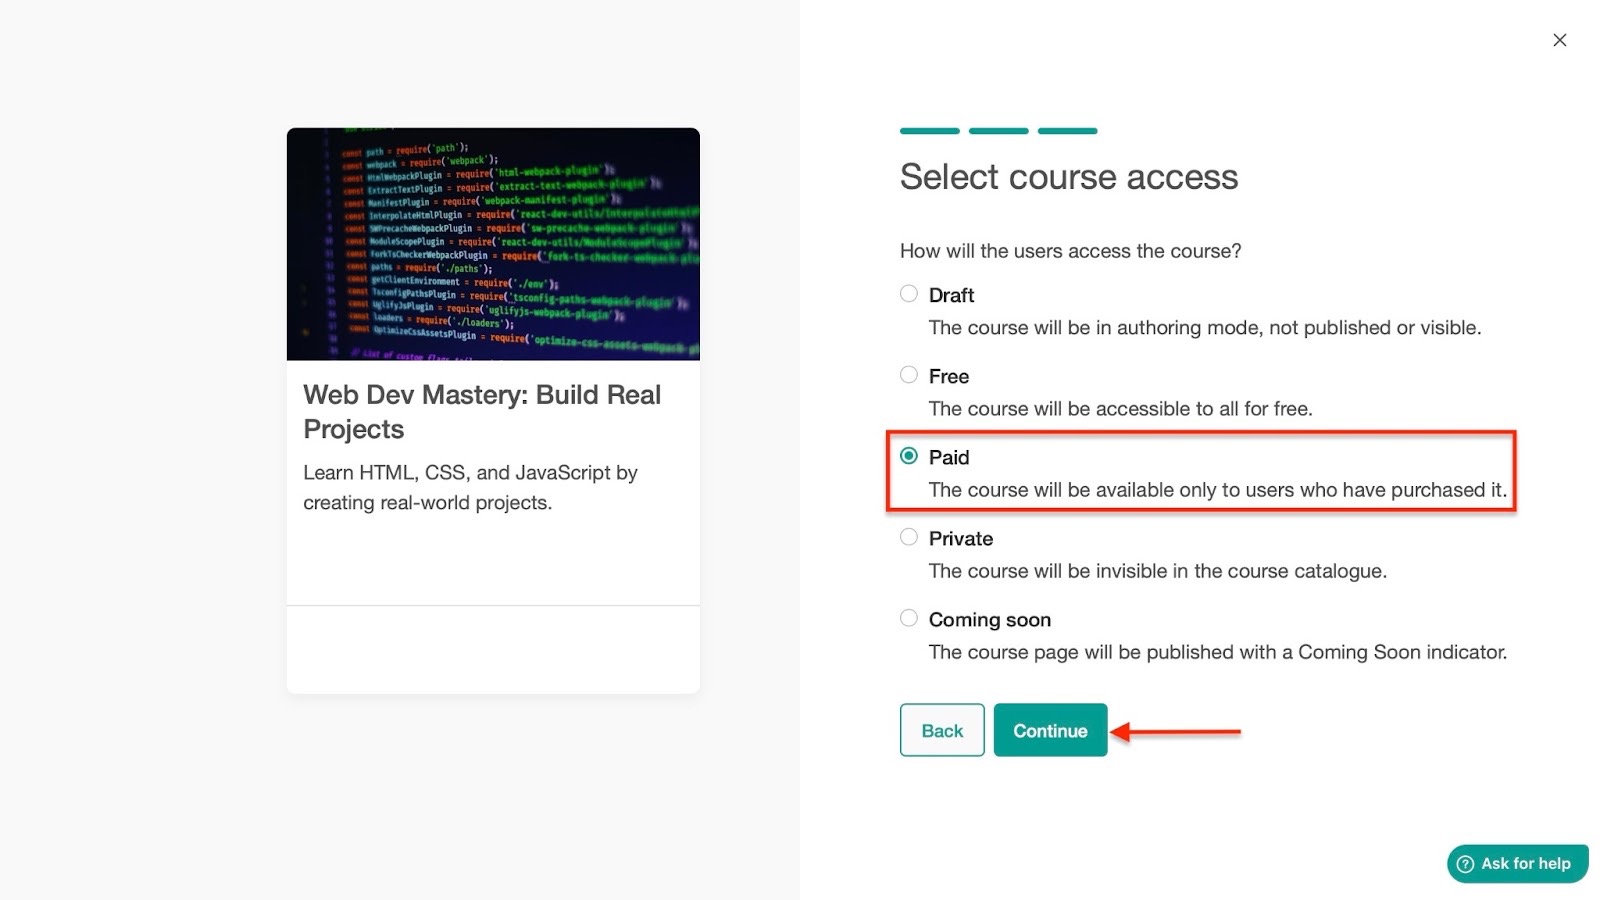
After that, select one of the three options by clicking the radio buttons beside them. Then, click “Insert content.”
You may click on the pen icon to upload a cover image, but it’s optional. Next, click “Continue.”

From here, create your course URL and click “Continue.”
Then select your course’s access by clicking the radio buttons beside your preferred options. Let’s select “Paid” and click “Continue.”
Continue by choosing a price. You can also choose a “compare-at price” to show your students how much they’ll be saving when they buy your course.
Once you've done that, hit “Finish.”
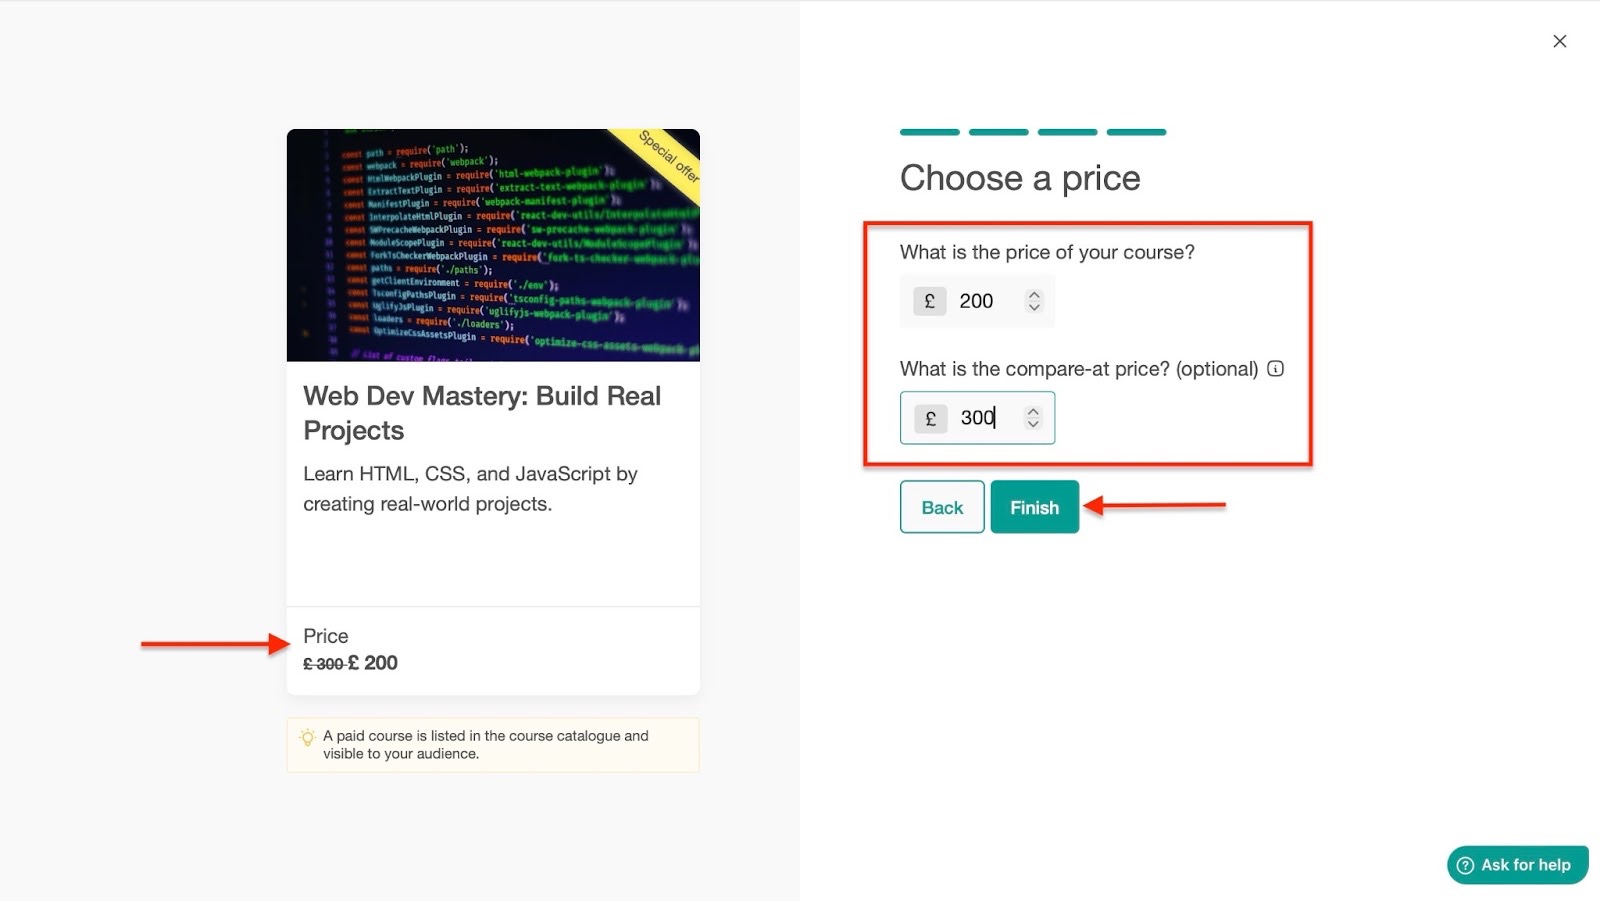
LearnWorlds will display your course in the Course Manager window. Click on it to add more edits and changes.
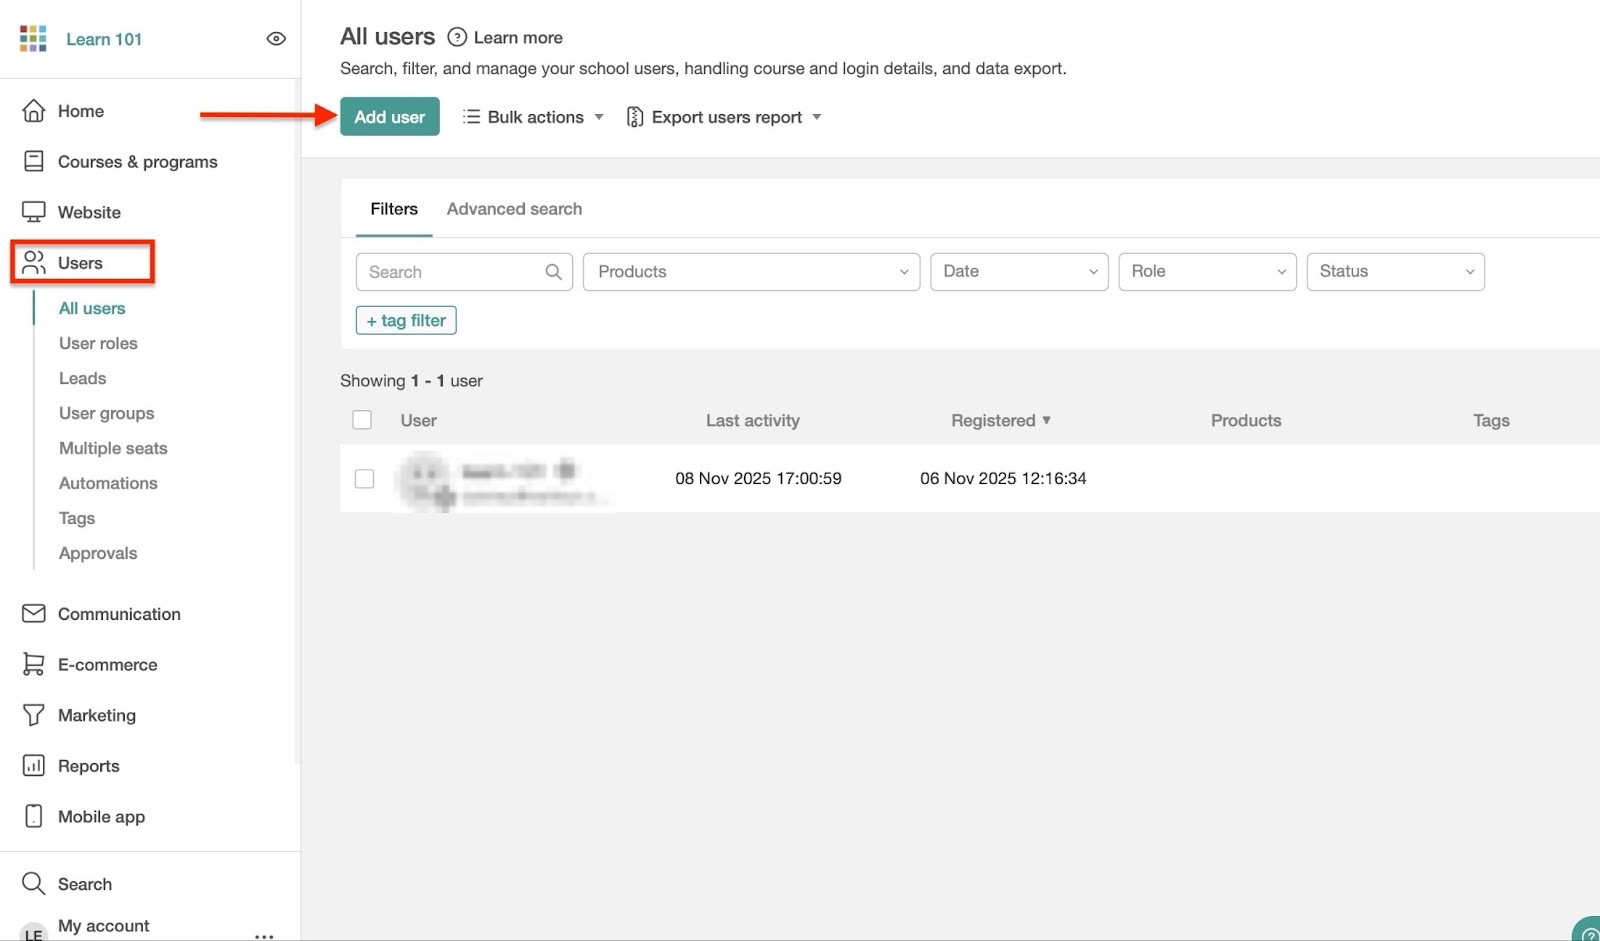
2. Users
On LearnWorlds, “users” refers to learners, instructors, administrators, or managers.
So the users feature lets you track and view individual learners and their groups in your online school. You can also enroll, unenroll, and delete users.
Of course, you can define user roles too. That means you choose who is an admin and who’s an instructor.
Let me walk you through how to add users.
Select “Users” in the sidebar and click “Add user.”
Next, add the username and email in the “User Details” section.
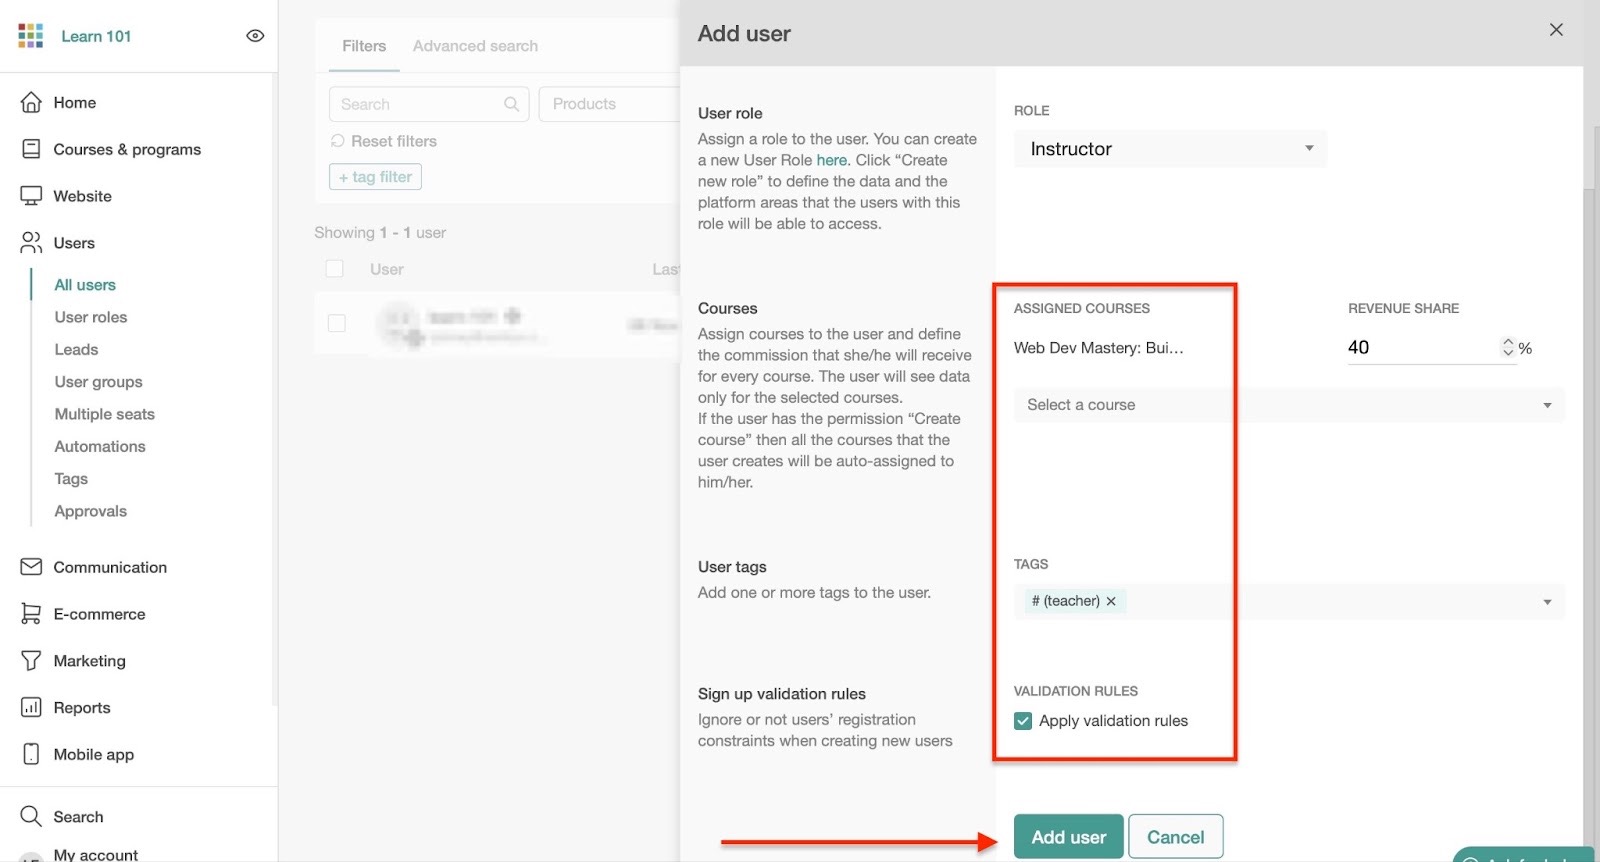
Then, in the slide-out panel, define the role of the user. After that, assign a course to them, especially if their role is an instructor.
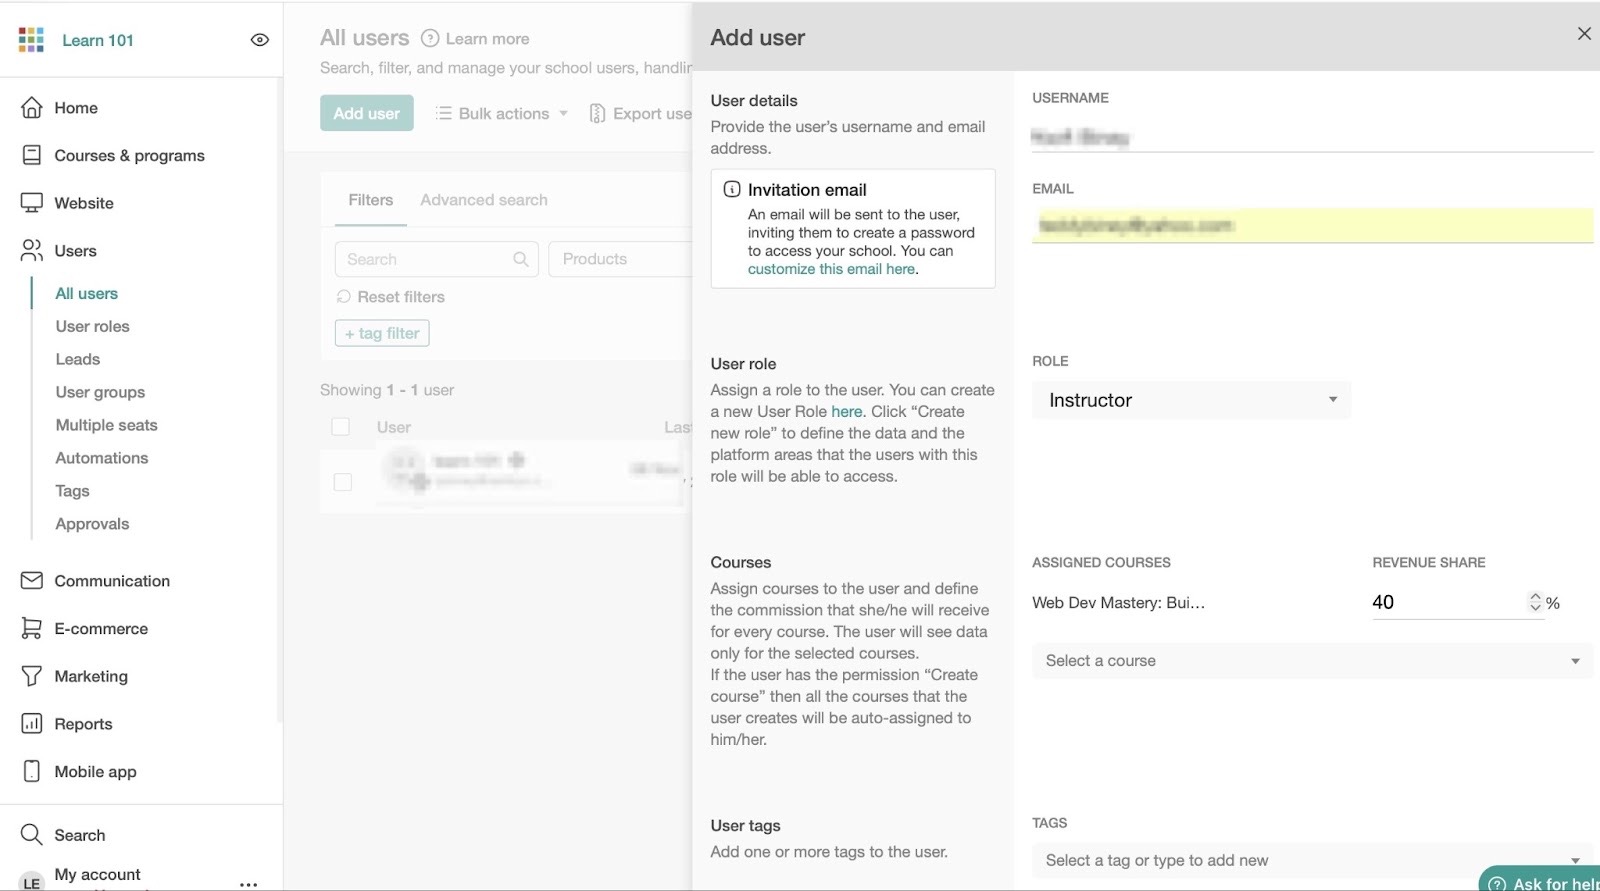
From here, scroll down to add a few user tags. You may tick the checkbox to enable “Validation Rules.”
This allows you to bypass normal sign-up rules on LearnWorlds. To finish, hit “Add user.”
You will find a new user in the “All users” window.

3. Affiliate program
I have already explained how affiliates work. You create an affiliate link, and the customer copies and shares it online.
They make money when someone buys from you through that unique link. It’s a good way to sell your courses fast, and during my test, I was able to set one up.
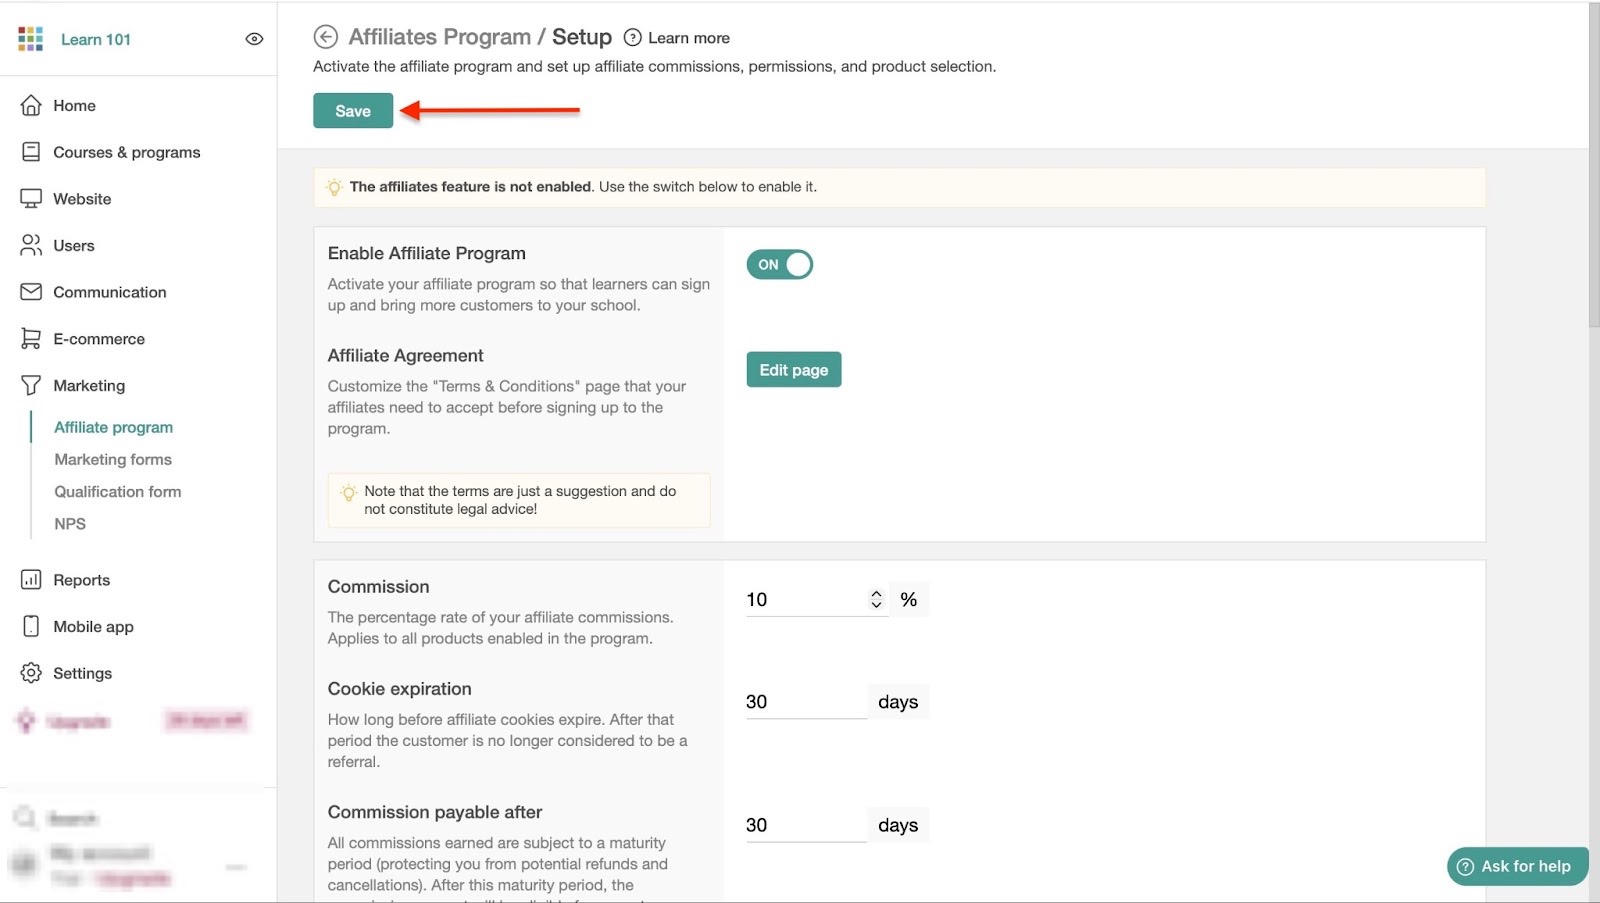
Begin by selecting “Marketing” in the sidebar. Then click “Start your affiliate program.”
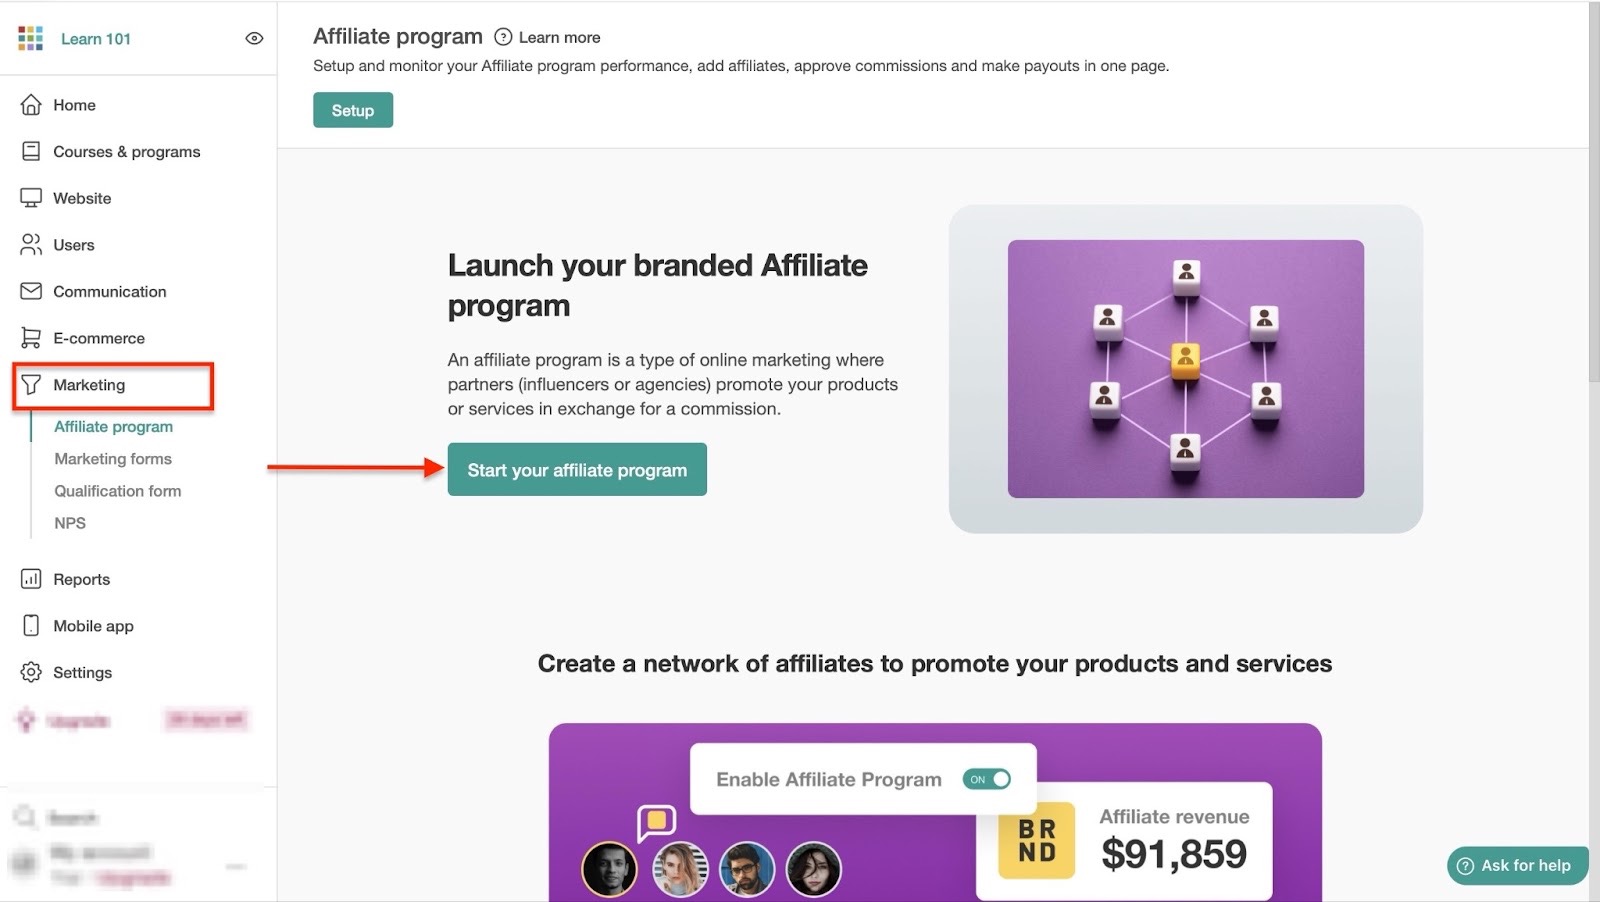
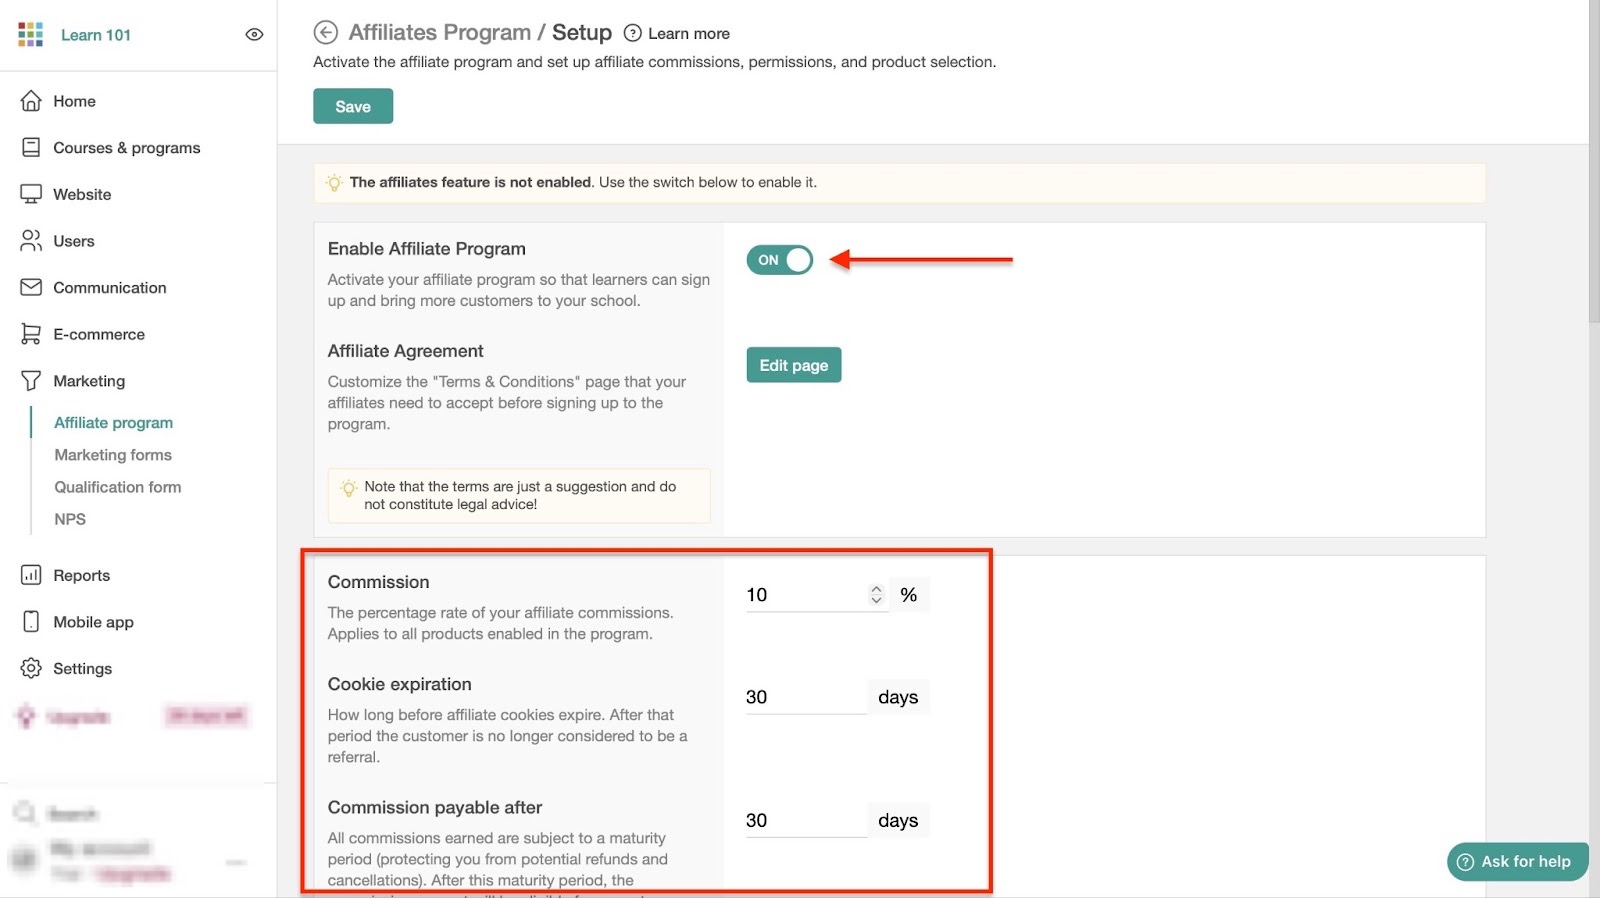
Then, toggle the switch next to “Enable Affiliate Program” to turn it on. After that, hit “Edit page” to make changes to your affiliate agreement.
You want a deal that works best for everyone.
Now, choose the commission rate, cookie expiration, and the number of days before you pay the commission.
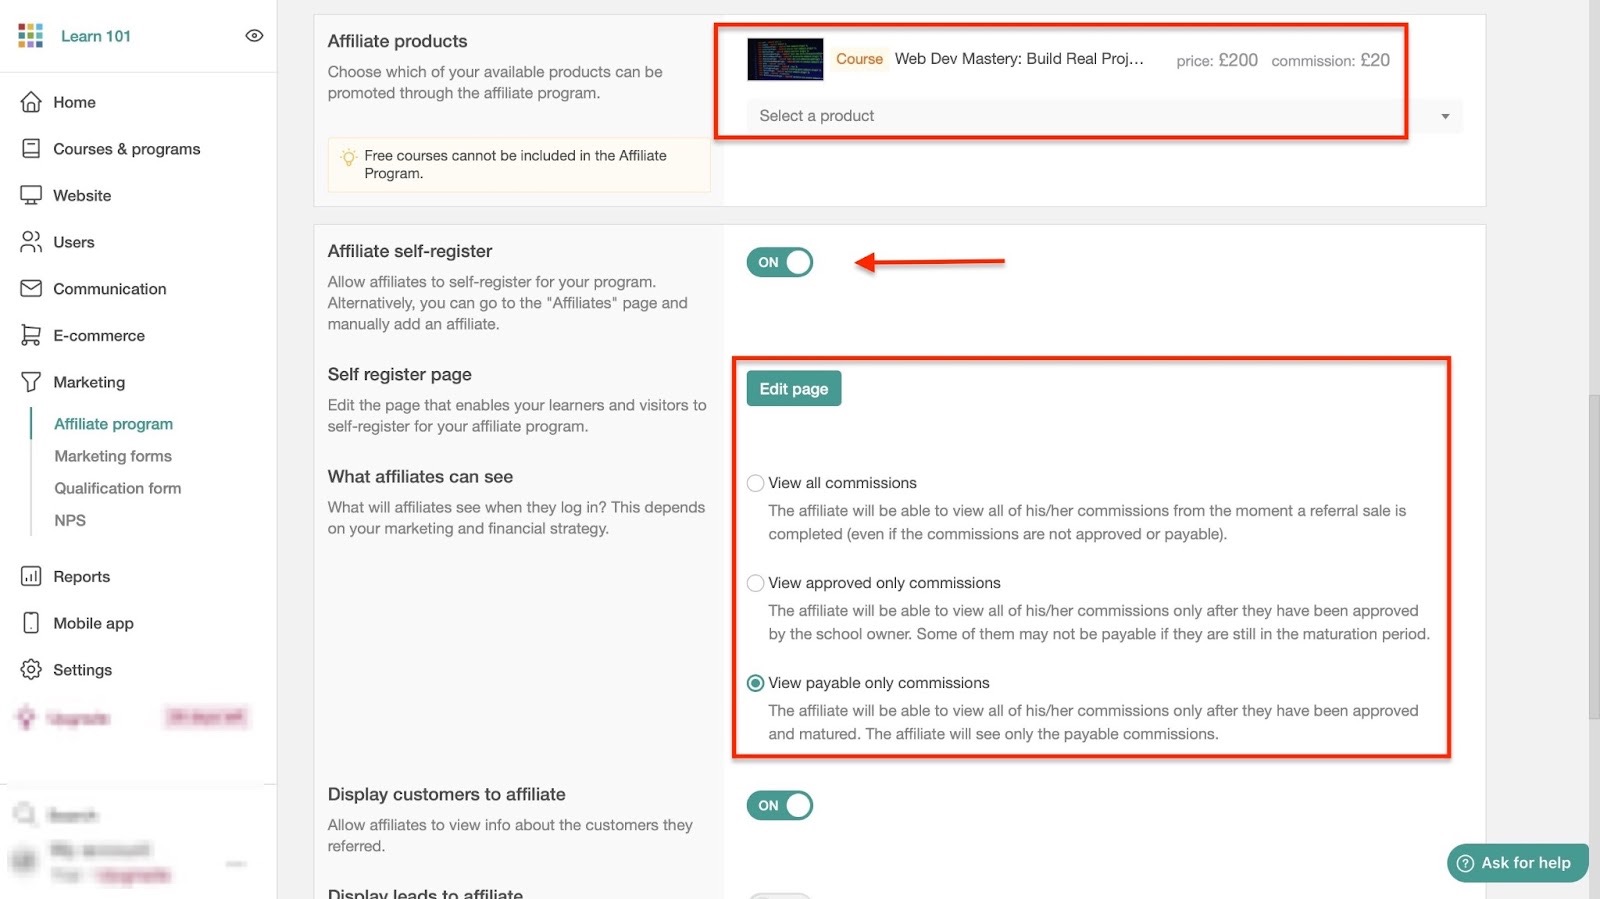
After that, scroll down to select the affiliate product and choose other preferred options. For example, you can toggle the switch to allow affiliates to register for your program by themselves.
Then you can also choose to show them what they’ve earned.
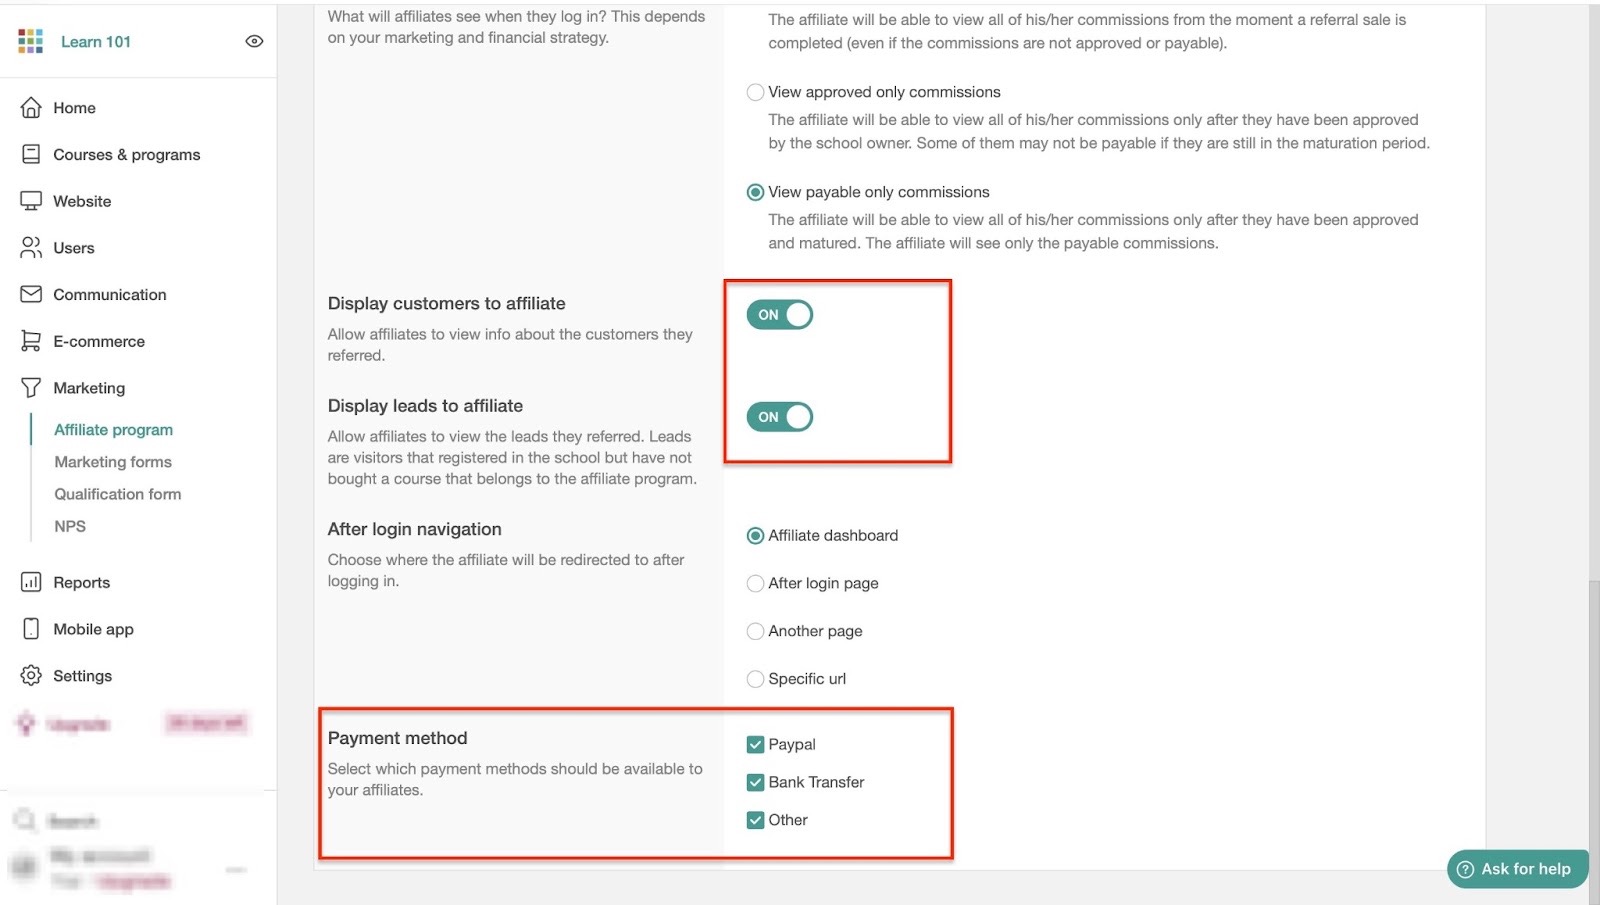
From here, scroll further down and toggle the switches to allow affiliates to view customers and leads they referred.
After that, choose what loads when affiliates log in. Once you've done that, choose a payment method.
Finally, scroll back up and click “Save” at the top of the window to finish.
LearnWorlds will create your affiliate program.
[fs-toc-omit]What I loved and what I didn’t like
What I loved 👍
✅ You have full control of all the users: learners, admin, instructors, etc.
✅ It has many features to help you host, sell, and market your online courses and your school.
✅ You can launch and track an affiliate program to help you sell fast and attract more learners.
✅ LearnWorlds offers a 30-day free trial period, and that's enough time to test the tool before committing.
What I didn’t like 👎
❌ Features like courses & programs, website, users, and more can feel cluttered and may be challenging to get around.
[fs-toc-omit]Best For
- Training institutions needing a fully-branded online school to teach, test, and certify students.
[fs-toc-omit]Pricing
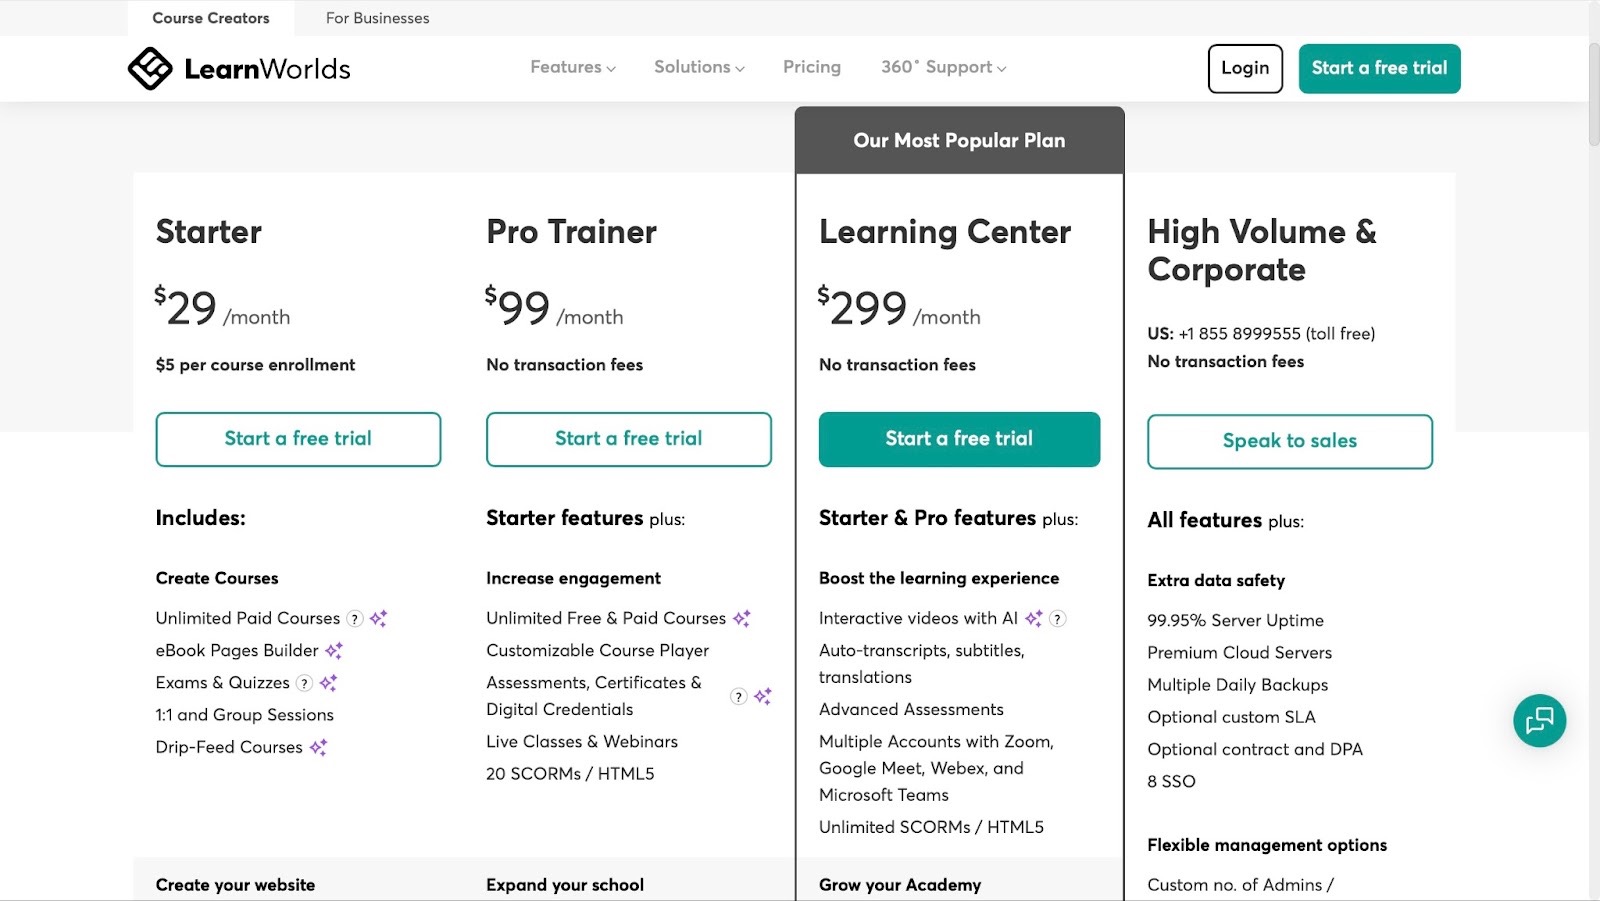
- Starter: $29/month
- Pro Trainer: $99/month
- Learning Center: $299/month
- High Volume & Corporate: Contact for price
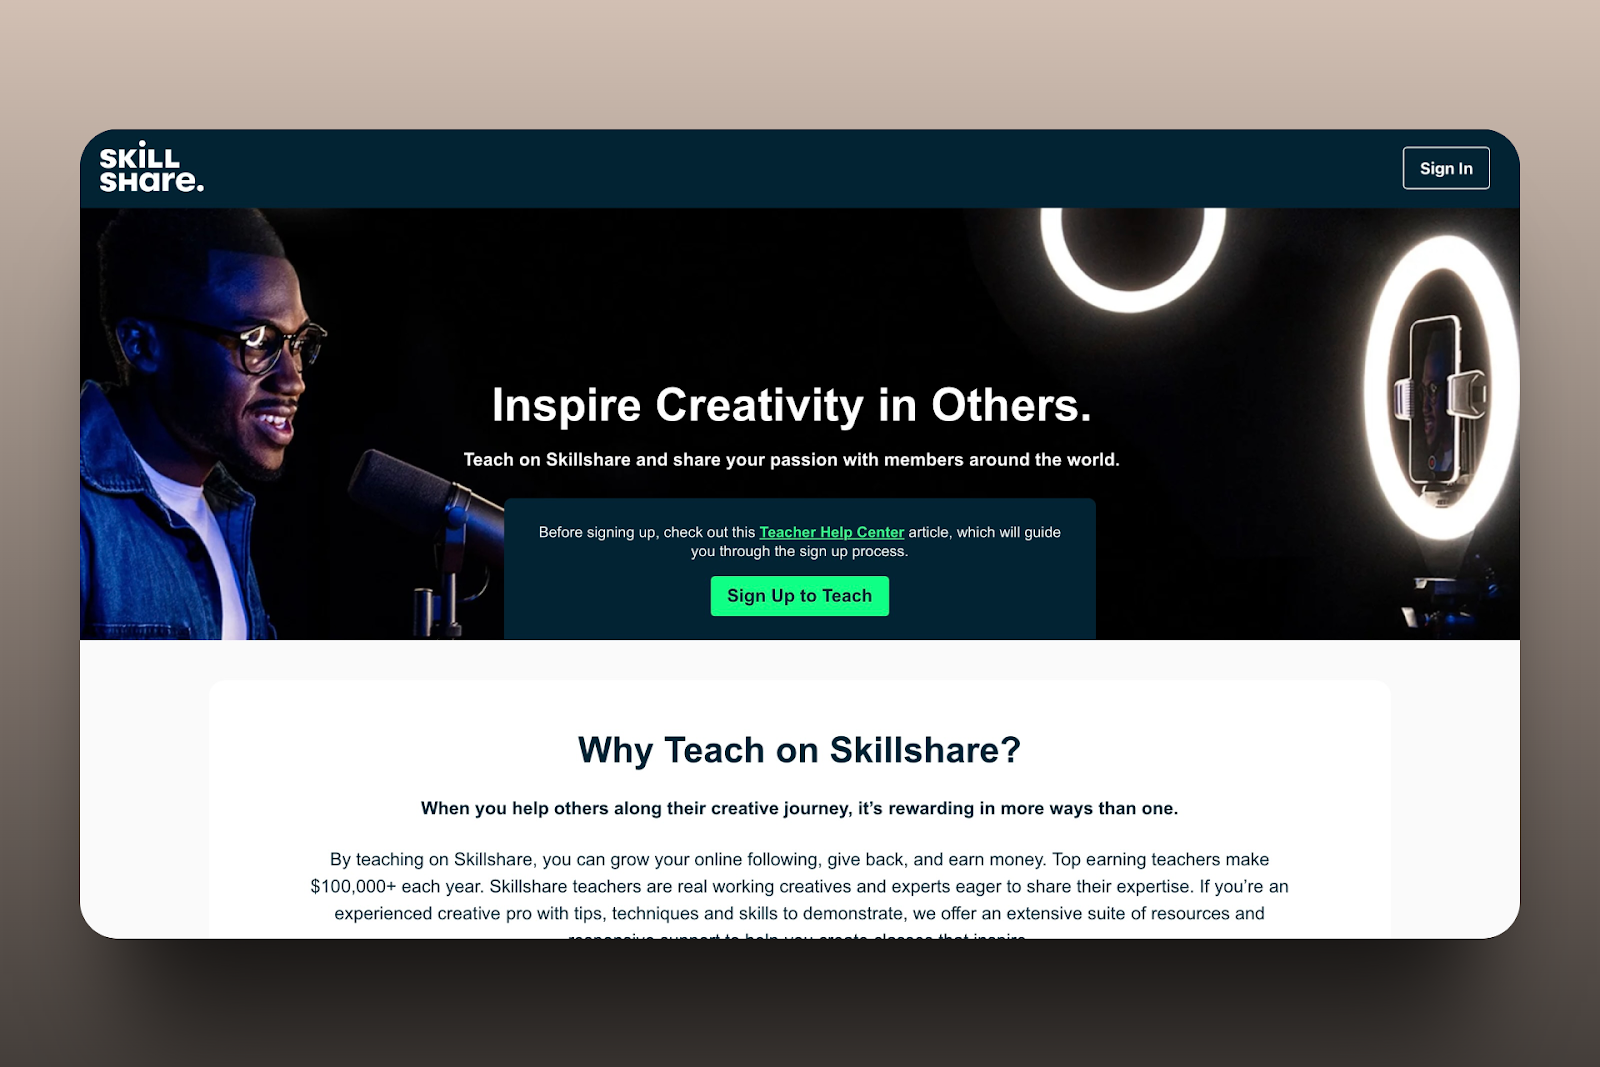
3. Skillshare
Rating: ⭐ ⭐ ⭐ ⭐ 4/5 stars | Starting price: $0 (with 10% platform fee and 2.9% + $0.30 Stripe credit card processing fee) | Integrates with: Google Calendar, Creator Hub, LinkedIn Learning Hub | Best for: Skill-based educators, content creators, coaches, entrepreneurs, designers, illustrators, etc.
Skillshare is a subscription-based online platform where you can teach and earn from your video courses.
It’s free to sell online courses on Skillshare, and you can earn through royalties based on watch time and referral bonuses.
Unlike Teachable, you can’t set up checkouts or build landing pages. But it gives you access to a global audience.
This is how Skillshare works.
The platform also allows you to add video lessons and key class details when creating your classes.
Teachers can even indicate which professional software and materials students will need. This makes it easy to build online courses from start to finish.
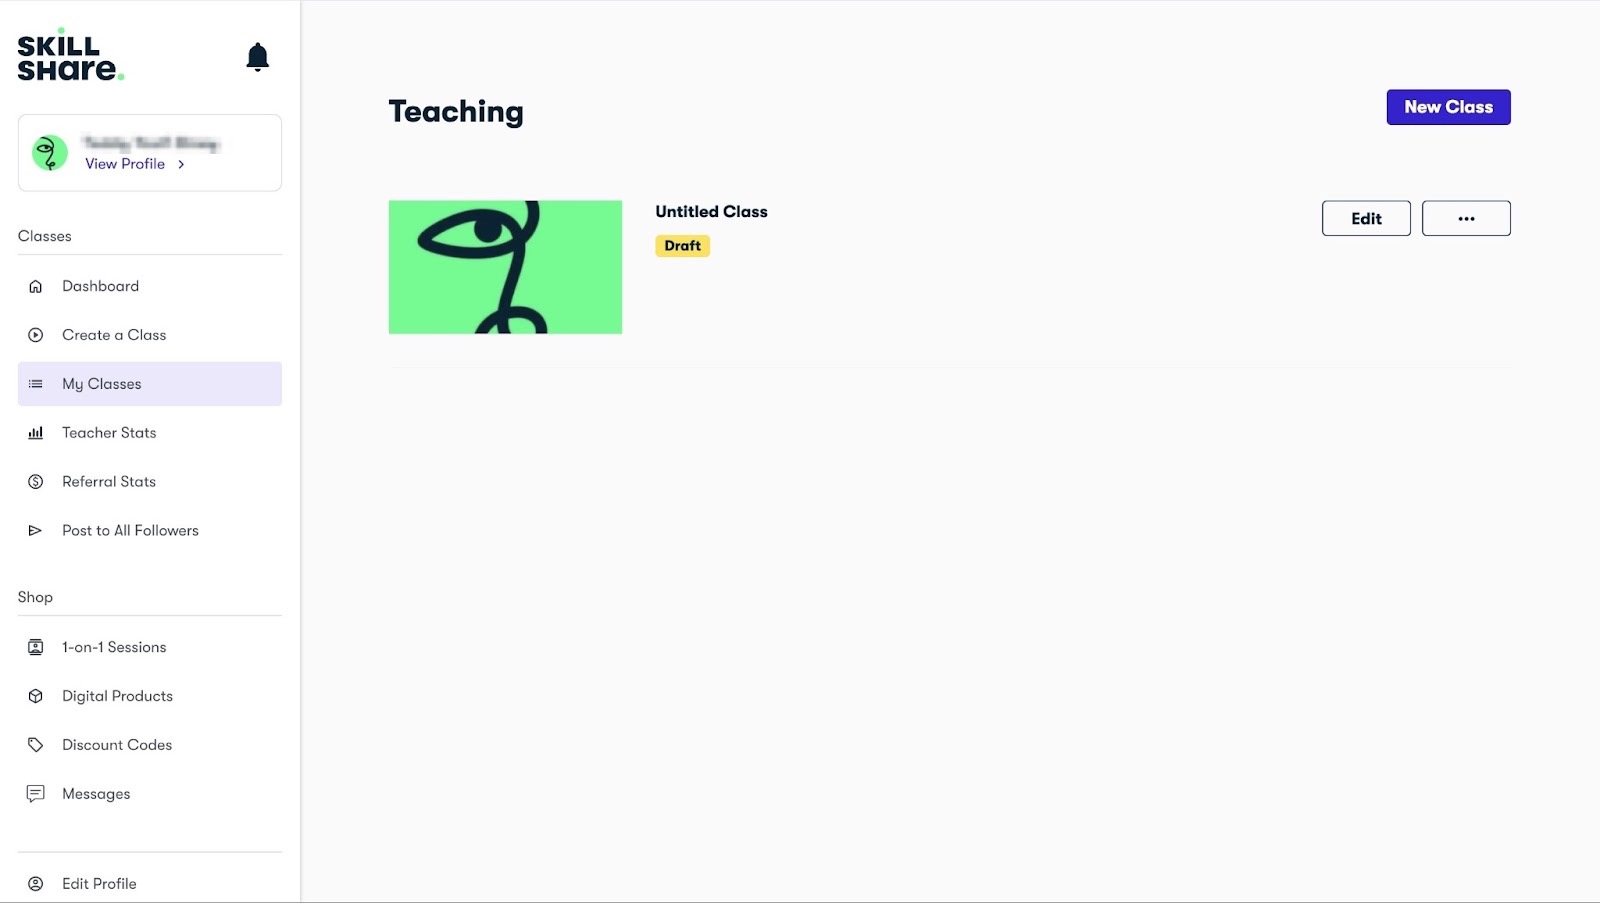
When I tested Skillshare, I realized that I could list all the courses I’d added. That helped me view, edit, delete, or create a new class from the “My Classes” feature window.
That also keeps my course list organized as I add more.
Like Easy's products feature, you have the option to add e-books, PDFs, EPUBs, videos, audio, images, etc. You can price them and add cover images, product titles, and descriptions.
You could sell the digital products you create with your online courses.
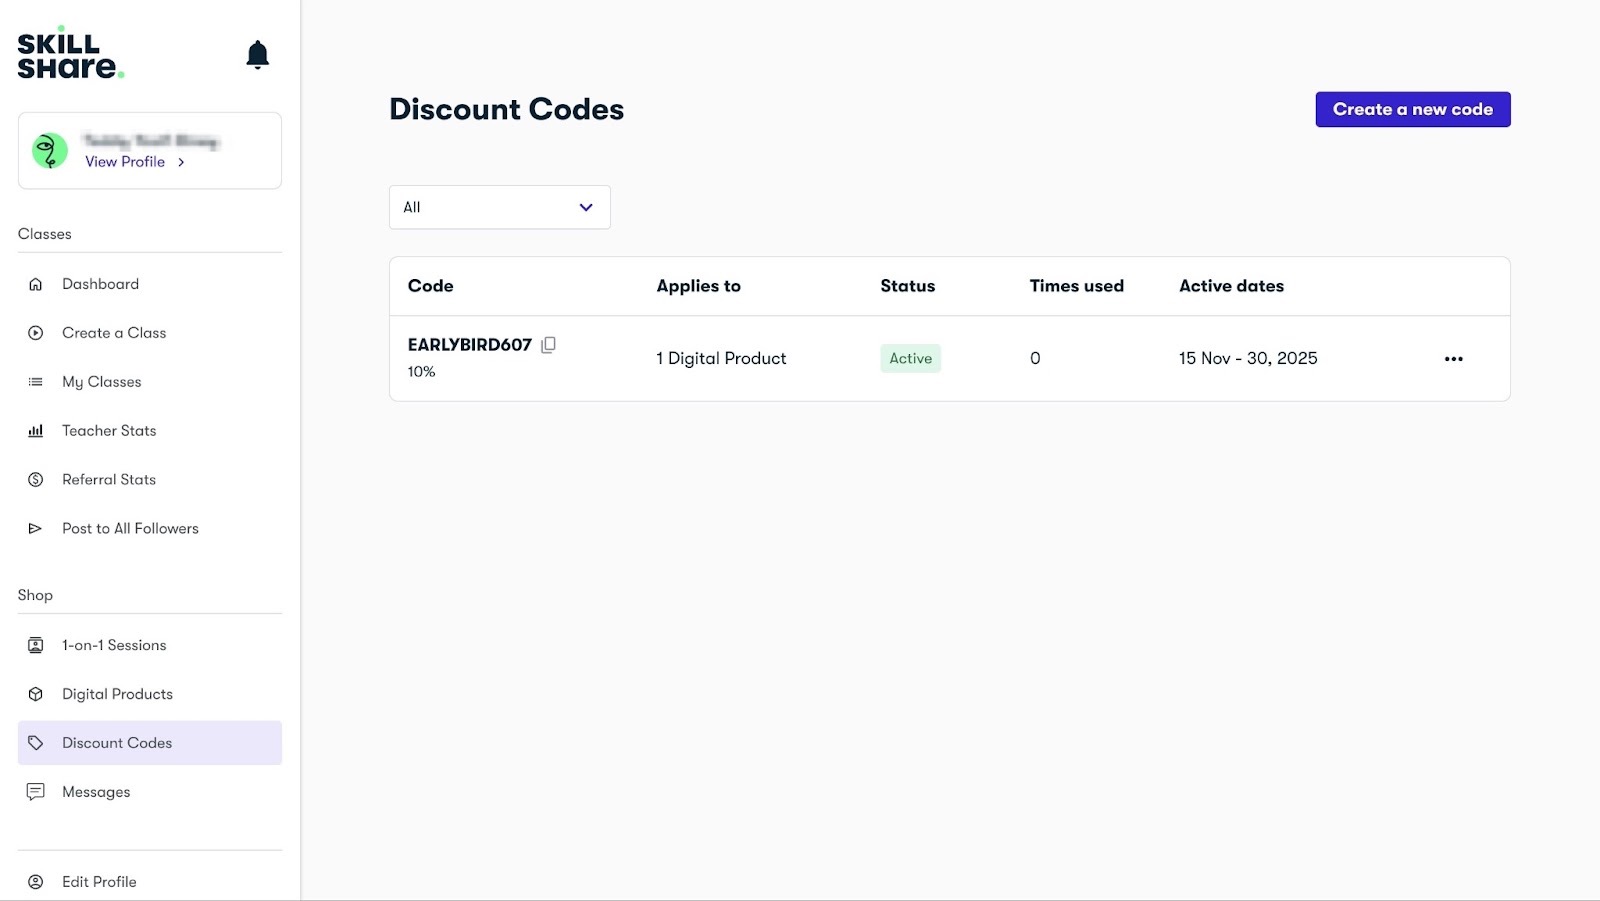
And if you want help selling your courses, you can create discount codes. They can help you attract more students and reward your loyal learners with special offers.
You can edit, copy, delete, and duplicate the code after you have created it.
[fs-toc-omit]What I loved about Shillshare
1. Create a Class
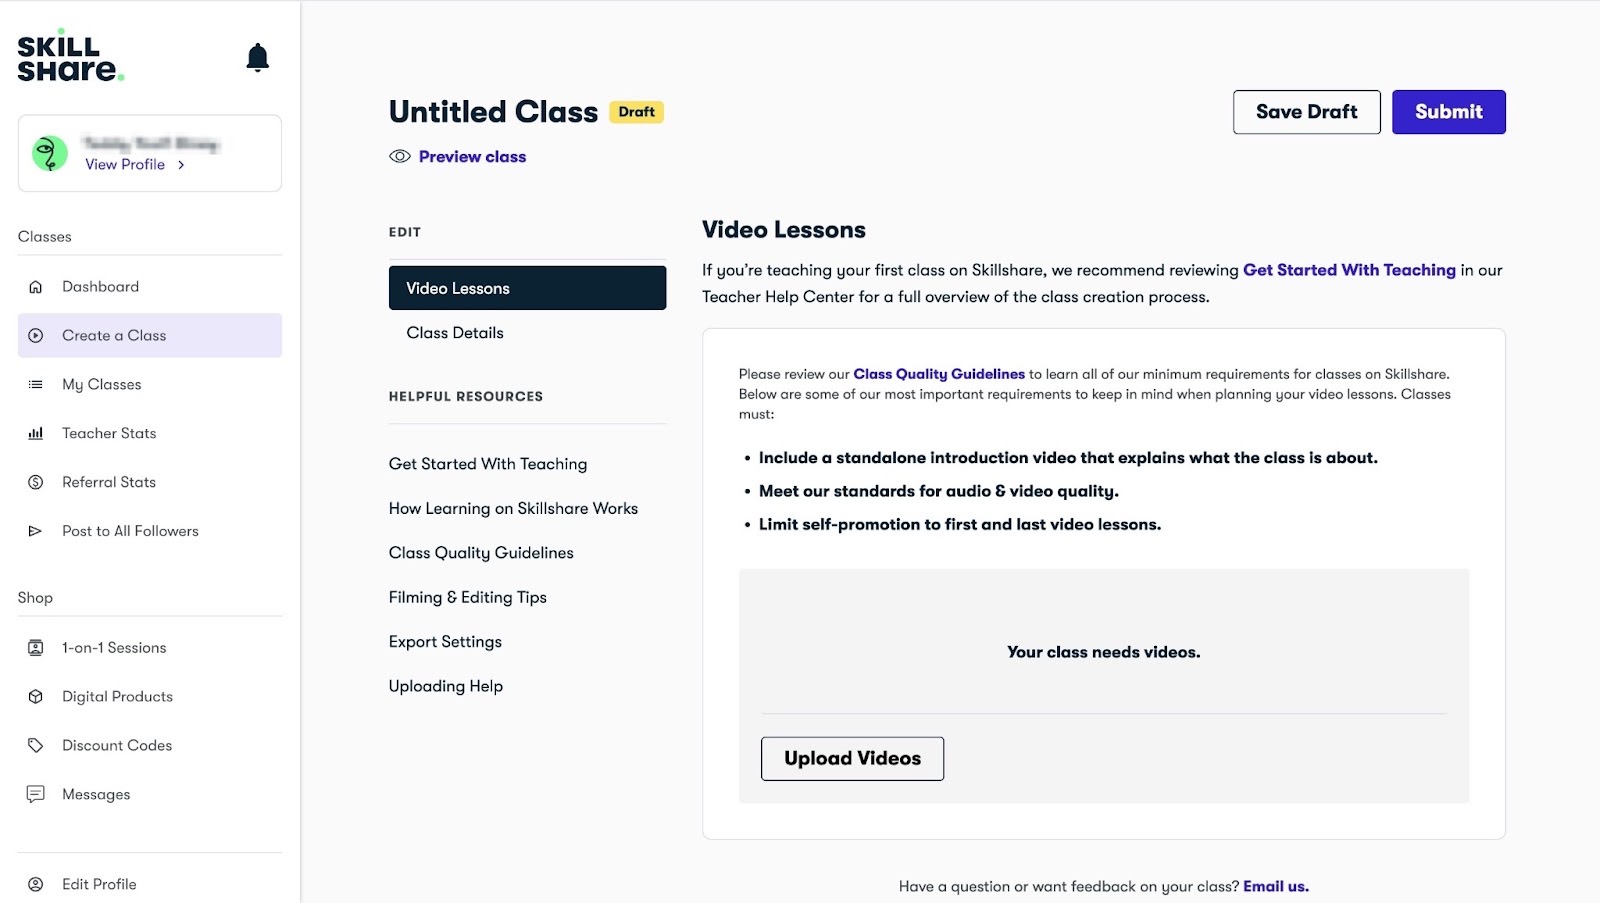
On Skillshare, the Create a class feature lets you create and publish your online courses.
Let’s see how that works:
Click “Create a class” in the sidebar and select “Video Lessons.” Now, click “Upload Videos” to add a video from your computer.
It should be at least two minutes long. You can upload more than one video.

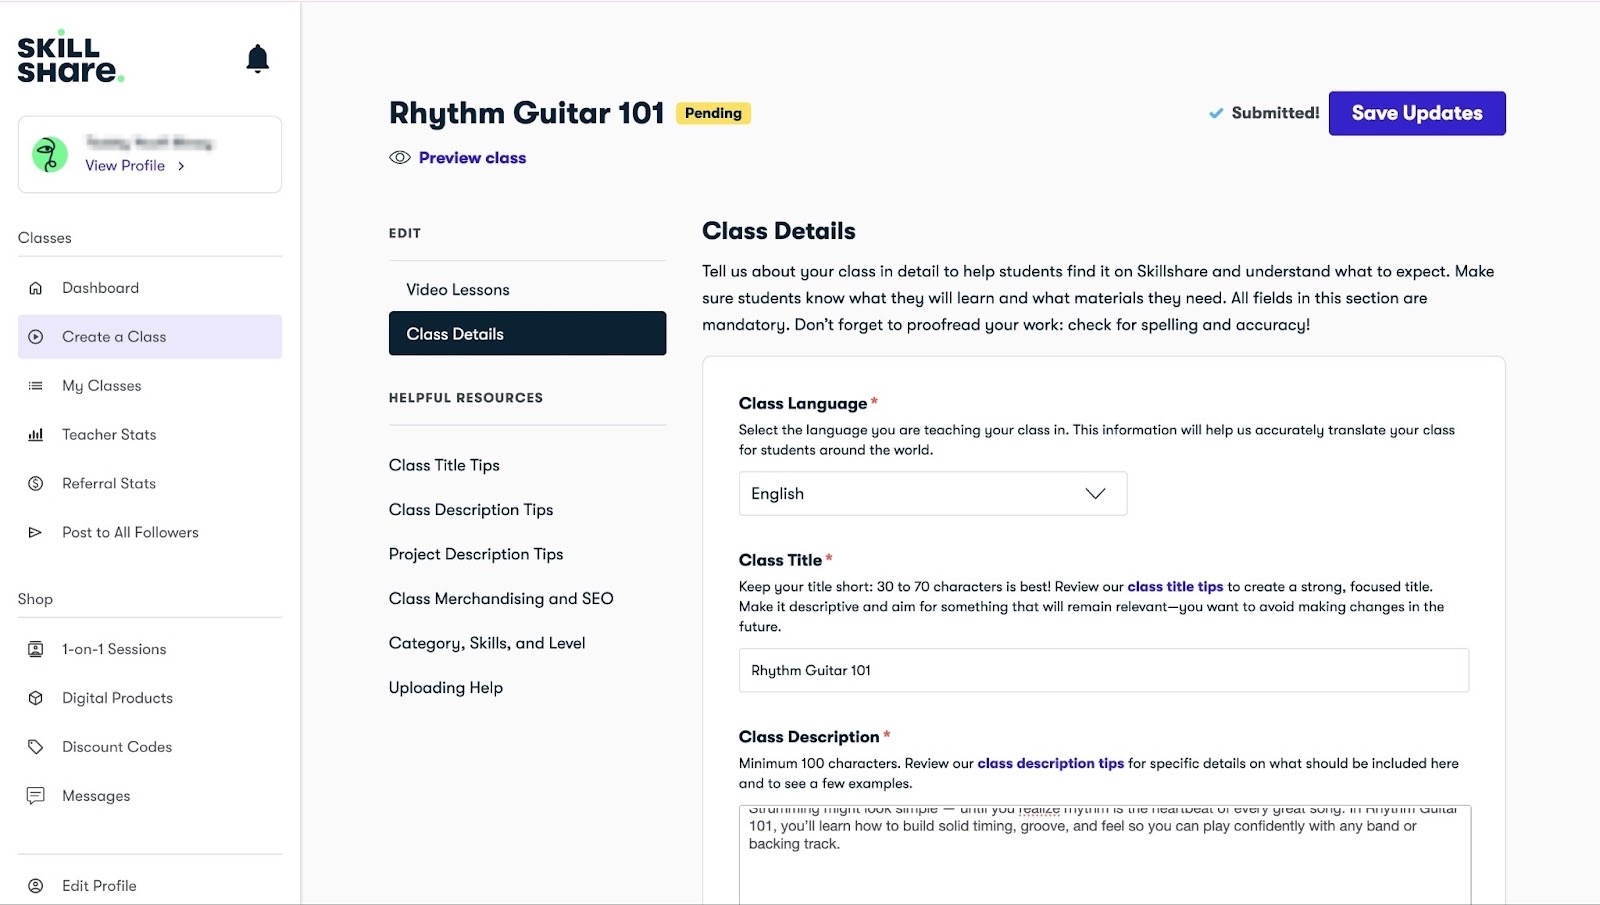
Once you've done that, hit “Save Draft” and click “Class Details” under the “Video Lessons” button.

Next, select the language you'll teach your course in and enter the class title, class description, and product description. Finally, select the skill level of your class.
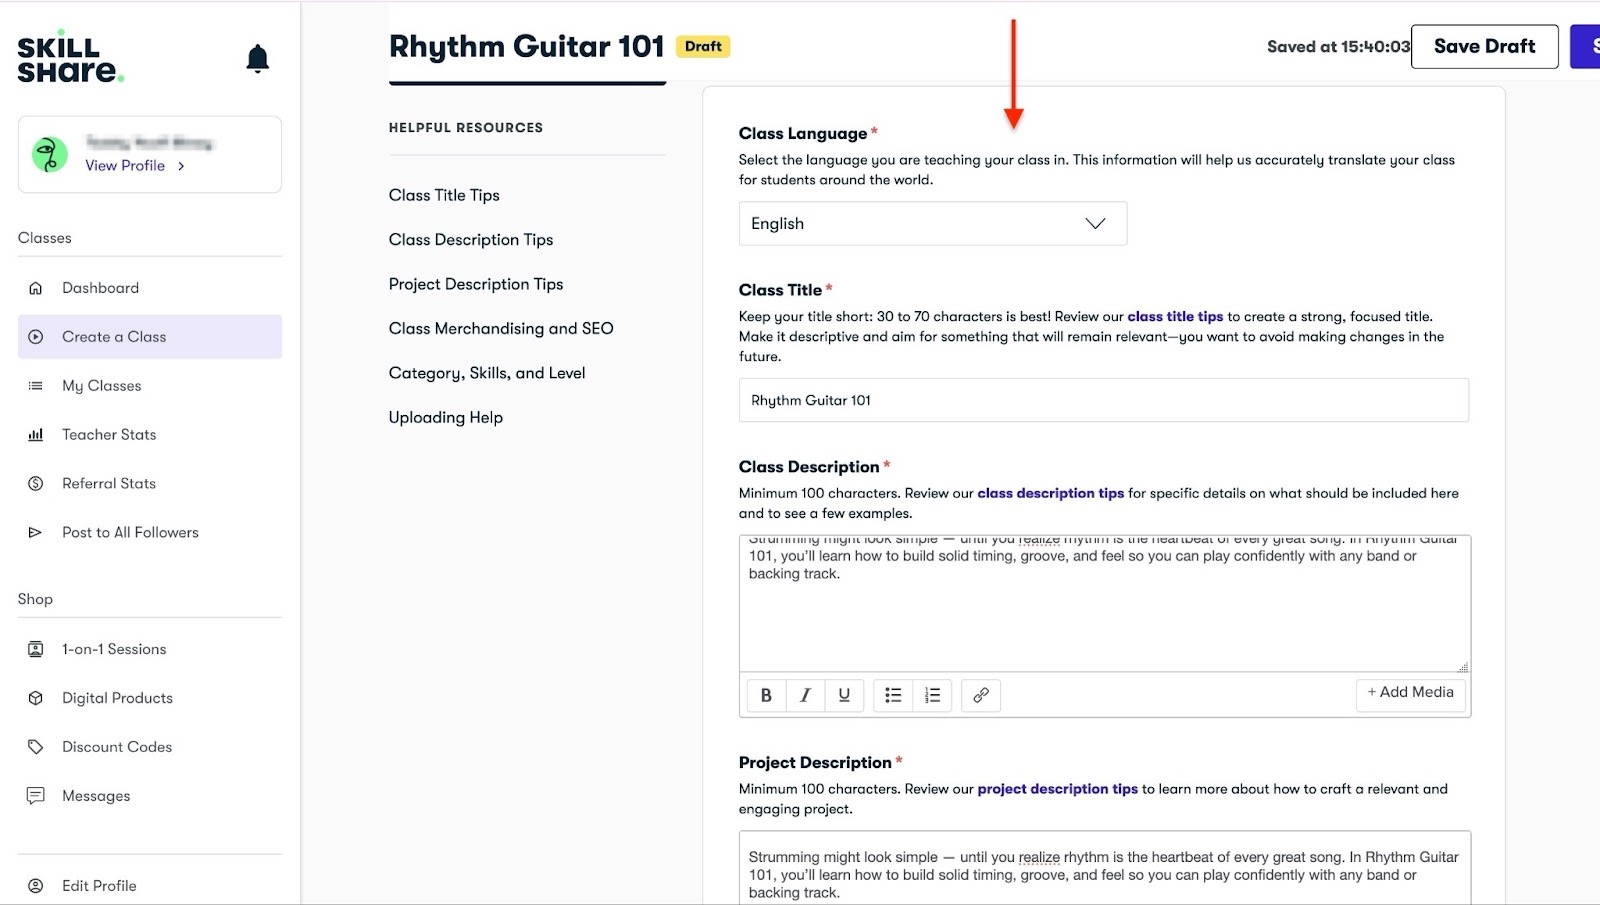
From here, scroll down to the “Discoverability & Findability” section.
Click and select the required fields in the product.

Once you’re done filling out these details, click “Submit” at the top right corner beside “Save Draft.”
Skillshare’s content team will then review your courses within the next 72 hours to ensure they meet their guidelines.
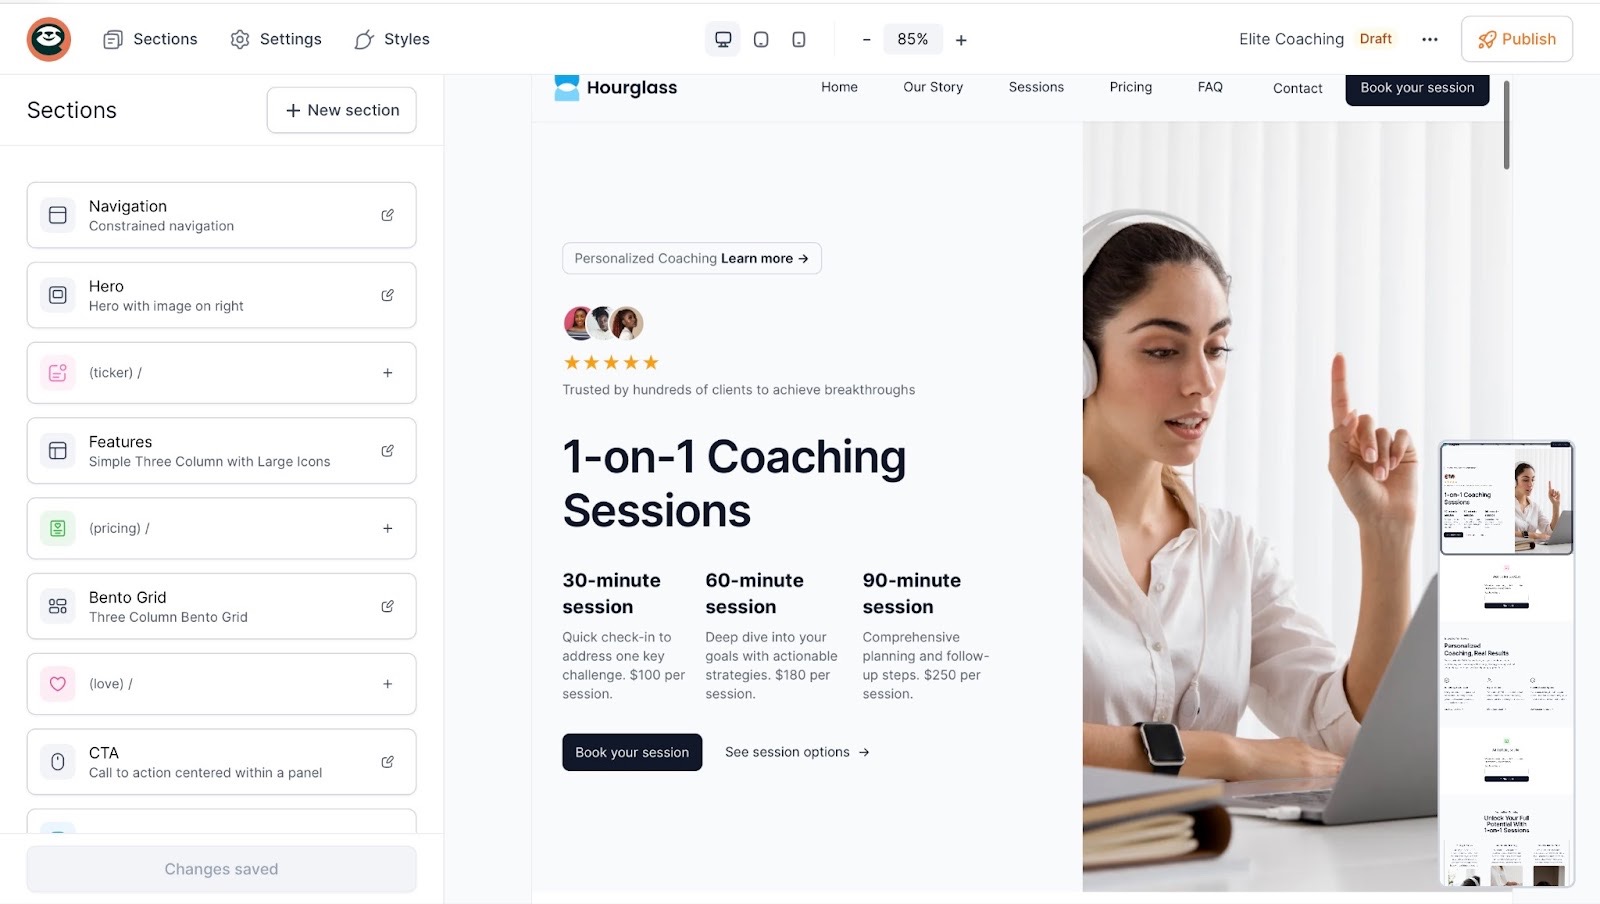
2. 1-on-1 Sessions
You can create 1-on-1 sessions to make extra money on Skillshare. These are private, paid video calls that you, as an educator, can offer to your students.
To create a session, click “1-on-1 Sessions” in the sidebar. Next, click “Create a 1-on-1 Session.”

In the new window, enter the session name, description, session duration, and price.
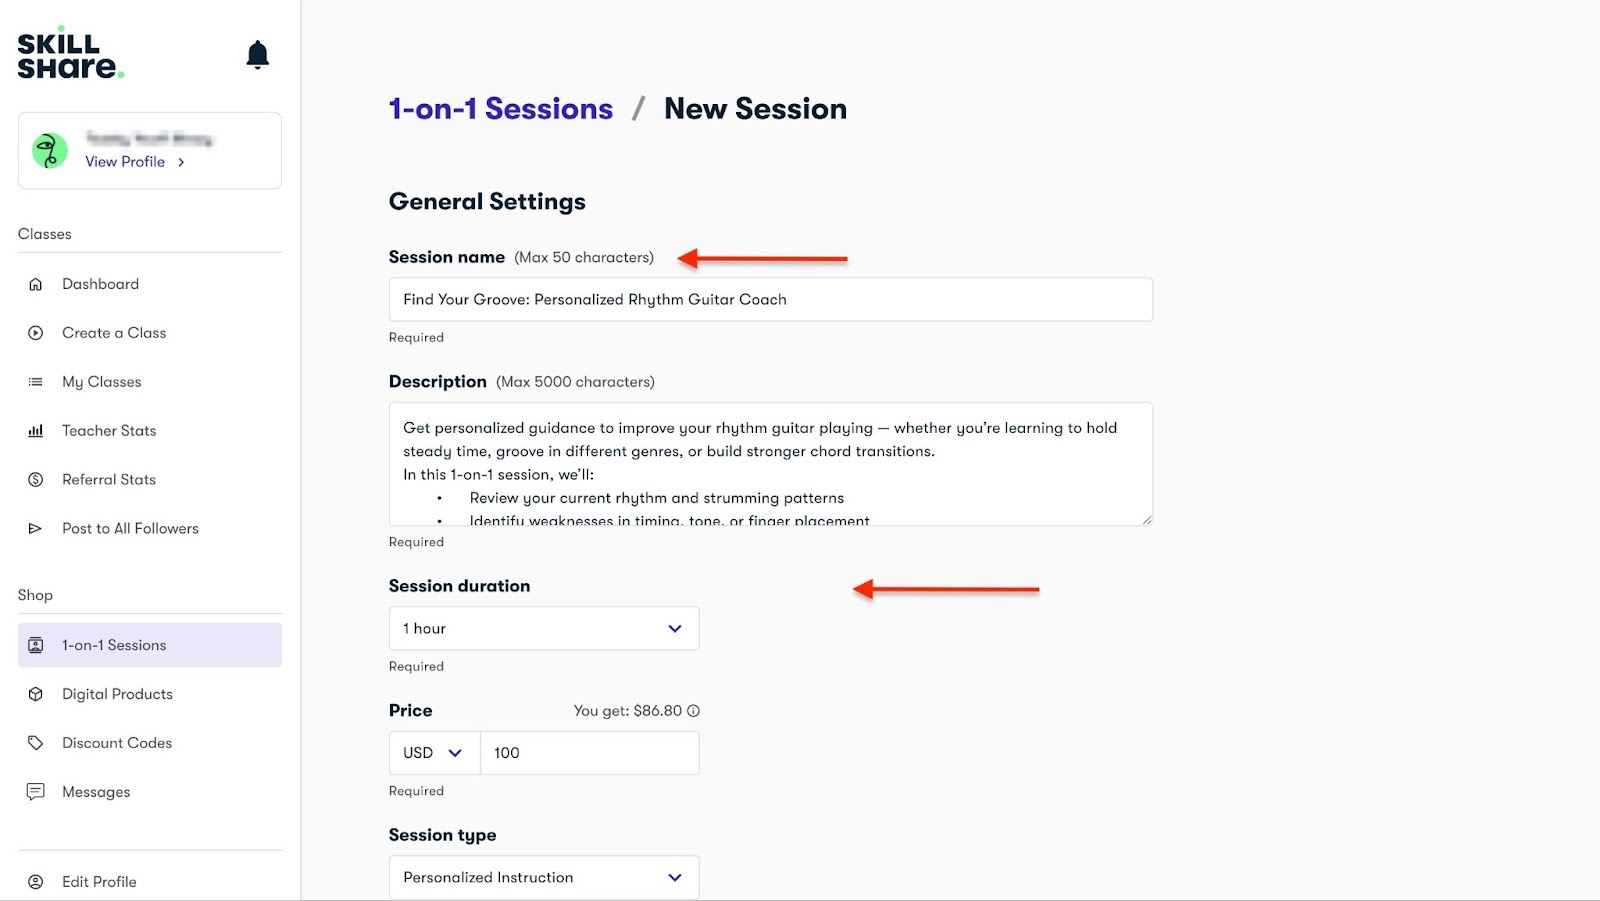
Then, scroll down to add the session type, primary category, subcategory, and relevant topics.
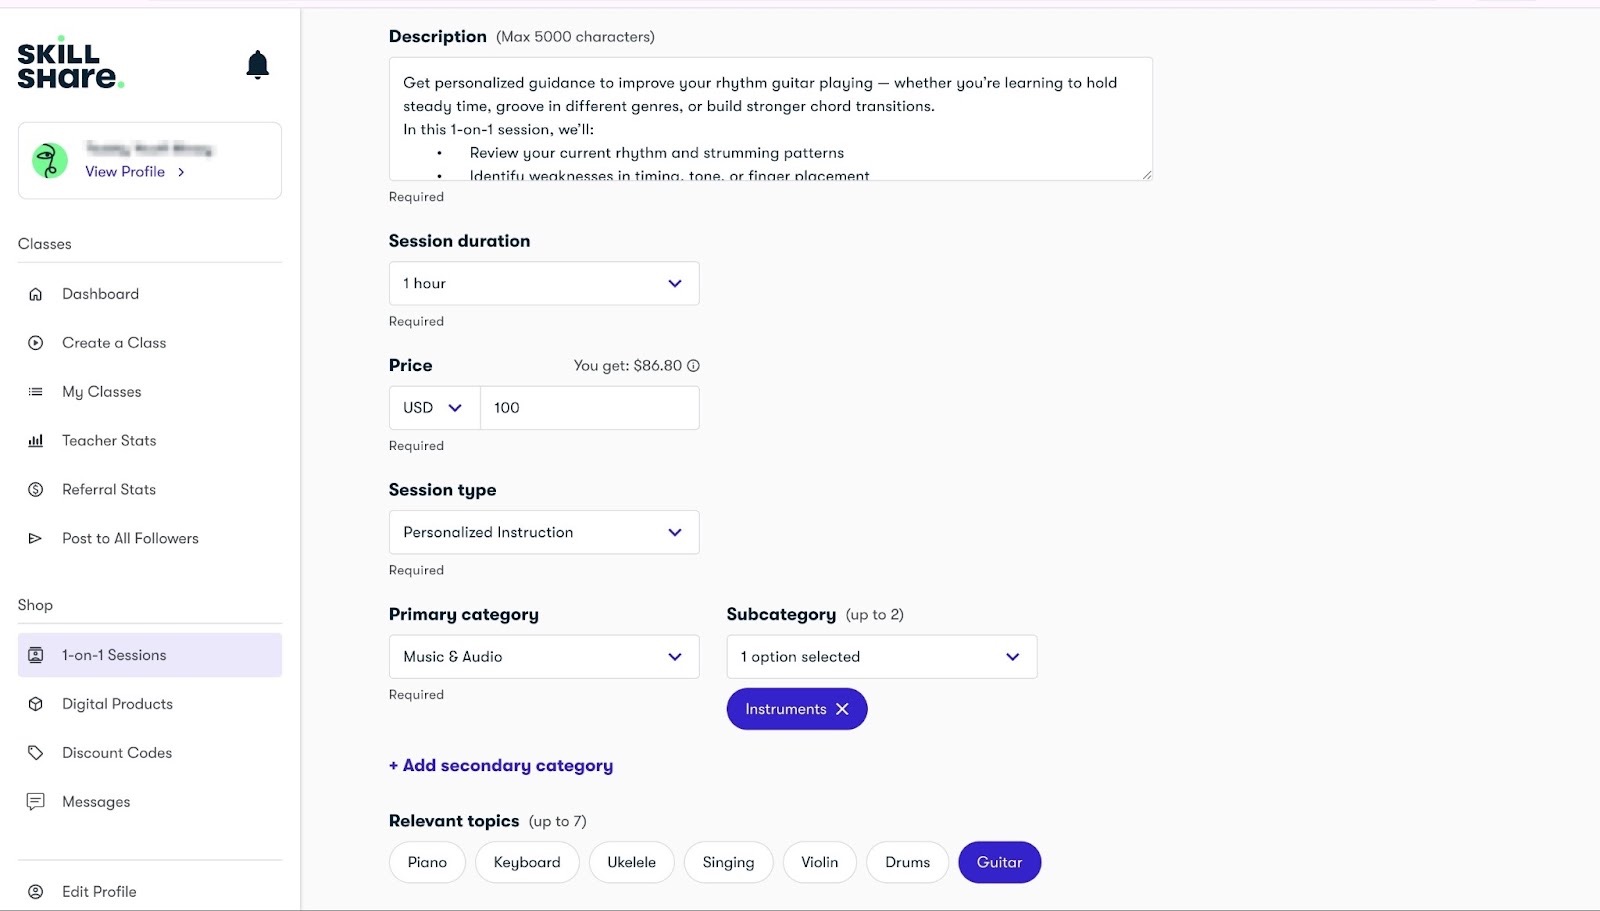
After that, select available days and times. Once you've done that, hit “Create session” to finish.

Skillshare will now display your new 1-on-1 session.

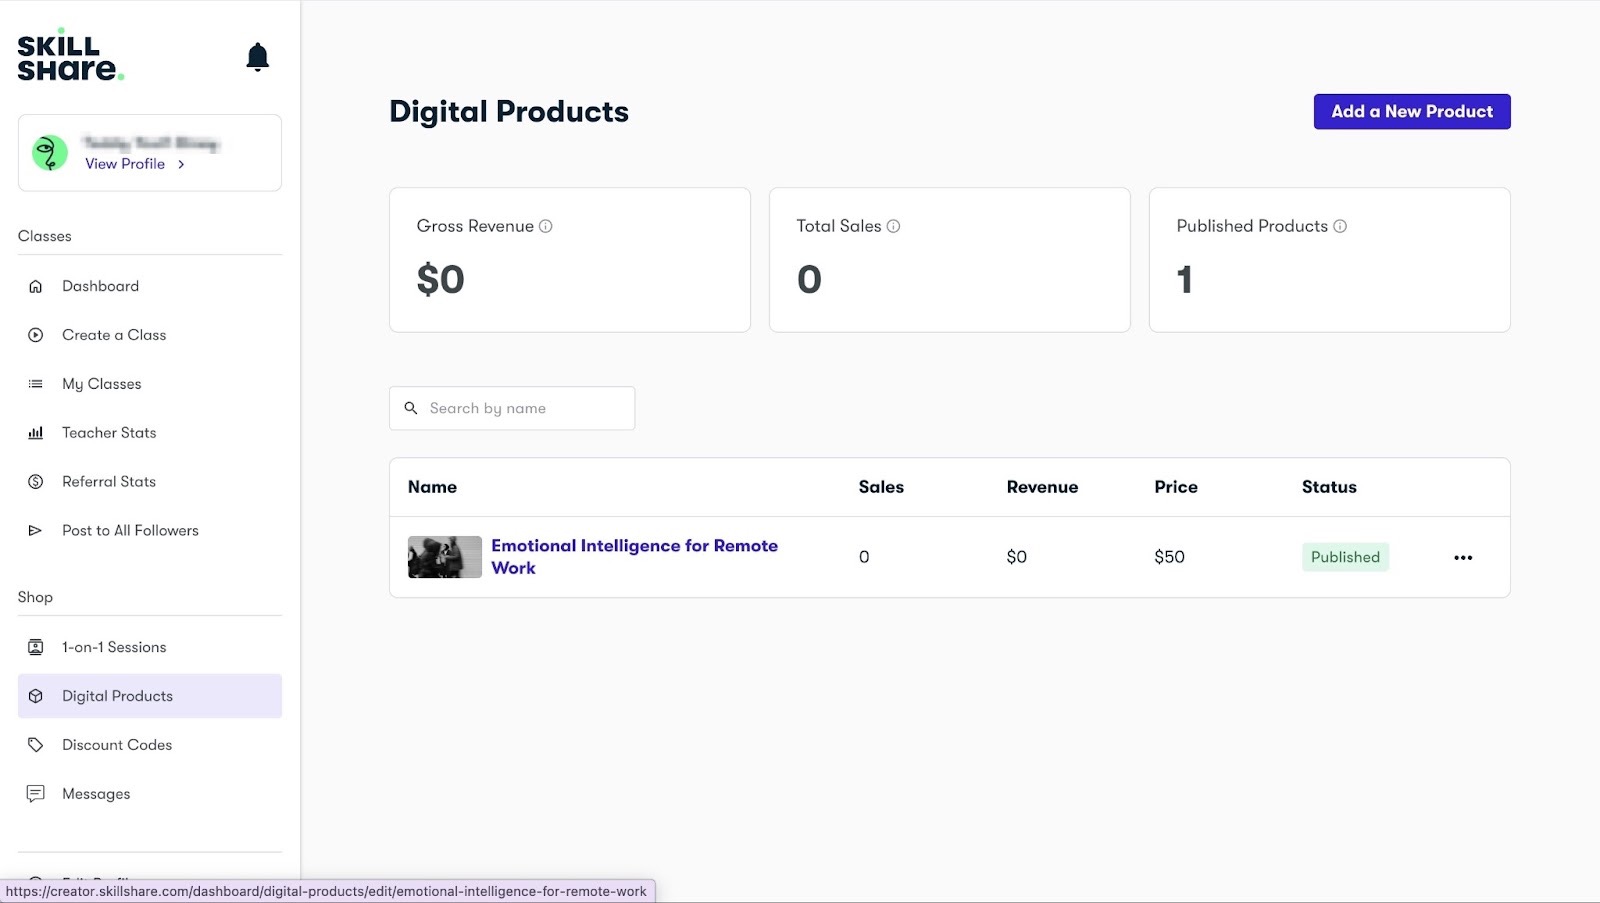
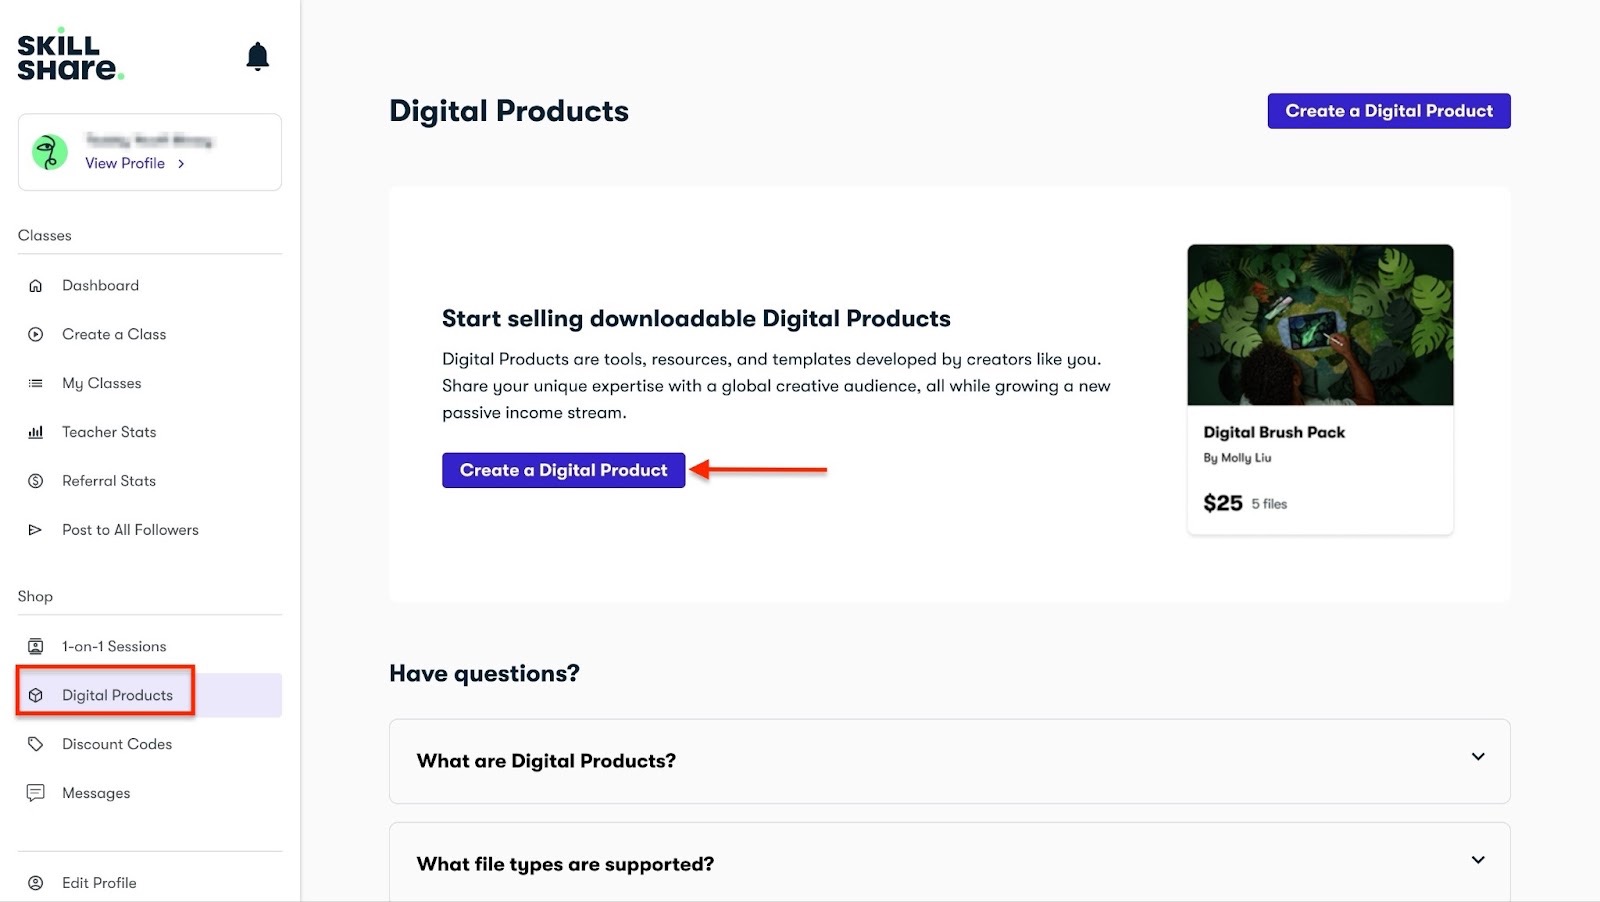
3. Digital Products
The thing about Skillshare is that you can create digital products to complement your course.
Let me show you that in a few simple steps.
Select “Digital Products” in the sidebar. Then, click “Create a Digital Product.”
Continue by entering the product name and description. After that, add a cover image.

Next, add the price and upload a file. You can add file formats like PDF, EPUB, video, audio, and more.
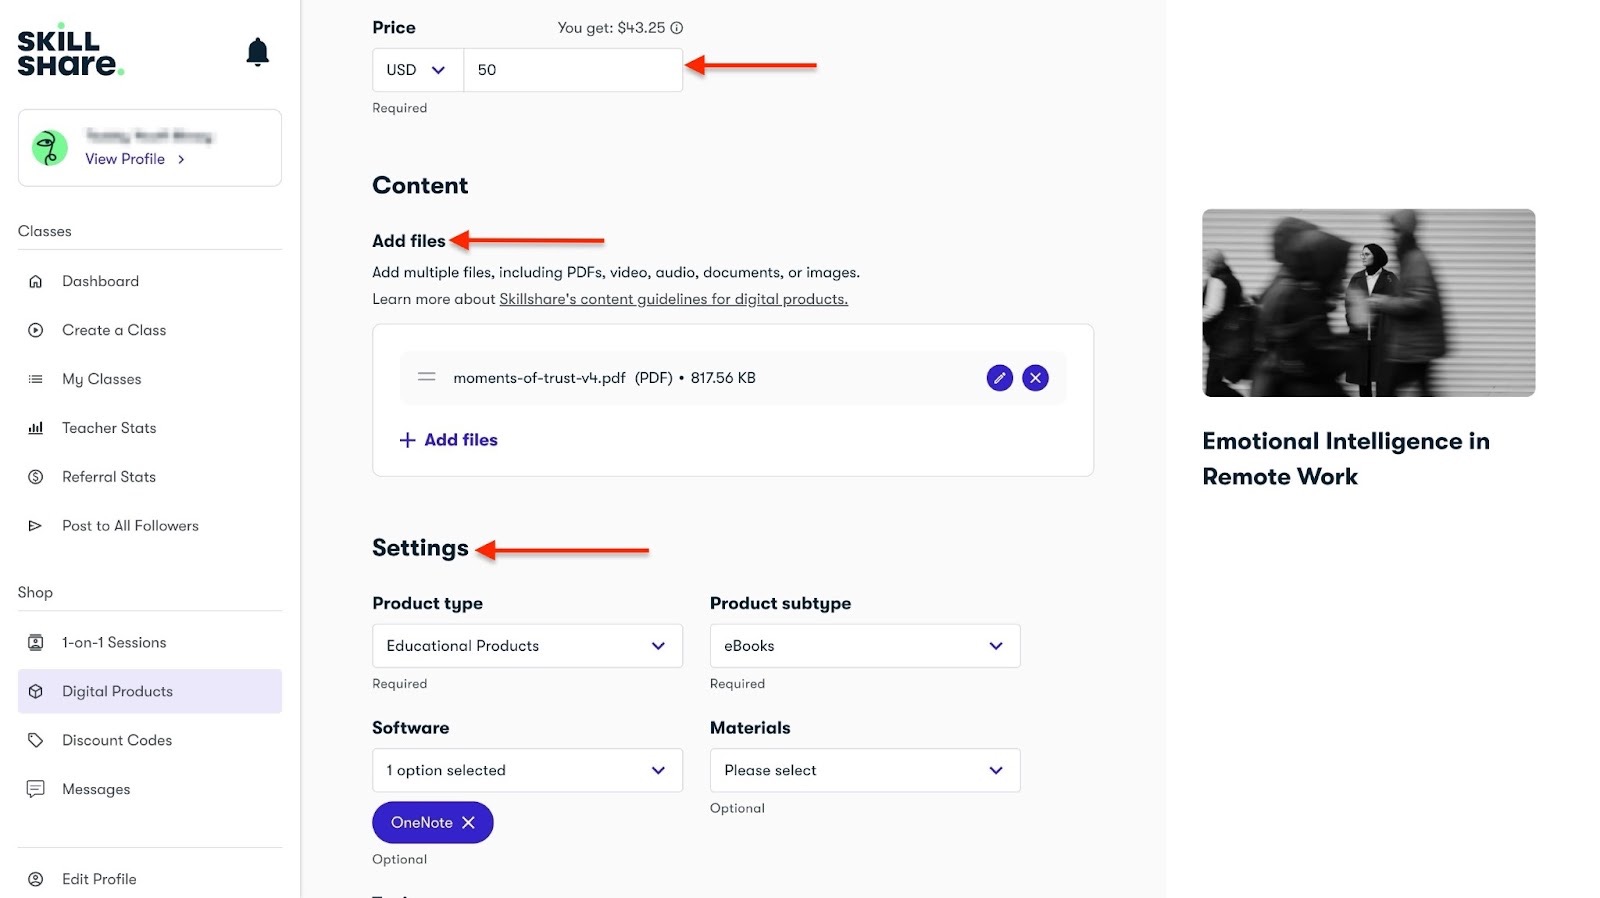
Once you've done this, select the product type and subtype, among other important options. Then, publish it.

You’ve just created a digital product.

[fs-toc-omit]What I loved and what I didn’t like
What I loved 👍
✅ You get access to a global audience, which means more visibility for your courses and potential to sell more.
✅ Can help you build an audience quickly.
✅ You can add your online digital downloads, like PDFs, e-books, templates, and workbooks, to enhance your lessons.
✅ It’s free to start teaching on Skillshare, so there’s no upfront cost to start selling online courses.
What I didn’t like 👎
❌ You don’t control your pricing because Skillshare decides how much students pay for memberships, and you get paid based on watch time.
❌ Competition is high on Skillshare, so it may take time and consistent publishing before you make a huge income.
[fs-toc-omit]Best For
- Creative professionals like designers, illustrators, animators, and more requiring a marketplace to teach short courses.
[fs-toc-omit]Pricing
- Free: $0
4. Podia
Rating: ⭐ ⭐ ⭐ ⭐ 4/5 stars | Starting price: $39 (with 5% transaction fee) | Integrates with: YouTube Live, Discord, Google Analytics, Pinterest, Facebook, Stripe, Calendly | Best for: Independent creators, community builders, small businesses, consultants, freelancers, and coaches
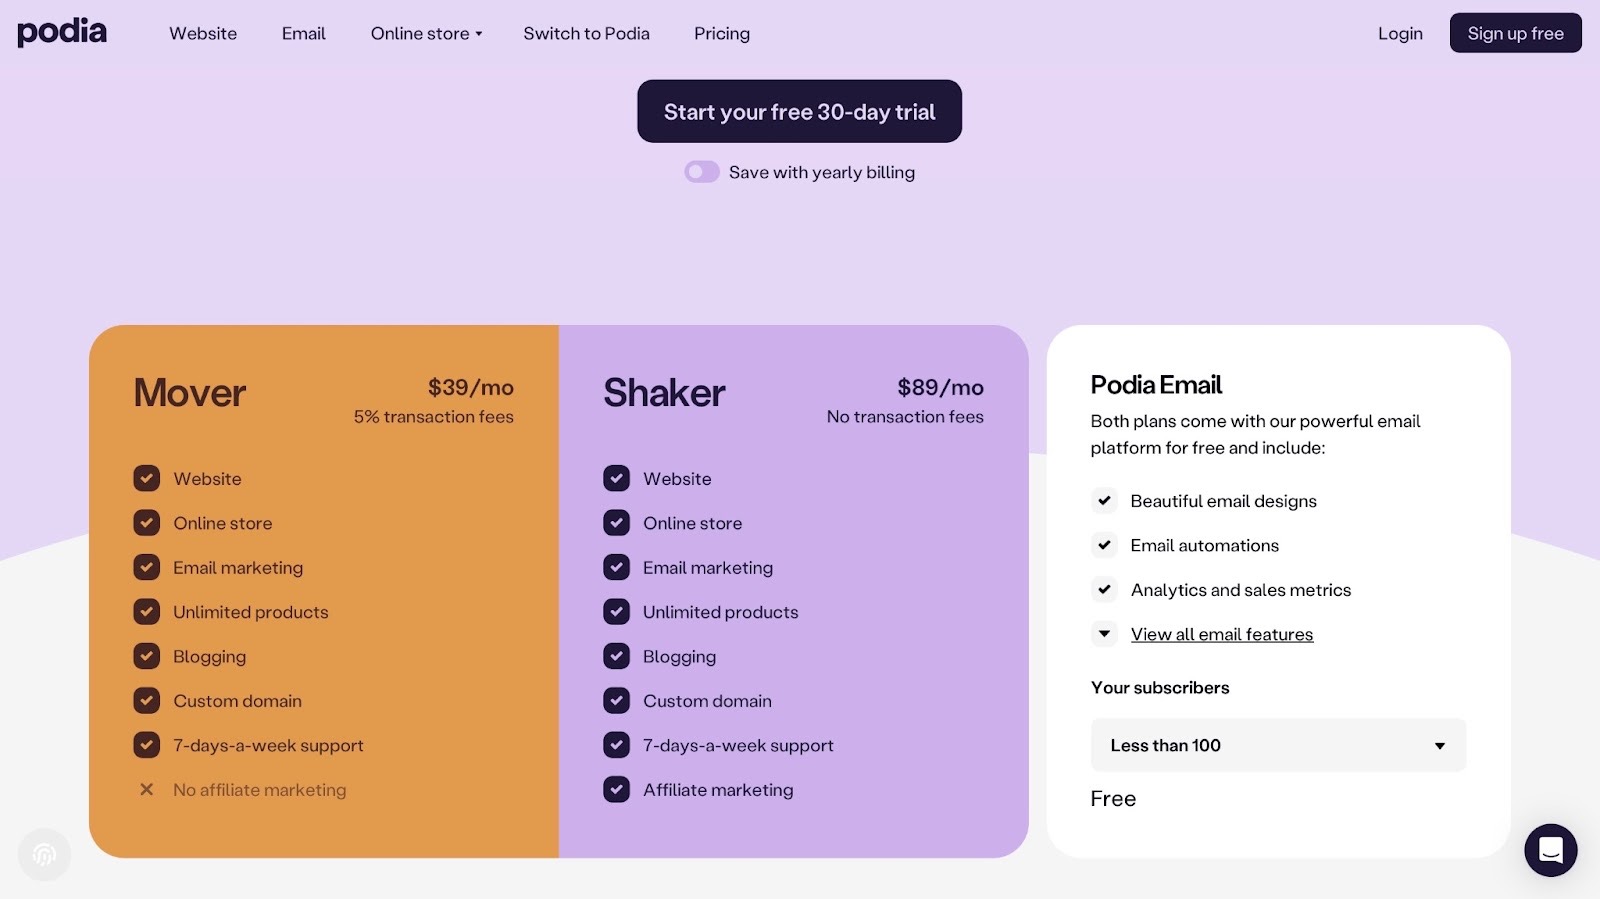
Podia is a platform for selling digital products, online courses, memberships, and coaching services.
Like a true Teachable alternative, Podia doesn't charge transaction fees on its paid plans.
There’s more, though.

Podia allows you to create and manage digital products like online courses, digital downloads, webinars, memberships, and bundles ( like courses + e-books).
You can do all this in a few simple steps right from the homepage. There’s no need to juggle through features because you can select all the product types in one place.
On Podia, you can set up a blog and start blogging. It has a text editor to help you write your content without leaving the platform.
You can also copy content from your computer and paste it directly into the text editor. Podia lets you add forms, lead magnets, and CTAs to your blog posts so you can grow your email list and increase sales.

One common feature that my picks for Teachable alternatives have is affiliates. Podia has that too, and there’s a good reason for that.
Your affiliates help you sell more while they earn commissions on the side.

Finally, adding or importing audiences like subscribers, customers, and community members is straightforward. And to identify your audiences easily, you can add tags.
The thing about tags is that you can also put your audience in categories, so you know who to send which emails to.
For example, you can create “big spenders” and “trial users” tags. If you are sending an email offering a new product, you can send it to the “big spenders” group only, since they are more likely to purchase it.
[fs-toc-omit]What I loved about Podia
1. Products
Once again, the products feature lets you create online courses and other digital products.
I could show you how to create a course in Podia.
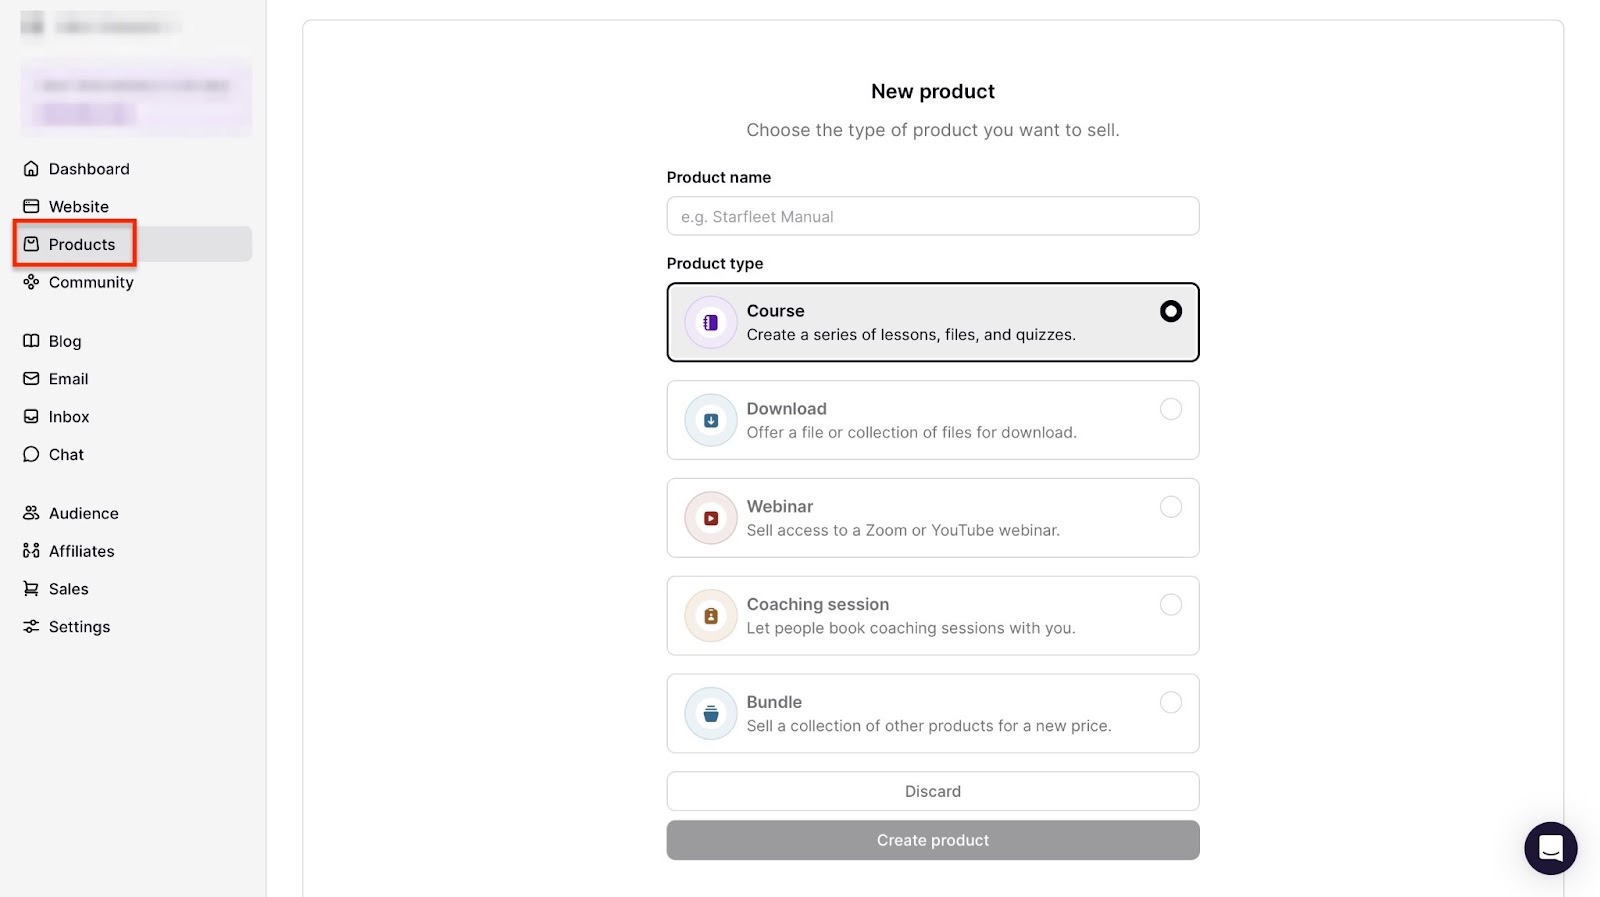
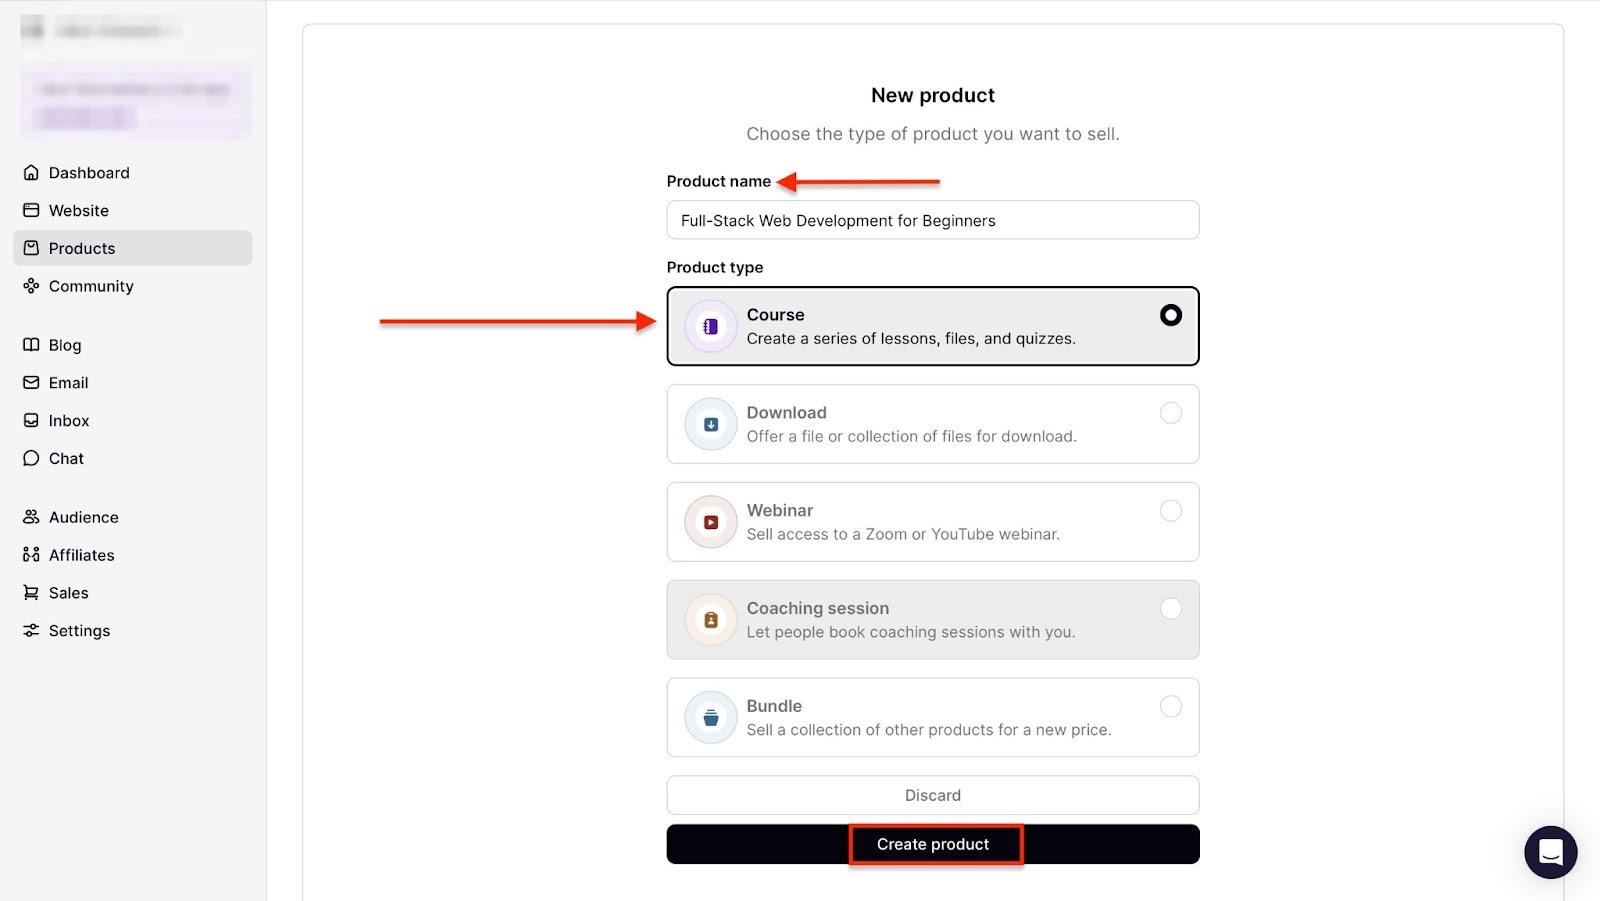
Start by selecting “Products” in the sidebar. Next, click “+ New product.”
Now, enter the name of your new course. Then click the radio button beside “Course” to select the product type.
After that, go to the bottom of the window and click “Create product.”
In the new window, move to the template lessons, “Example: Section 1.” Then, click the three-dot menu and select “Edit section.”

In the editing window, add the title and description of the section.
Then select either “Section is available immediately” or “Section is delayed” to decide on the section’s availability to your customers. After that, click “Save.”

To add a sample text lesson, click the hamburger button on the left side of the “Sample text lesson.”
In the new window, enter the title and content of the text lesson. You can click “View lesson” at the top right corner of the window to preview your lesson.
From here, scroll down to choose the course’s visibility and visitor or customer preview options. Then, hit “Save.”
Follow the same steps to add video lessons and quizzes to your course.
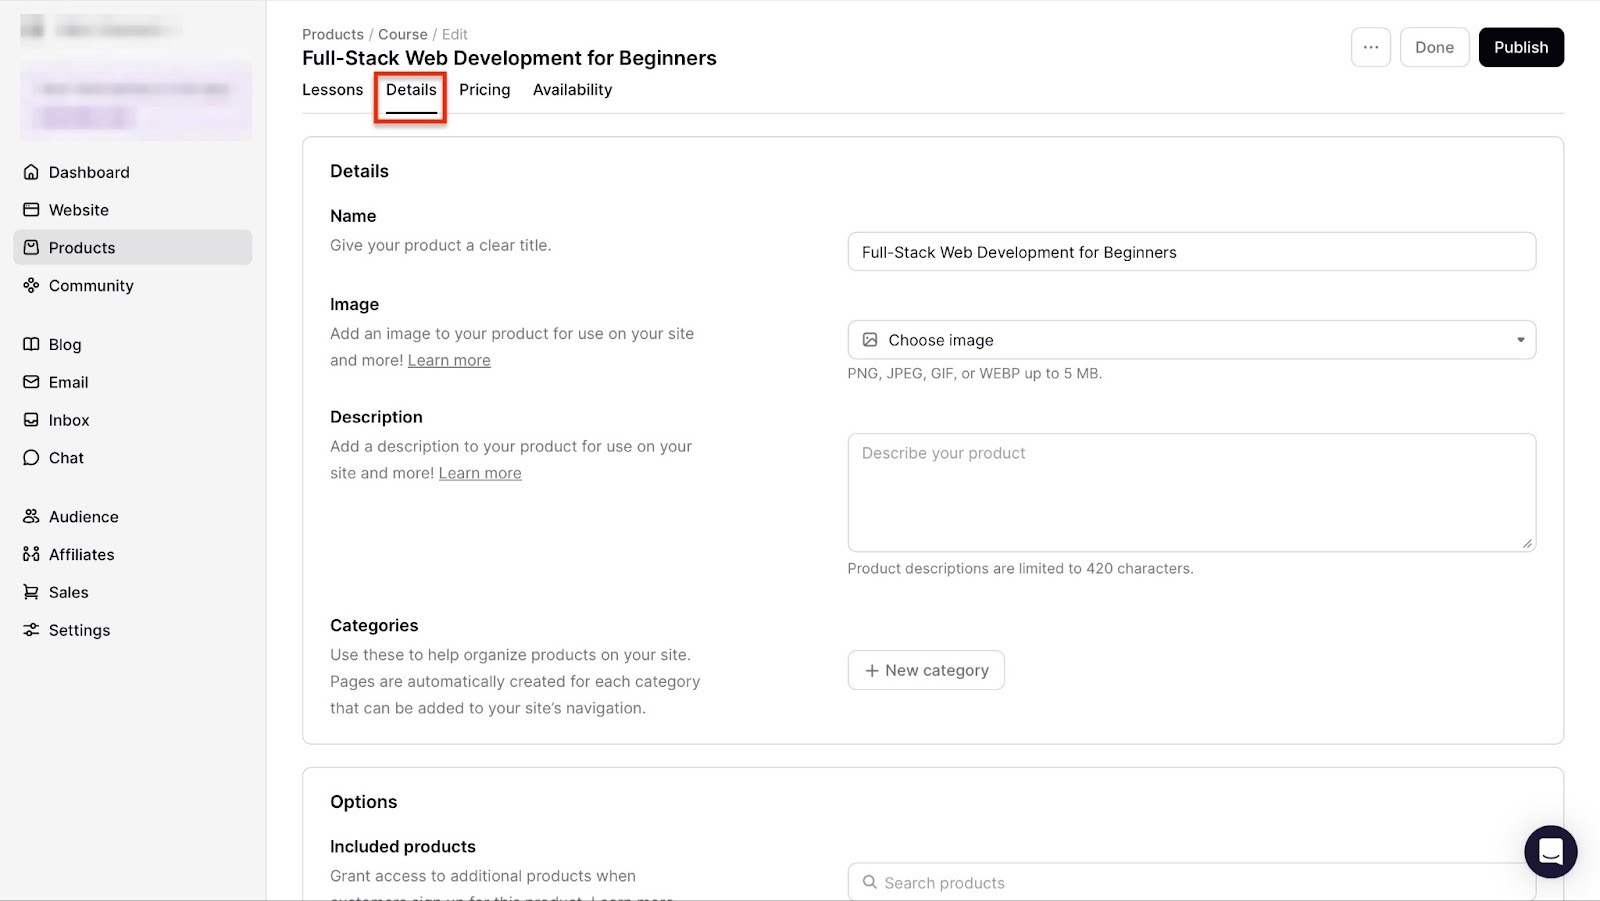
Once you've done that, click “Details” in the navigation bar to add, change, or edit the course name, image, description, category, and supplementary products.
You can also add a certificate, as well as customers’ comments and discussions.
Next, click “Pricing” in the navigation bar to set the price. Then, connect your account to a payment method.
You can also add upsells. Continue by clicking “Save.”
To finish, click the “Availability” in the navigation bar and select “Edit” to choose your preferred options. After that, hit “Publish.”

Podia will display your newly created course in the products window.
2. Community
Podia’s community feature lets you create a paid or free community. You can also run two such communities at the same time.
Your paid community can have private discussions and include access to your digital products.
This is how you can launch a community on Podia:
Select “Community” in the sidebar. Then, click “Create community.”

In the new window, click “Launch community” at the top right corner.

Podia will then launch your community. Click “Share Community” to copy the URL and share it online.

3. Audience
Another thing Podia lets you do is add new members. You can invite these new members to join your community. You can also send them emails and ask them to sign up for your course.
Let me show you how to add a person using the audience feature.
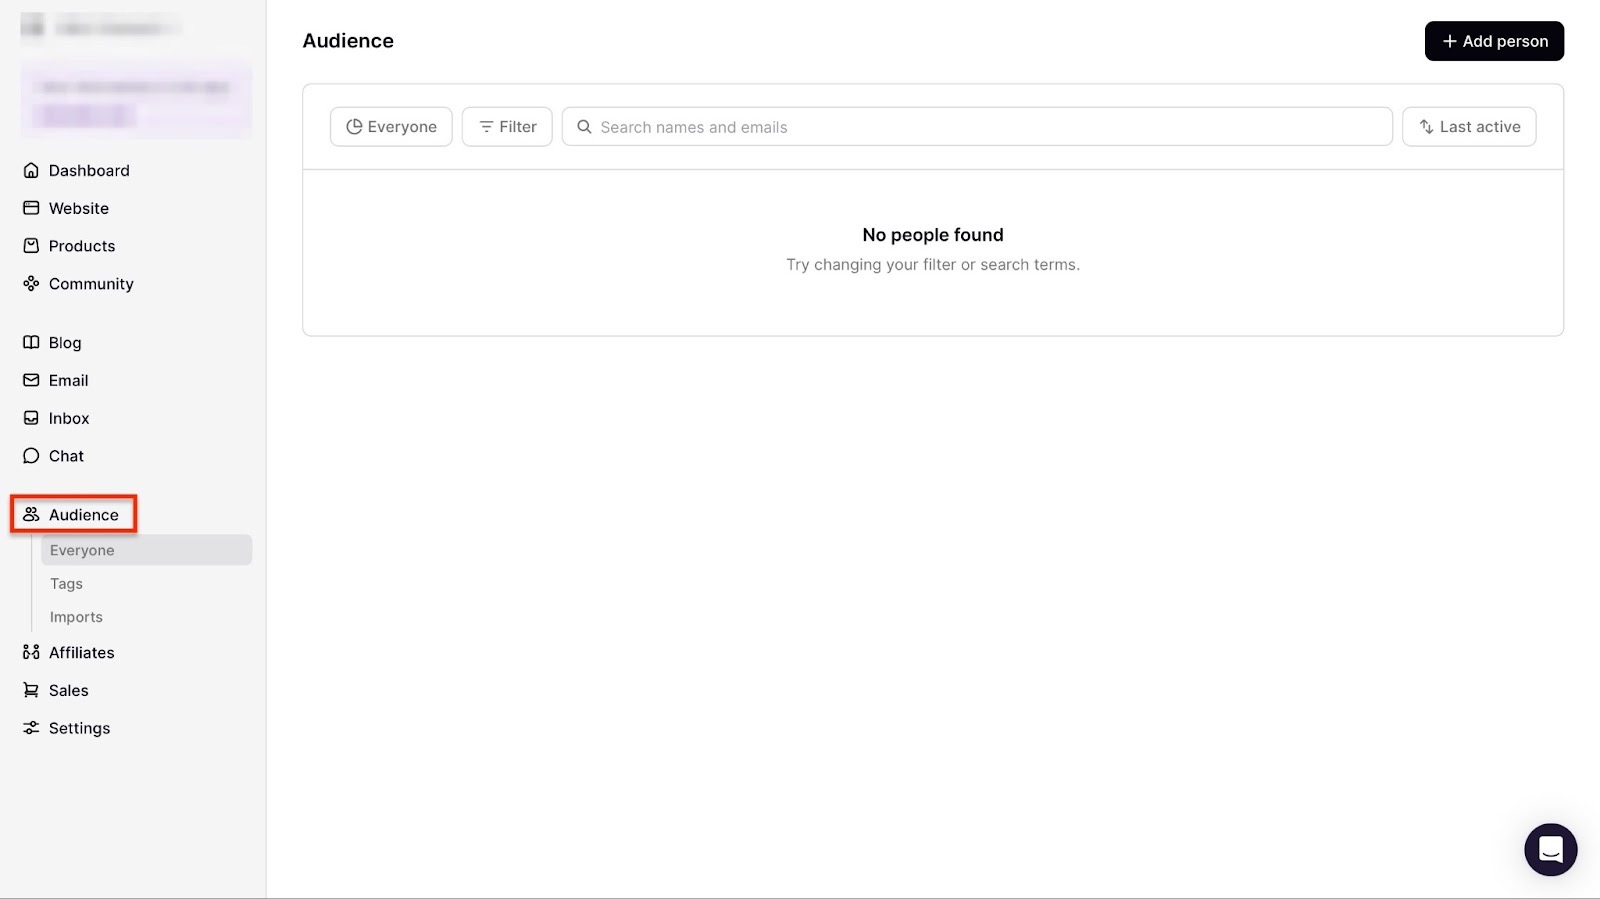
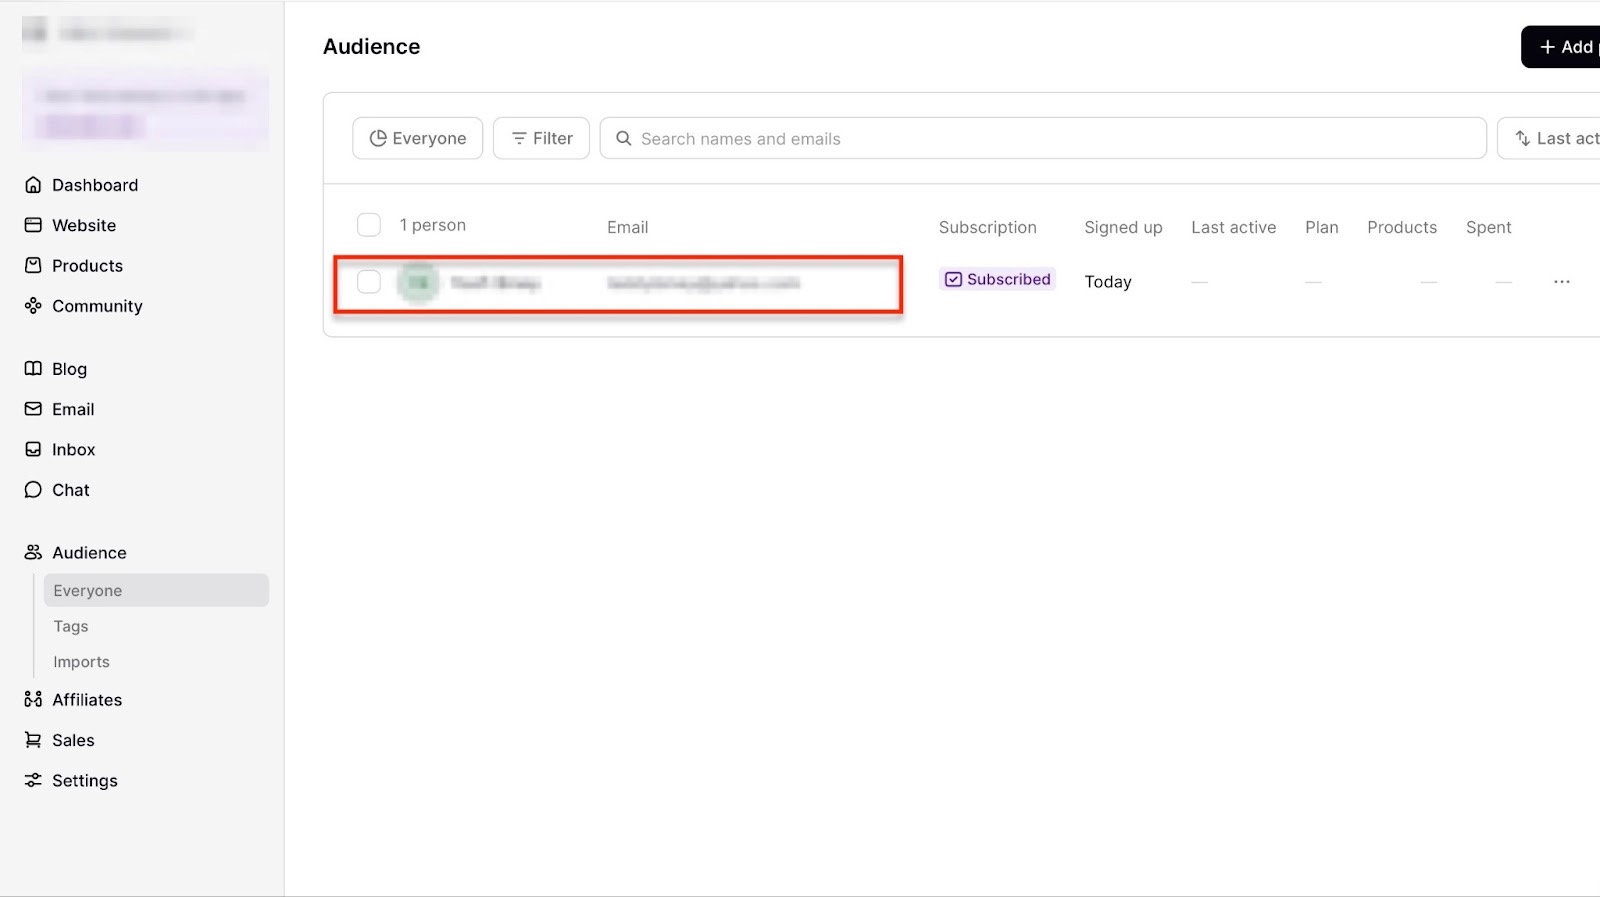
Select “Audience” in the sidebar. In the new window, click “+ Add person.”

In the pop-up window, enter the name, email, and tag of the person you're adding. Then click the “Add person” button.

Podia will then display the new person’s name, email, and subscription status in the audience feature window.
[fs-toc-omit]What I loved and what I didn’t like
What I loved 👍
✅ Offers a 30-day free trial so you can test the platform before committing.
✅ Paid plan starts at $39, which is affordable compared to many Teachable alternatives.
✅ Has an affiliate program you can set up to help you earn more.
✅ Allows you to build a community right on the platform.
What I didn’t like 👎
❌ Podia’s website feature offers a good start, but may limit creators who want more design freedom.
❌ Supports Stripe and PayPal, but PayPal can be used for one-time payments only and not for memberships or payment plans.
[fs-toc-omit]Best For
- Small business owners wanting a simple platform to sell online courses, memberships, and digital downloads.
[fs-toc-omit]Pricing
- Mover: $39/month
- Shaker: $89/month
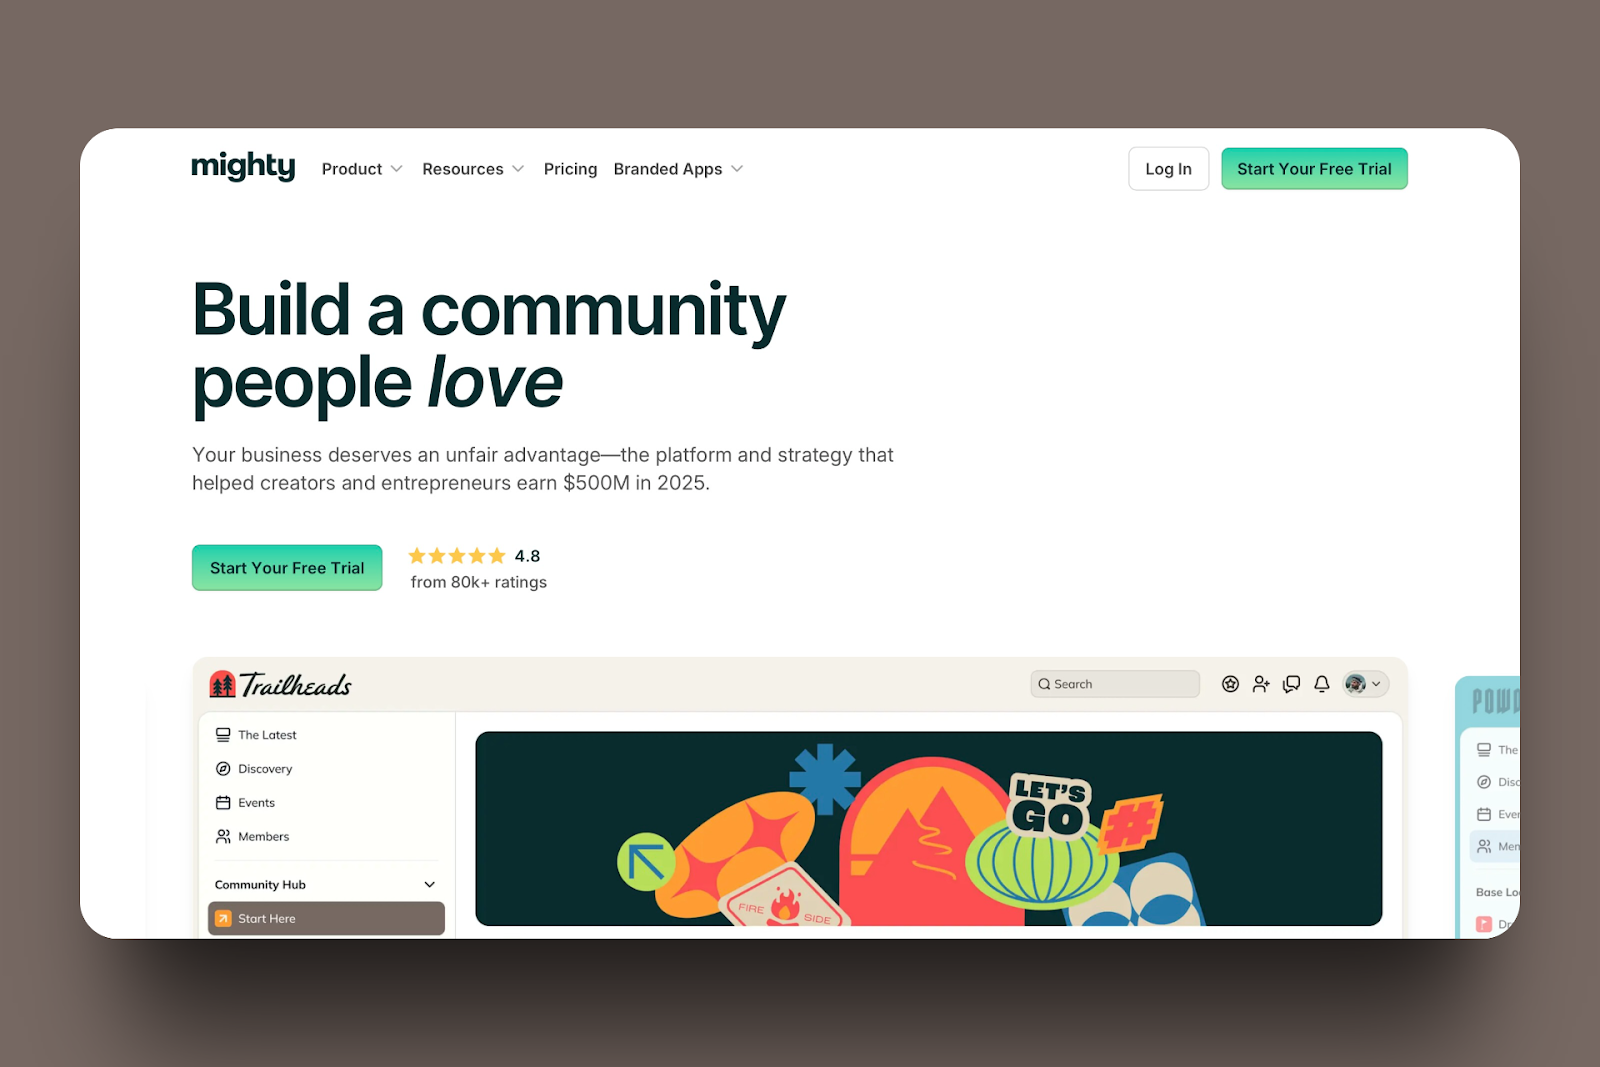
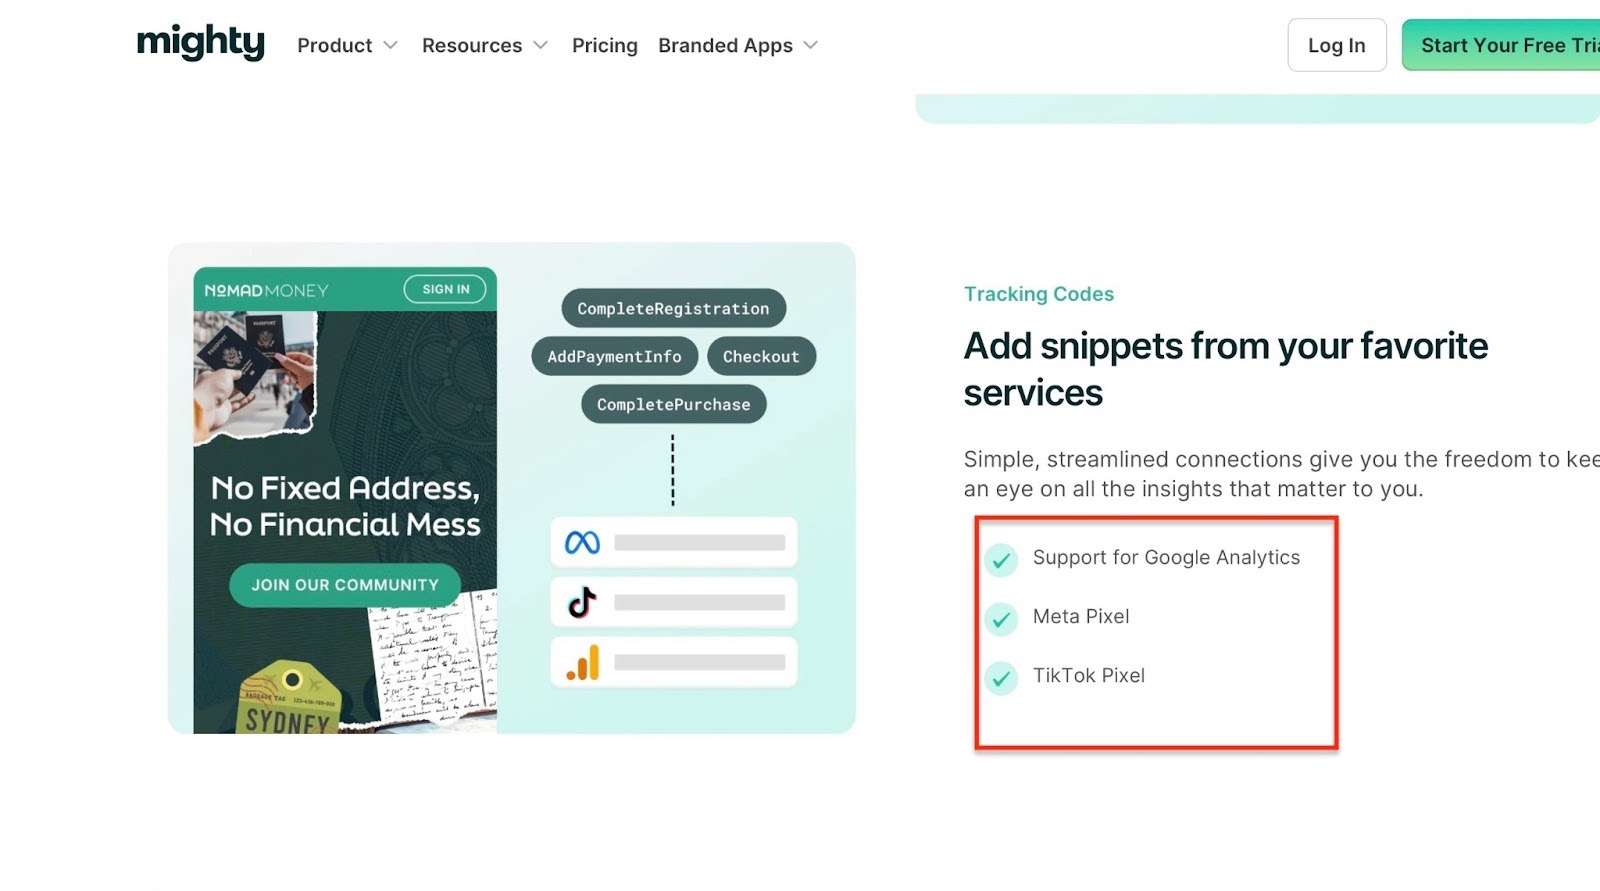
5. Mighty Networks
Rating: ⭐ ⭐ ⭐ ⭐ 4/5 stars | Starting price: $49 (with 5% transaction fee) | Integrates with: Zapier, Amazon, Monday.com, Notion, Canva, Figma, Datawrapper, Google Drive, GitHub | Best for: Educators, coaches, experts, consultants, brand entrepreneurs, community builders, and creators
Fifth on my list of best Teachable alternatives is Mighty Networks. It’s a community-first platform for creating, marketing, and selling online courses, memberships, and communities.
And just like the other Teachable alternatives, there’s more to Mighty Networks.
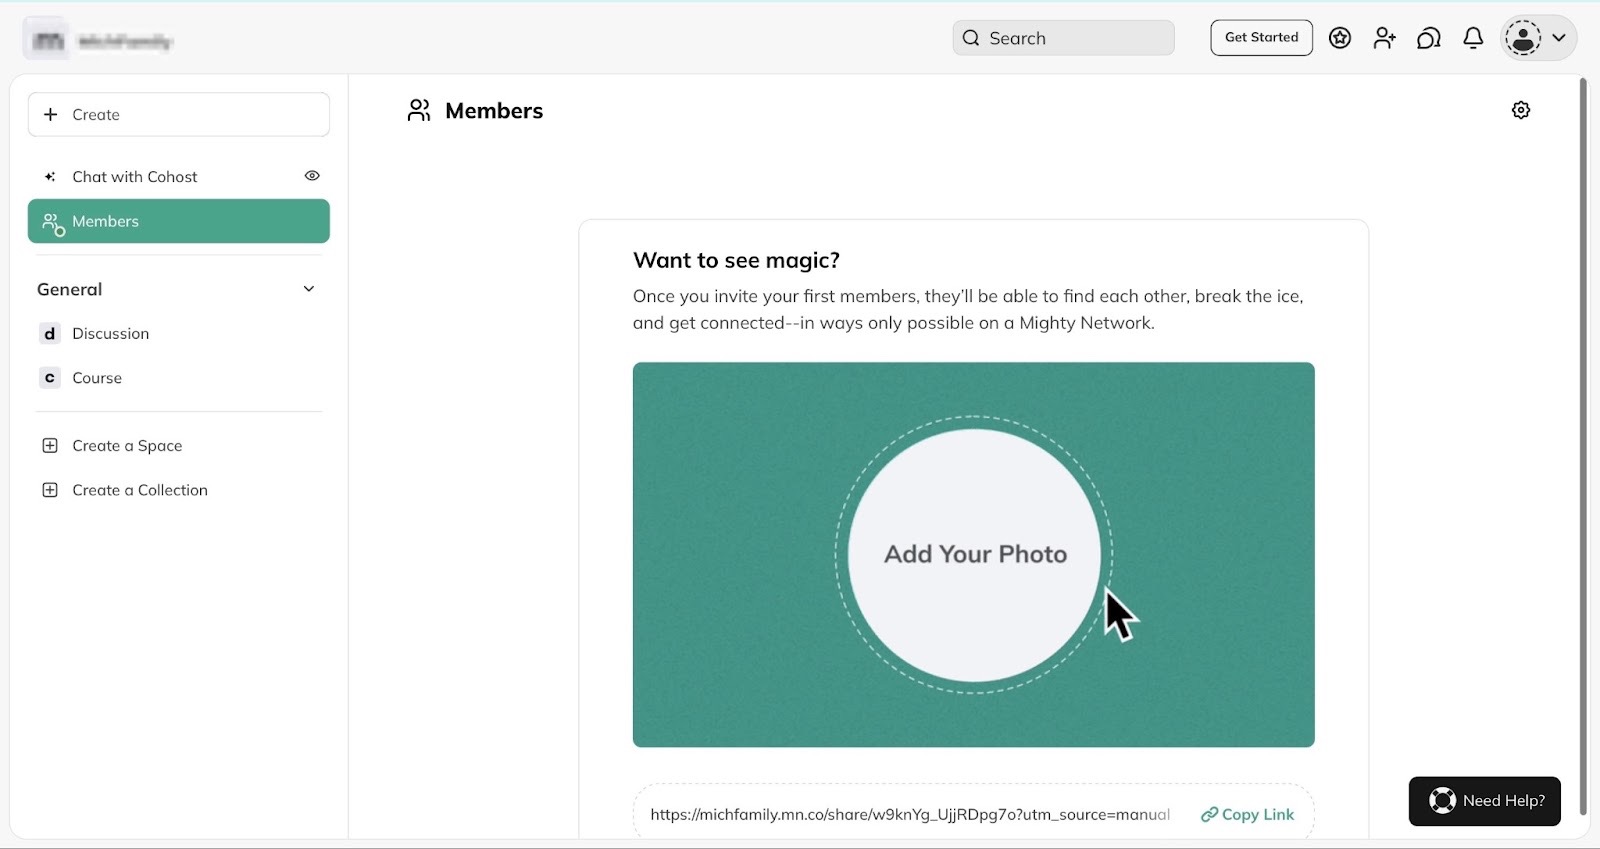
It lets you invite members to your online community through a URL, and you can also add more customers directly via an invite.
You can also create online courses and quickly feature them in your community for students to join.
So, all you have to do is answer one question, and Co-Host™, Mighty Network’s AI, will generate the course modules for you.
This can save you a lot of time. I mean, instead of worrying about ideas for your course, Co-Host can come up with them.

Moreover, you can also create a section inside your community to focus on specific topics, groups, or purposes.
For example, you could have a space or section in the community called “Web Development Bootcamp.”
You could have another space called “Weekly Q&A” for discussions on web development. And you can always invite students to join.
That’s not all. You could also group these spaces or sections into a collection. Let’s say the space is “Web Development Bootcamp,” as I mentioned earlier.
A collection would be spaces like “Web Development Basics,” “JavaScript Essentials,” and “Weekly Practice Challenges.”
[fs-toc-omit]What I loved about Mighty Networks
1. Course
Mighty Networks’ course feature lets you create full online courses with its AI, Co-Host. You’d have to answer the simple question: What is the idea for this outline?
Anyway, here is how you create a course on Mighty Networks:
Select “Course” in the sidebar under the “General” section. Now, click “Get Started.”

Next, enter your answer to the Co-Host’s question and hit “Suggest Outline.”

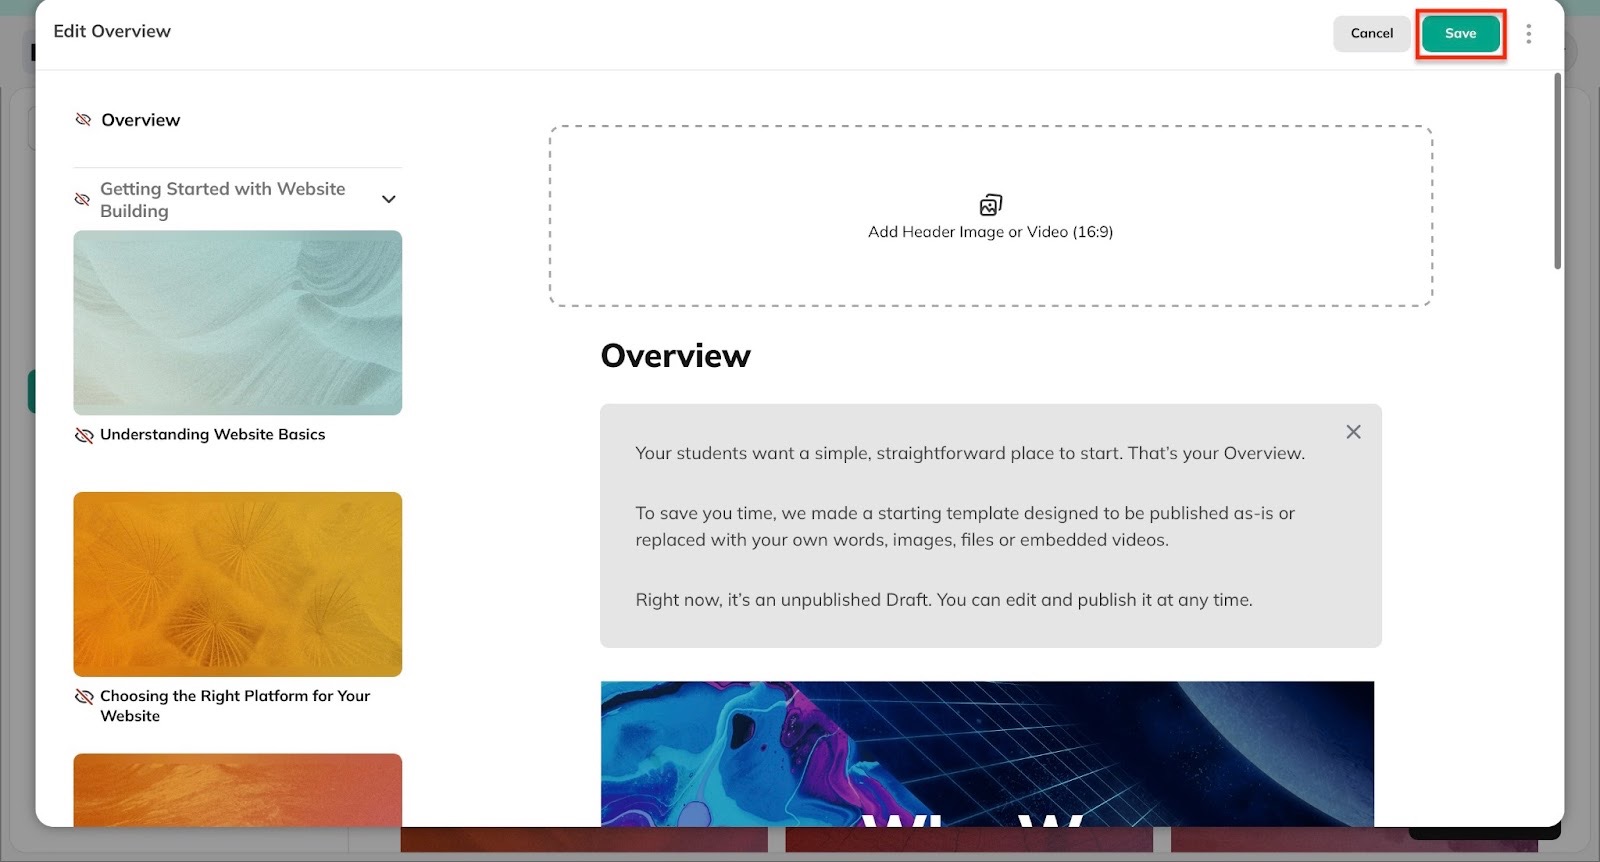
Now, hover the cursor over the outline and click on the pen icon when it’s visible.
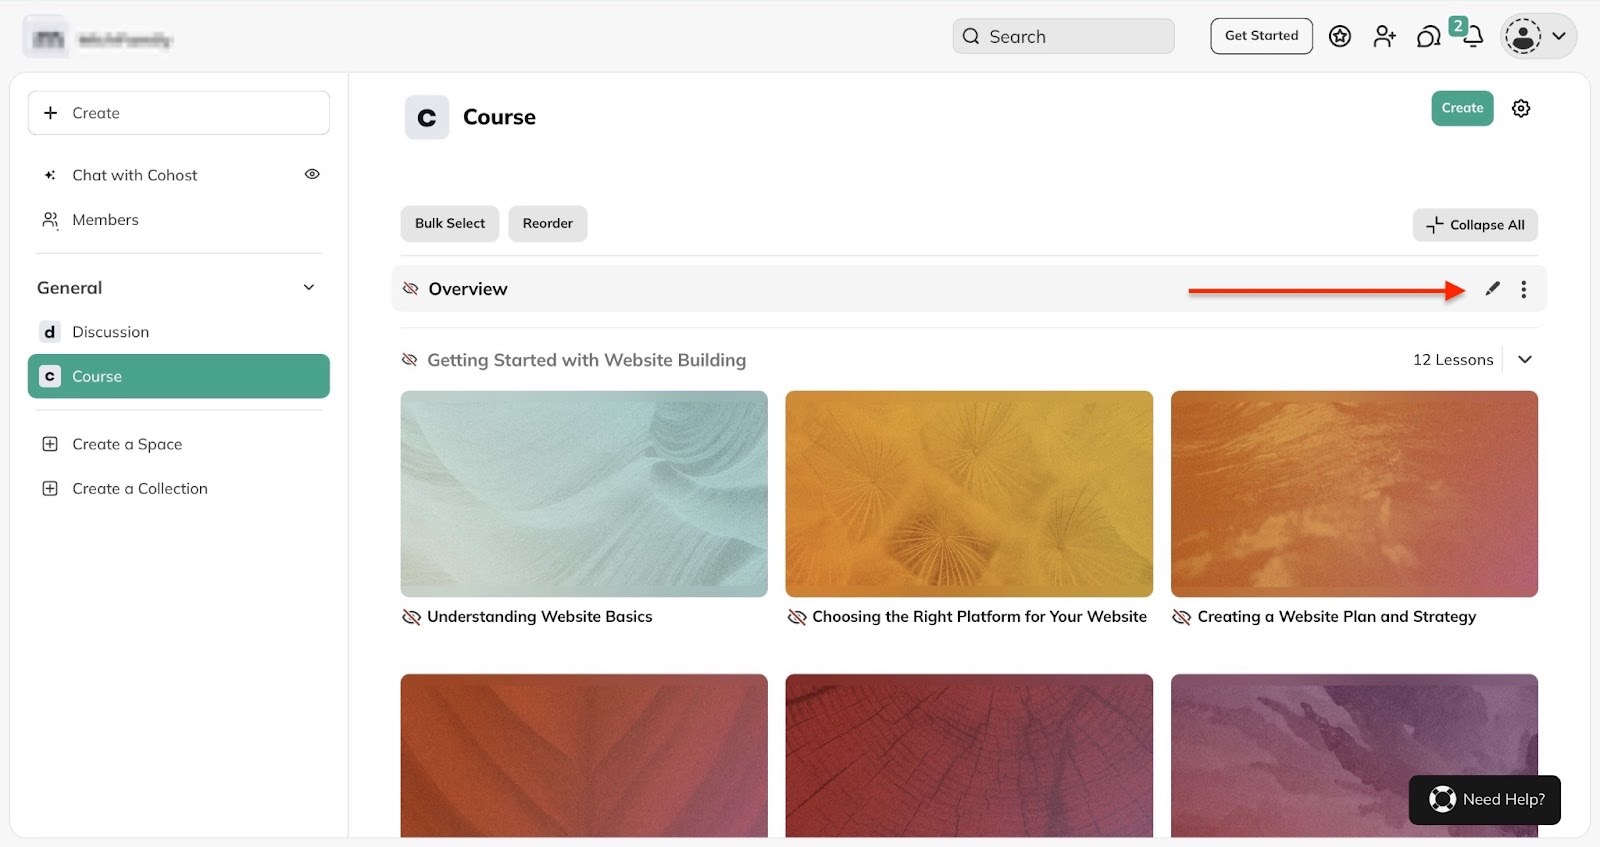
In the pop-up window, edit each course module and click “Save.”
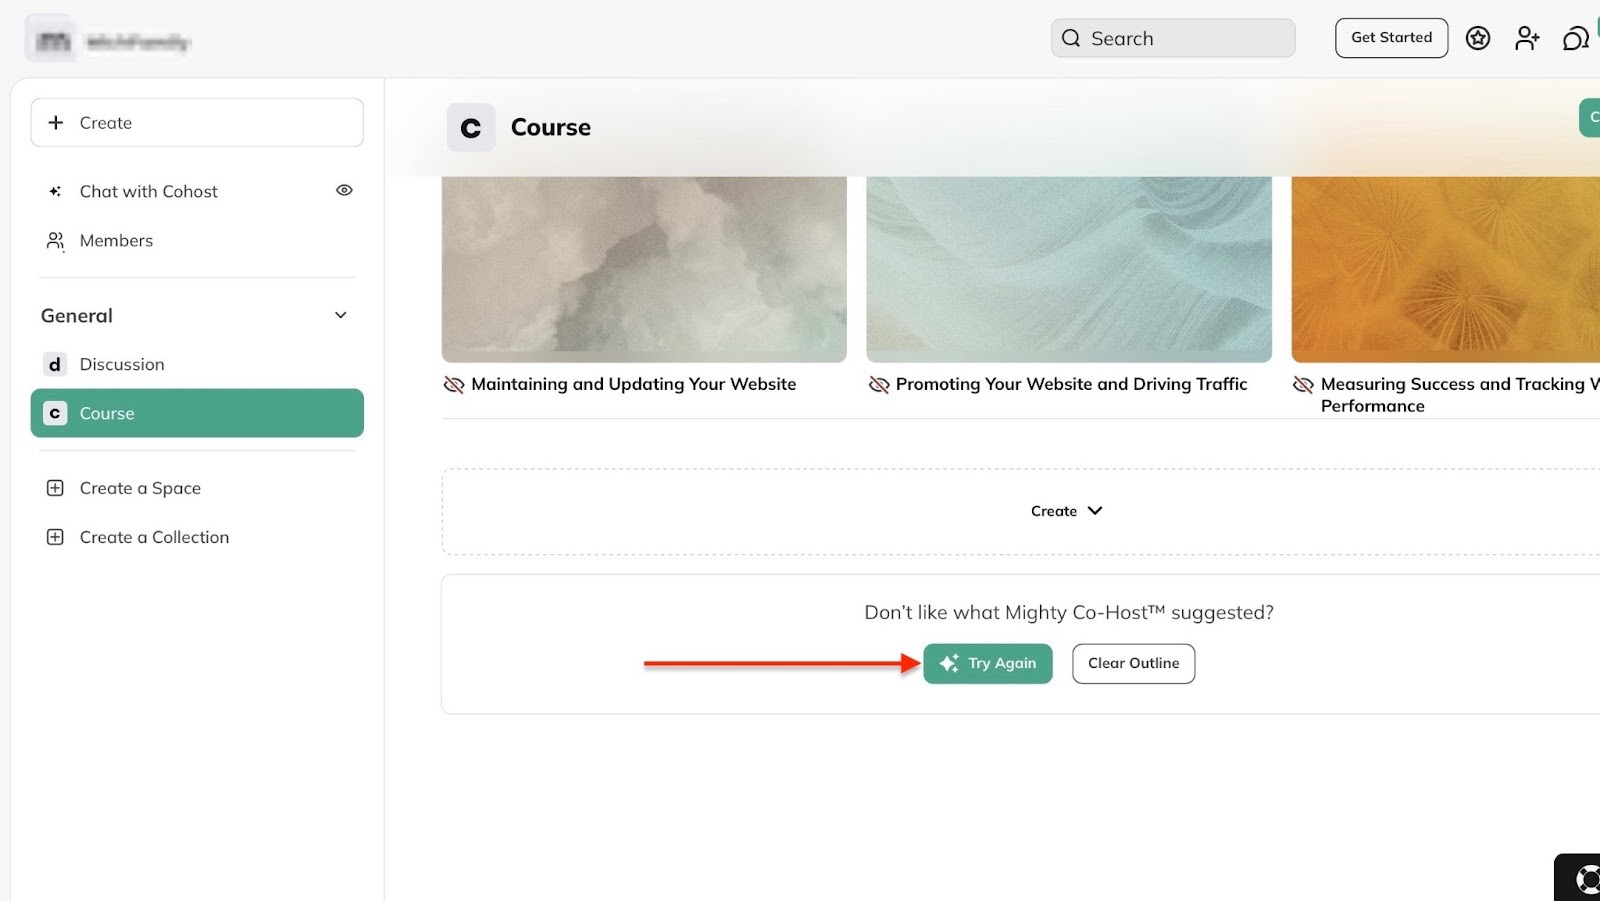
In case you don’t like the outline Co-Host suggested, return to the homepage and scroll to the bottom of the window. Then, click “Try Again.”
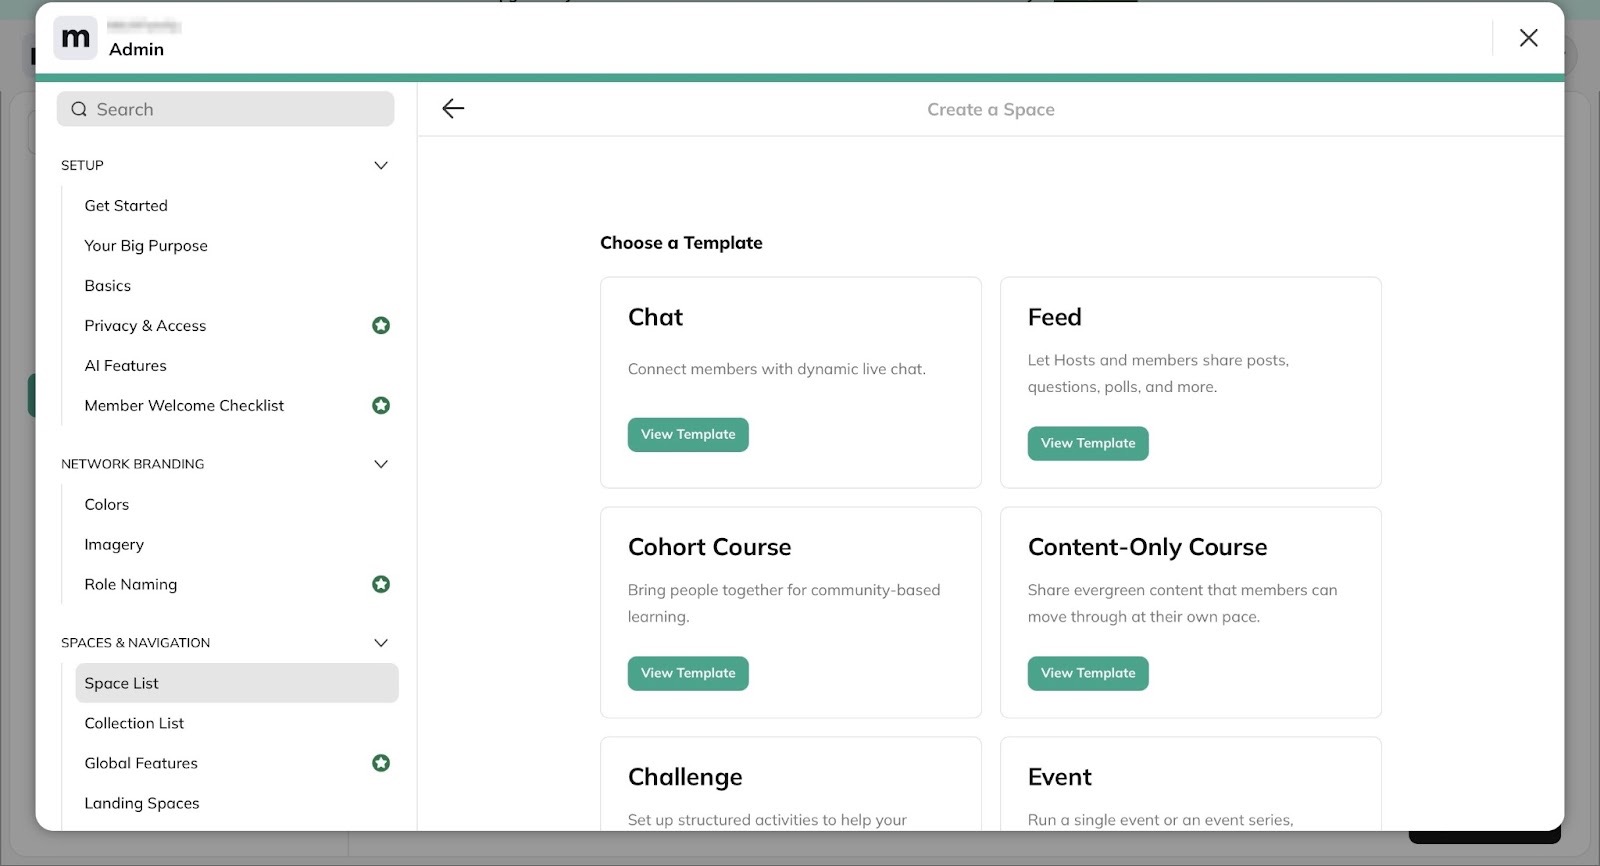
2. Create a Space
On Mighty Networks, the “Create a Space” feature lets you create a dedicated area within your community or network.
It shows the community-first nature of the platform.
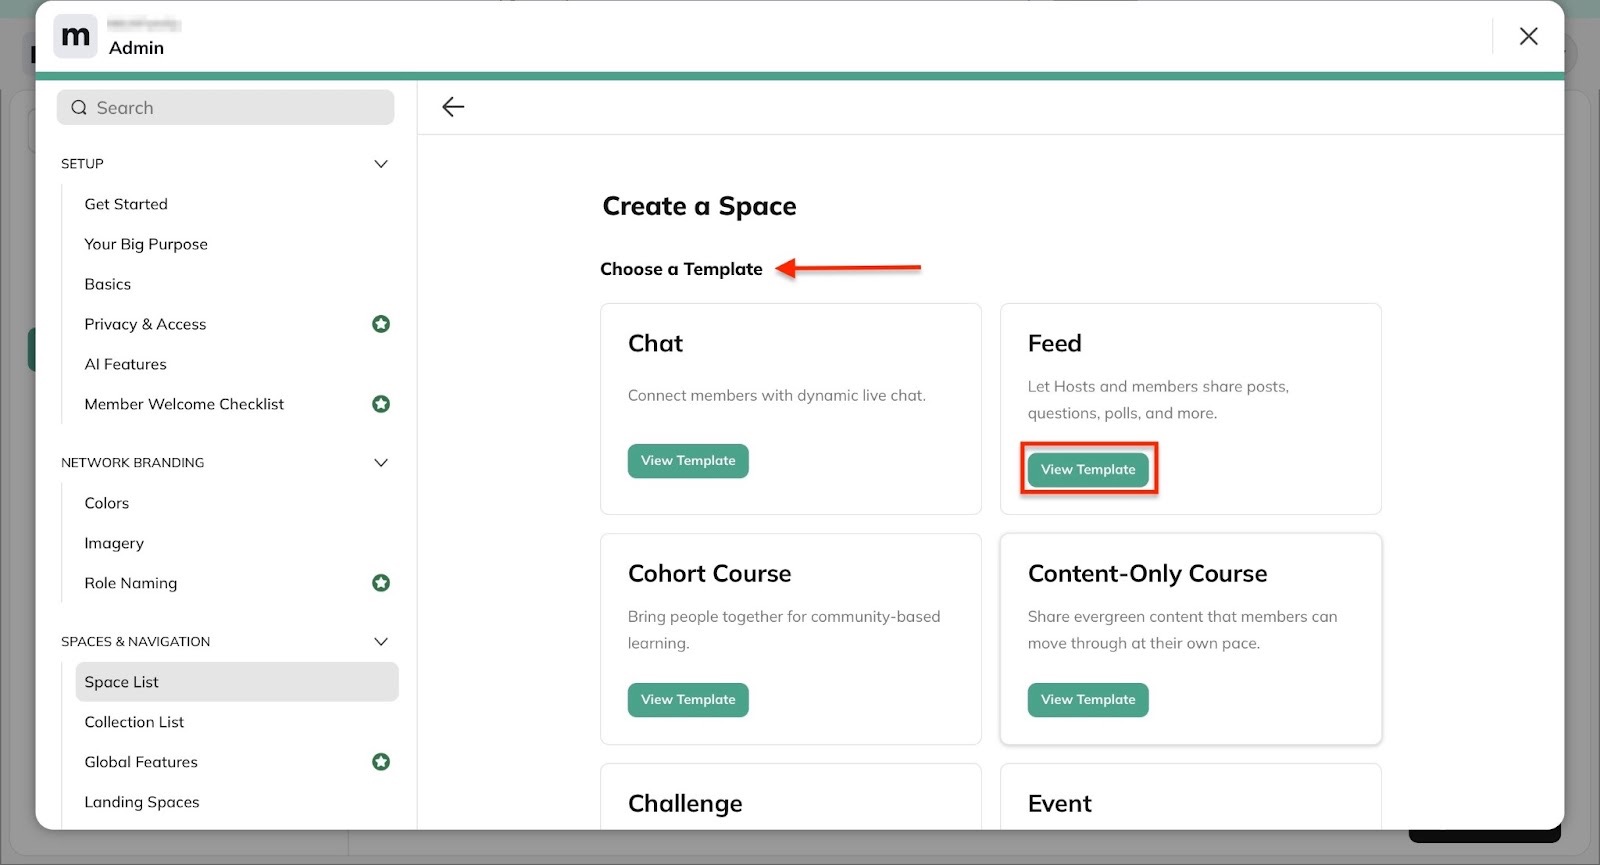
To use this feature, start by clicking “Create a space” in the sidebar.

Then, in the pop-up window, select the kind of space you’d like to create. You could create a space for chat, feed, event, content-only course, and more.
Let’s select “Feed.” So click the “View Template” button to continue.
In the new window, add the name of your space.

Then, scroll down to fill out the necessary fields and select the appropriate radio buttons.
Lastly, click “Create Space” to finish.
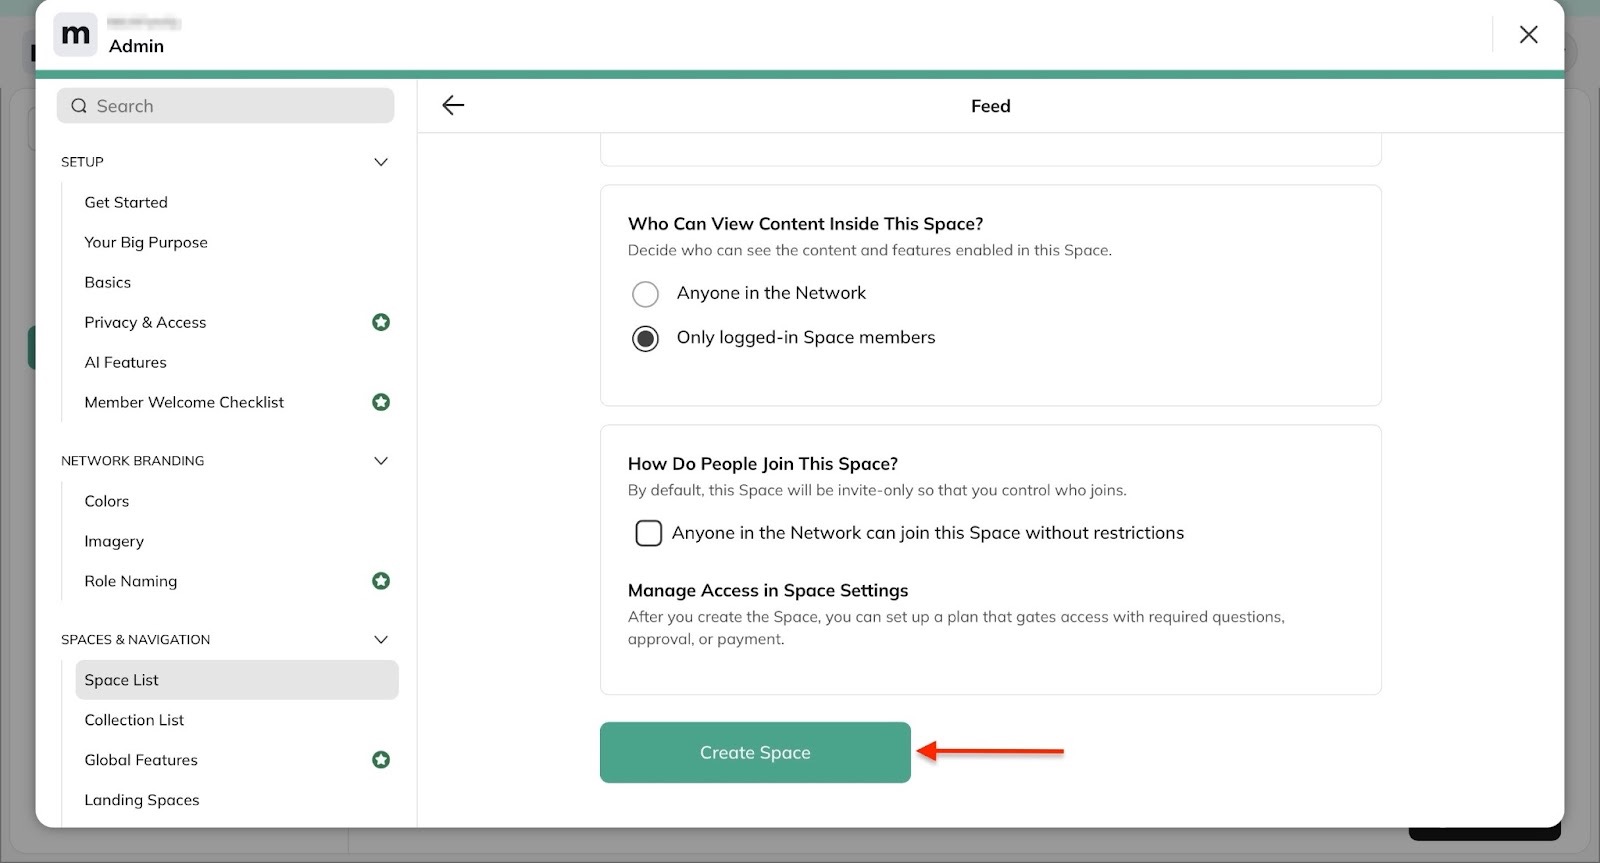
Mighty Networks will create your space. Now you can create a plan, invite people to join that space, or view the space.

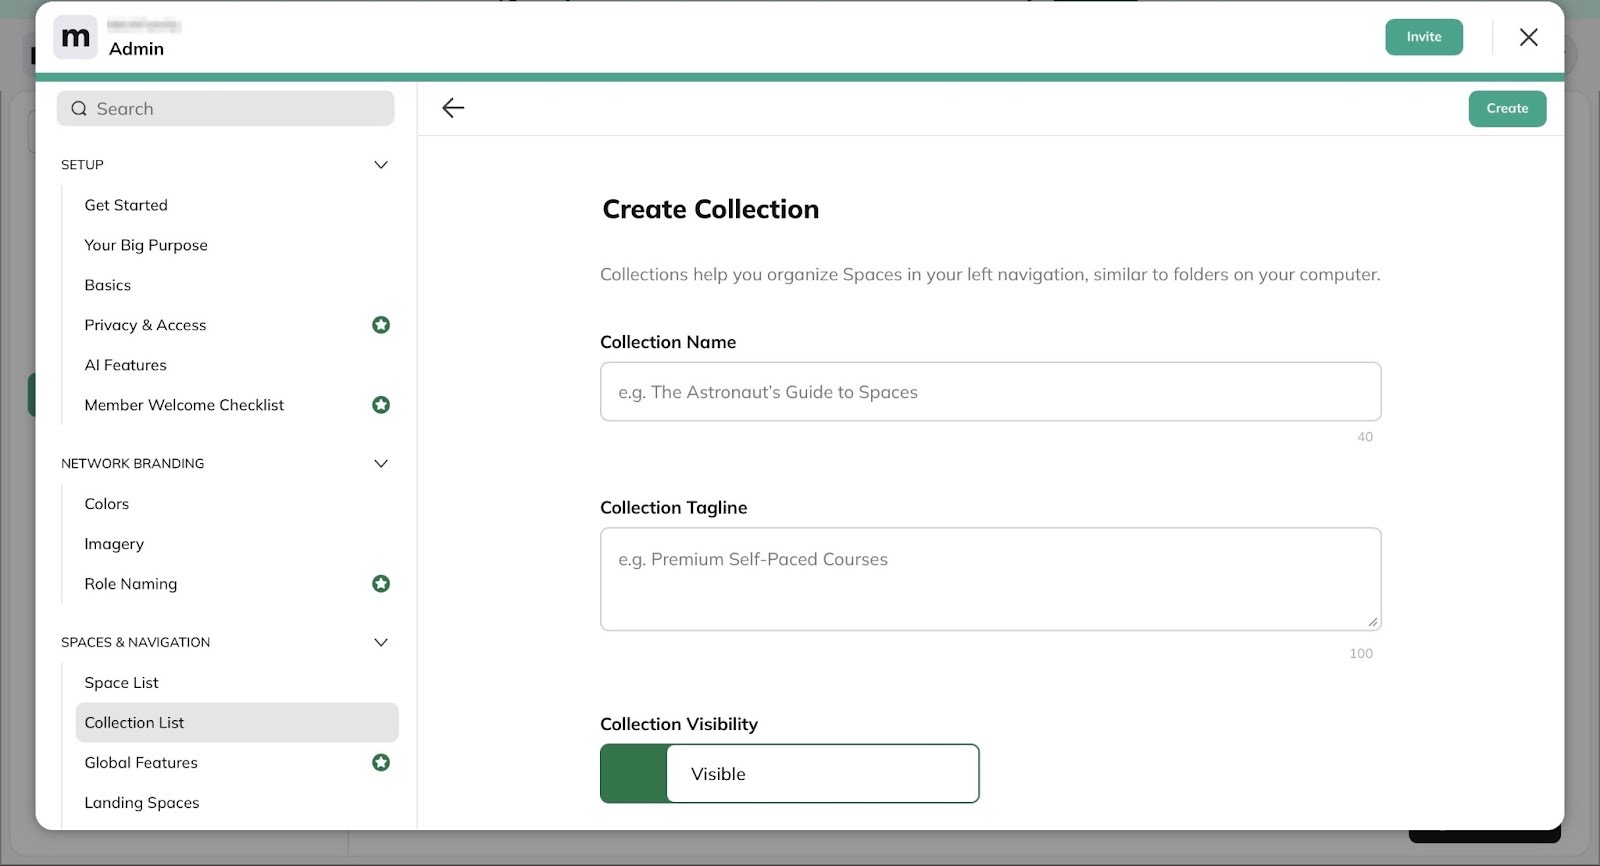
3. Create a Collection
Mighty Networks’ create a collection feature allows you to group spaces. A group of spaces is what the platform calls a collection.
To create your collection, click “Create a collection” in the sidebar.

Next, enter the collection's name and tagline. After that, toggle the switch to make the collection either visible or hidden.
Then, click “Create” at the top right corner of the window.

Now, scroll down and select “Create a Space here.”

Create a space like we did earlier, and click the close icon to return to the “Create a Collection” feature window. You can add more than one space as you please.
Mighty Networks will list the new collection you just created. Click the kebab menu beside it to create the space you want to add to the collection.

[fs-toc-omit]What I loved and what I didn’t like
What I loved 👍
✅ You don’t need separate tools for creating courses, memberships, and a community.
✅ Plans start at $49, and that’s affordable.
✅ Its focus on community can help with customer retention and loyalty.
✅ You can add quizzes and also track student progress with the Courses plan.
What I didn’t like 👎
❌ Higher plans can be very expensive. For example, the Courses plan is $109, and the Growth plan is $360.
[fs-toc-omit]Best For
- Coaches looking for a community-first platform to turn their audience into paying community members.
[fs-toc-omit]Pricing
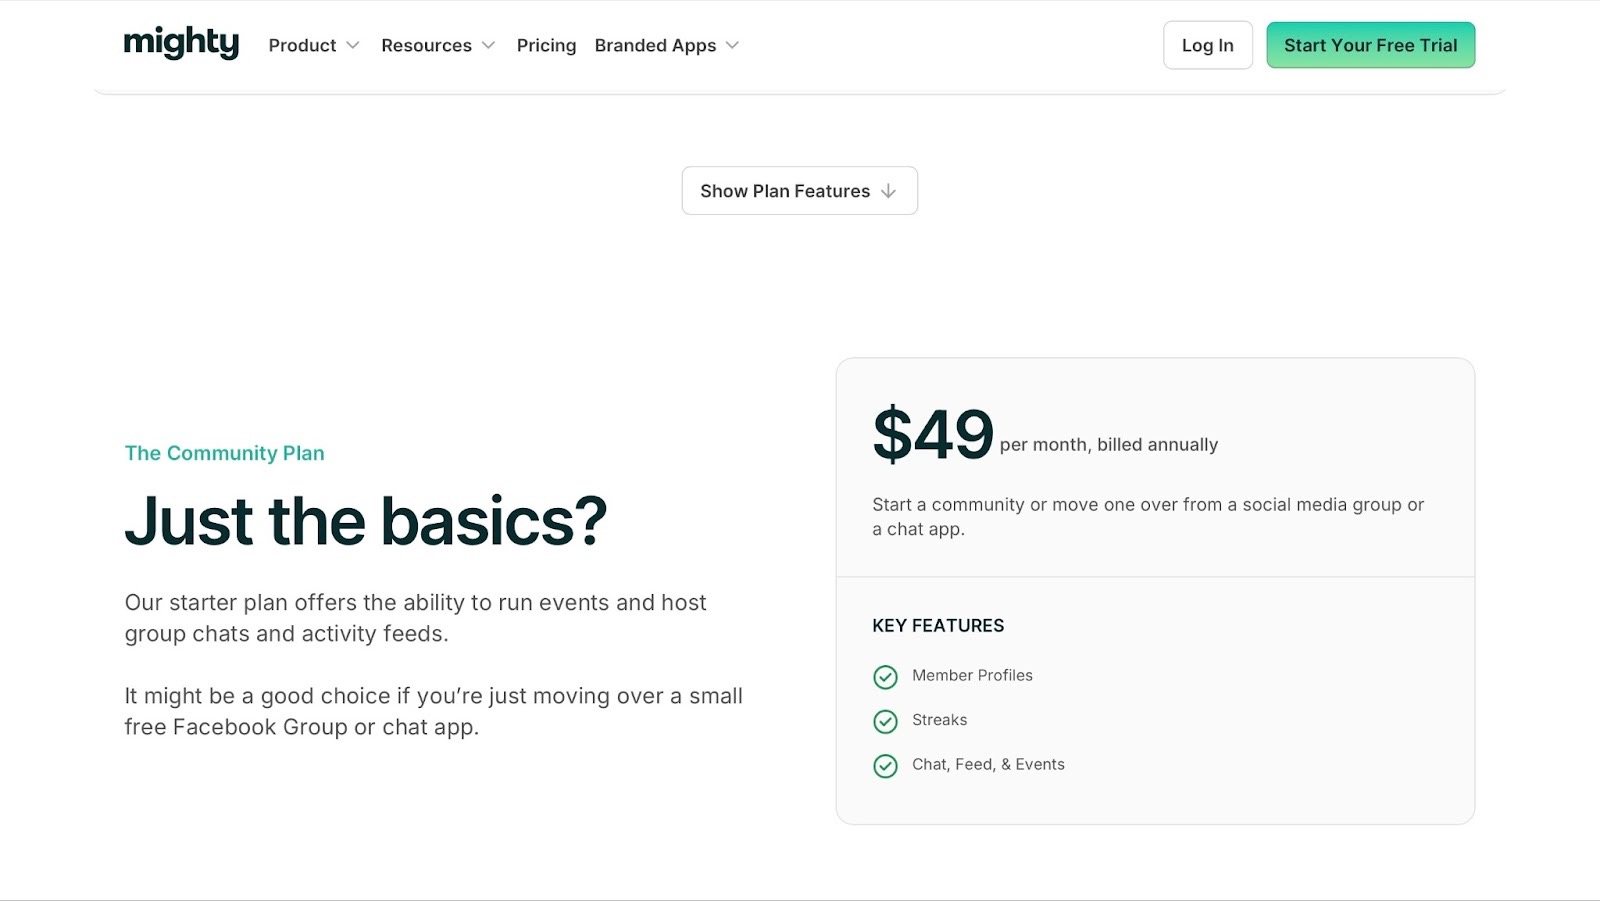
- The Community Plan: $49/month
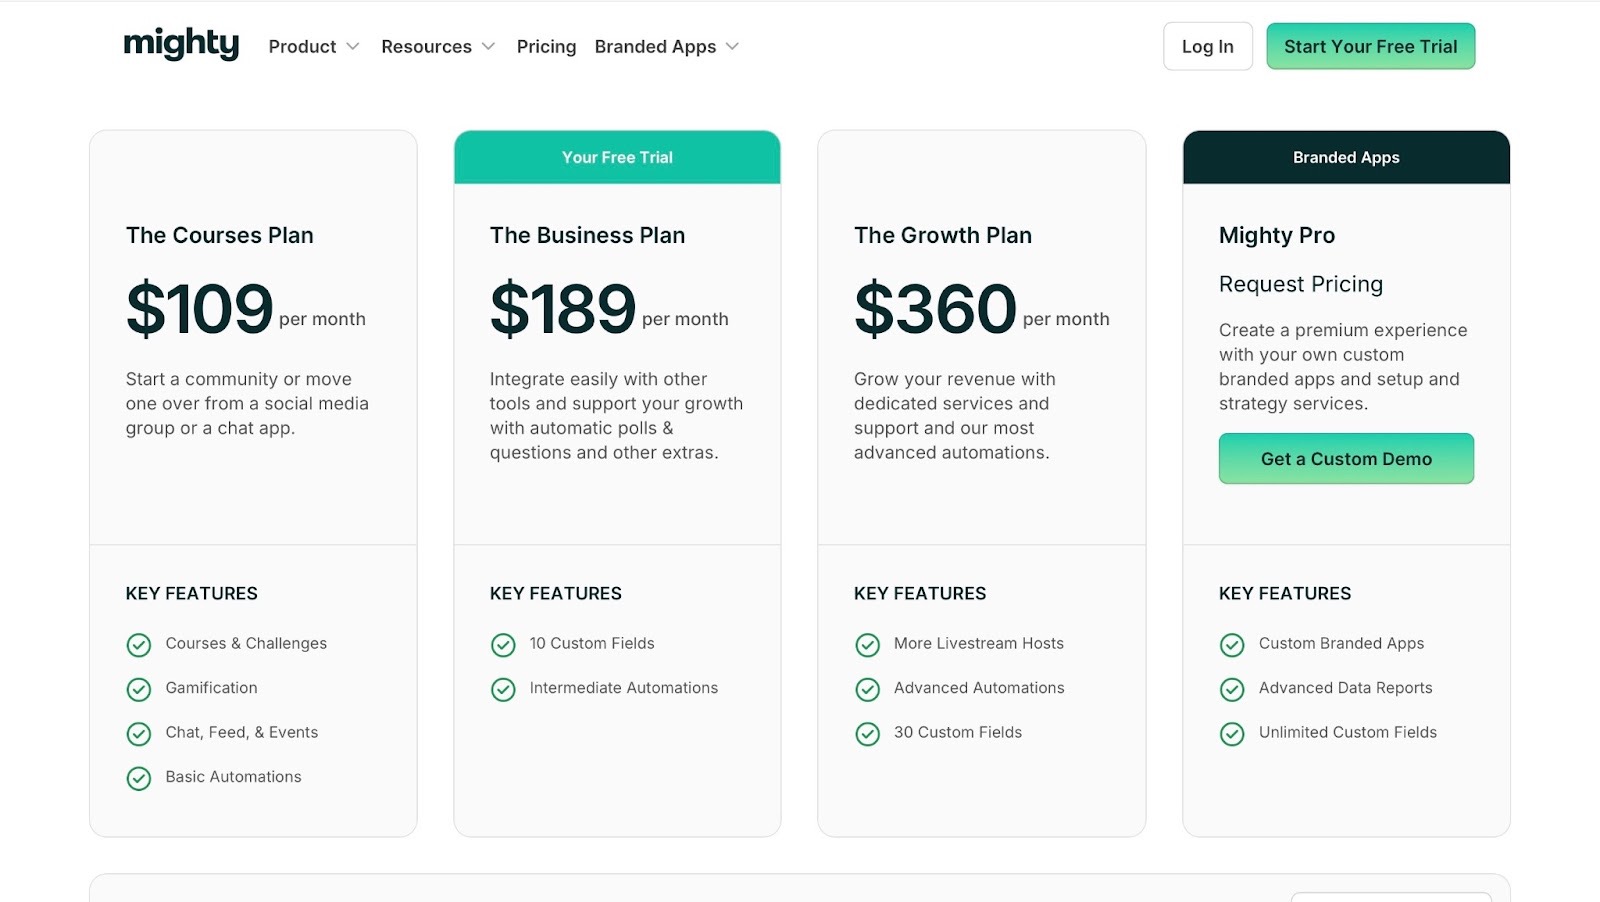
- The Courses Plan: $109/month
- The Business Plan: 189/month
- The Growth Plan: $360/month
- Mighty Pro: Contact for pricing
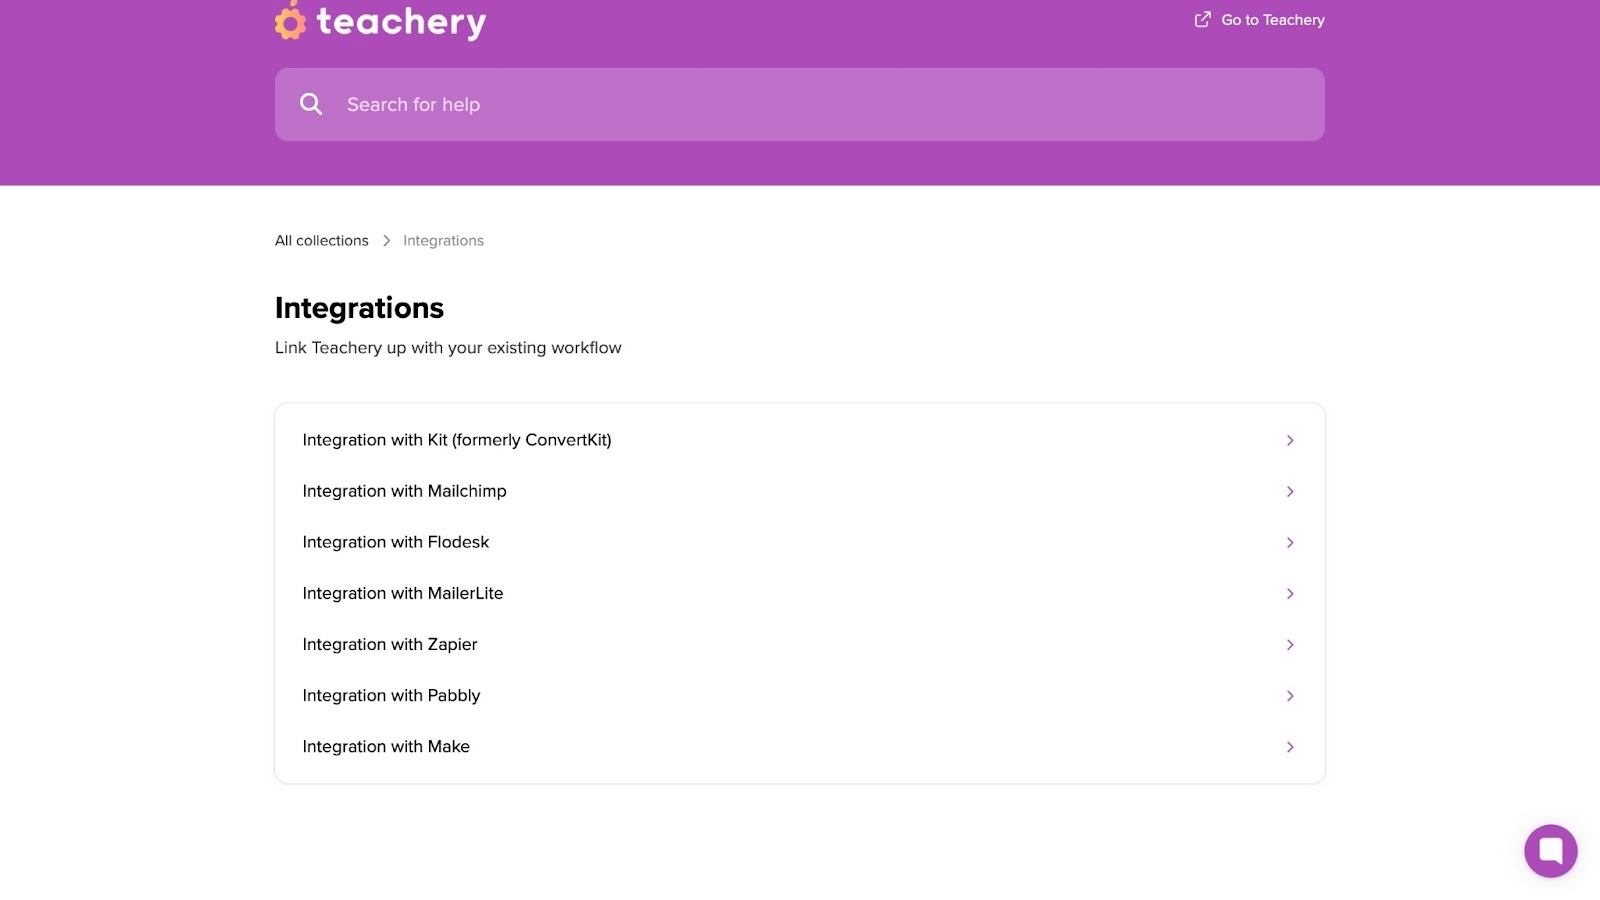
6. Teachery
Rating: ⭐ ⭐ ⭐ ⭐ 4/5 stars | Starting price: $49 (with no transaction fee) | Integrates with: Kit, MailerLite, Zapier, Pebbly, Make, Flodesk, Mailchimp | Best for: Course creators, independent coaches, subject-matter experts, and consultants
Last but not least is Teachery. It’s a simple, customizable online course-selling platform.
It’s also a Teachable alternative that lets you create, sell, market, and deliver digital products.
I’m sure you’d want to know what puts Teachery on this list. I’ll get to it.

You can create online courses and add fully customizable themes to them. This means you can change the look and feel to match your branding.
There’s also a search bar you can use to quickly find your courses. That’s in case you end up creating many of them.

If you want to display your courses, you can do that with Teachery’s hubs feature. It kind of reminds me of the storefront feature on Easytools.
You can create as many course hubs as you want.
Additionally, Teachery lets you add customers or students, search for their names and emails, and check their activities.
Also, you can always download your customer list as a CSV file. So you have control over your customer list.

I realised that you can add affiliates on Teachery as well. The platform allows you to decide how much commission to pay them, and you can track that on the platform.
I also found that you can add yourself as an affiliate and earn for your referrals.

[fs-toc-omit]What I loved about Teachery
1. Courses & Themes
On Teachery, you can create a proper course where you teach people a skill or share knowledge. You could even create themes for other creators to use on the platform.
I’ll teach you how to create your first course with this feature.
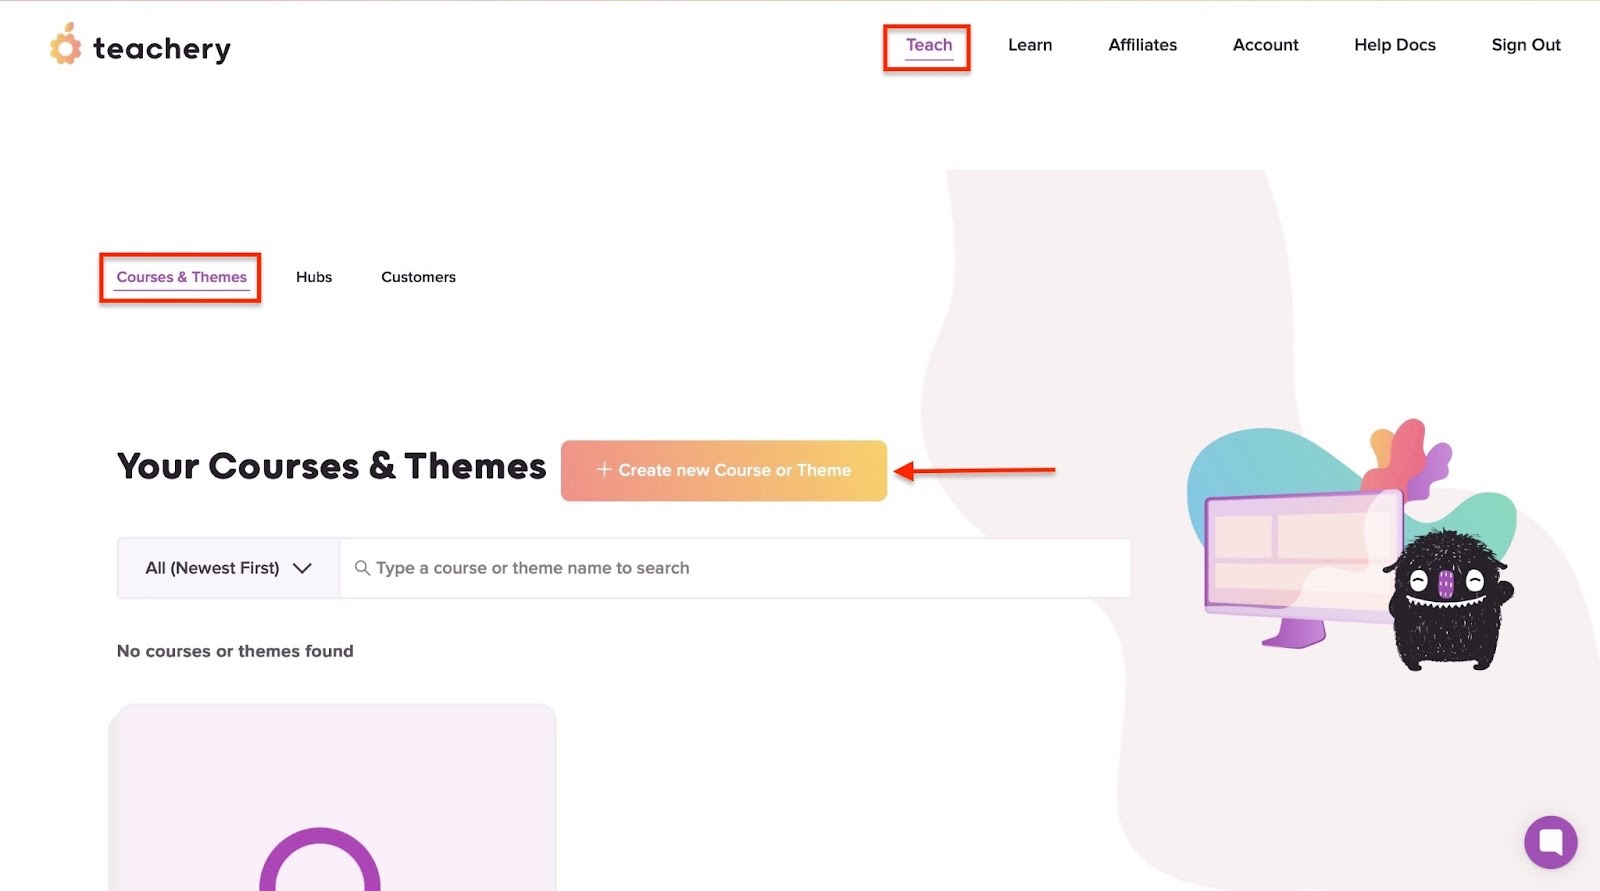
Let's start by selecting “Teach” in the navigation bar. Then, click “+ Create new Course or Theme.”
Next, click “Use a NEW Starter theme.”

Now, select any of the themes and click “Build Course.”

Teachery will build your course. Now you can customize it to fit your brand.
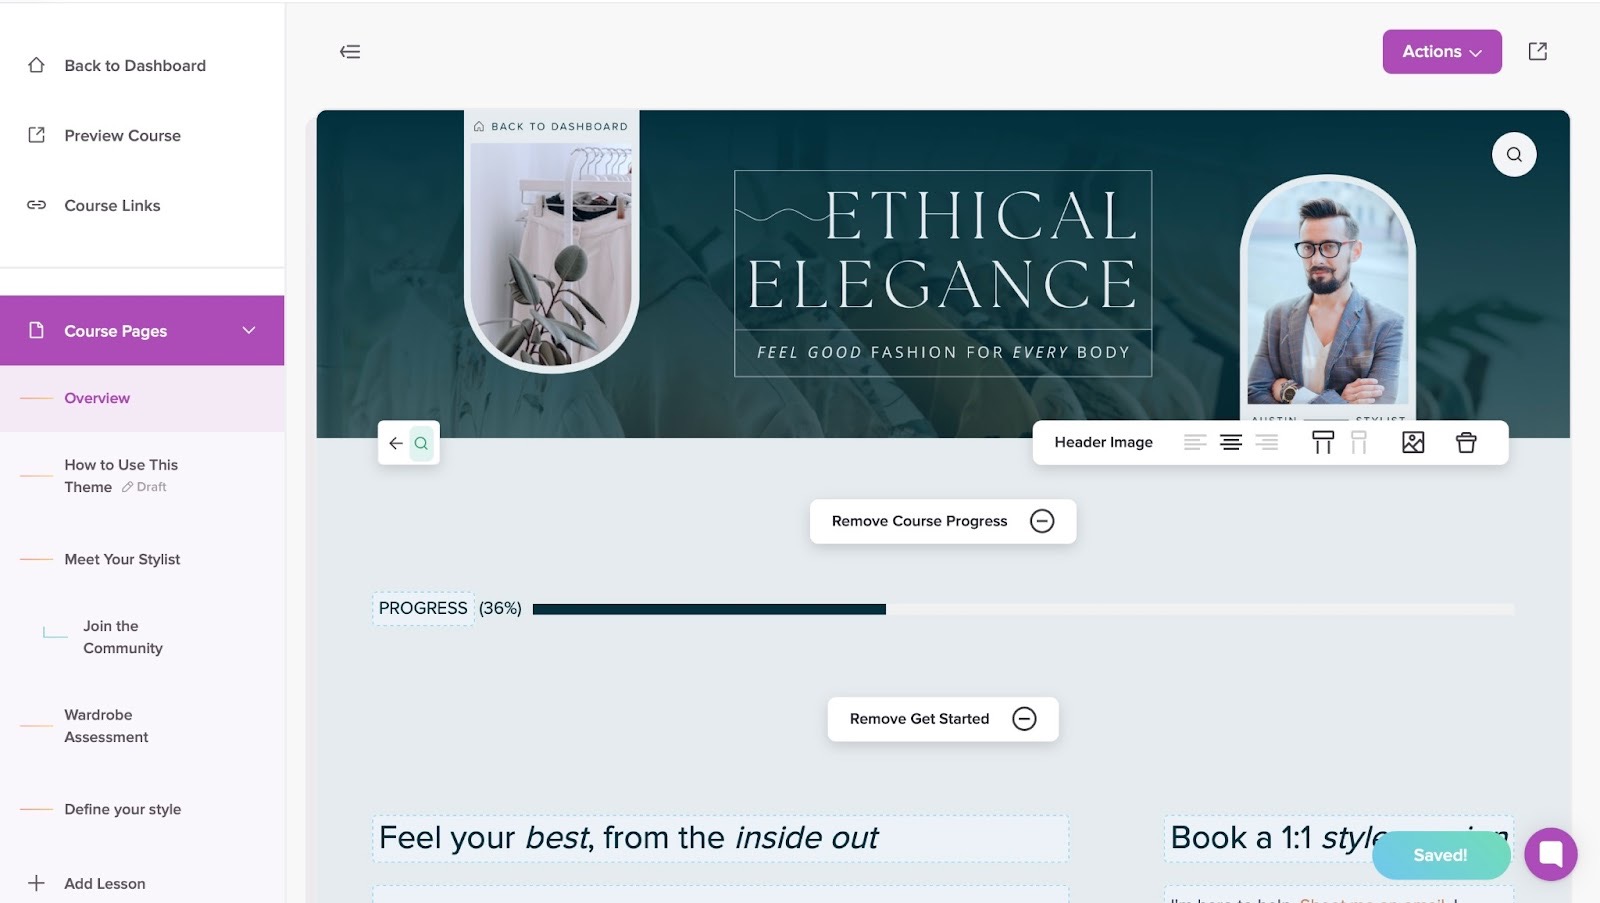
Clicking preview will show you how it’ll look once it's published.

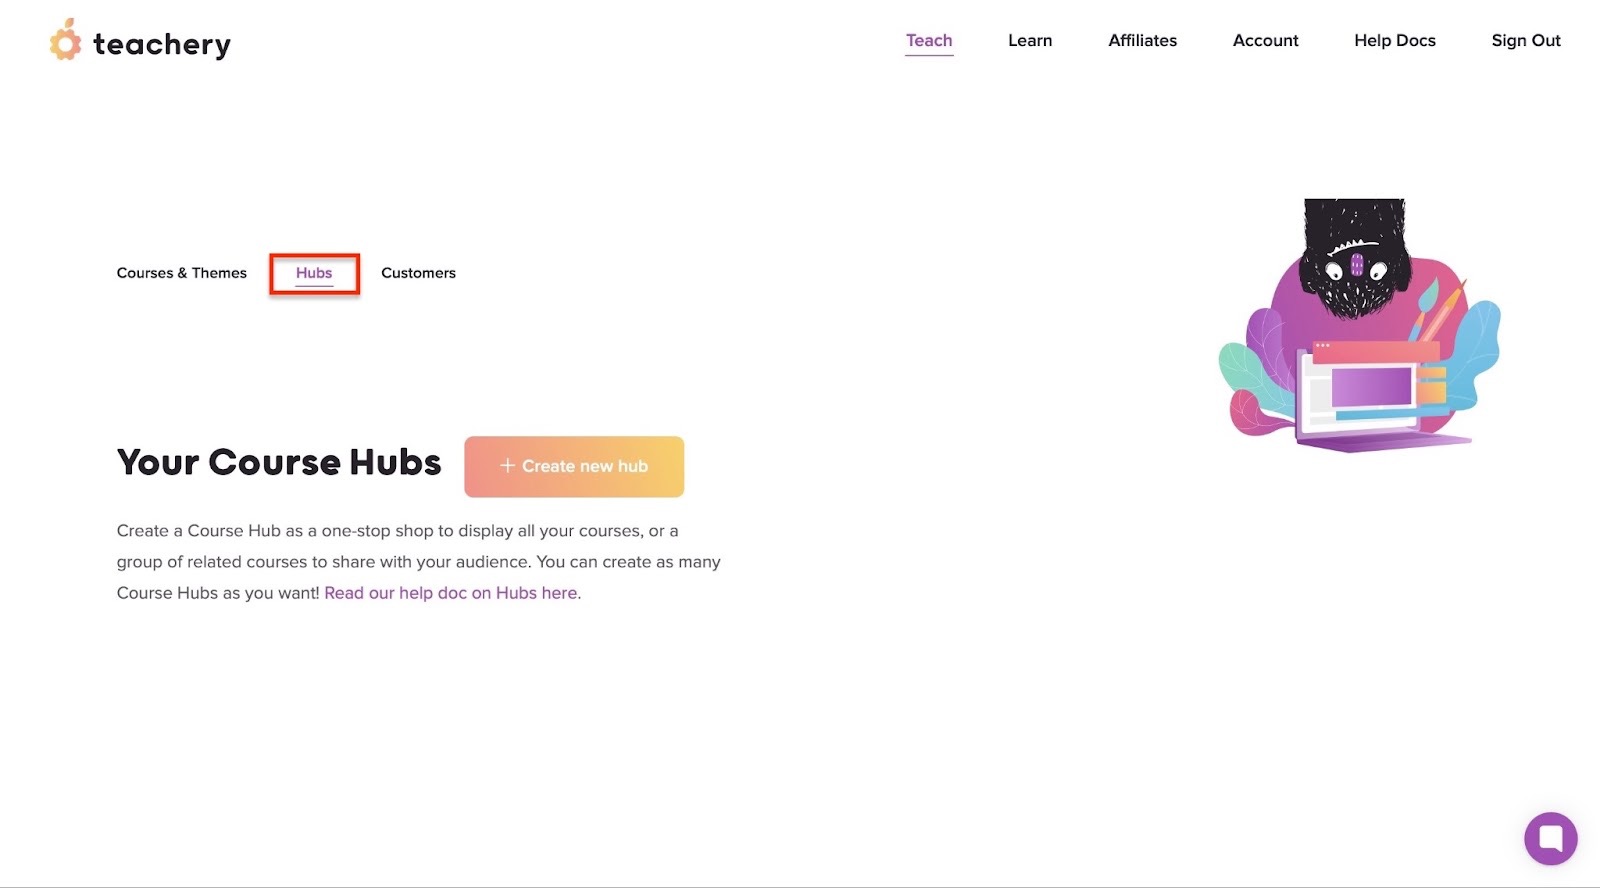
2. Hubs
The hubs feature lets you display your courses on one page for potential customers.
Here’s how to go about it.
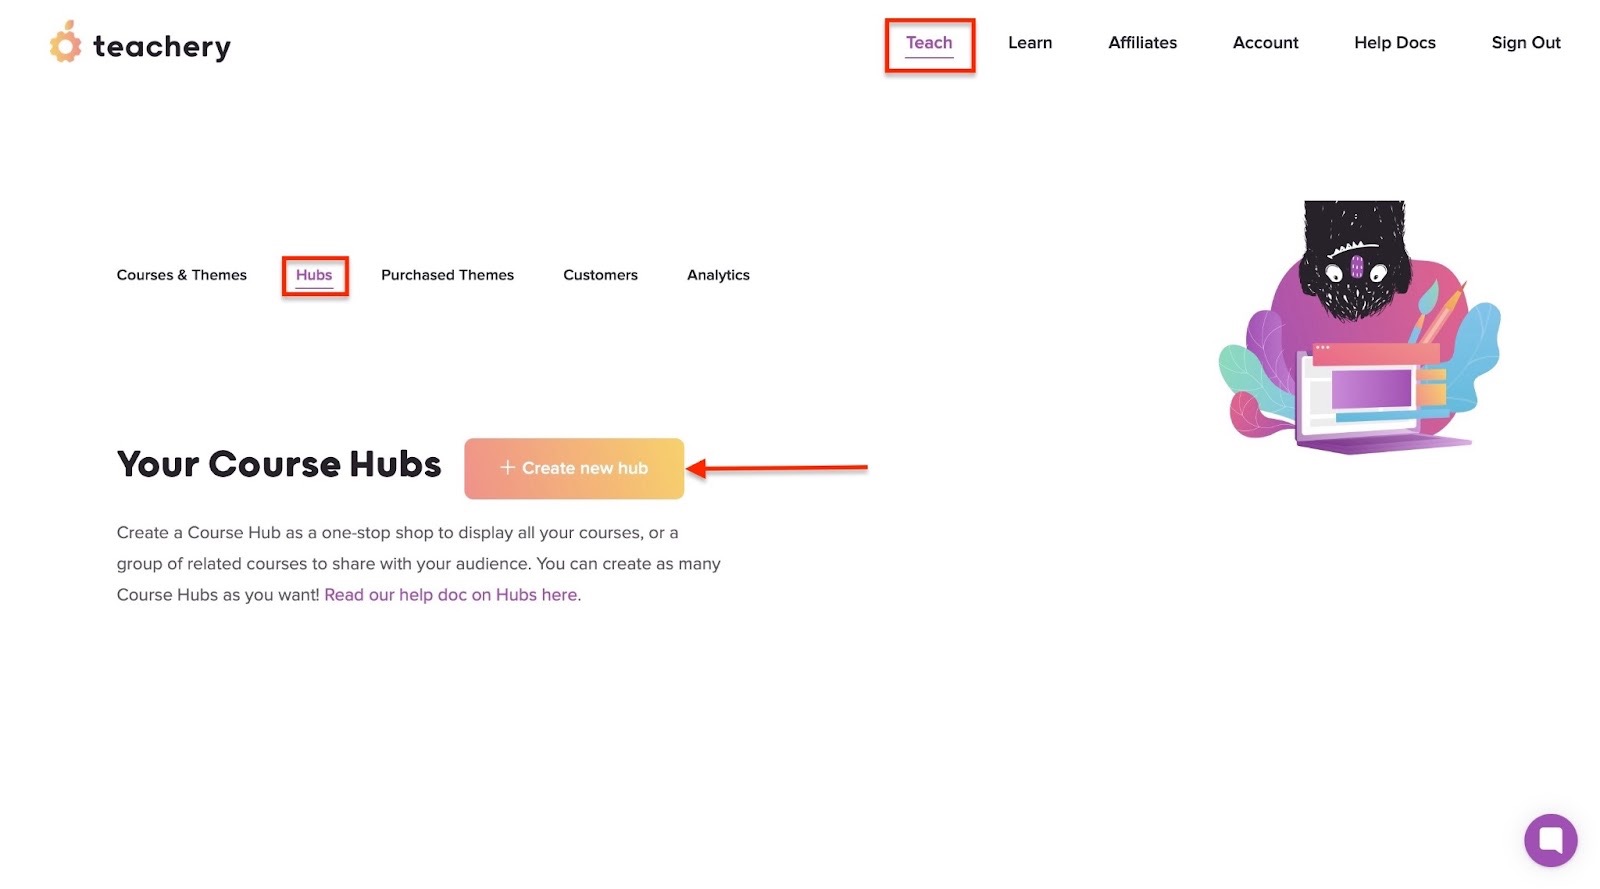
First, go to “Teach” in the navigation bar and select “Hubs.” Then, click “+ Create new hub.”
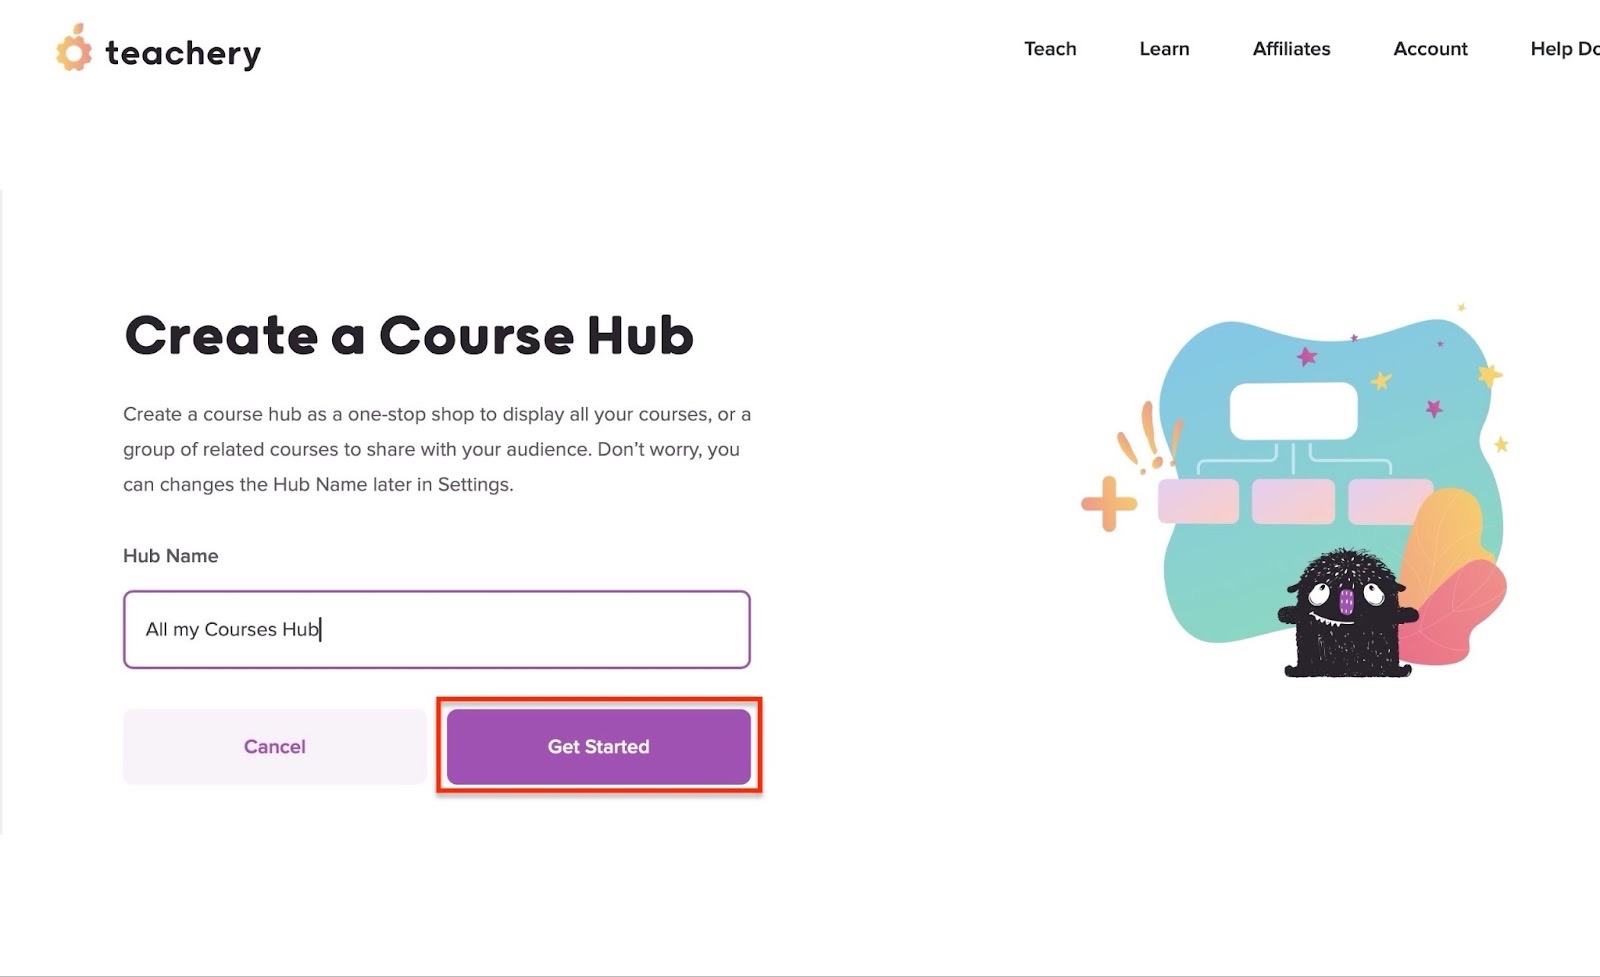
Enter the hub’s name and hit “Get Started.”
In the new window, you can edit your newly created hub. To add your courses, scroll down and click “+ Add Course.”

After that, select the course (or courses) and click “Add 1 Course to Hub” at the top right corner of the window.

Teachery will add your course to the newly created hub. Once you add more courses, you can click “Copy Link to Hub” and share it online to bring in more customers.

3. Customers
Last but not least is the customers feature. It simply lets you manage people who enrolled in or bought your online course.
Here’s how to add a customer:
Select “Teach” in the navigation bar and choose “Customers.” From here, click “+ Add Customer to Course or Theme.”
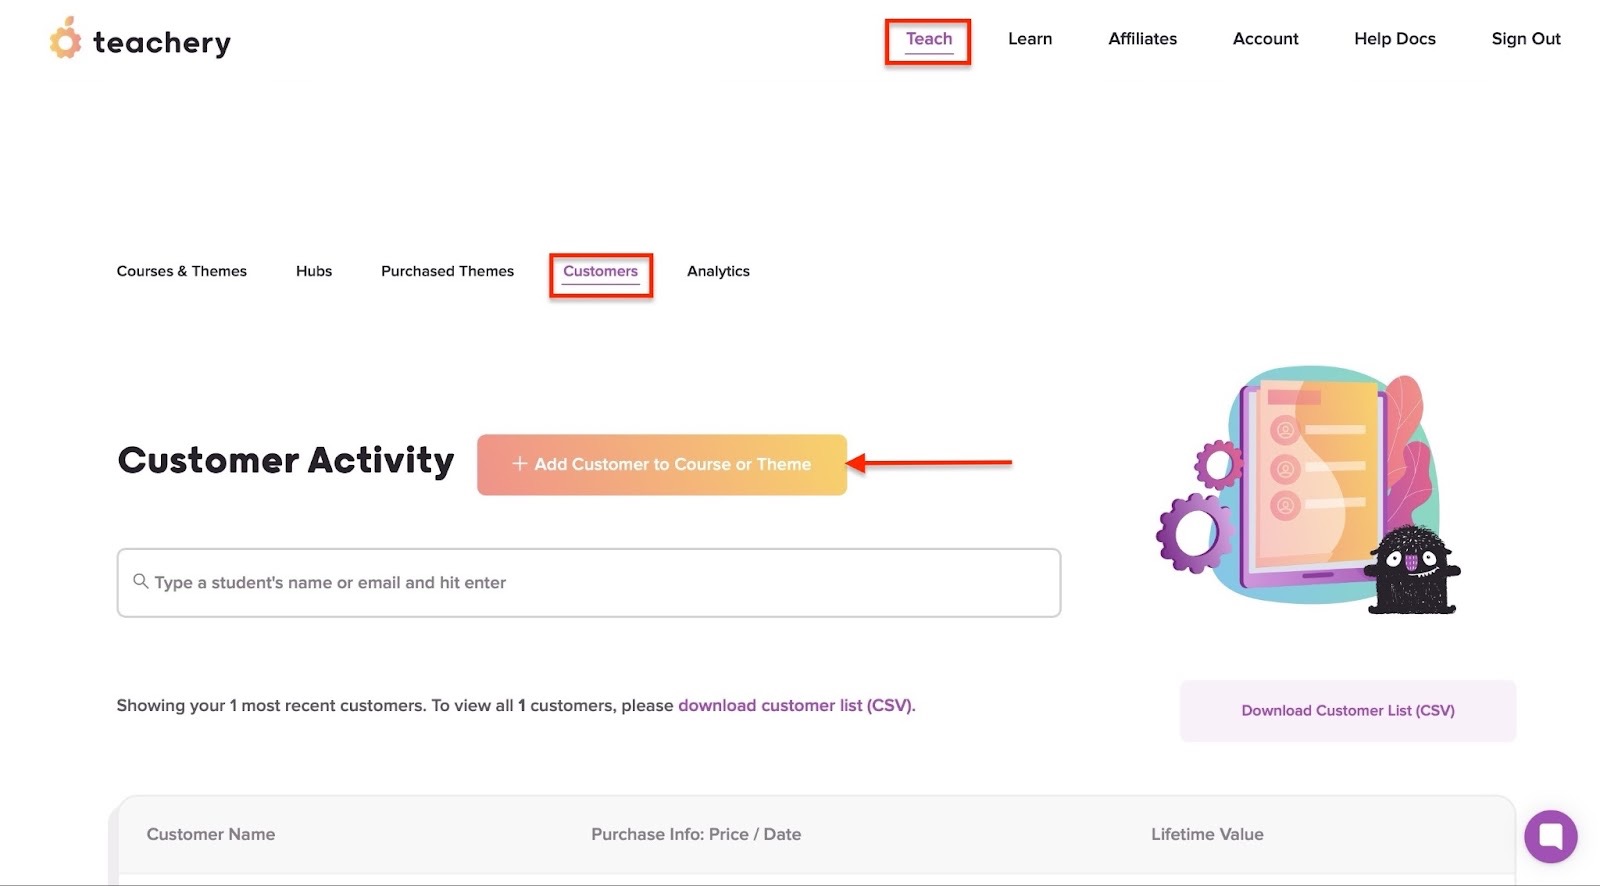
Now, enter the customer’s name and email address. Then add them to a course or theme.
Once you’ve done this, hit “+ Add customer.”

Teachery will display the name of your newly added customer.

[fs-toc-omit]What I loved and what I didn’t like
What I loved 👍
✅ Very easy to use, and you can add a course in minutes by using pre-designed themes.
✅ Charges no transaction fees and has flat pricing for everyone.
✅ Has a strong support team with live chat and helpful docs
✅ You can add affiliates to maximize your earnings.
What I didn’t like 👎
❌ Not for large organizations that need enterprise-level features.
❌ Doesn't have built-in support for certificates and quizzes.
[fs-toc-omit]Best For
- Course creators wanting to sell online courses without paying transaction fees.
[fs-toc-omit]Pricing
- One-time plan (lifetime access): $49/month

Additional popular Teachable alternatives
I could mention even more Teachable competitors, like
- Etsy
- Thinkific
- Kajabi
- Patreon
- LearnDash
- Payhip
- Sellfy
- Udemy
- Gumroad and
- Creative Fabrica.
Other creators even use their e-commerce and website platforms, like
- WordPress
- Shopify
- WooCommerce and
- BigCommerce
Now that you know the top alternatives to Teachable, let’s see how to choose the right platform.
How to choose the best Teachable alternative
To choose the best Teachable alternative, you should:
- Define your business needs
- Look for must-have or necessary features
- Compare pricing plans and return on investment (ROI)
- Check the platform’s integration with other tools and its app compatibility
Now, let's look at each factor in detail.
1. Define your business needs
First, you should define your business needs when choosing the best Teachable alternative.
In other words, you must know what you want to achieve with your online courses. For example, your audience may be beginners and not professionals or teams.
For beginners, you want a platform that’s very easy to use, like Easytools or Teachery. Your customers or students should be able to access your course content easily, for instance, in a single click.
A platform that displays all their purchased courses clearly helps users achieve this.

You also want to be able to sell more than just online courses. You should be able to add e-books, templates, quizzes, workbooks, and more to your courses.
So consider choosing a platform that offers that.

Also, your customers shouldn’t have to struggle trying to get around your course hosting platform. Figuring out which buttons to click should not feel like rocket science.
But if you want to sell to professionals and teams, we already have customers doing that on Easytools. Marcin and Przemek, founders of Przeprogramowani and creators of 10xDevs, are great examples.

Another thing to decide on is whether you want to run live sessions, cohort-based programs, or self-paced courses.
You can sell live sessions on Easytools. As for prerecorded self-paced courses, we already have customers who sell them, and you can do the same with Easy.

For a professional-level course, marketing support and automation tools will be valuable. As such, you need to consider using platforms that offer built-in marketing and analytics tools.
In fact, a good Teachable alternative could offer some of these features through integrations with other tools.

On the topic of community, your online course business also needs to offer students memberships and community features. You want your students to feel like they’re part of a vibrant community.
The best Teachable alternative you choose will help you give them that.

You could make a checklist of your business must-haves and nice-to-have features by reading the next factor.
{{cta-banner-1}}
2. Look for must-have features
When choosing the best Teachable alternative, you should know which features are must-haves for your needs. For creating, selling, and marketing online courses, the platform you choose must have:
- A course builder
- Checkout and payment processing
- Landing pages
- Marketing and analytics tools
- Integration with other tools
- User management
- Scalability and support
- No hidden/low transaction fees
- Gated access to courses
- Community features
Starting with the course builder, a good option would allow you to upload videos, PDFs, add quizzes, and suggest structured lessons.

It would also let you sell courses with different pricing models:
- One-time payments
- Subscriptions and memberships
- Payment plans
- Freemium
- Pay-as-you-want
- Cohort-based or live coaching
A platform that comes with a checkout is also a plus. Preferably, one that turns leads into paying customers through upsells, cross-sells, testimonials, and more.
And what’s a checkout without the right payment options? The right platform for you should also integrate with popular payment gateways like Stripe and PayPal so you can easily collect payments.

It should also allow you to build a branded website or landing page with no coding required.
Of course, marketing features and integration with other tools are non-negotiable. You should be able to send marketing emails and manage affiliates.
Furthermore, the right platform for you should offer plans that help you grow your business. And as your business grows, it should scale with you rather than push you to switch platforms.
For example, the Easytools Professional plan lets you create unlimited checkouts and projects. So, as your customer base and demand grow, you can still create and sell as many projects.
Easytools will still handle all your checkouts without fail

Lastly, your platform pick must have community features. On Podia and LearnWorlds, for example, you can create communities for your students.

Easytools integrates with Circle and Discord so you can add your students to your communities on those platforms.
Plus, we have an actual community for our creators. We send updates and announcements to that community.
We keep our customers informed about changes and updates to the platform. And you can also share tips with your colleagues or learn from them.

3. Compare pricing plans and ROI
You should compare plans and return on investment (ROI) when choosing the best Teachable alternative. The reason behind this comes down to two major factors. Which are:
a. Pricing affects your product’s profitability
If you’re paying high platform and transaction fees, that may eat into your revenue.
LearnWorlds, for example, charges $5 per course enrollment on its Starter plan but none on its higher plans.
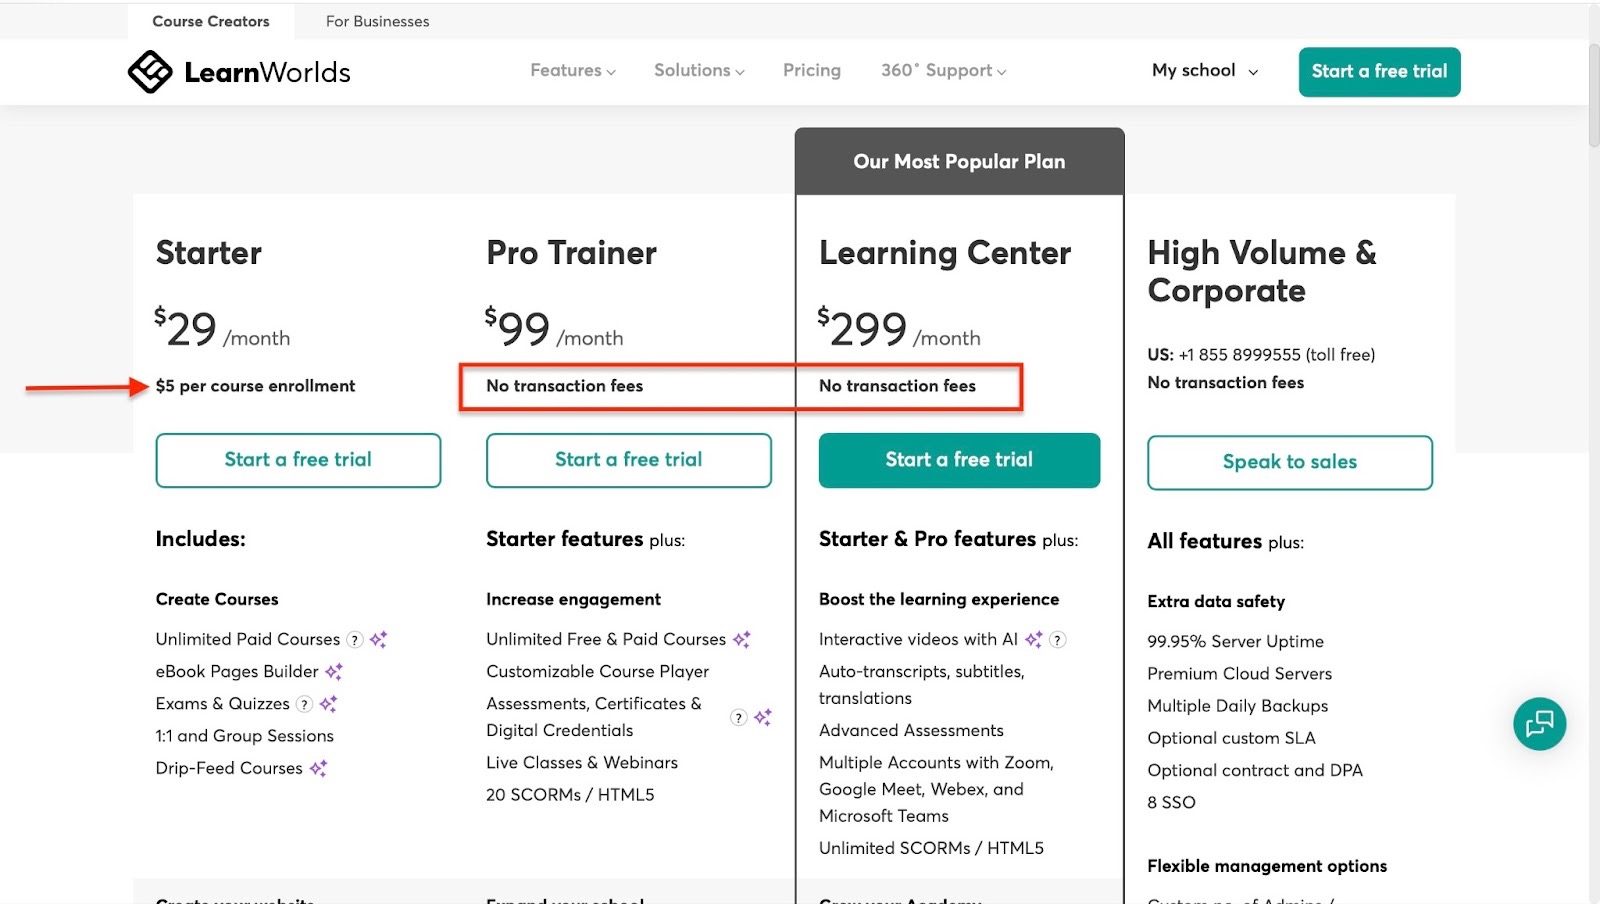
Many platforms highlight low or no transaction fees as a selling point.
But that’s more reason for you to check and make sure all the fees won’t affect profitability in a bad way.
b. ROI reflects real value
Sometimes, you may mistakenly think that a cheaper plan means you realize a better ROI. Unfortunately, that's not always the case.
If the platform doesn't give you features for, say, marketing or automations, it’ll be challenging to sell.
And if you can’t market your course, I doubt that you’ll make sales. So a cheaper plan doesn't always show value.
The plan that gives you the tools to sell and market your course is where you’ll see real ROI.
For example, one of our customers made $13,000+ in a single day selling her online course because of Easycart.

Even if she paid a monthly platform fee of $79 and a 2% transaction fee on every sale, she still made a lot of profit.
Now, here’s how you compare pricing plans and ROI. You have to look at the monthly or annual cost of selling on the platform.
Let's take Easytools, for example. It has two paid plans: Creator at $59/month or $708/year, and Professional at $99/month or $1188/year.

Also, you have to check the features that come along with the plan.
For example, Easy’s Professional plan gives you all features plus marketing, analytics, free add-ons, and priority support.
The thing is, you’d like to find out if all these features will help you sell and market your online courses.
Don’t choose a platform that costs more than it earns for you. You can’t grow your business that way.
4. Check integrations and app compatibility
Finally, you should check the integrations and app compatibility of the Teachable alternatives. You want tools that fit into your overall workflow.
From creating your course to designing a landing page, marketing it, collecting payments, and tracking sales and performance.
You want tools that connect smoothly with the platform to help you do this.
When it comes to marketing and sales, you need platforms that integrate with Mailchimp, MailerLite, ActiveCampaign, and Kit (ConvertKit).

When your marketing efforts bring in buyers, you want tools that’ll help you collect payments. This can be Stripe or PayPal.
It’s even better if the payment gateway has been improved and connected smoothly to a feature like Easycart.
When you can offer leads, upsells, and cross-sells from the get-go, you tend to convert them to paying customers easily.

If you offer live online courses, then you’ll need a platform that works well with scheduling tools like Zencal, Calendly, SavvyCal, and YouCanBook.Me.

For live sessions, you might also want to connect to Zoom, Microsoft Teams, or Google Meet.

Beyond that, you should also be able to check sales and performance of your courses with Google Analytics or Facebook Pixel.
This is extra important if the platform doesn't offer you analytics or reports of any kind.
If you want tasks like adding a student to your email list to be automated, check for integrations with tools like Zapier and Make.
Of course, to retain, you need CRM tools like HubSpot, Freshchat, Zendesk, and more.

The more compatible the platform is with the tools I’ve mentioned, the less manual work you’ll have to do. That’ll save you some time and the hassle that comes with it.
The faster you launch and start marketing, the sooner you can make sales and move on to customer support and retention.
So check integrations and make sure they are in line with your entire workflow. After all, your choice platform should help improve your process from start to finish.
Choose the best alternative to Teachable
The best Teachable alternative for you is just an easy decision away now that you've read to the end.
In this article, I walked you through the six best Teachable alternatives on my list. They are Easytools, LearnWorlds, Skillshare, Podia, Mighty Networks, and Teachery.
Then, I talked about four major factors to help you choose the best Teachable alternative. I also mentioned that you should define your business needs and look for must-have features.
Last but not least, you should also compare pricing plans and ROI, and check for tool integrations. I believe this should guide you in making the right decision.
FAQs
What are the best Teachable alternatives?
The best Teachable alternatives are Easytools, LearnWorlds, Skillshare, Podia, Mighty Networks, and Teachery.
Which Teachable alternatives offer better value for money?
The Teachable alternatives that offer better value for money are Easytools, LearnWorlds, Podia, Mighty Networks, and Teachery.
Take Easytools, for example. Our plans start at $0 with a 5% transaction fee. You can also create unlimited checkouts (Easycart) with that plan.
Our $59 per month Creator plan gives you every tool in Easy’s arsenal with just a 2% transaction fee. Plus, Easytools offers a broad range of integrations with other tools.
What Teachable alternatives let you sell digital downloads as well as courses?
Teachable alternatives that let you sell digital downloads are Easytools and Podia. You can sell like e-books, templates, workbooks, planners, and more.
Does Teachable offer a free trial?
Yes, Teachable has a 7-day free trial on all its plans.
Which Teachable alternatives include built-in email marketing or automation?
Teachable alternatives that include built-in email marketing are Easytools, Podia, LearnWorlds, and Mighty Networks.
No fees, no legal hassle – start selling anywhere instantly.
Sign up FREECancel anytime · No merchant lock-in

More
Related articles
Ready for more? Check out these related articles that will keep your momentum going. They’re packed with easy-to-follow tips and tricks to help you supercharge your digital goods business.


Start now
Take it easy with Easytools
Focus on creating, and let Easytools handle the behind the scenes work.
No coding · No credit card required · Built on Stripe
© 2024 Easytools. All rights reserved.