Tools
37 min read
10 best blogging tools in 2026! Features, pricing, pros, and cons
Explore the top 10 blogging tools for SEO, email marketing, content creation, and analytics. Find the best software to grow and manage your blog efficiently.

Written by
Adam GospodarczykReviewed by
Marta Jagosz
Updated on
April 10, 2026
Published on
March 30, 2026

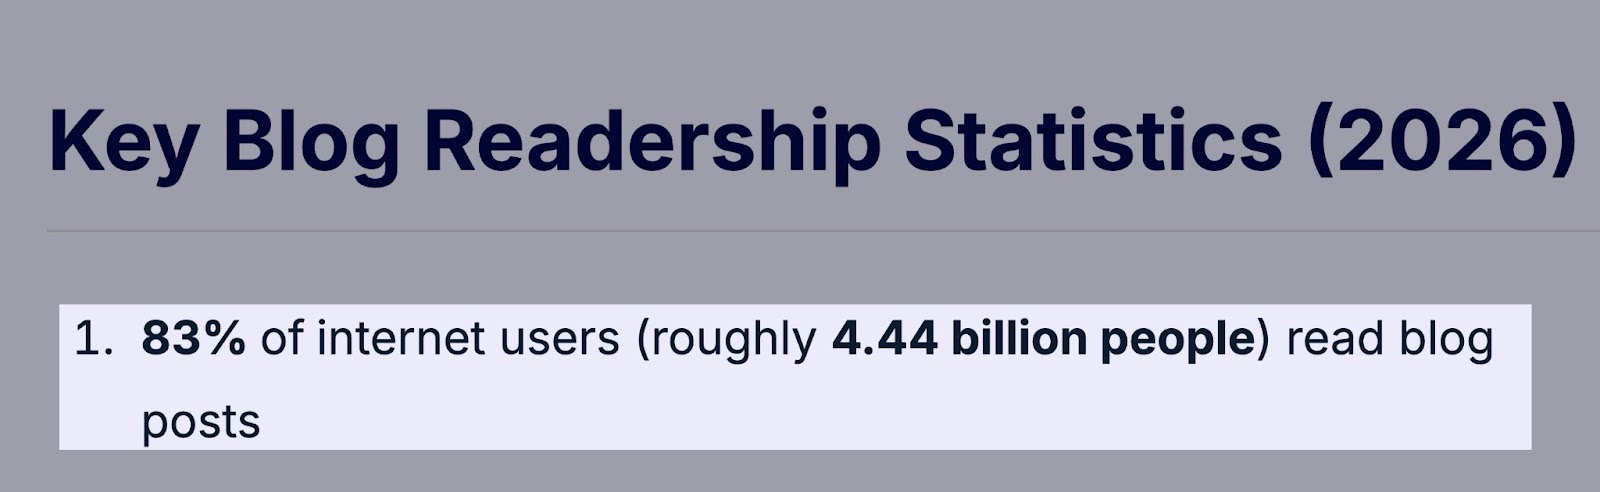
Statistics show that 83% of internet users read blog posts. This makes blogging one of the best ways for content creators to build an audience and grow their online presence.
But the challenge is that starting a blog involves a lot of work.
From writing and publishing to SEO and promotion. It can quickly feel overwhelming without the right blogging tools.
So, in this guide, I’ll break down the best blogging tools to help you create, manage, and grow your own blog.
And I’ll talk about 3 factors to help you choose the right one.
Let’s go!
TL;DR
- Blogging tools help you create, publish, optimize, and grow a blog more efficiently.
- The best blogging tools are:
- 1. WordPress - Best blogging platform
- 2. Easytools - Best for selling digital products and services
- 3. Ahrefs - Best for SEO and keyword research
- 4. MailerLite - Best for email marketing
- 5. Fillout - Best for building forms
- 6. Google Docs - Best for writing and collaboration
- 7. Napkin AI - Best for generating visuals for blog posts
- 8. Trello - Best for content planning and management
- 9. Grammarly - Best for content editing and proofreading
- 10. Google Analytics - Best for website tracking
- You can choose the best blogging tools by considering the features you need, checking integrations, and assessing pricing.
Best blogging tools compared
10 best blogging tools
1. WordPress - Best blogging platform
First on my list of the best blogging tools is WordPress.
It’s a content management platform that lets you create, publish, and manage blog content.
It’s one of the most popular blogging software options and powers millions of websites, from personal blogs to e-commerce sites.
WordPress has tons of features, but three stood out to me the most.
First up was Posts, which lets you create, edit, and organize your blog content.
Next was the AI Assistant feature. With this feature, you can get all the help you need with AI for tasks like writing, editing, and improving your content.
And finally, the Media feature, where you can upload and manage images, videos, PDFs, and more.
I’ll go into more detail with the features in the next section.
[fs-toc-omit]What I loved about WordPress
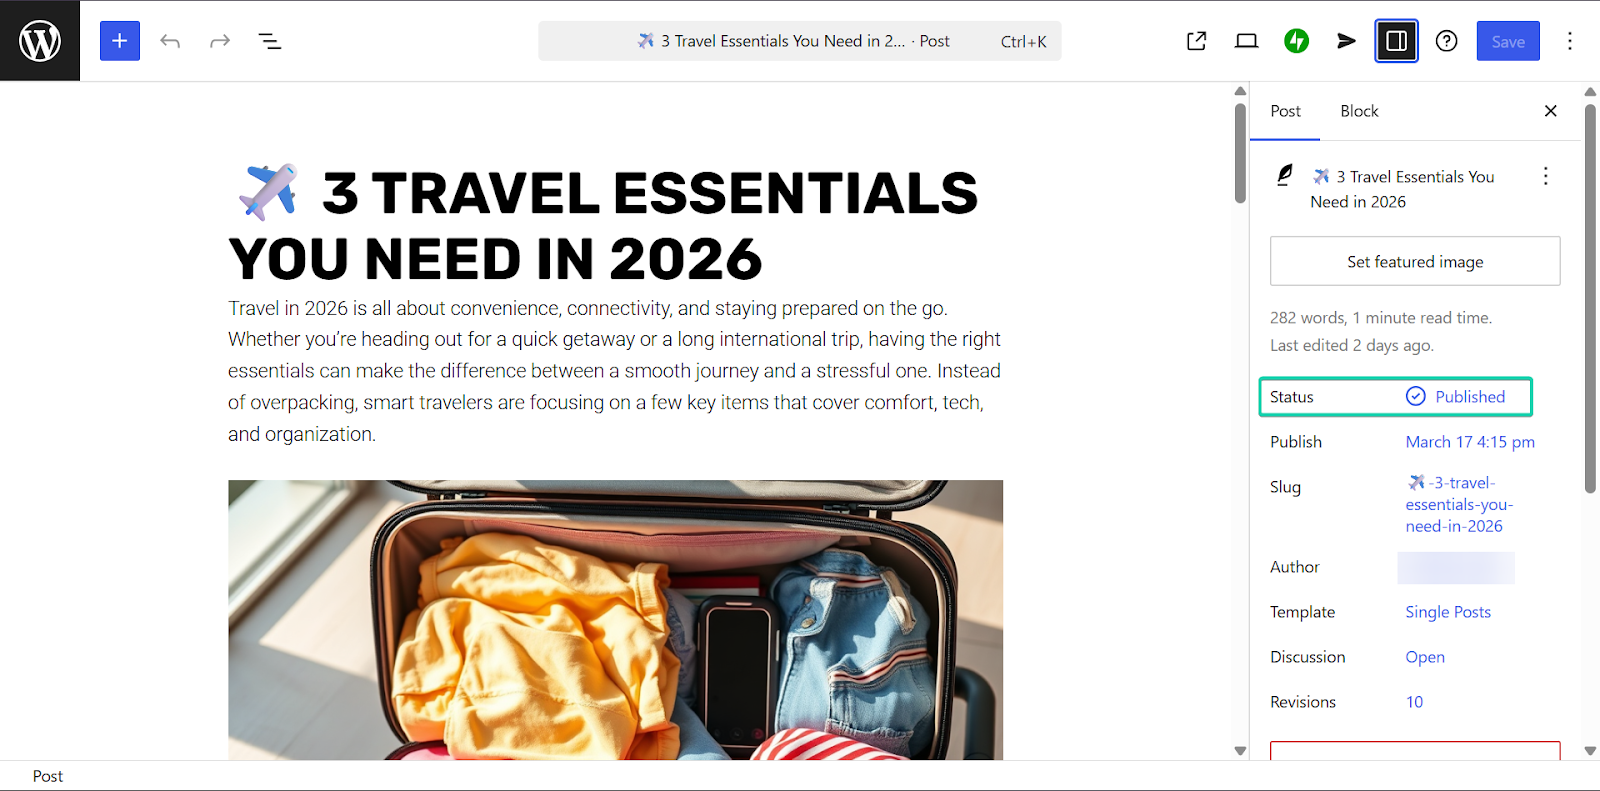
1. Posts
Posts are where your blog content lives. You can create different types of blog content, from tutorials, listicles, or opinion pieces.
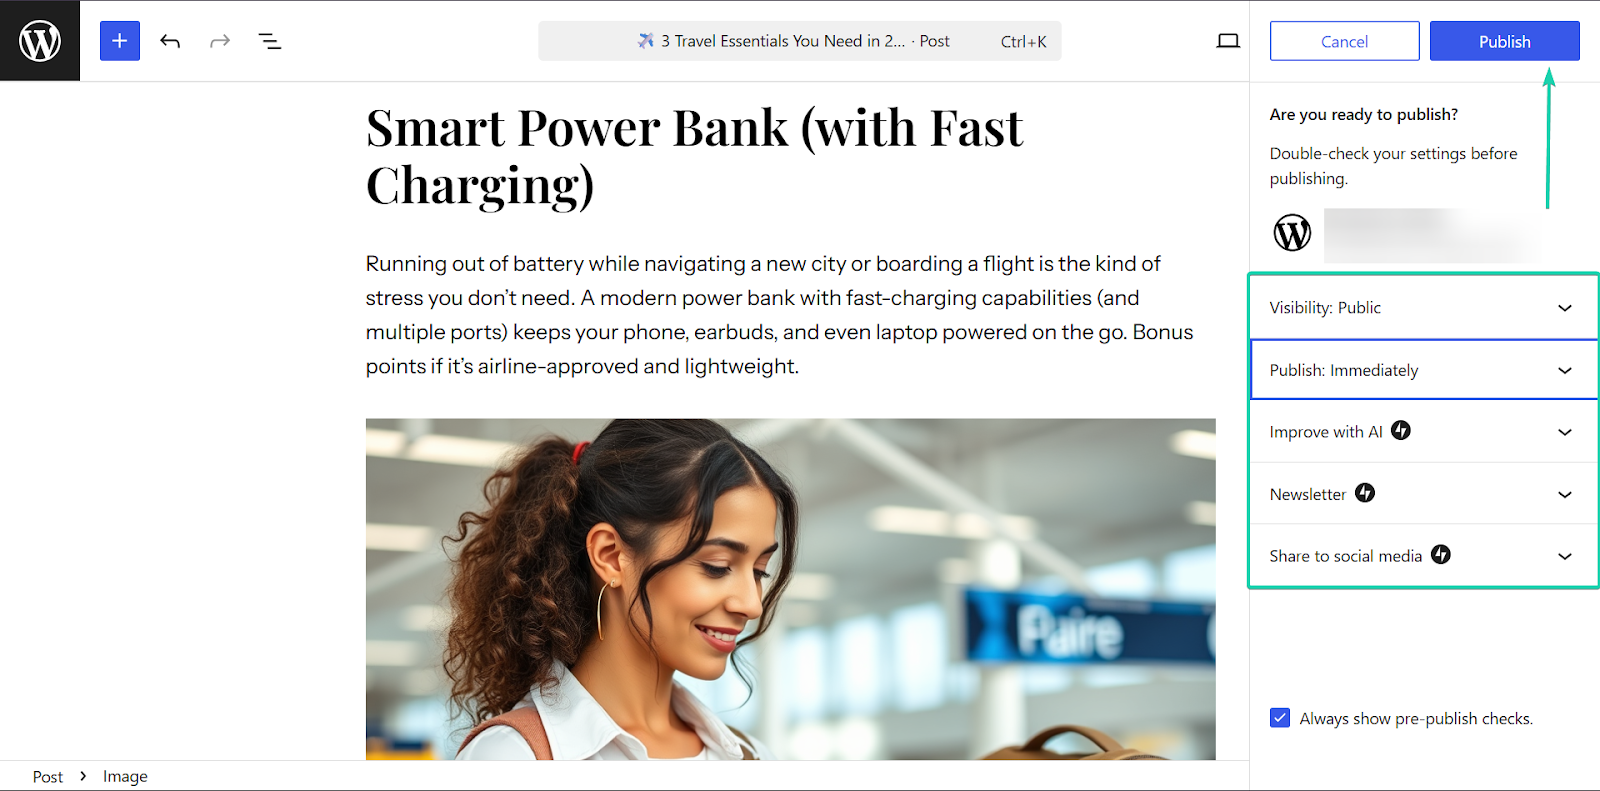
You can write your content using WordPress’s built-in editor, format it (headings, images, and links), and then publish or schedule it. You can also update your content at any time.
Let’s see how it works:
Head to “Posts” on the sidebar and click “Add Post.”
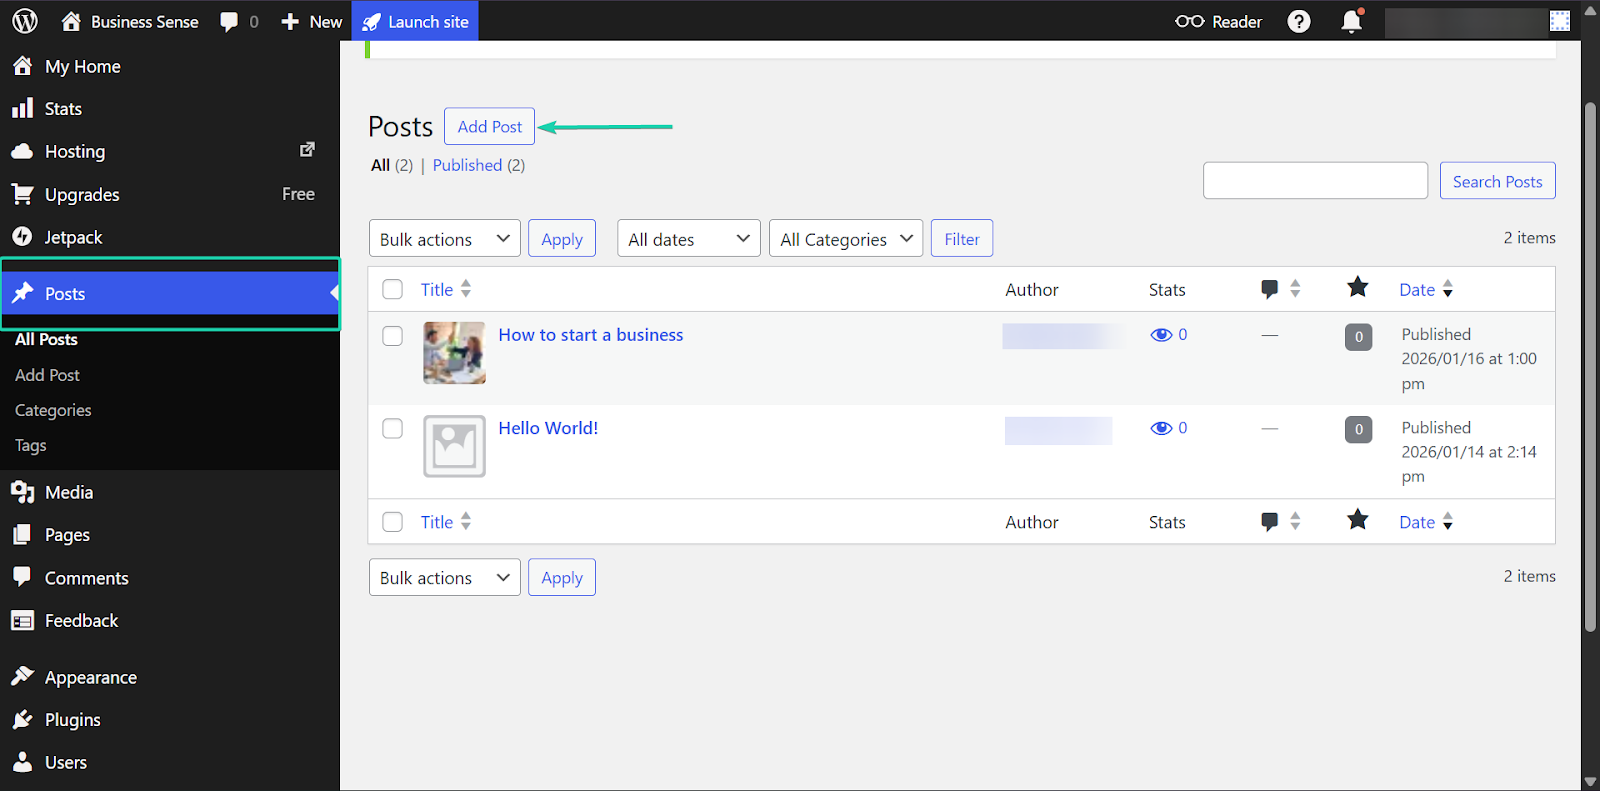
You’ll be redirected to WordPress’s built-in writing editor, where you can start writing immediately.
You can also add blocks to your posts. These elements, like headings, lists, images, tables, and AI assistance, are designed to make your posts more structured and readable.
Once you’re done creating your post, hit “Publish.”
You can choose whether to make your posts public or private, and also when you want to publish.
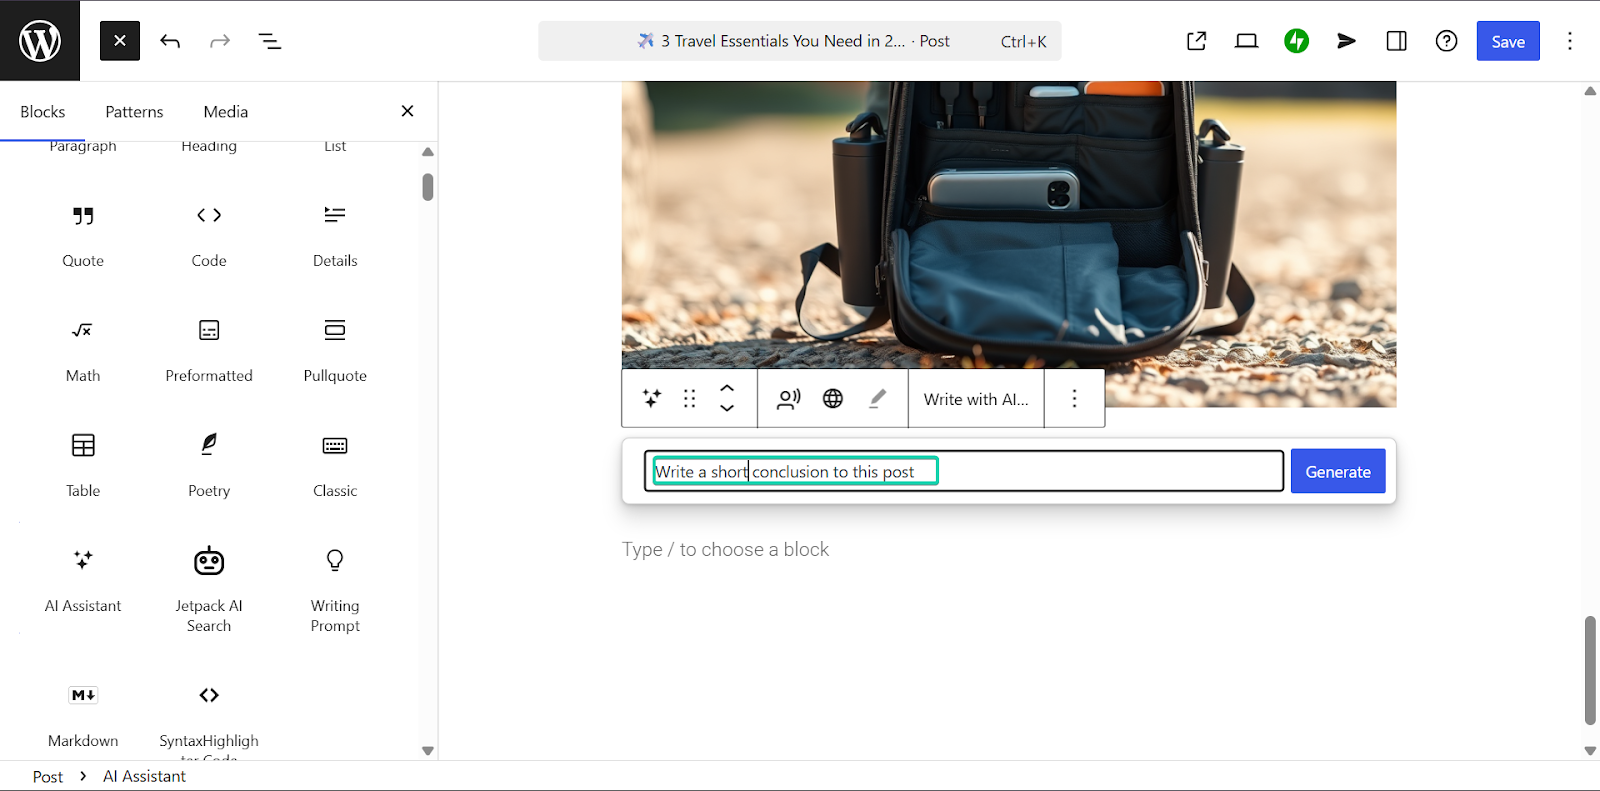
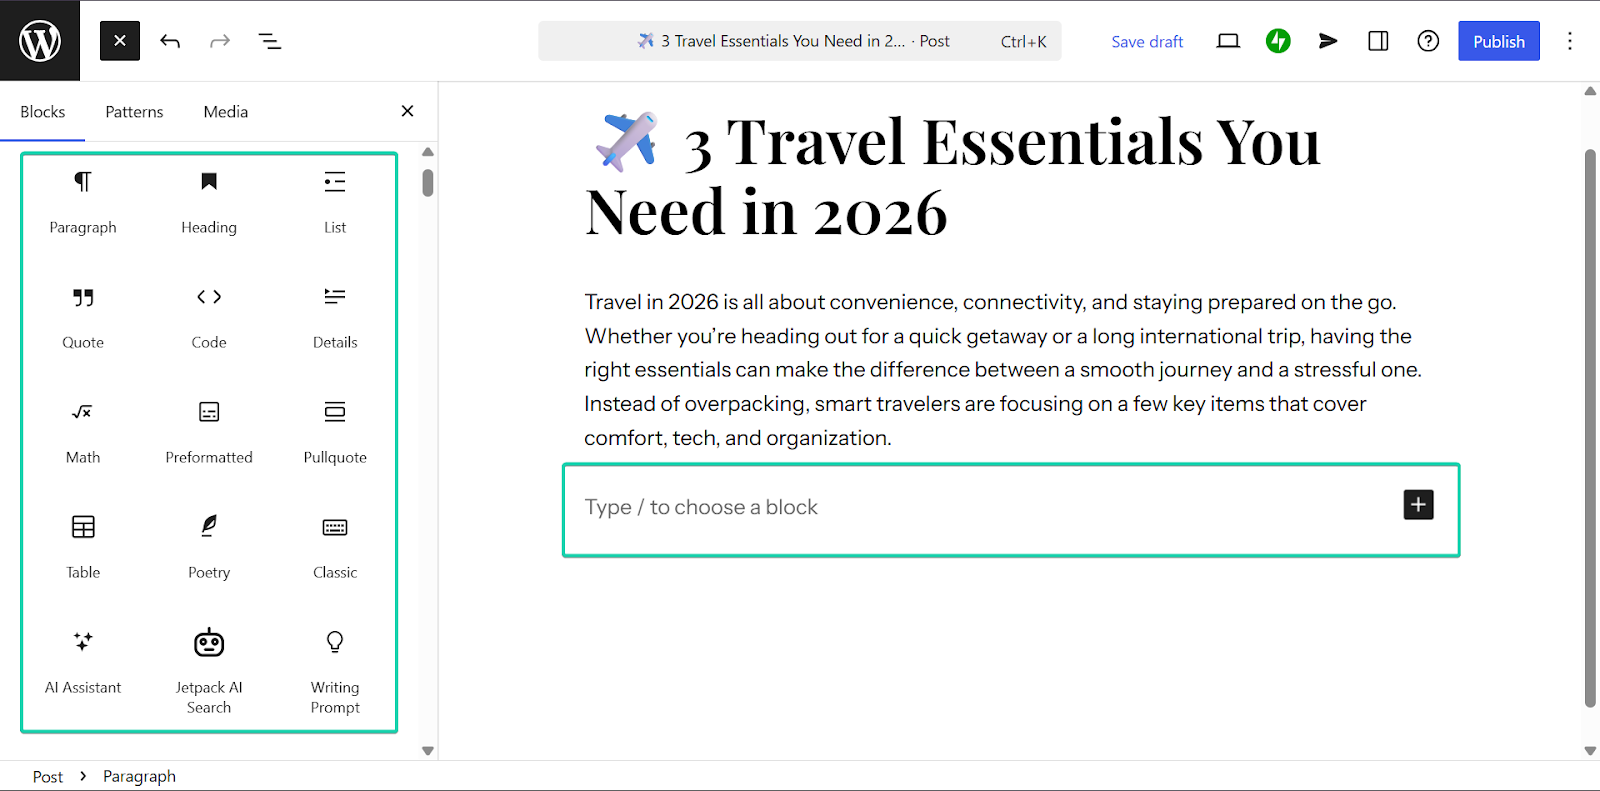
2. AI assistant
WordPress has an AI Assistant tool that helps you write, edit, and refine your content faster when creating posts. You can use AI to generate blog post ideas, draft sections of your content, and fix your grammar and tone.
It’s a fantastic feature because it can help you get past that pesky writer’s block and speed up your content creation.
I’ll take you on a walkthrough of this feature.
While using the built-in editor, hover over “Type / to choose a block” and click the “+” button.
Select “AI Assistant.”

Next, enter your prompt.

WordPress’s AI Assistant will then generate text for you.
You can edit the text or ask it to regenerate the text.
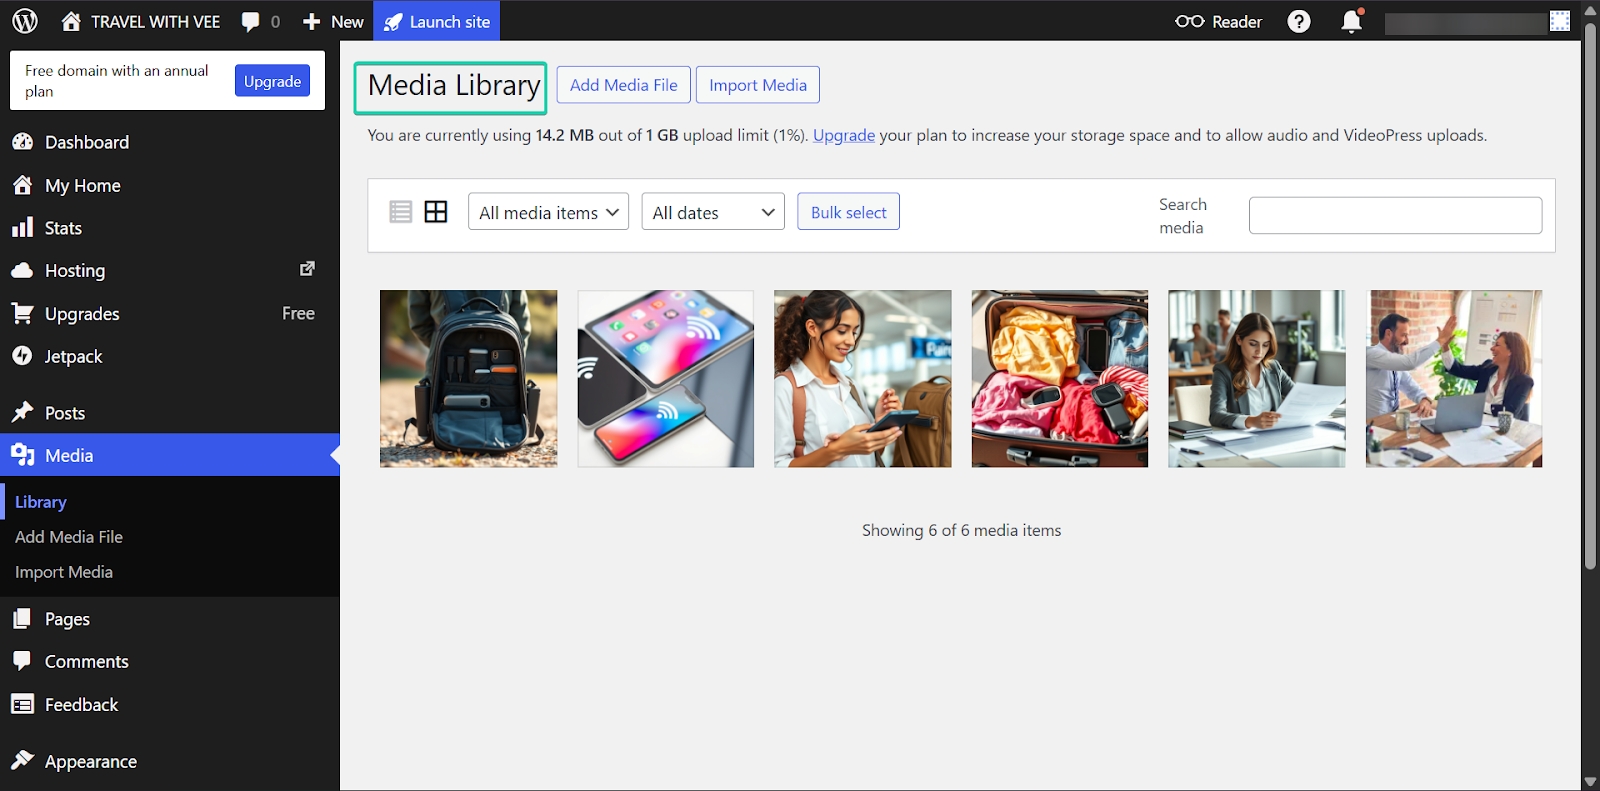
3. Media
The media feature stores all your files, such as images, videos, PDFs, and other downloadable content.
It works by uploading these files directly to WordPress, then inserting them into your posts. It’s a great way to keep all your content assets in one place.
Here’s a walkthrough on how to use this feature:
From the sidebar, go to “Media” and click “Select Files.”

Next, select the media document you want to upload to WordPress.
Once it’s done, the document will appear in your media dashboard.
While in editor mode, you can insert any of your uploaded files into your posts.
[fs-toc-omit]What I loved vs what I struggled with
What I loved 👍
✅ Very beginner-friendly but highly scalable.
✅ Has thousands of themes and customization options.
✅ Great for creating fully-functioning websites
What I struggled with 👎
❌ Has too many features that can feel overwhelming at first.
❌ Some features require paid plugins, which can quickly increase your monthly plan.
[fs-toc-omit]Best for
- Bloggers who want a tool that’s user-friendly and highly scalable.
[fs-toc-omit]Pricing
- Personal: $4/month
- Premium: $8/month
- Business: $25/month
- Commerce: $45/month
- Enterprise: Contact for pricing

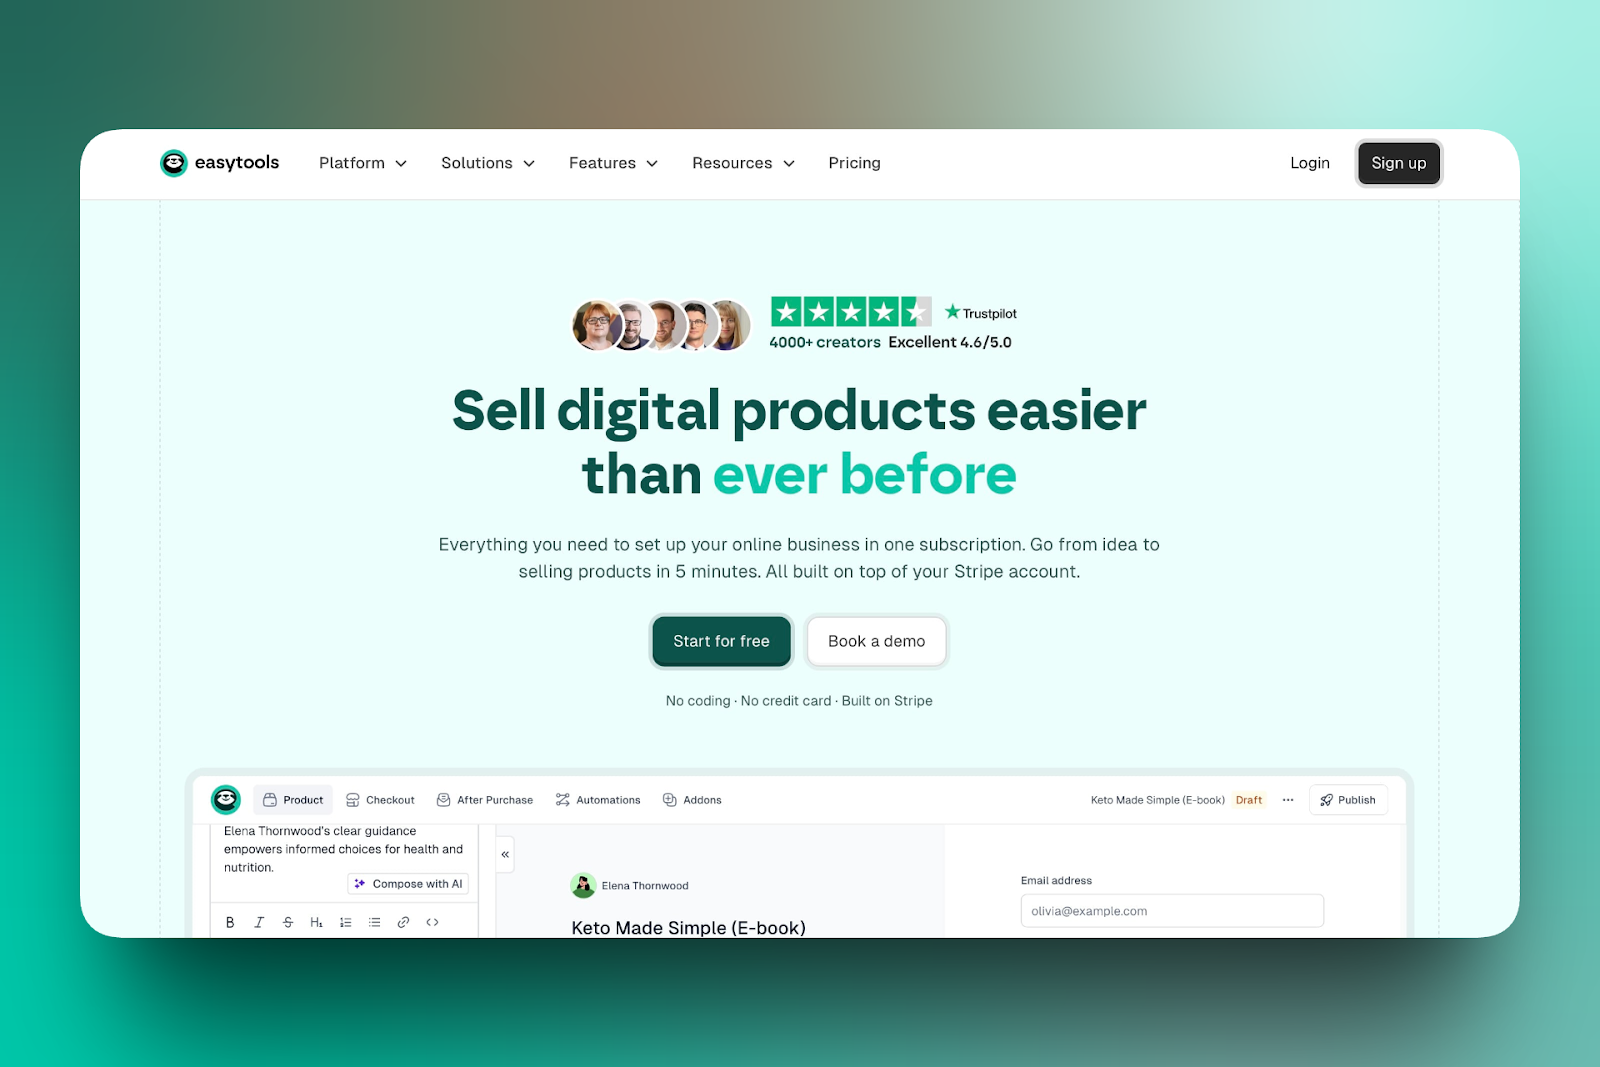
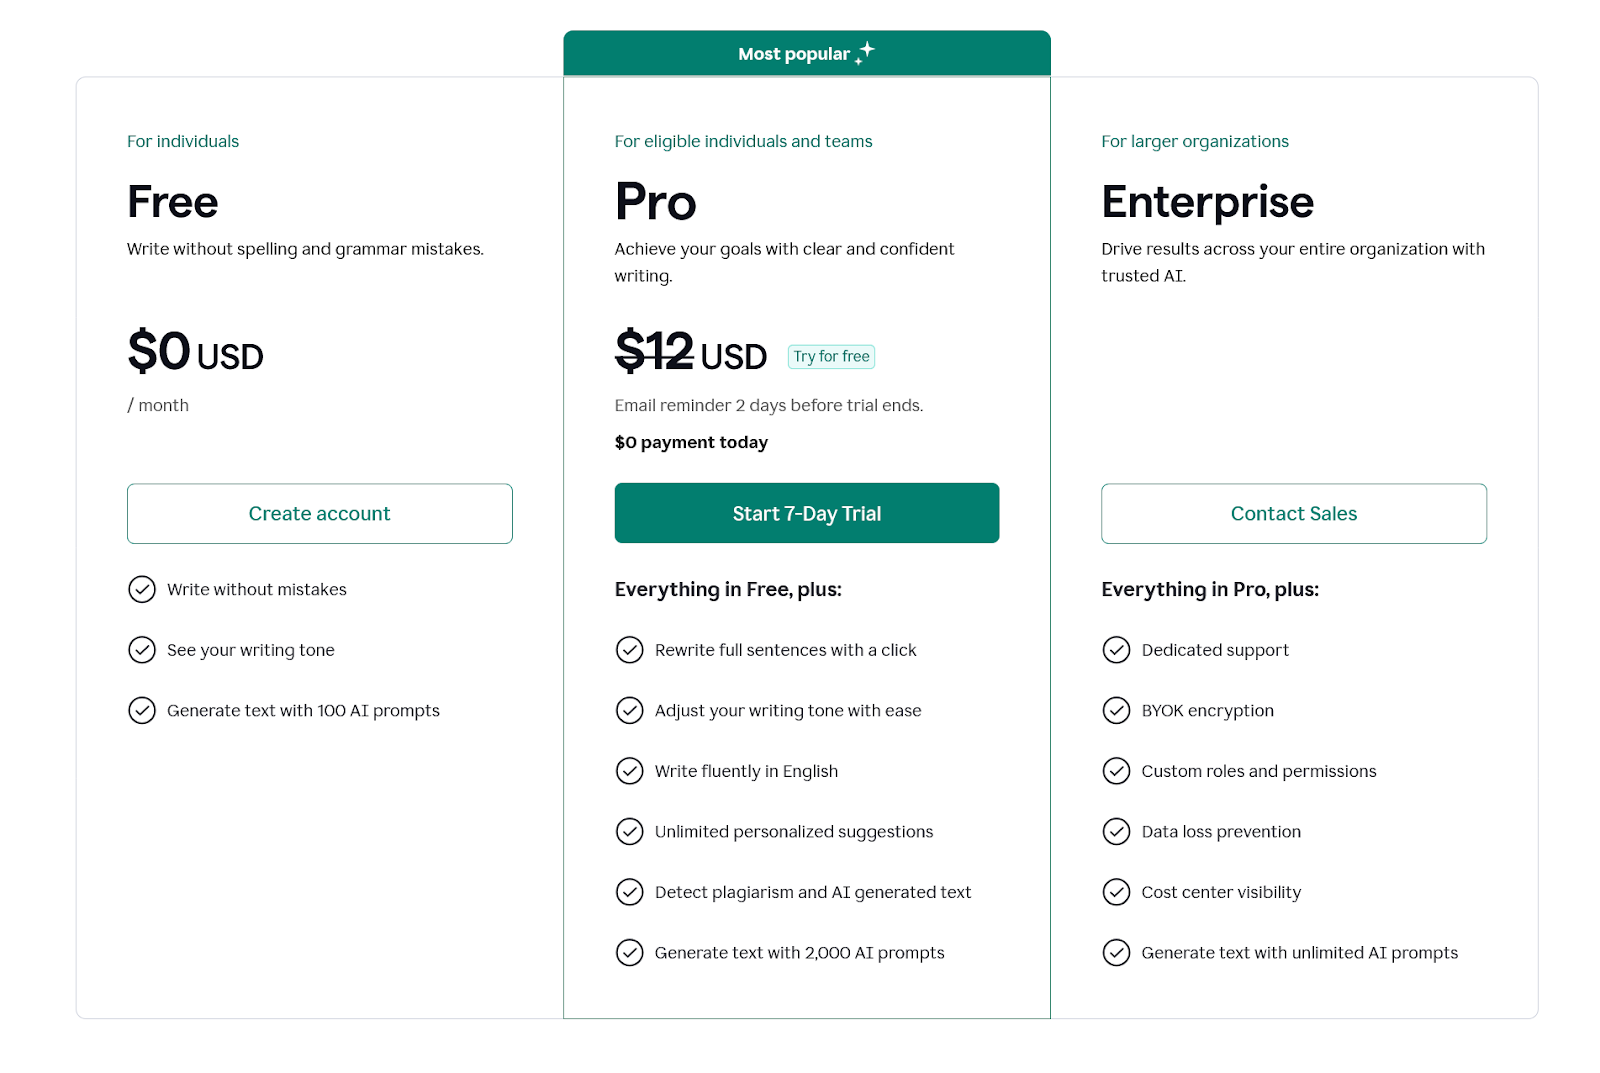
2. Easytools - Best for selling digital products and services
At number two on my list of the best blogging tools is Easytools.
It’s an all-in-one platform that helps creators and businesses build simple websites and storefronts for selling digital and physical products.
Easytools is for non-technical bloggers who want to manage products, audiences, and income in one place.
Its store feature lets you create and sell digital products, including guides, webinars, online courses, e-books, and live events.
You can also sell physical products.
With its websites feature, you can build simple landing pages with the help of AI.
And its email feature lets you send newsletters to your audience and prospects.
The thing about these features is that you don’t need additional tools to get them working. You can do all these functions right inside Easytools.
Let’s check them out.
[fs-toc-omit]What I loved about Easytools
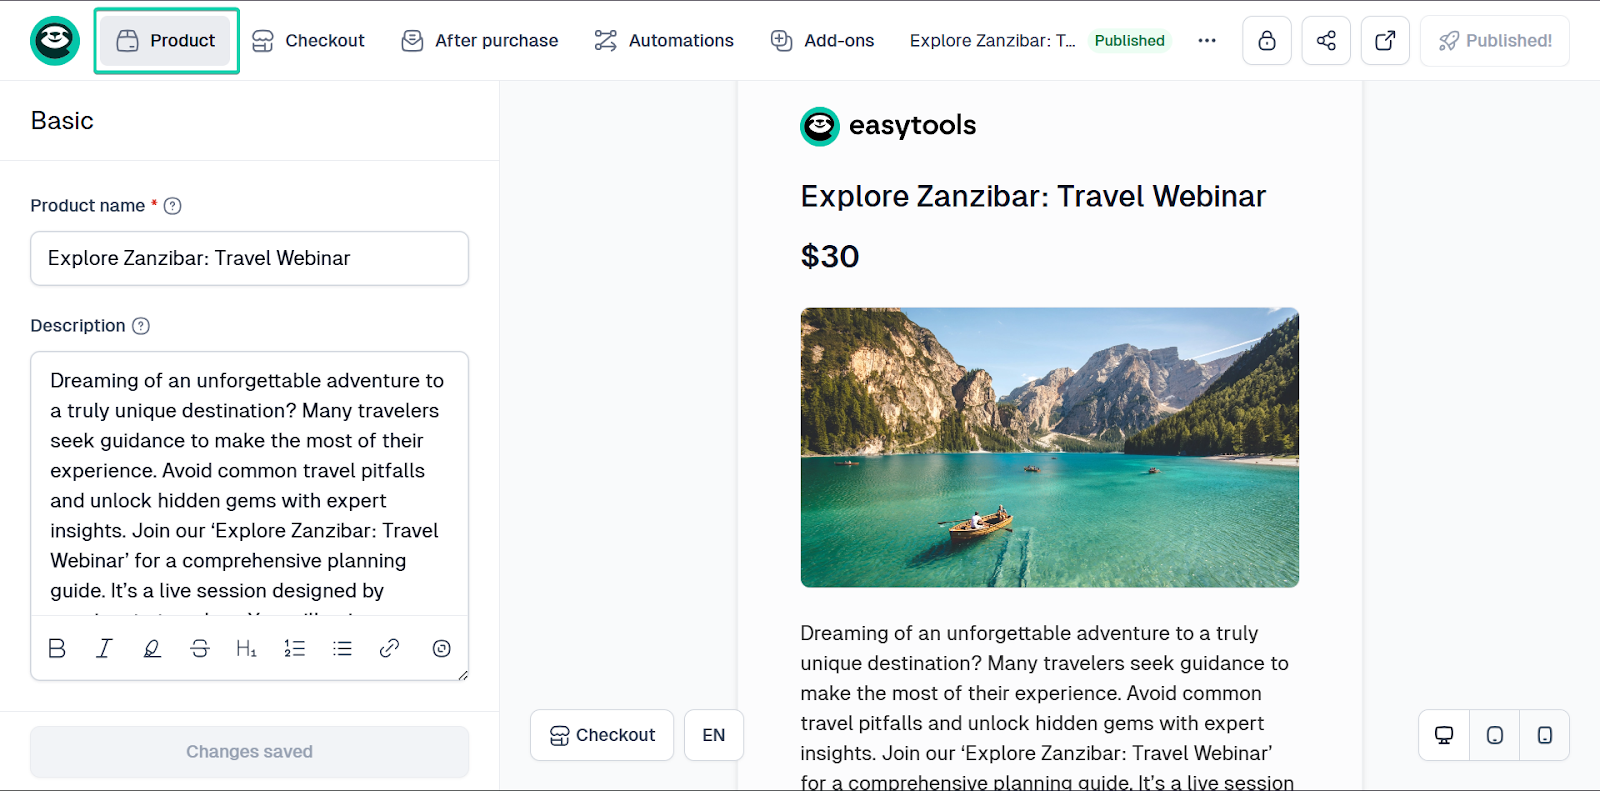
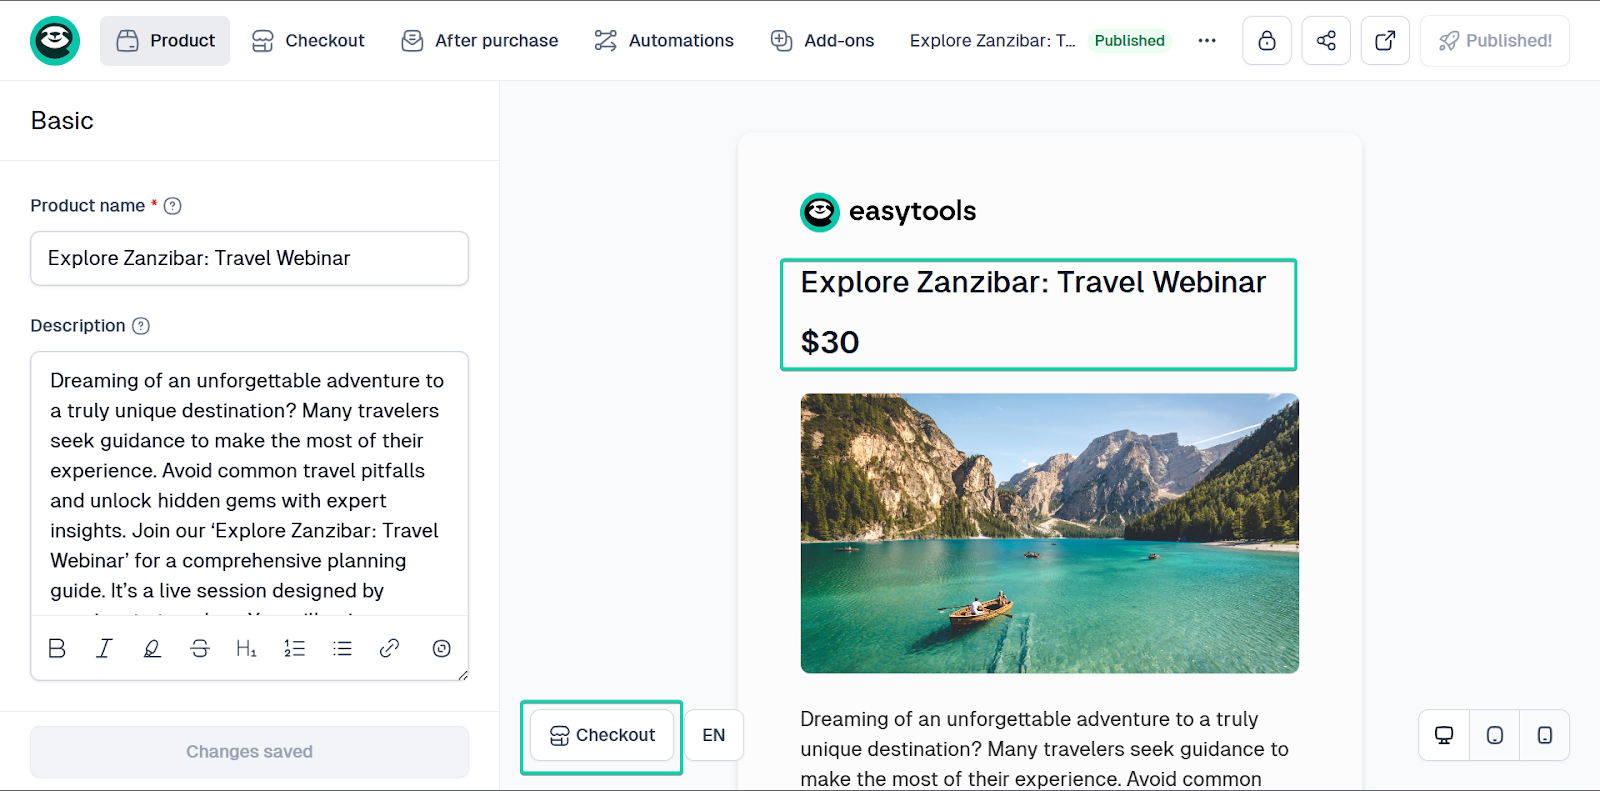
1. Store
The store feature lets you create and sell digital and physical products, like e-books, guides, webinars, live events, and courses.
You can create a product (either from scratch or a template), set a price, and Easytools handles payment and delivery.
Let’s see how it works:
First, go to “Store” and select “Products.”
Under “+ New”, select “New product from template.”
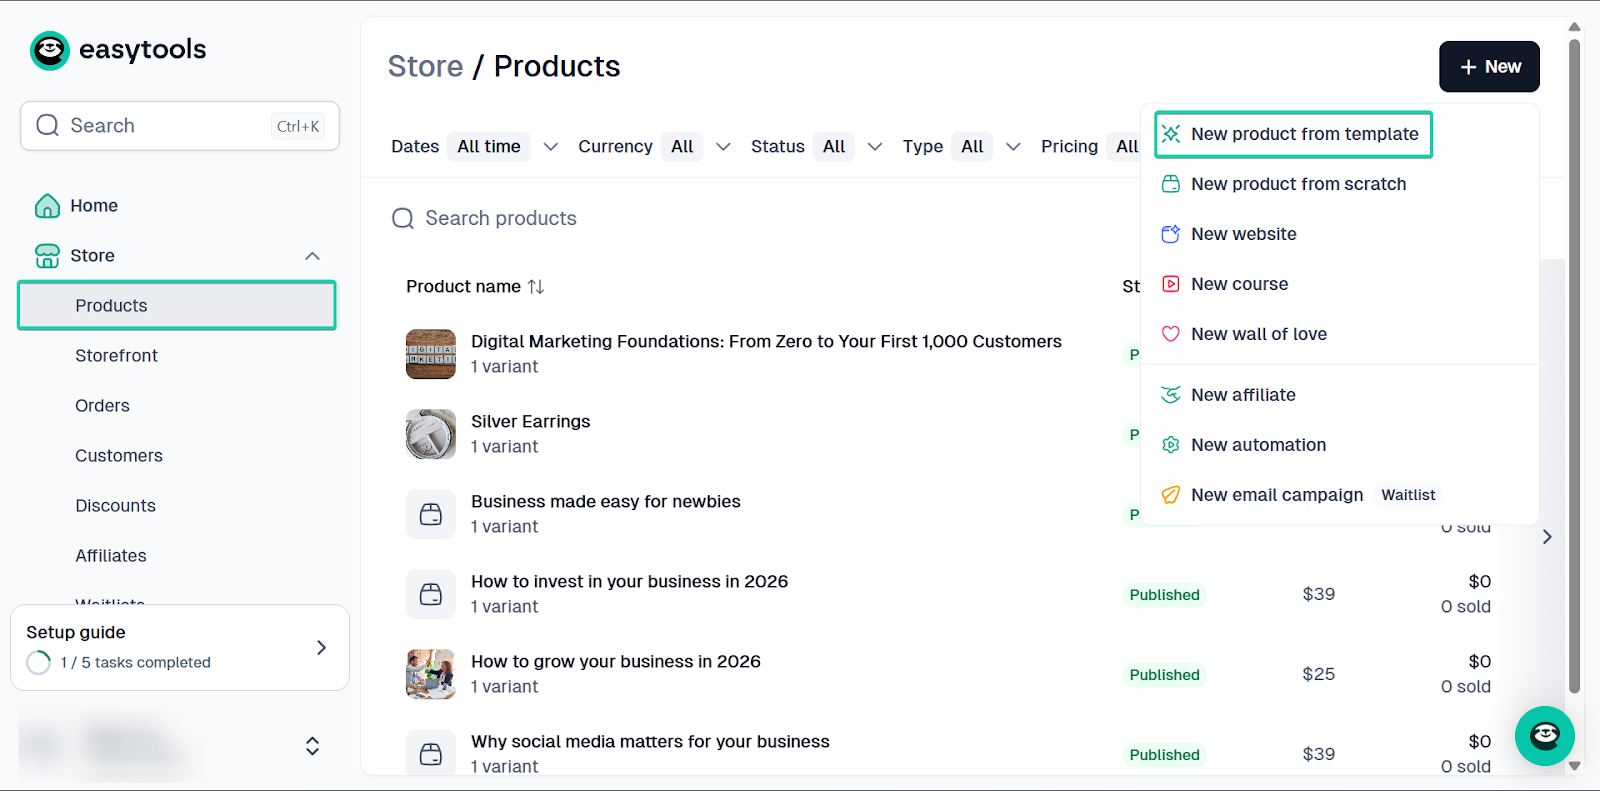
Next, give your product a name and select the type.
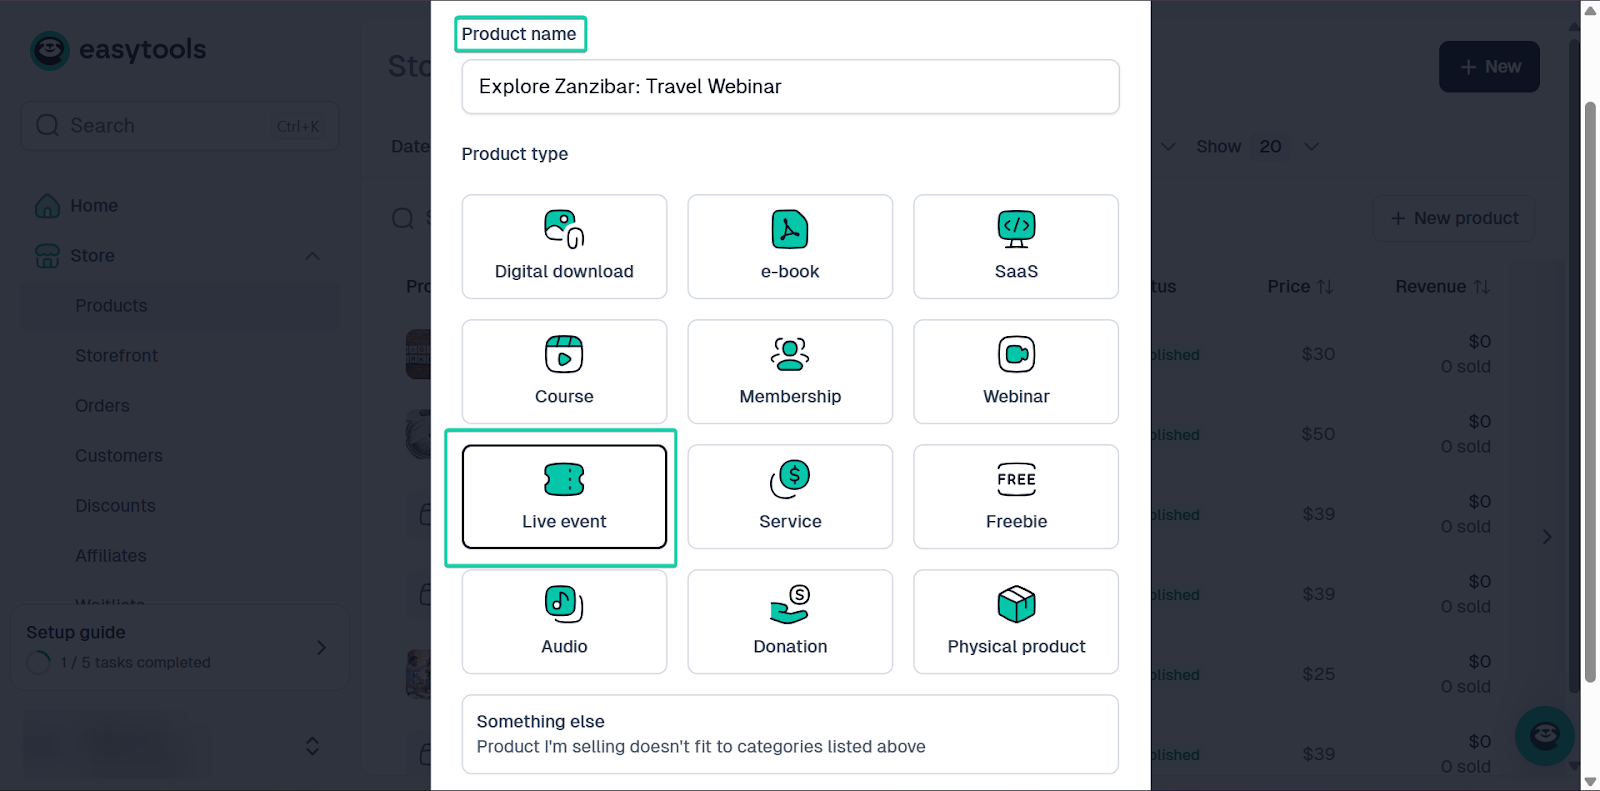
You can edit the template, add images, and edit text.
Once you’re done, your product is ready for sale.
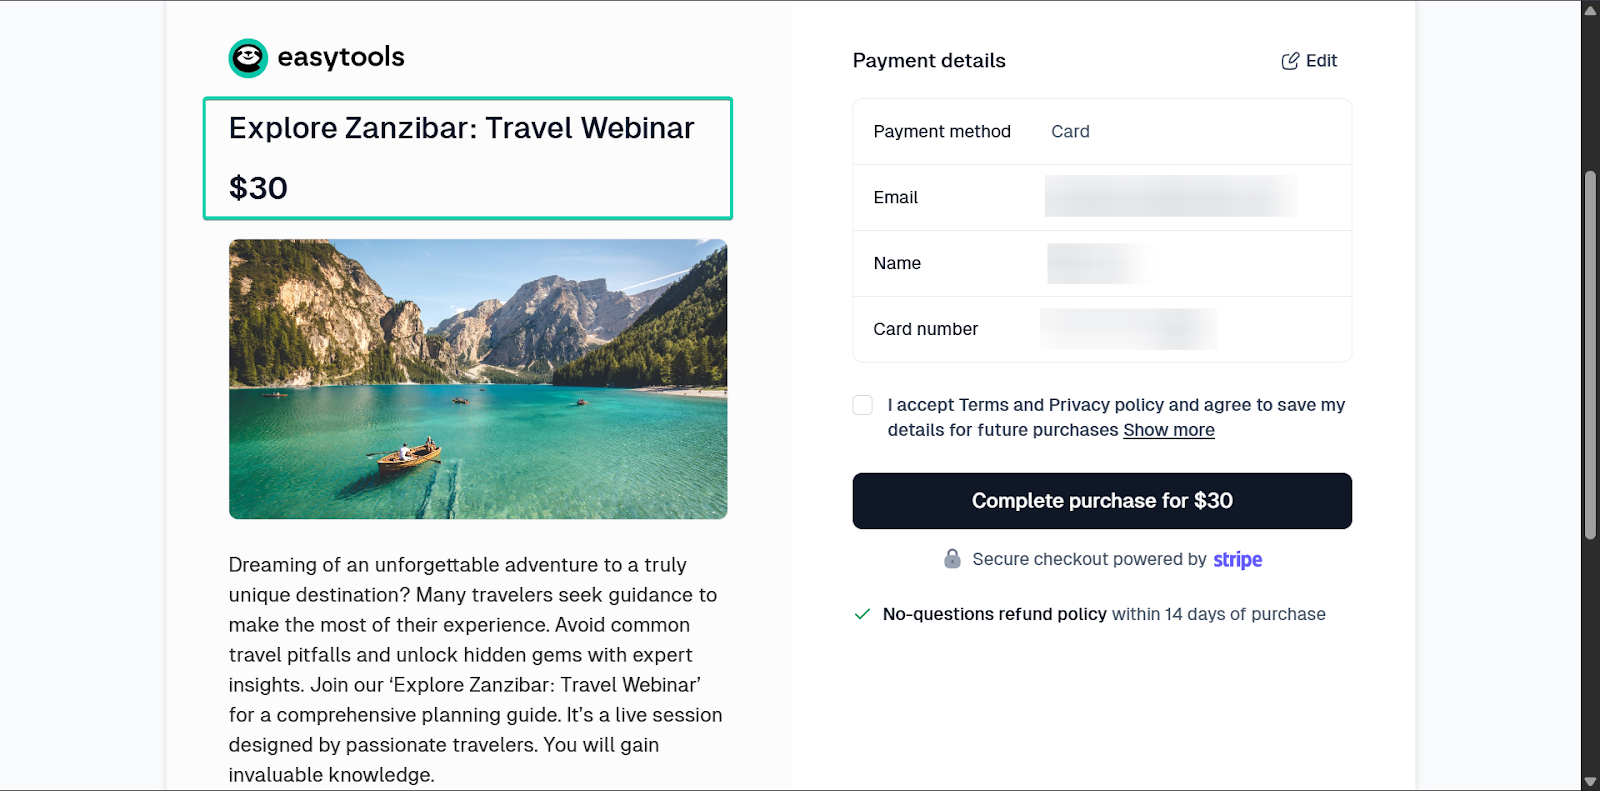
You can then freely customize your checkout by adding more images, displaying reviews or showing, and order bump to encourage your customers to increase their cart value with complementary products.
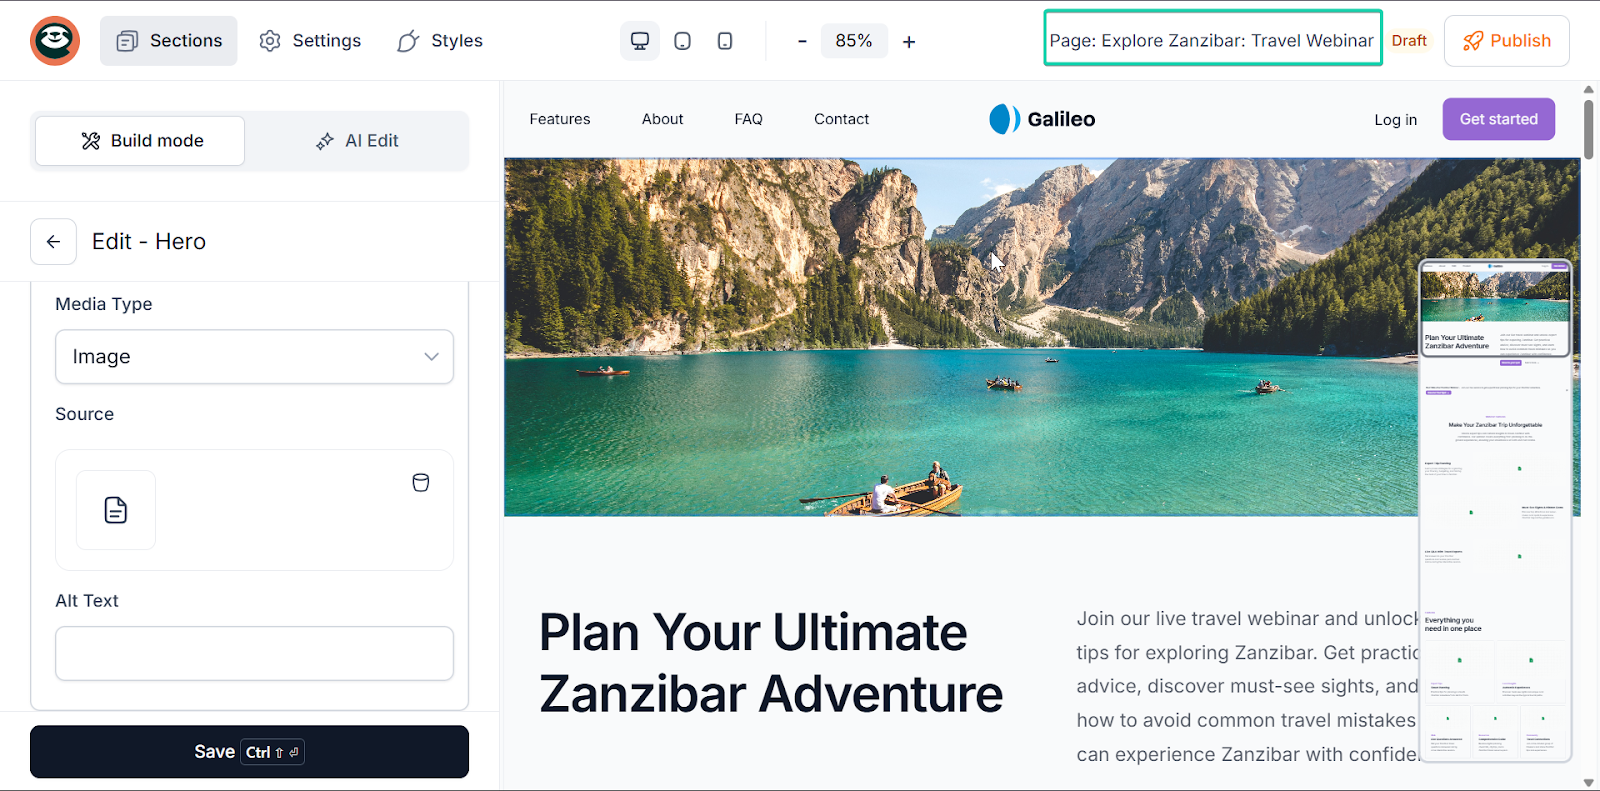
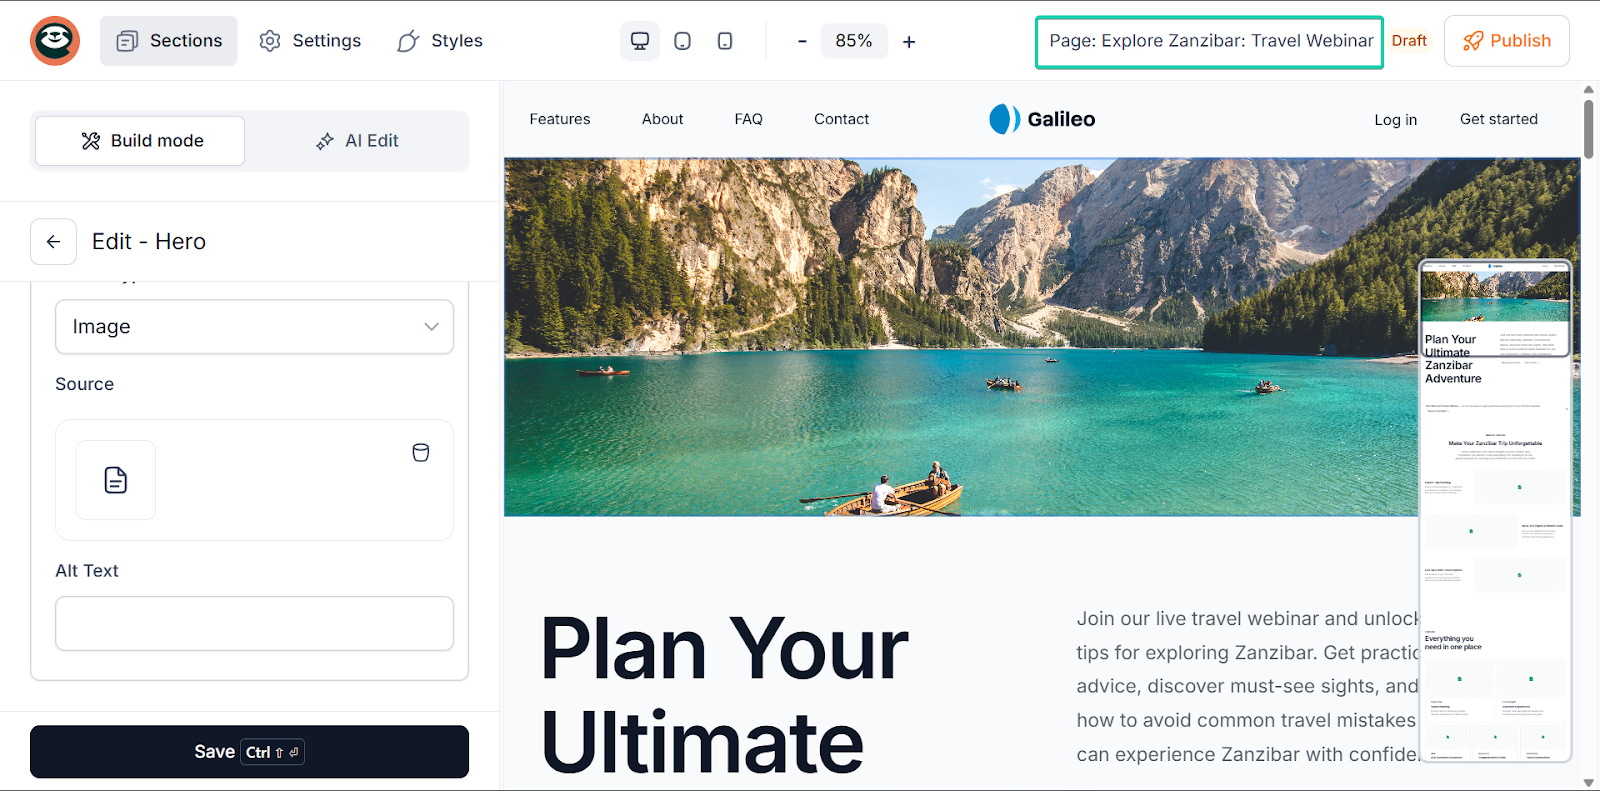
2. Websites
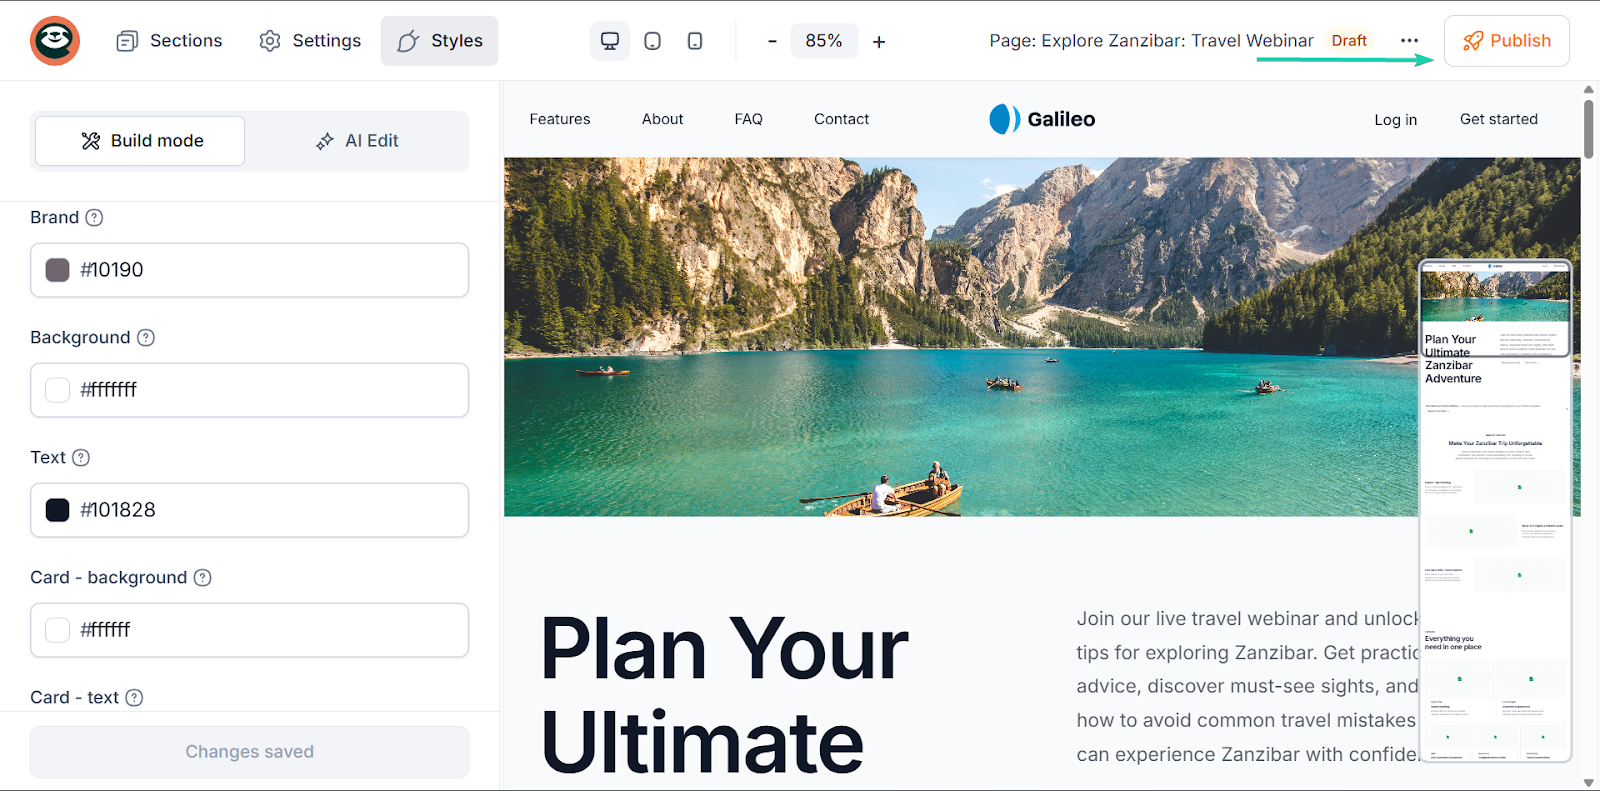
Easytools’ websites feature lets you create clean, simple landing pages without design or coding skills.
All you have to do is to add your product (if you already created one on Easytools), or simply describe what kind of page you want to create.
Based on that, AI will create a draft for you and fill it with content - and then you can freely edit it.
Let’s go on a walkthrough:
Go to “Landing pages.”
You can create a new landing page or edit one.
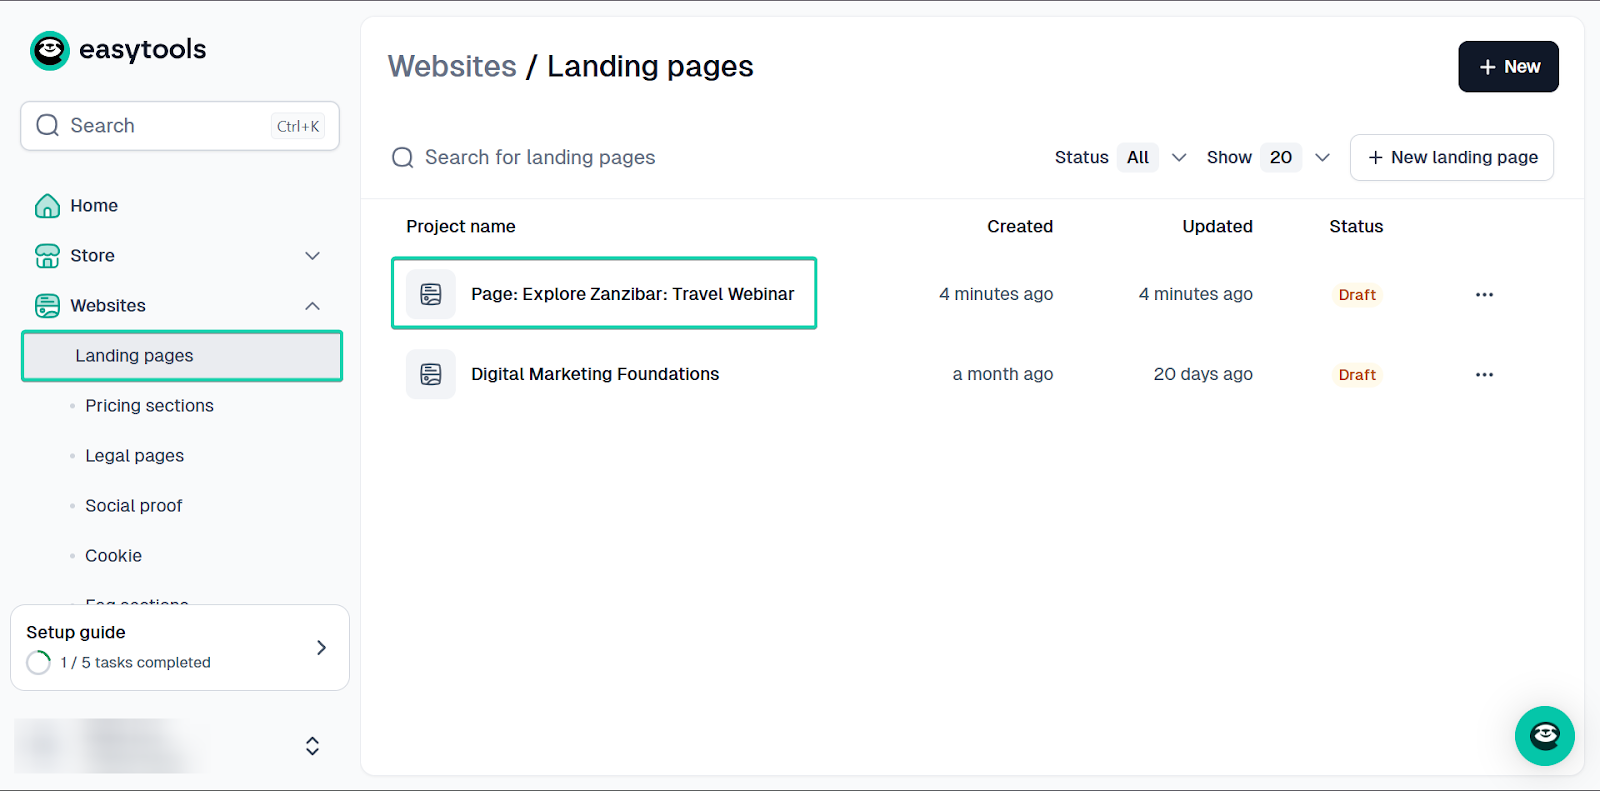
Next, edit your landing page either manually (build mode) or with AI assistance (AI edit).

When you’re done editing your landing page, click “Publish” for it to go live.
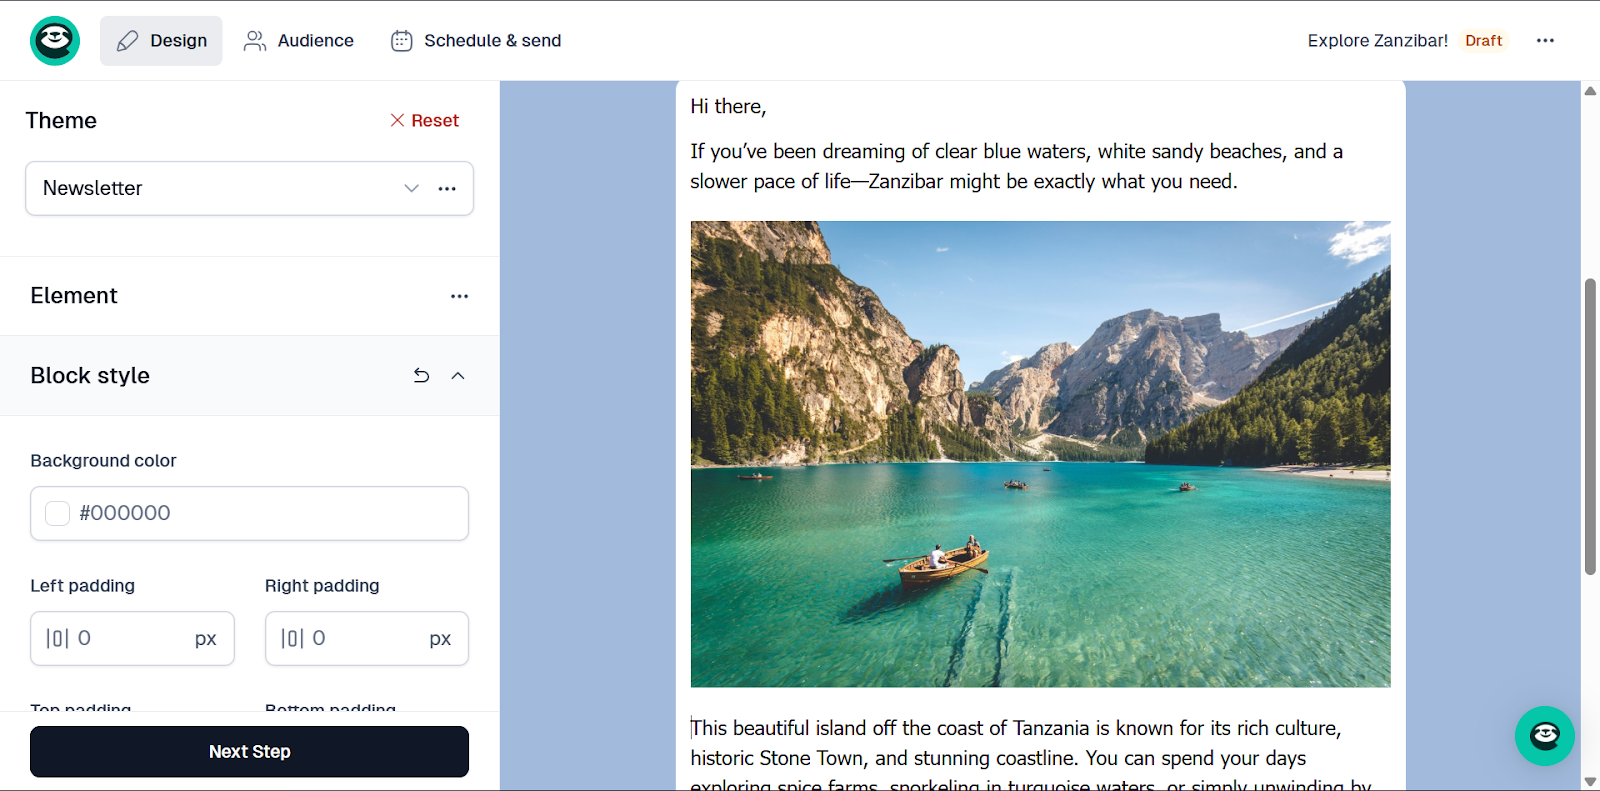
3. Email (Easymail)
Easymail is Easytools’ built-in email marketing feature that lets you send newsletters to your audience directly from the platform.
It’s a great way to drive traffic to your storefront and keep your target audience interested in your services.
I’ll show you how it works:
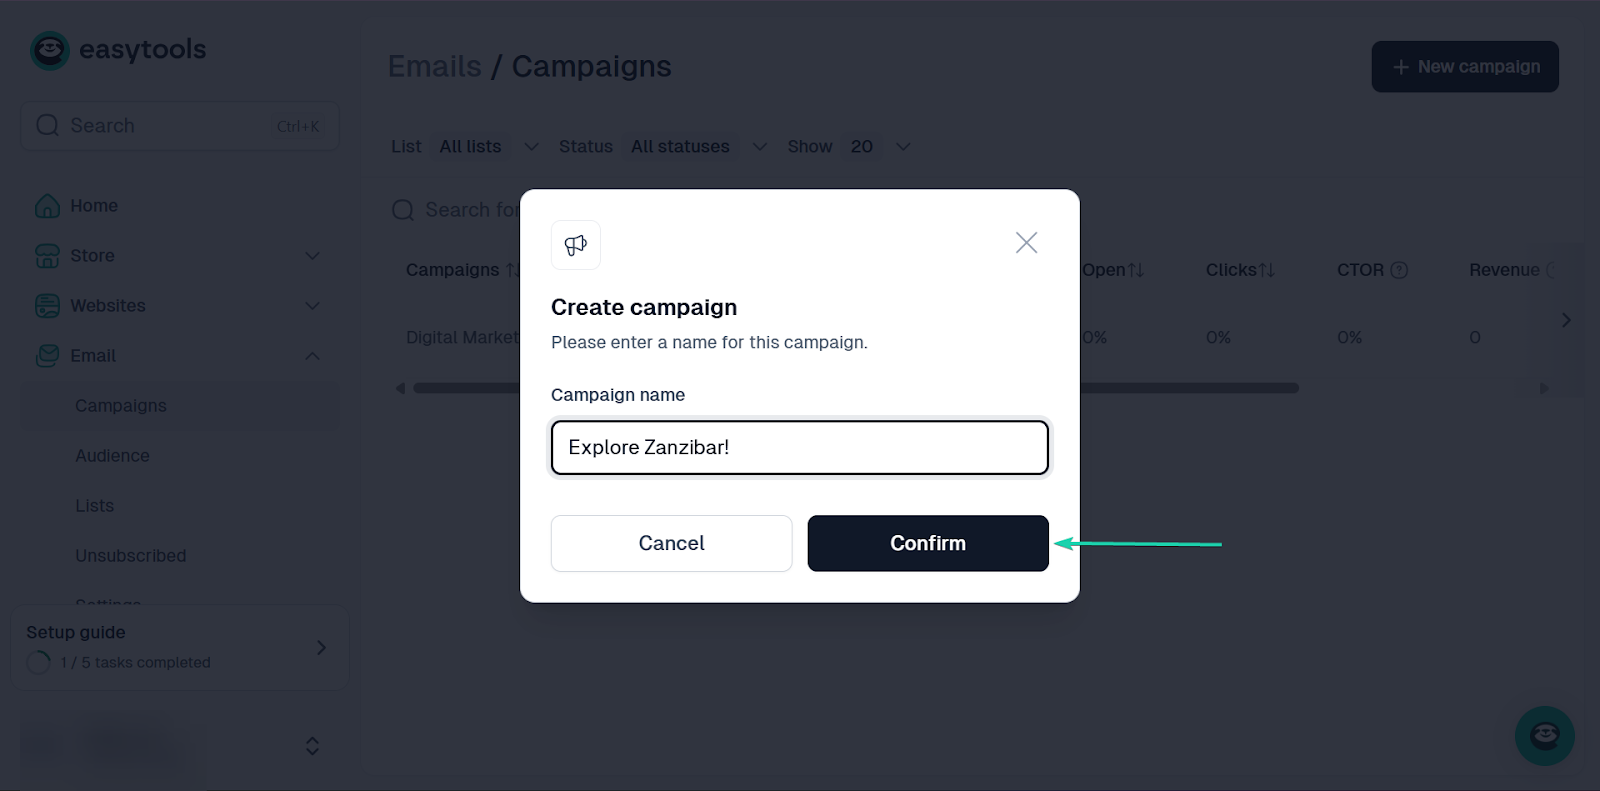
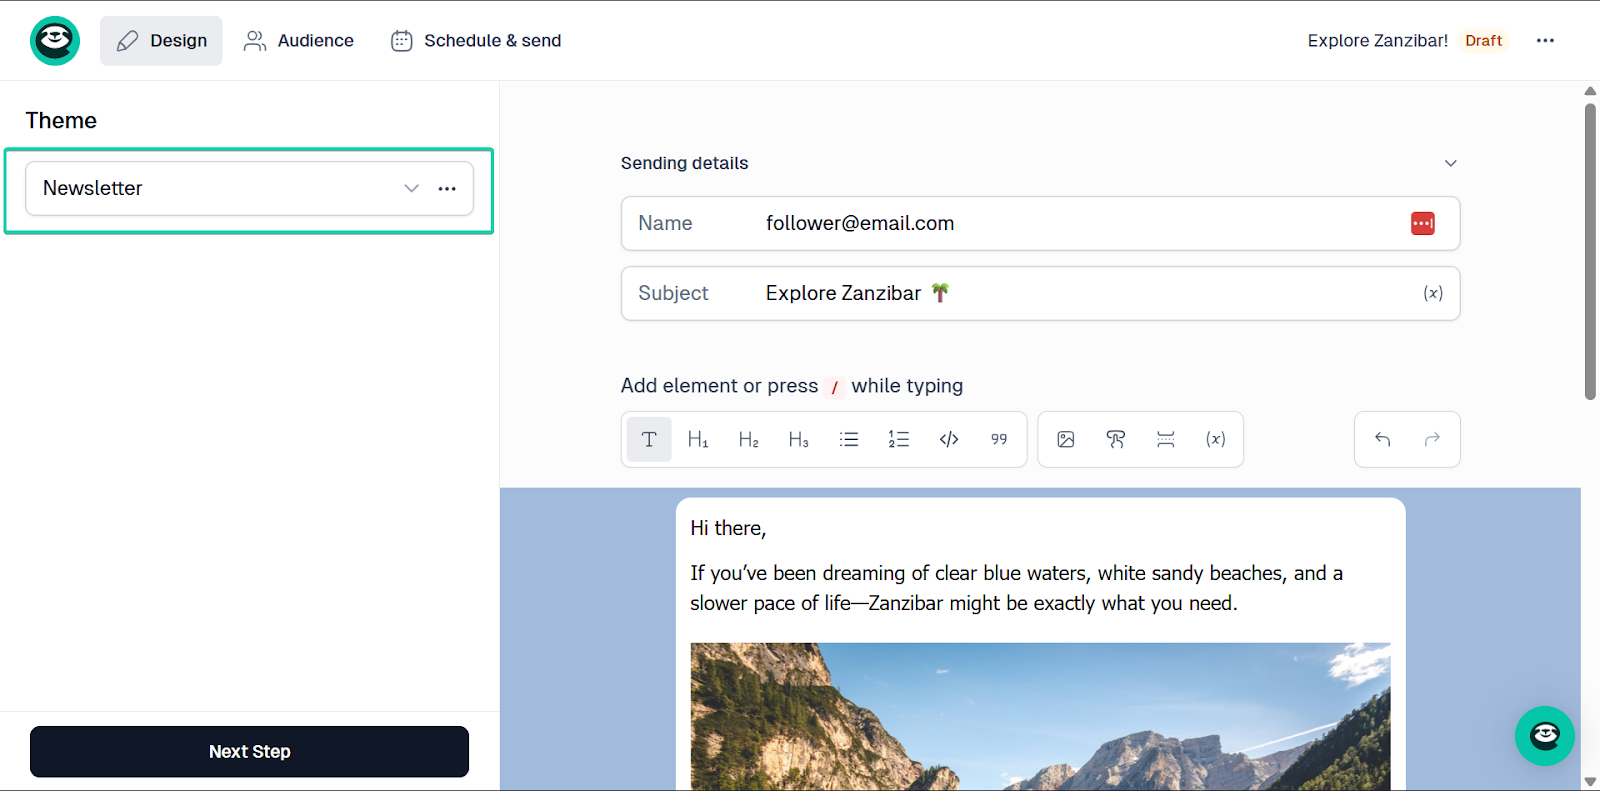
First, go to “Email” and select “Campaigns.”
Click “+New Campaign.”
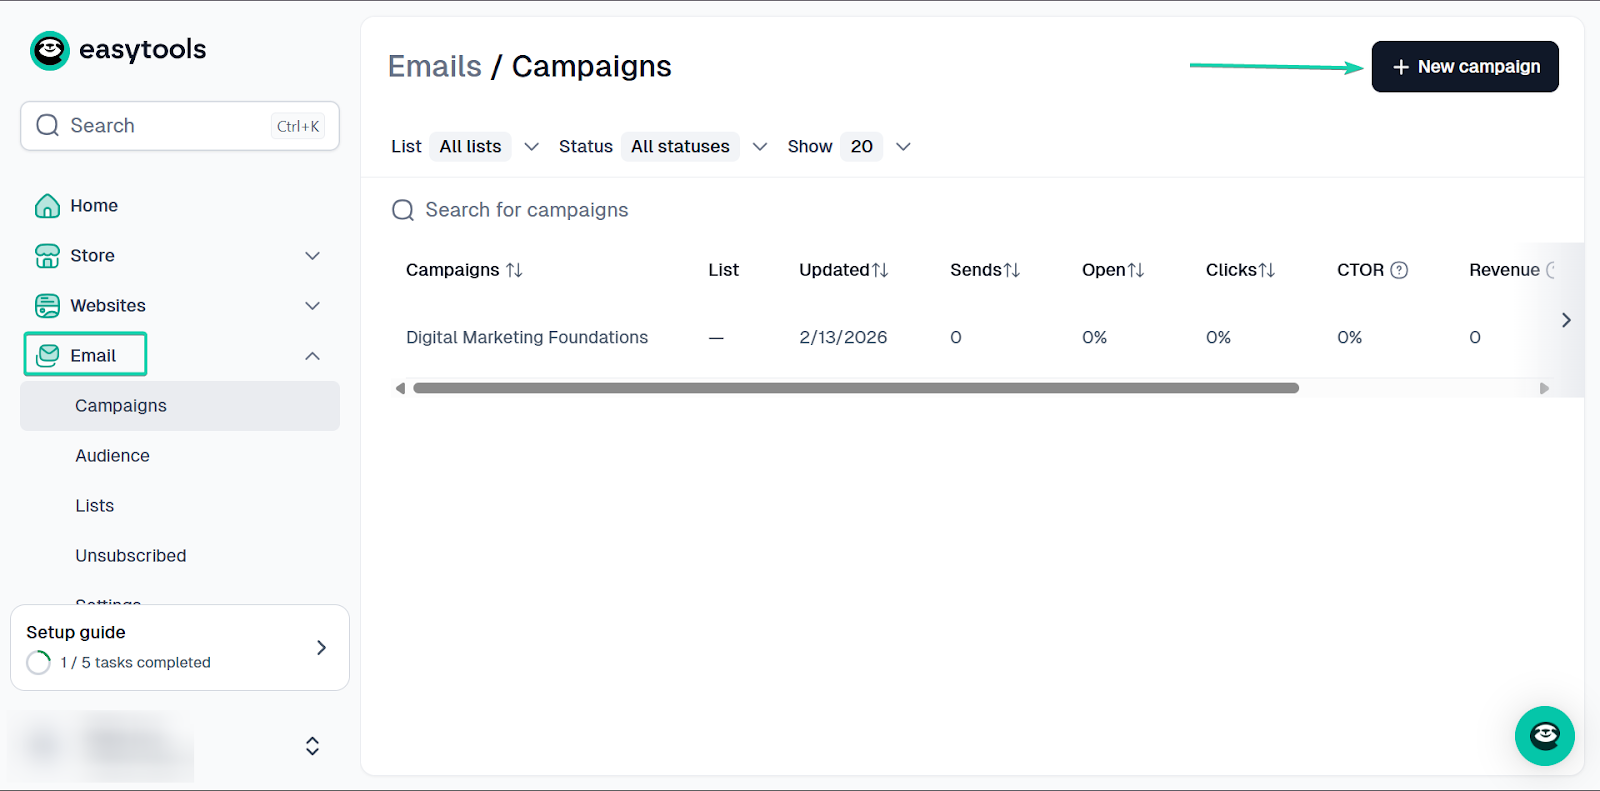
Next, give your campaign a name and click “Confirm.”
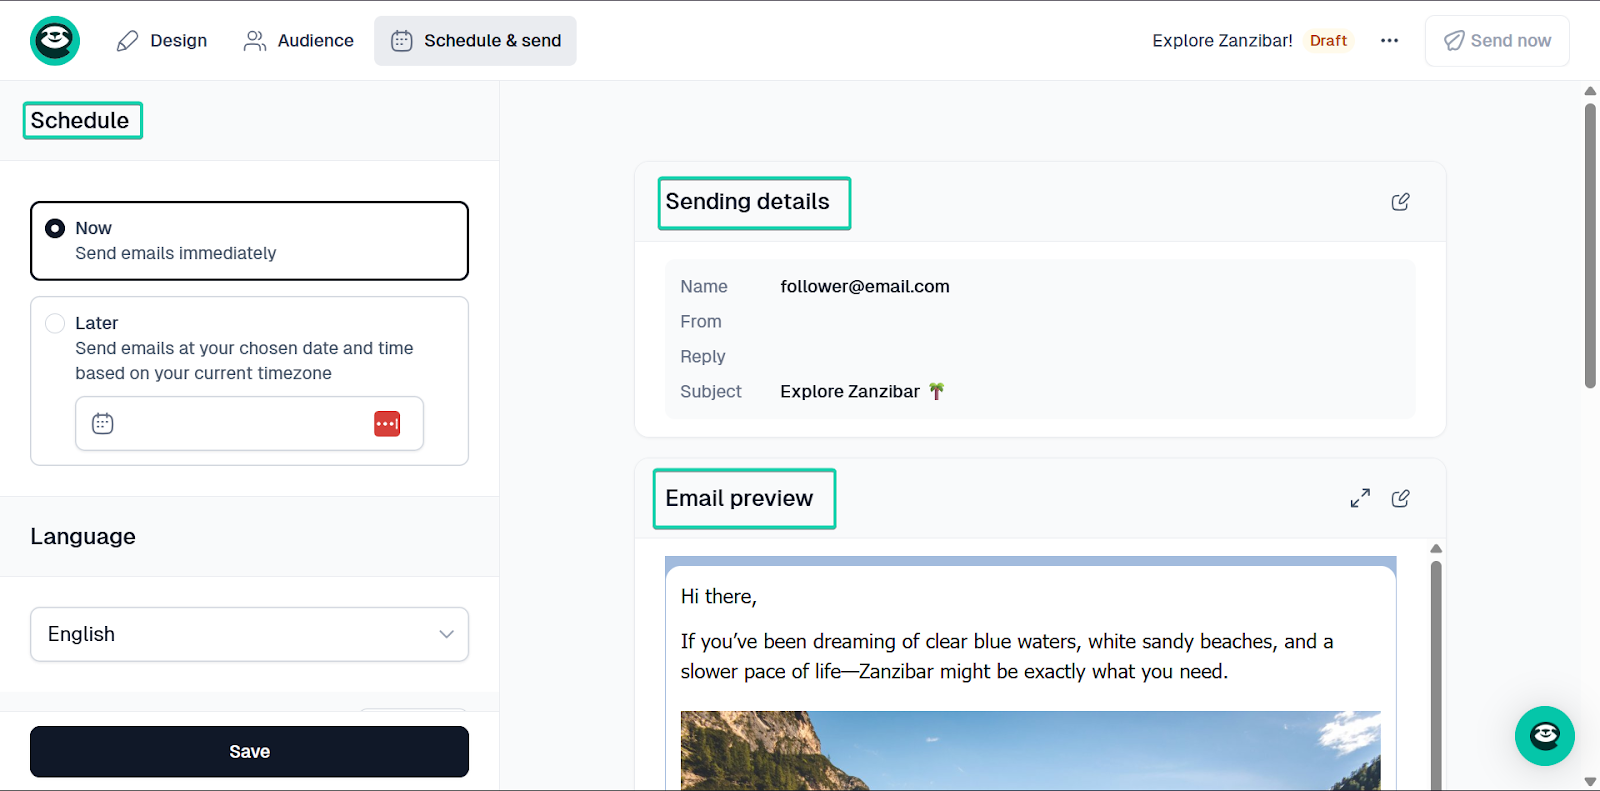
Once you’re done, draft your newsletter.
You can design your newsletter's layout and add media, like images.
Click “Next step.”

When you’re done writing your newsletter, you can choose to either send it immediately or at a later date.
You’ll also have to select the contacts you want to send the newsletter to.
Click “Save” when you’re done.
[fs-toc-omit]What I loved vs what I struggled with
What I loved 👍
✅ It’s a great all-in-one platform. You don’t need many integrations to keep it running.
✅ It’s very beginner-friendly and easy to set up.
✅ It’s great for monetization and building an audience.
What I struggled with 👎
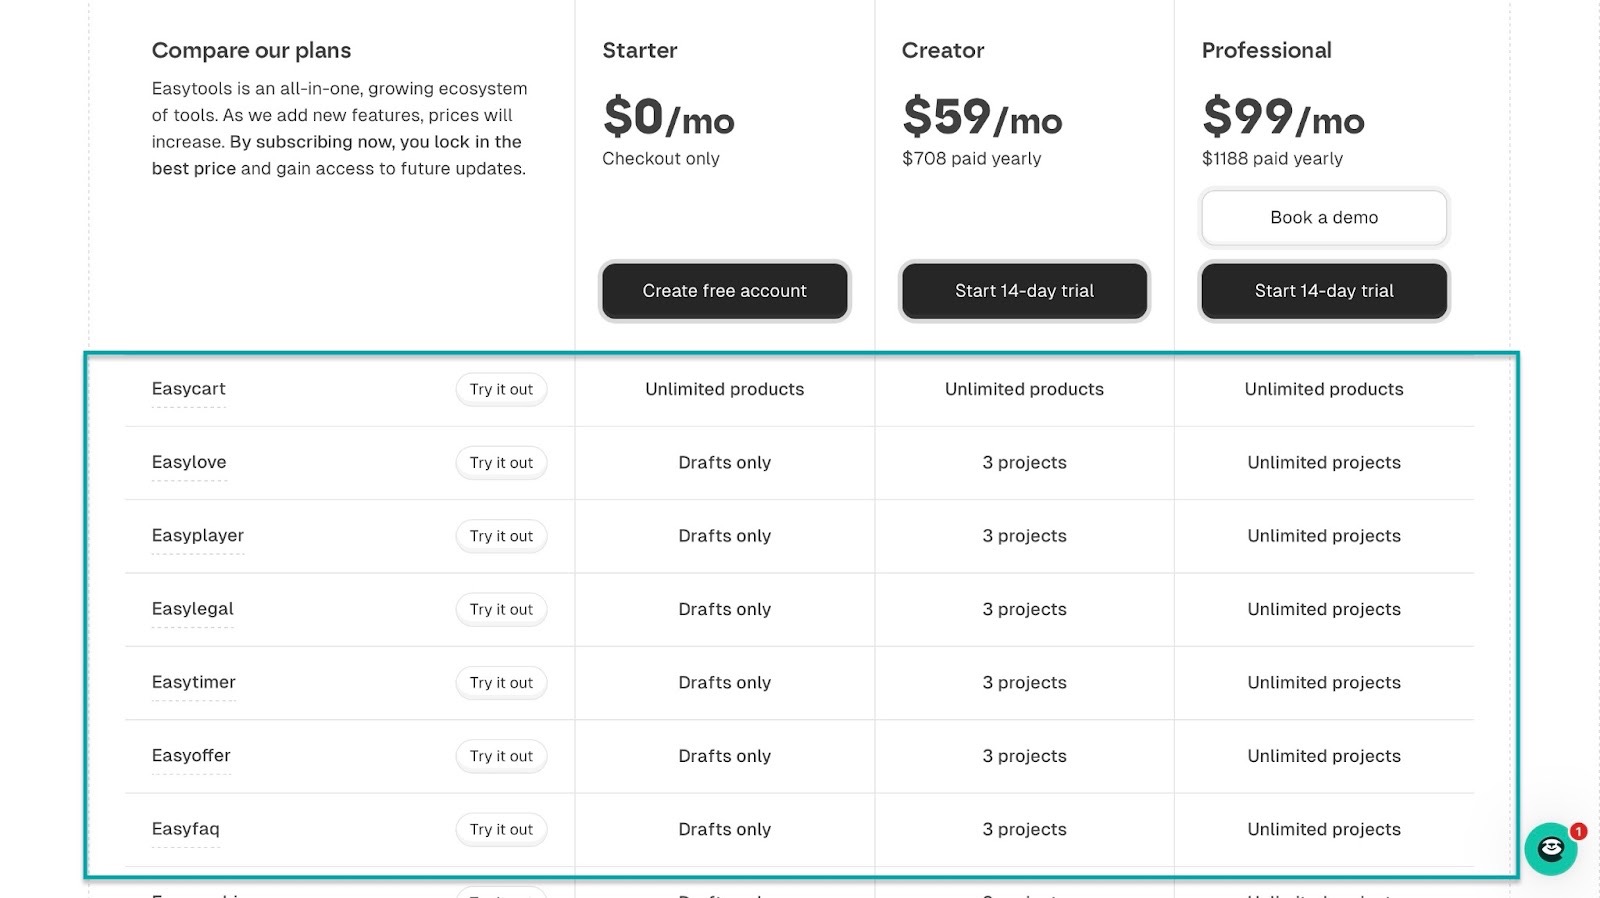
❌ Easytools’ Starter plan offers checkout only, but it’s unlimited, and you can create as many as you want.
[fs-toc-omit]Best for
- Creators who want a simple, all-in-one platform for selling digital and physical products.
[fs-toc-omit]Pricing
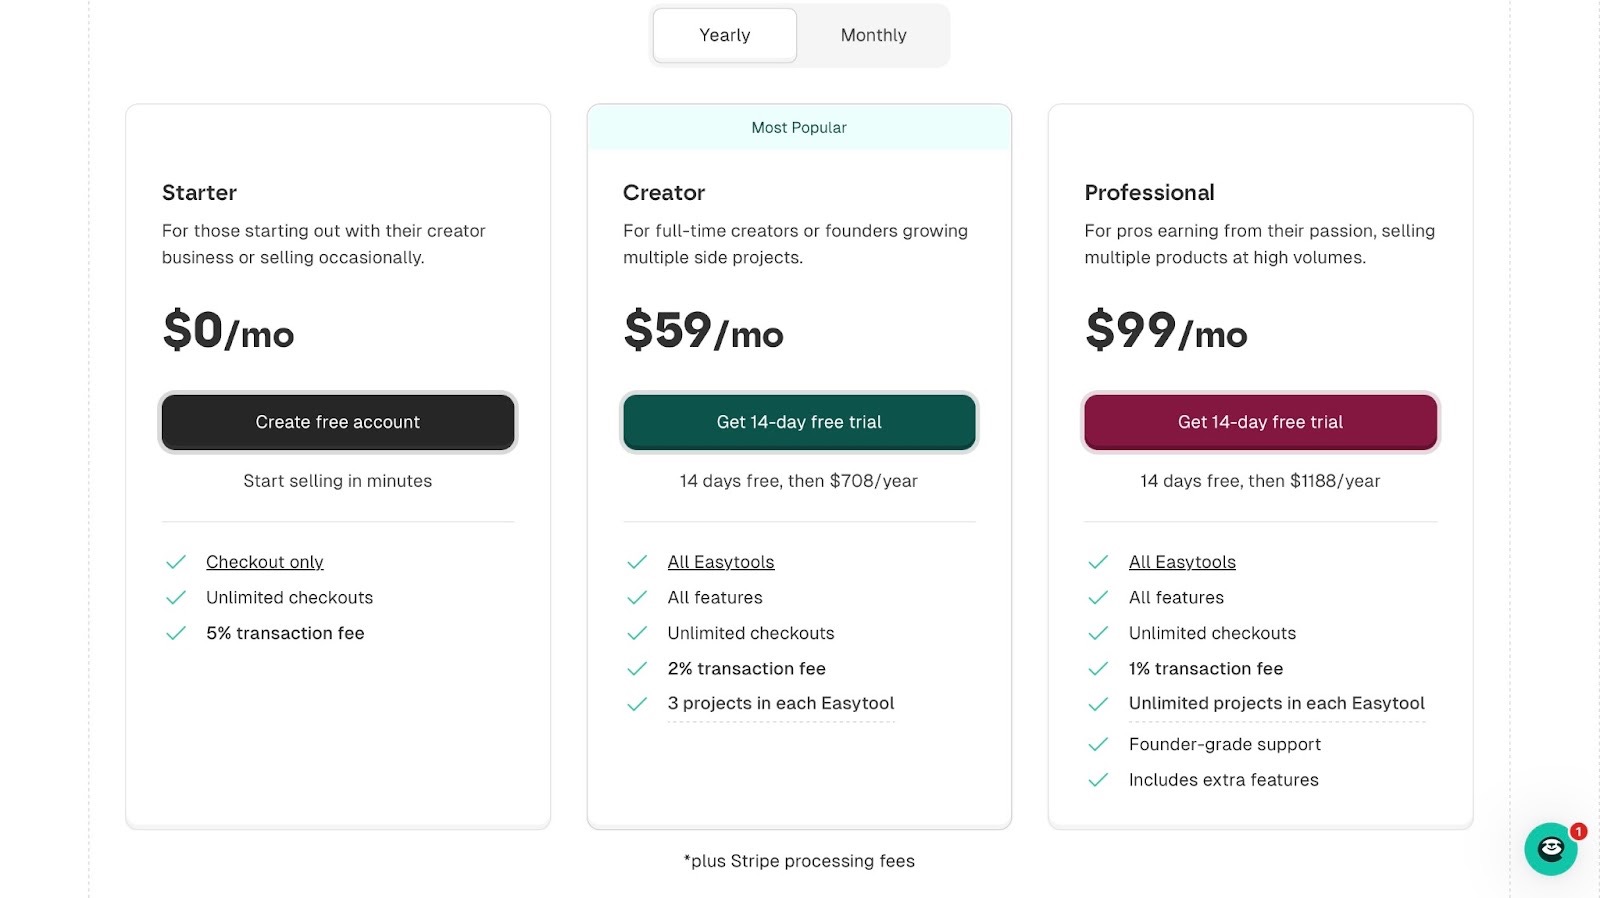
- Starter: $0/month
- Creator: $59/month
- Professional: $99/month
3. Ahrefs - Best for SEO and keyword research
Up next on my list of the best blogging tools is Ahrefs.
Ahrefs is an SEO and keyword research tool that helps you discover what people are searching for online and optimize your content to rank higher in search results.
It's a useful tool, especially if you want your content to generate traffic and clicks. So instead of guessing, you can plan your content based on what people are looking for.

Ahrefs ’ projects feature lets you track and optimize your website’s SEO performance.
Its AI content helper optimizes your content based on factors like search intent and competitor insights.
With its social media management (SMM) feature, you can link your social media profiles to Ahrefs. You can then draft posts and publish or schedule them directly from the platform.
I’ll get into more detail with the features below.
[fs-toc-omit]What I loved about Ahrefs
1. Projects
The projects feature on Ahrefs lets you set up your website and track its overall SEO performance.
For example, you add your website to the platform, and it starts monitoring metrics like keyword rankings and technical SEO issues.
It helps you see how your blog is performing in search engines and also pinpoints issues that could affect your rankings.
Let’s see how it works:
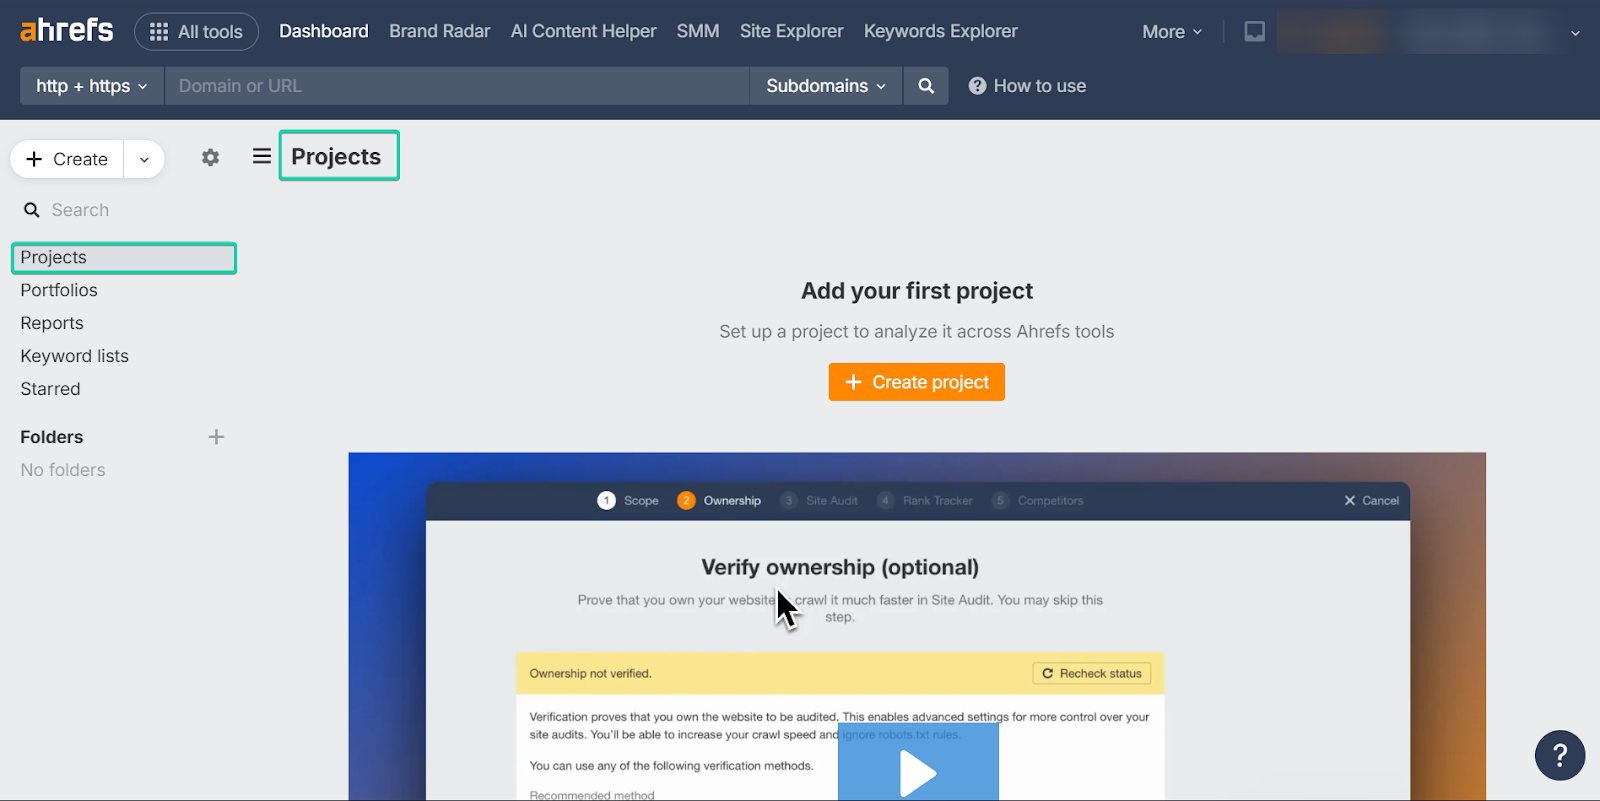
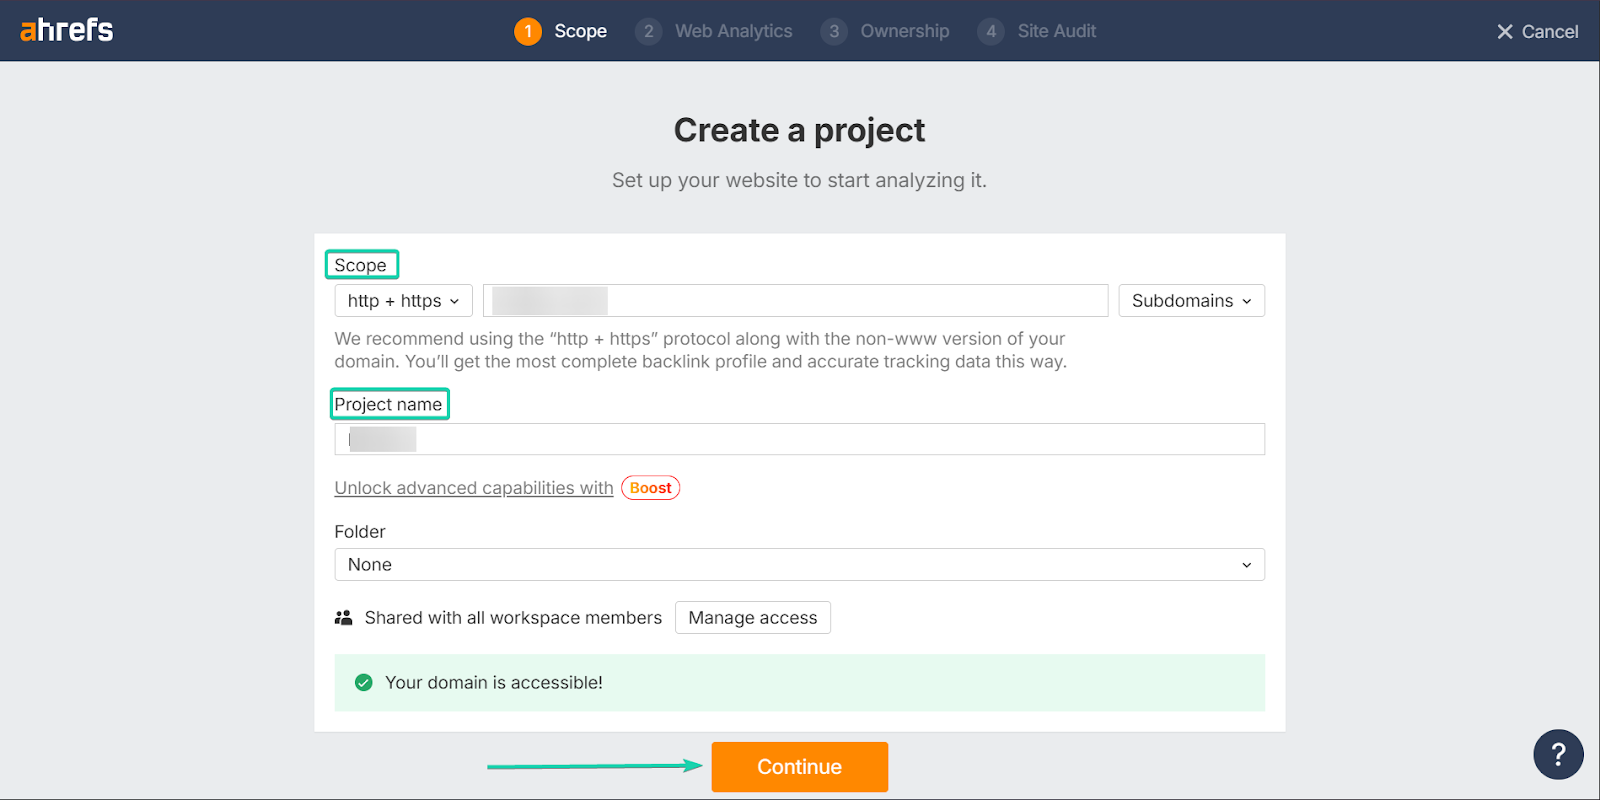
First, go to “Projects” and click “Create Project.”

Next, fill out the details. These include pasting a link to your website and naming your project.
Click “Continue” when you’re done.
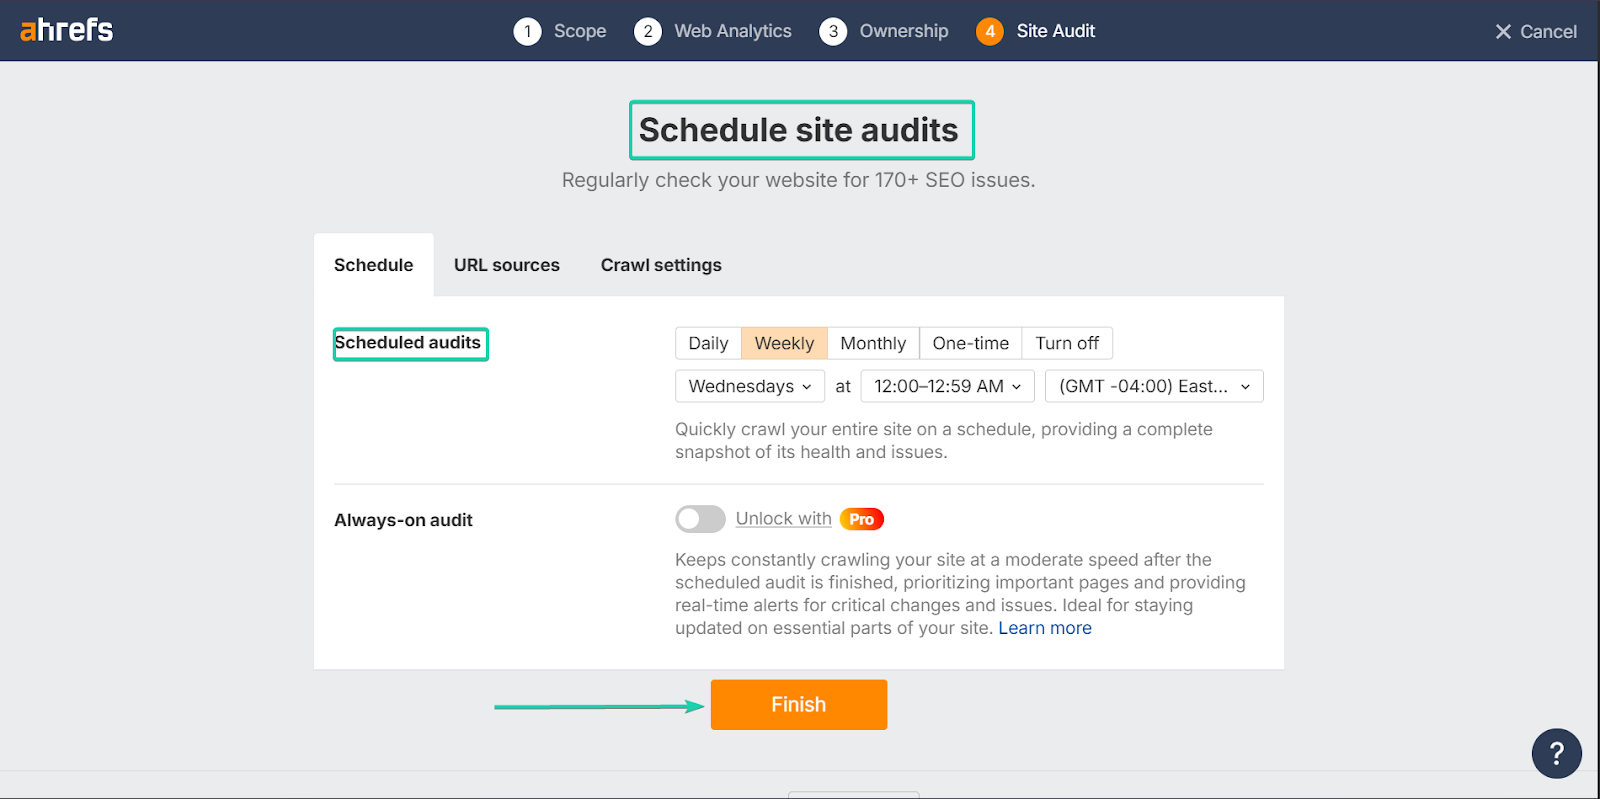
Finally, you can schedule site audits. Ahrefs will regularly check your site for any SEO issues and alert you.
You can choose between daily, weekly, monthly, or one-time audits. You can also set the date and time you want to receive your reports.
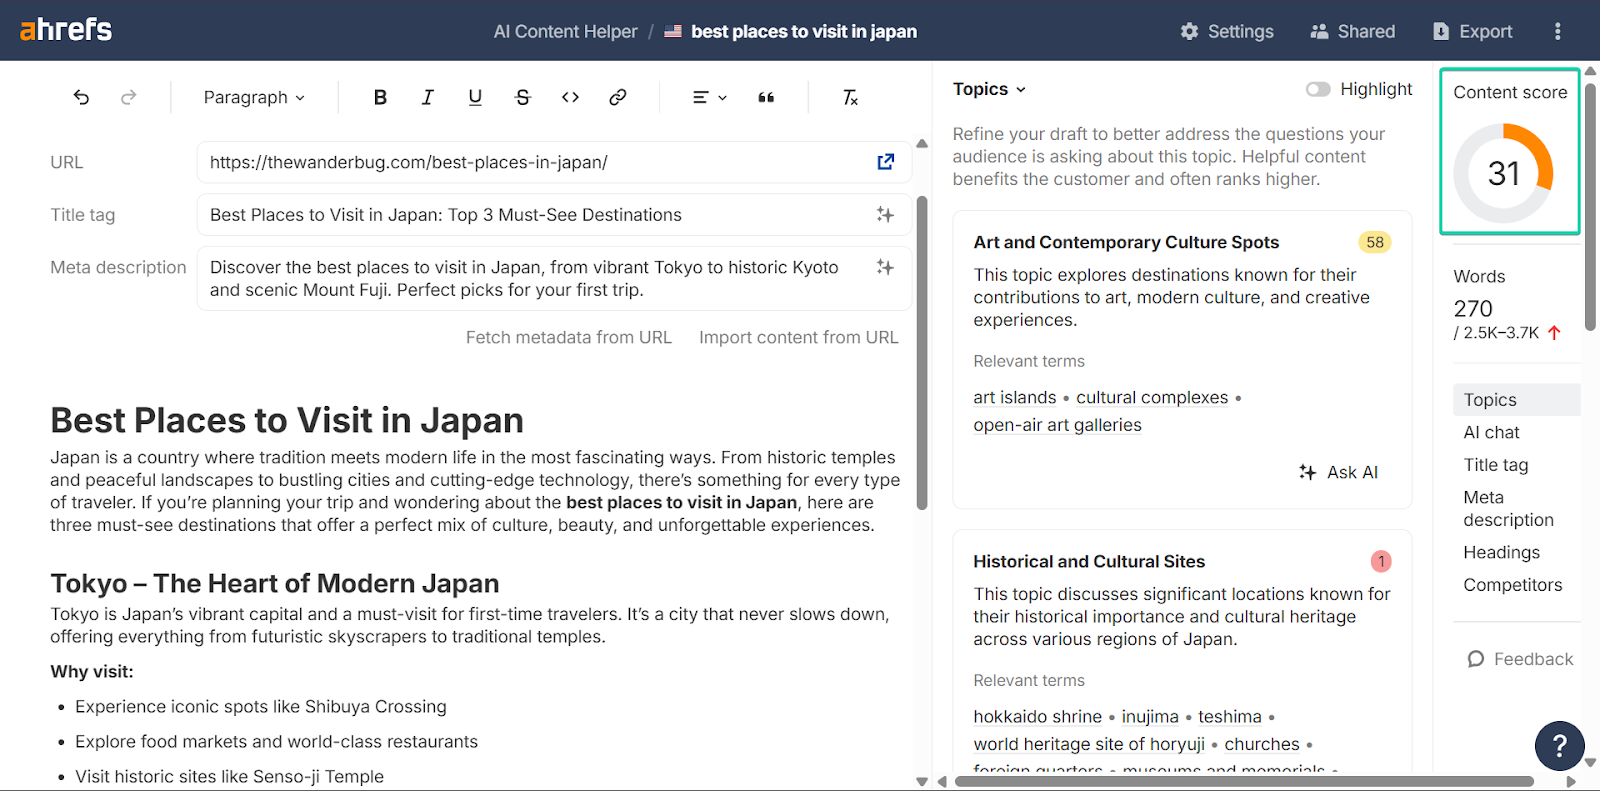
2. AI content helper
The AI content helper feature helps you create content that aligns with what search engines and website visitors are looking for.
It analyzes top-ranking sites for your target keywords and provides recommendations on topics like content structure and search intent.
This helps bloggers write content that ranks.
Here’s a brief walkthrough:
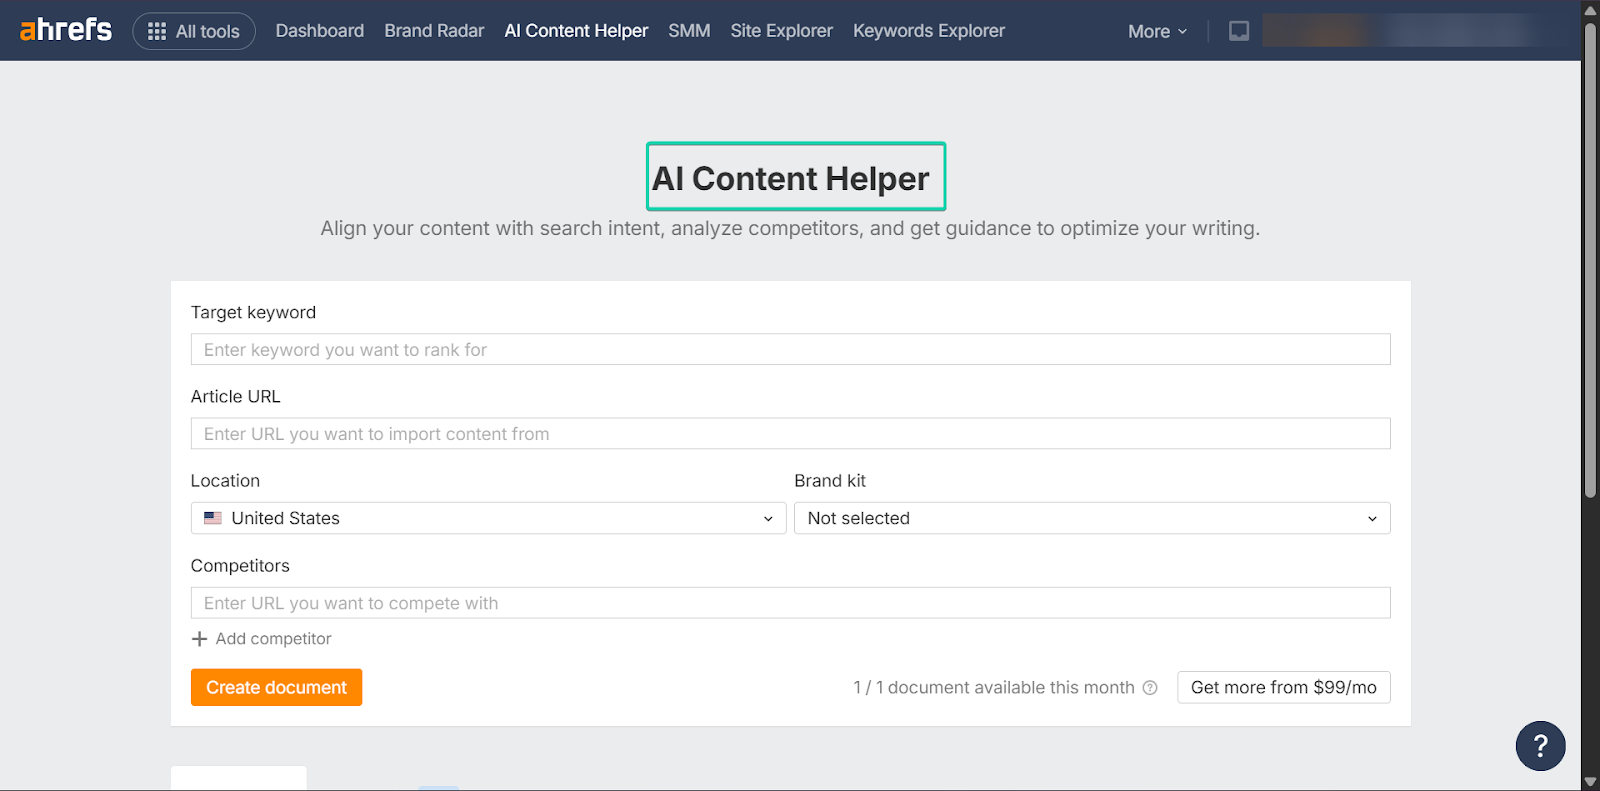
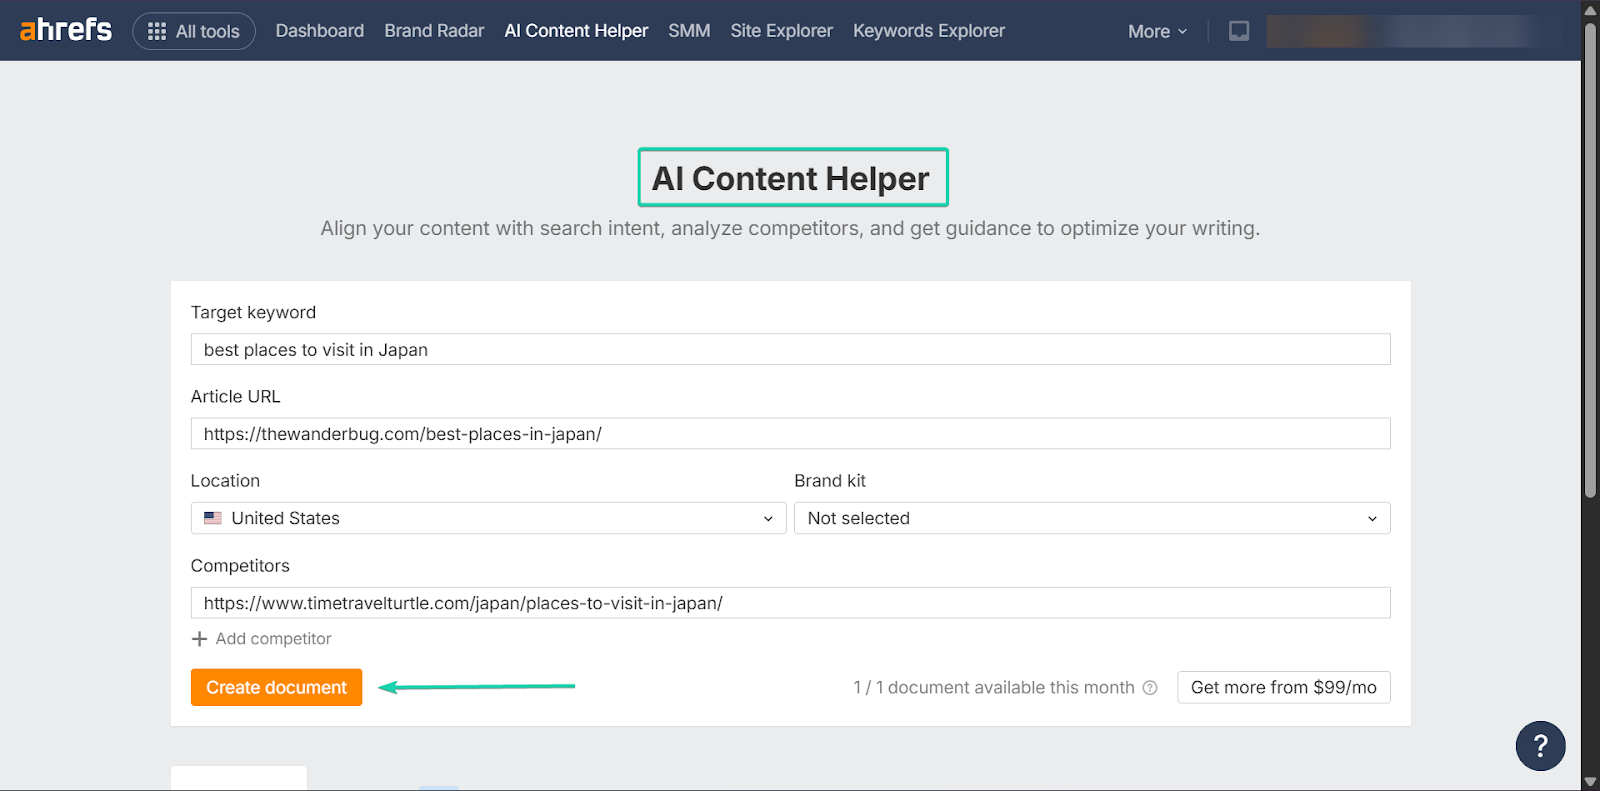
First, go to “AI Content Helper” and fill out the required details.
You’ll have to add the target keyword, as well as URLs for your website and your competitor’s website. You can add as many competitors as you want.
Click “Create document” when you’re done.
Next, select your competitors. This involves reviewing the best-performing sites for your target keywords.
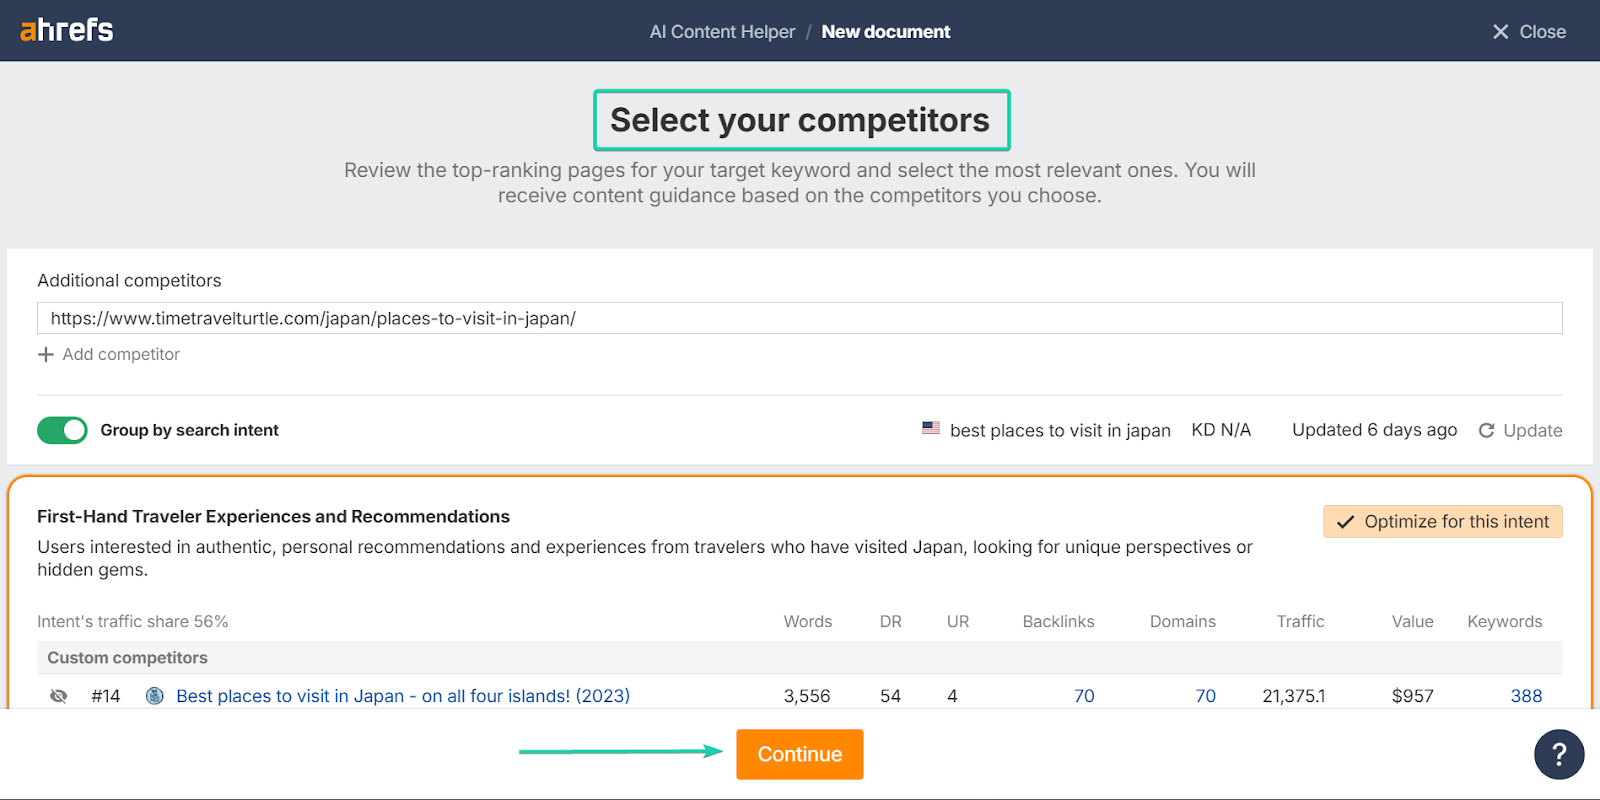
In Ahref’s built-in editor, you can draft content with insights from what competing websites are doing.
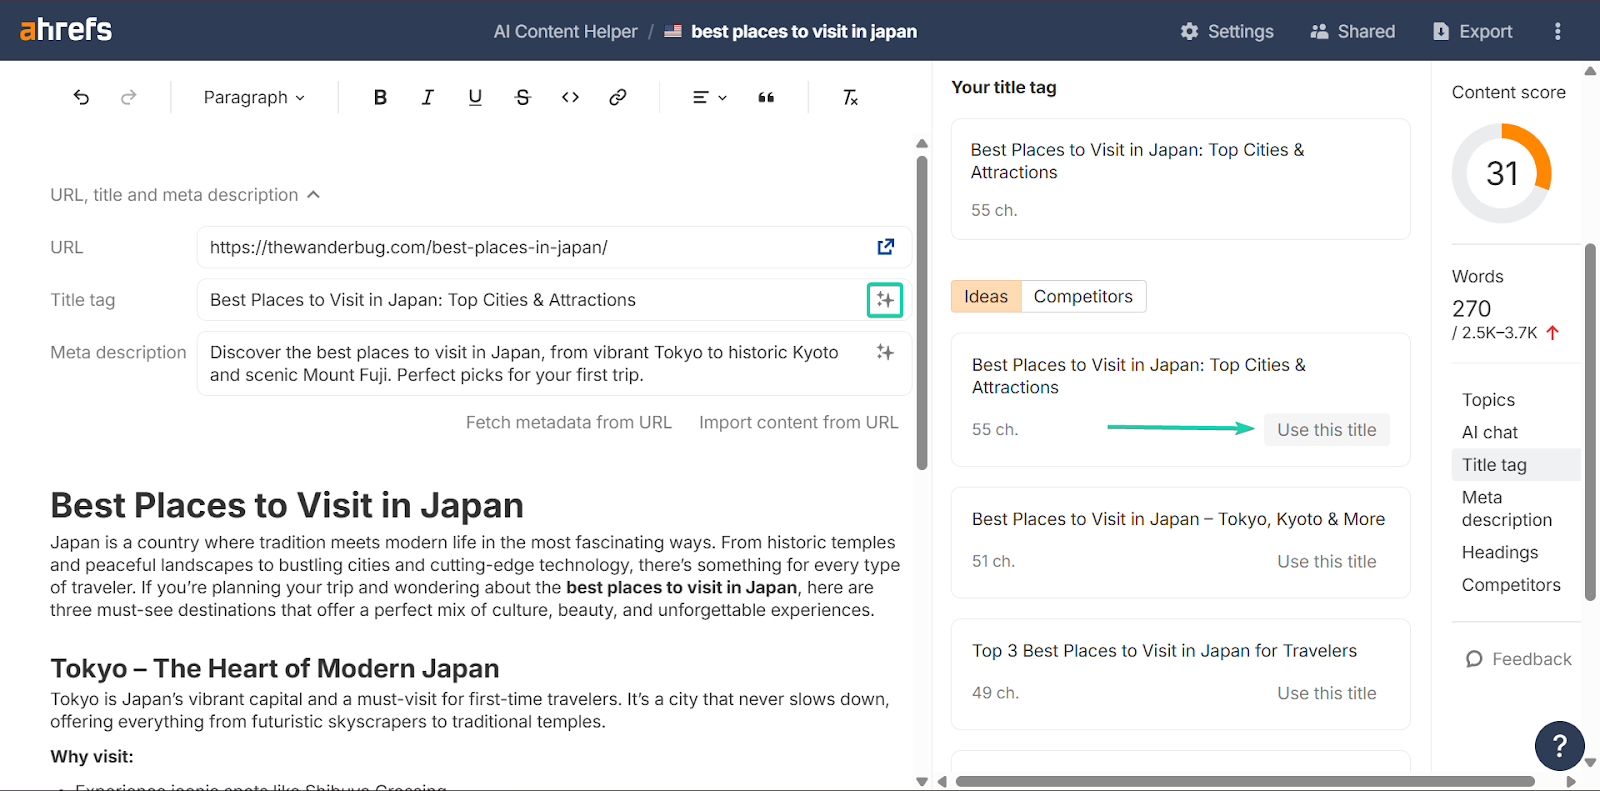
It also has a content score. This shows how well your content is optimized for a specific keyword.
You can also use AI to assist with your writing.
For example, you can use AI to generate texts for your title tags and meta descriptions.
Once you’re done, you can export your draft or share it with your team.
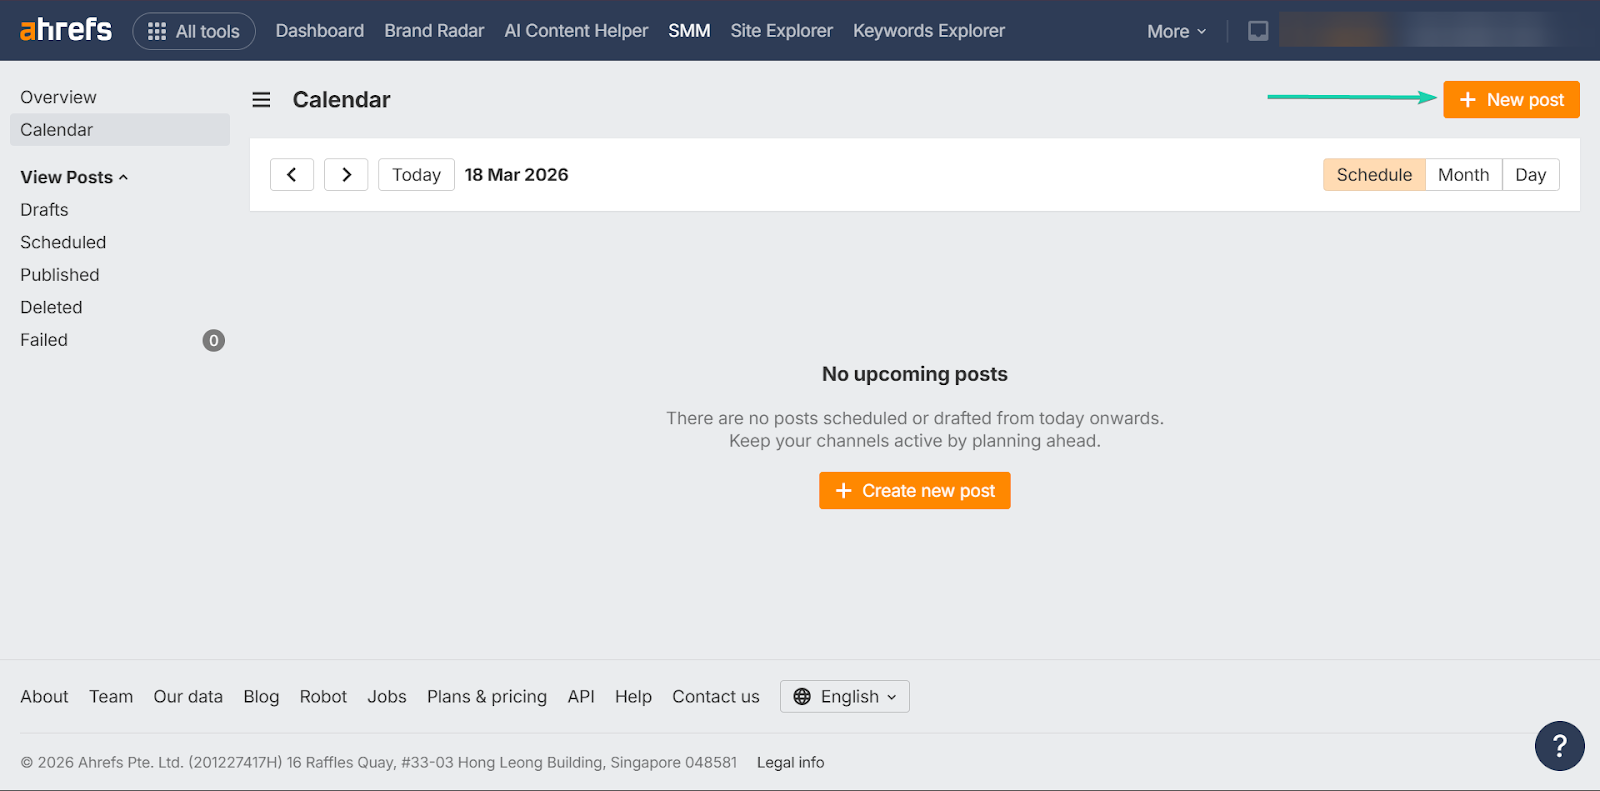
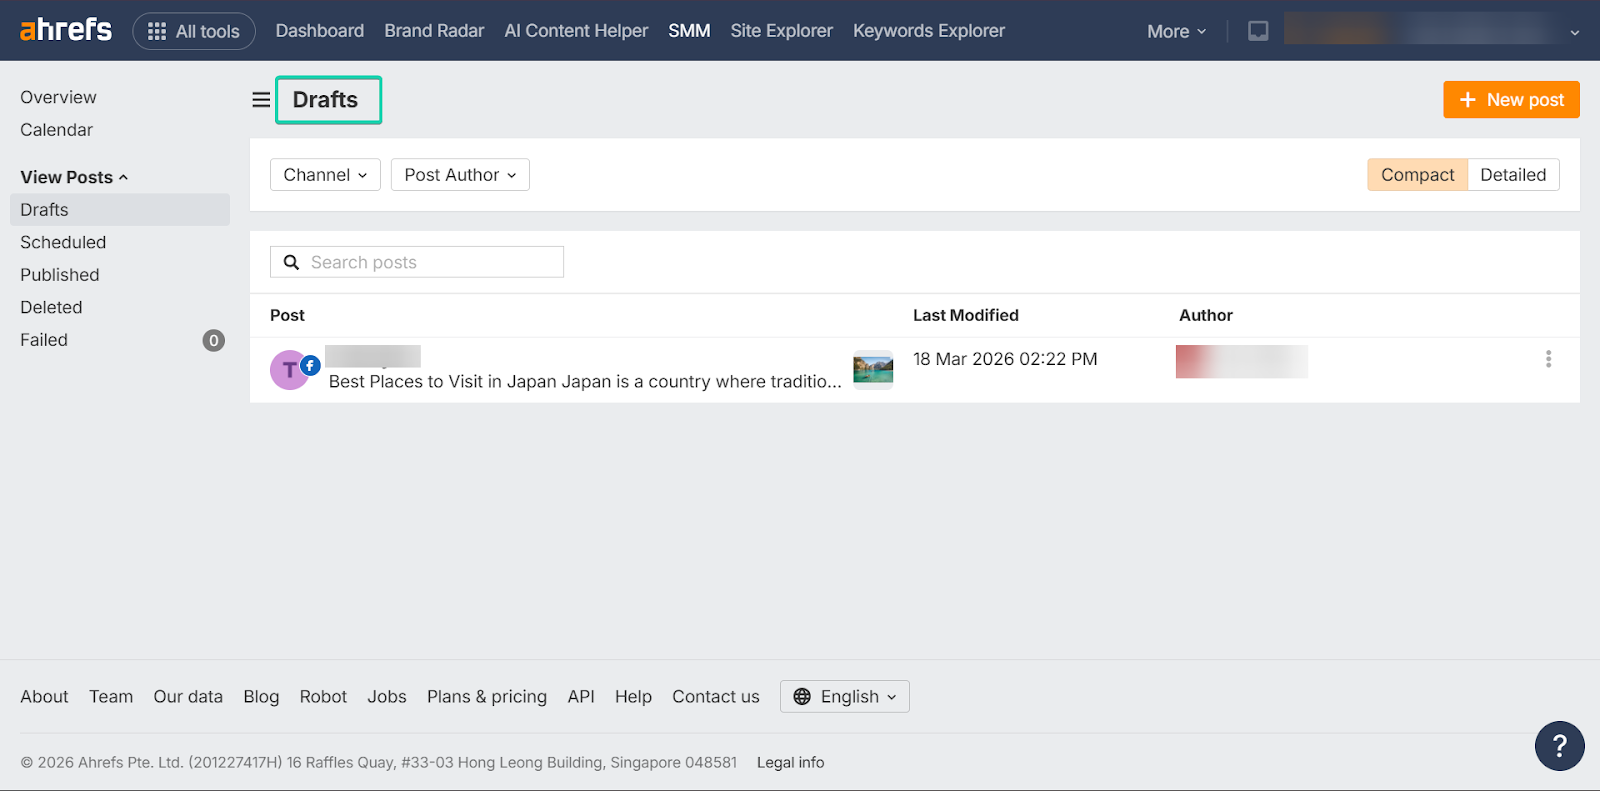
3. Social media management (SMM)
Ahrefs also allows you to connect your social media accounts (Facebook, Instagram, X, LinkedIn) and create posts directly from the platform.
You can publish or schedule your blog posts without needing a separate social media tool. This helps you save time switching between tools.
Let me show you how:
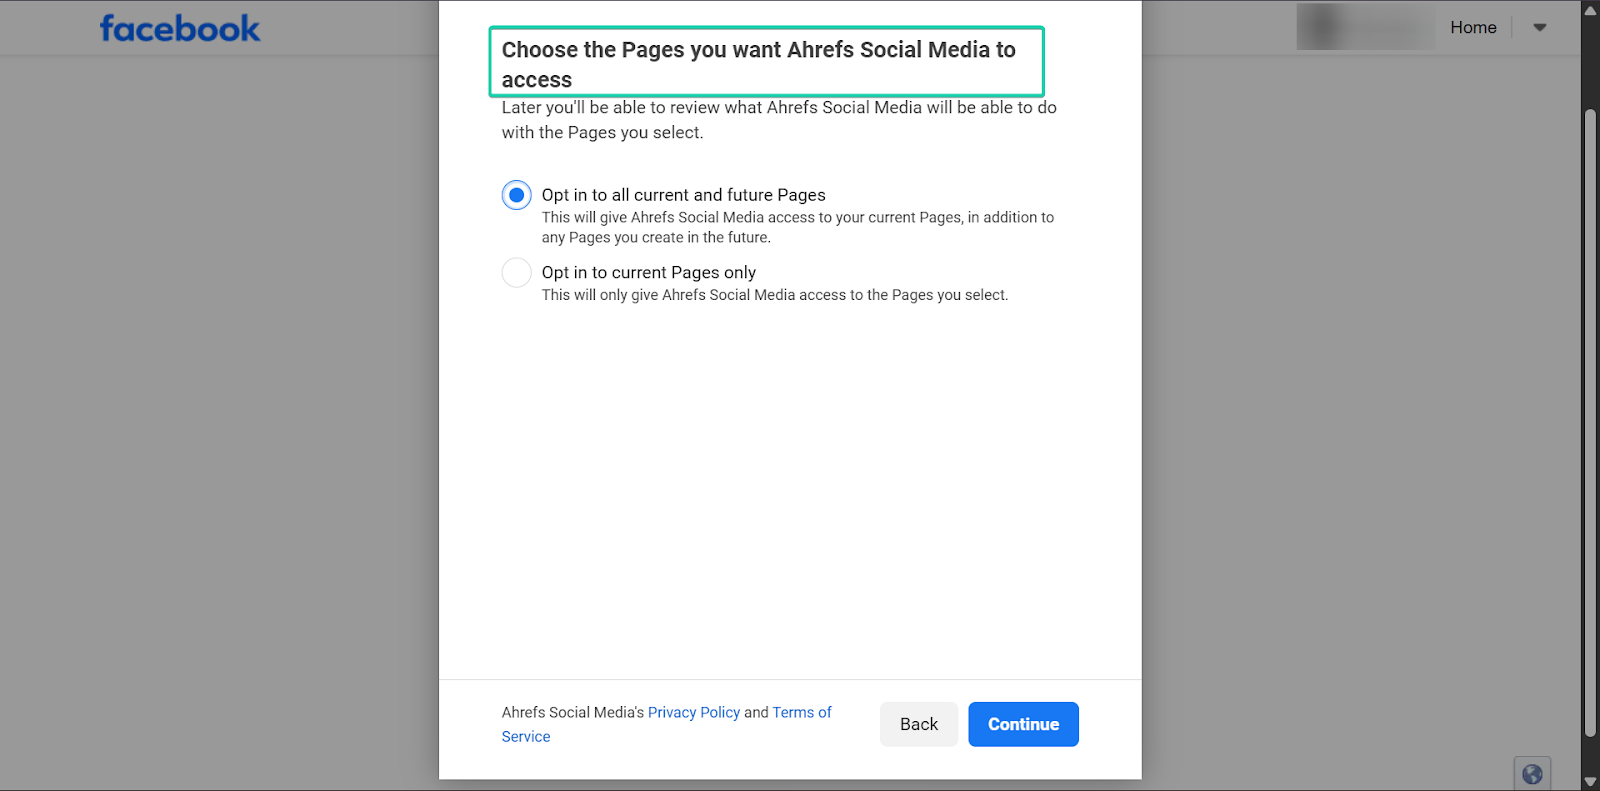
Head to “SMM” and click “Connect channel” to link Ahrefs to your social media channel, like Facebook, X, or LinkedIn.

Once you’re connected, you can start drafting posts directly from Ahrefs.
When you’re done drafting your post, you can save it as a draft, publish immediately, or schedule it.
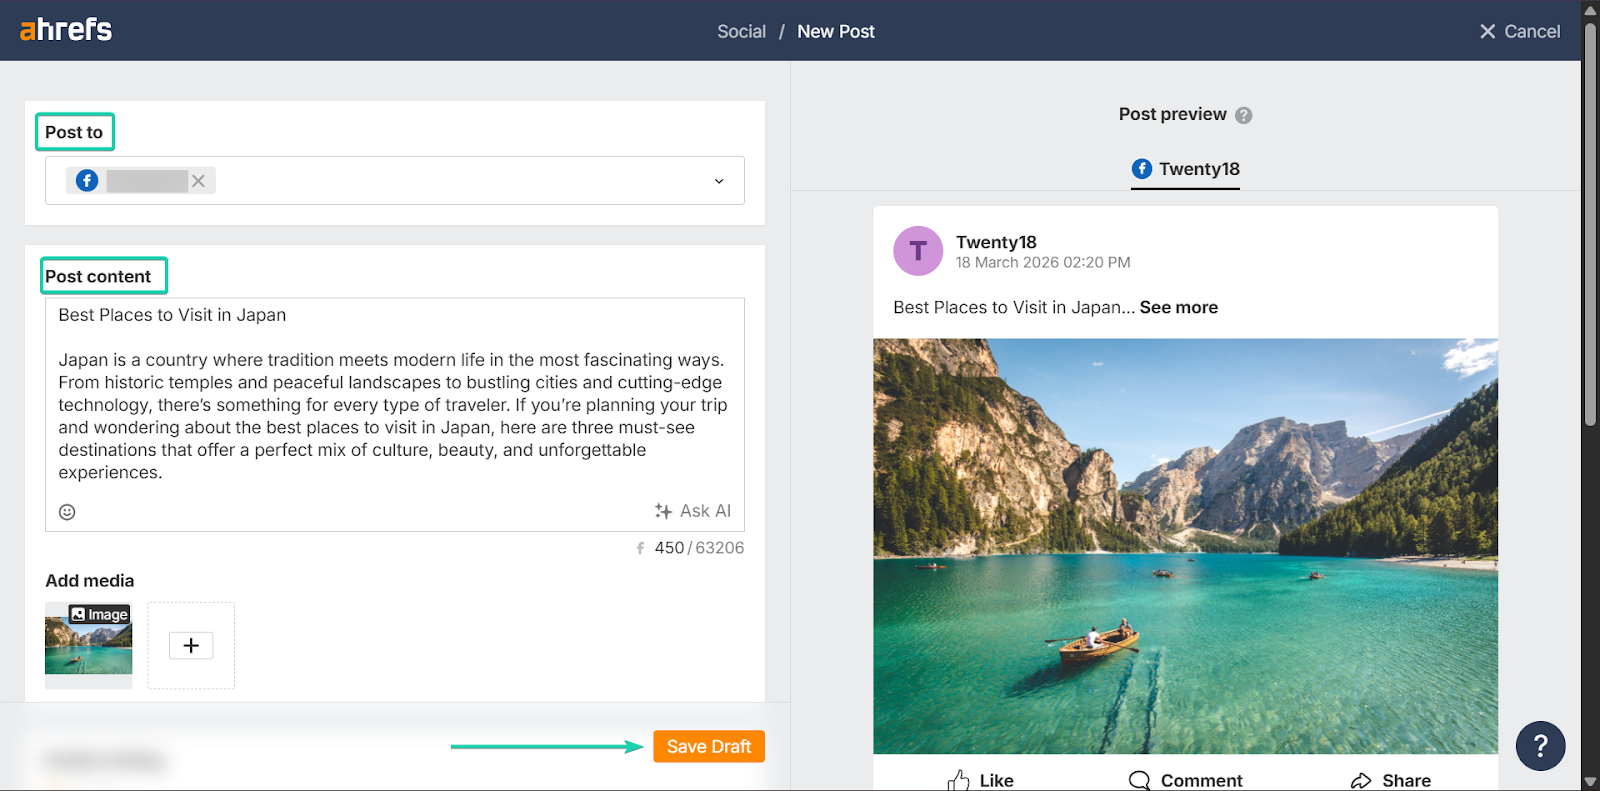
All saved drafts will be stored on your dashboard, and you can edit them at any time.
[fs-toc-omit]What I loved vs what I struggled with
What I loved 👍
✅ Strong keyword research capabilities
✅ Helps users create data-driven content
✅ Great for long-term blog growth
What I struggled with 👎
❌ Can feel overwhelming at first, especially if you’re new to SEO and keyword research
❌ It’s relatively pricey, with the lowest tiered plan starting at $129/month
[fs-toc-omit]Best for
- Freelancers and SEO professionals focused on growing organic traffic to websites and blogs.
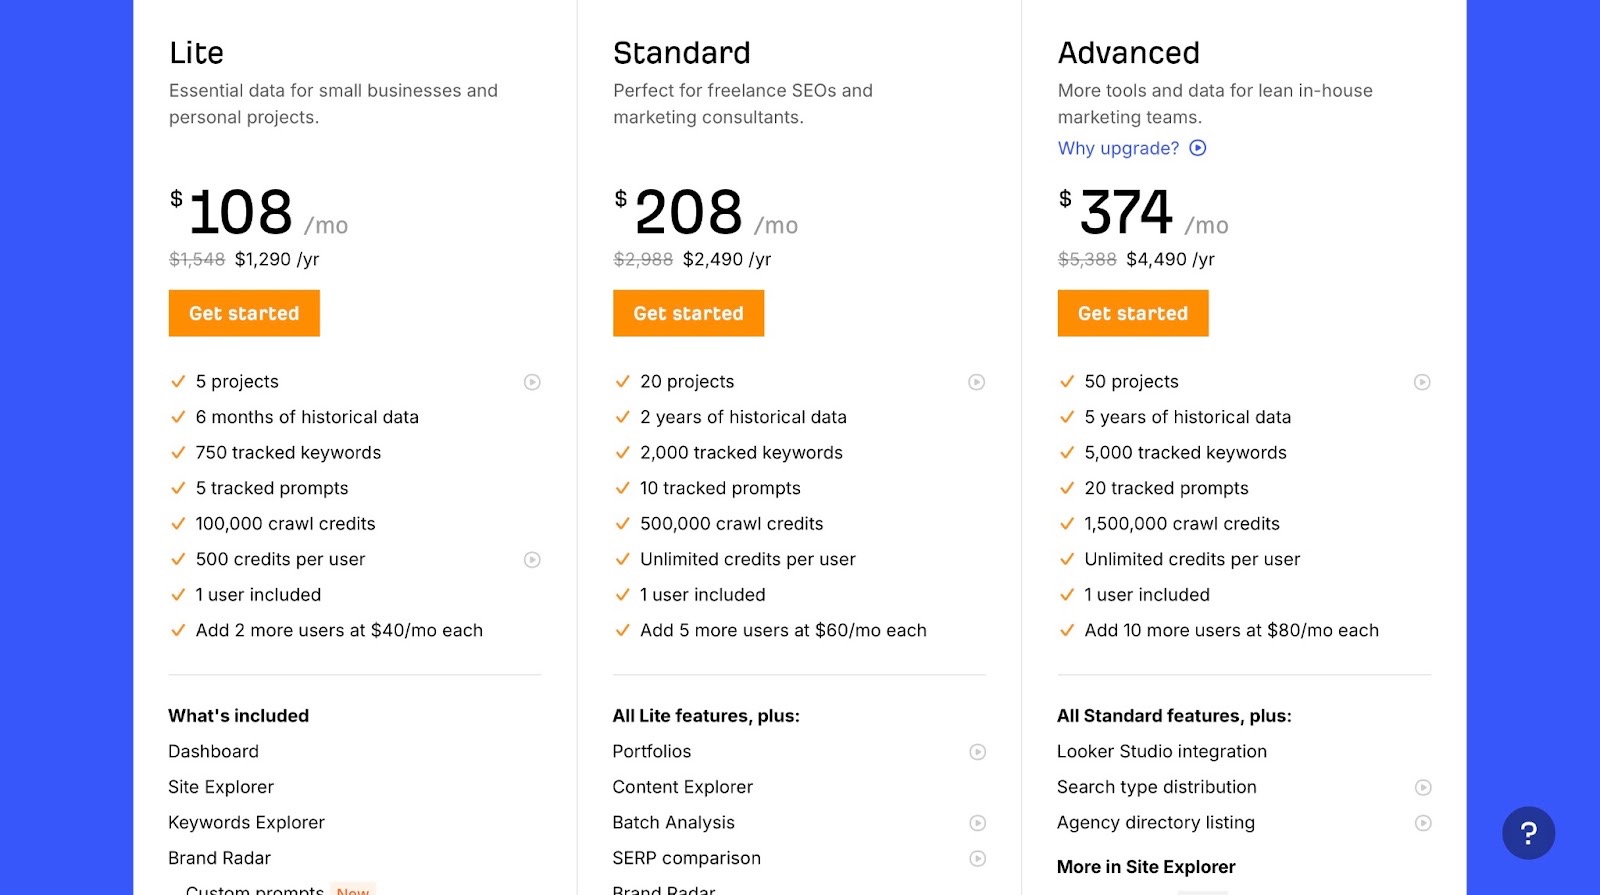
[fs-toc-omit]Pricing
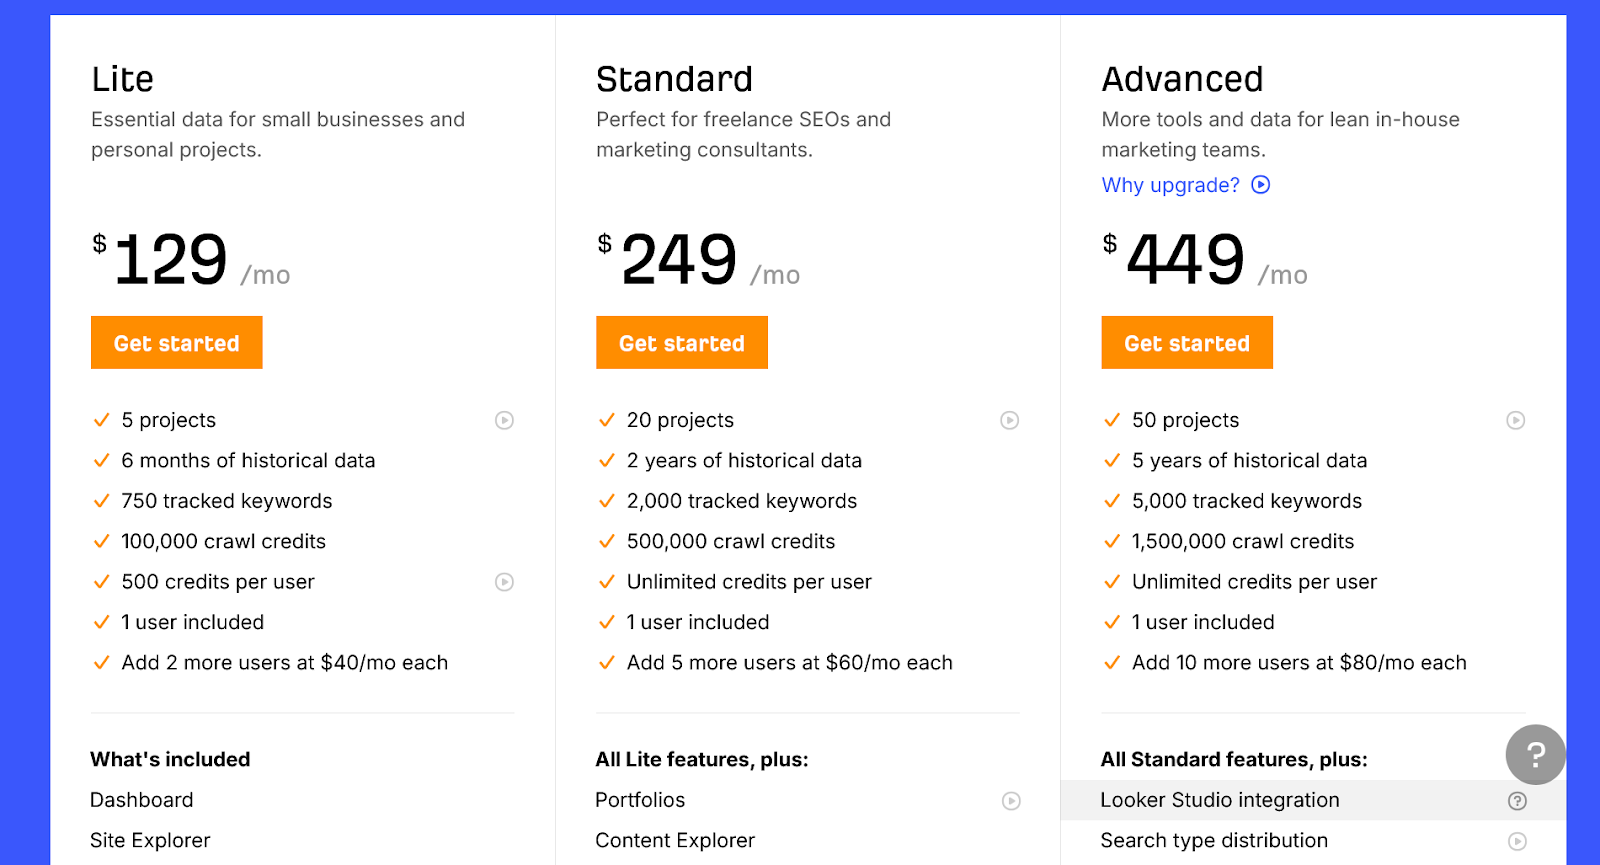
- Lite: $108/month
- Standard: $208/month
- Advanced: $374/month
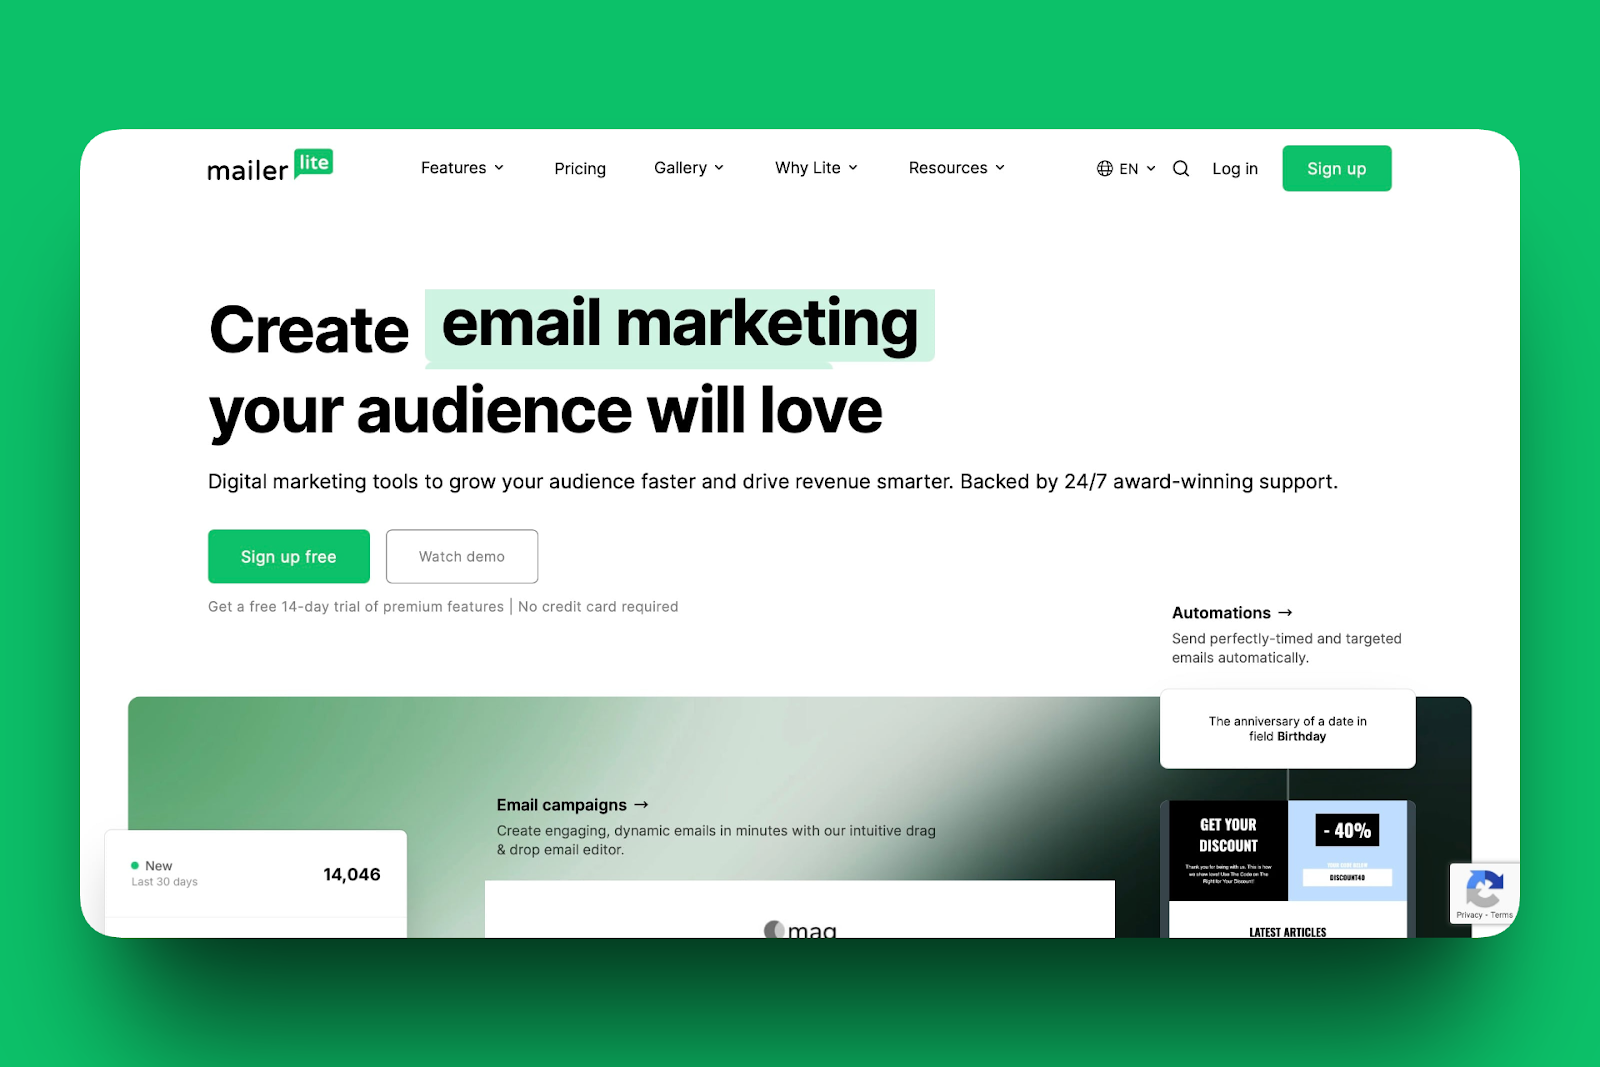
4. MailerLite - Best for email marketing
MailerLite is fourth on my list of best blogging tools.
It’s an email marketing tool that helps you build an audience, send newsletters, and automate your email communication.
The key features I really liked in MailerLite were campaigns, automations, and forms.
Campaigns lets you create and send email newsletters to your followers.
Secondly, the automations feature lets you set up automated emails.

And with the forms feature, you can collect subscriber information directly on your website.

[fs-toc-omit]What I loved about MailerLite
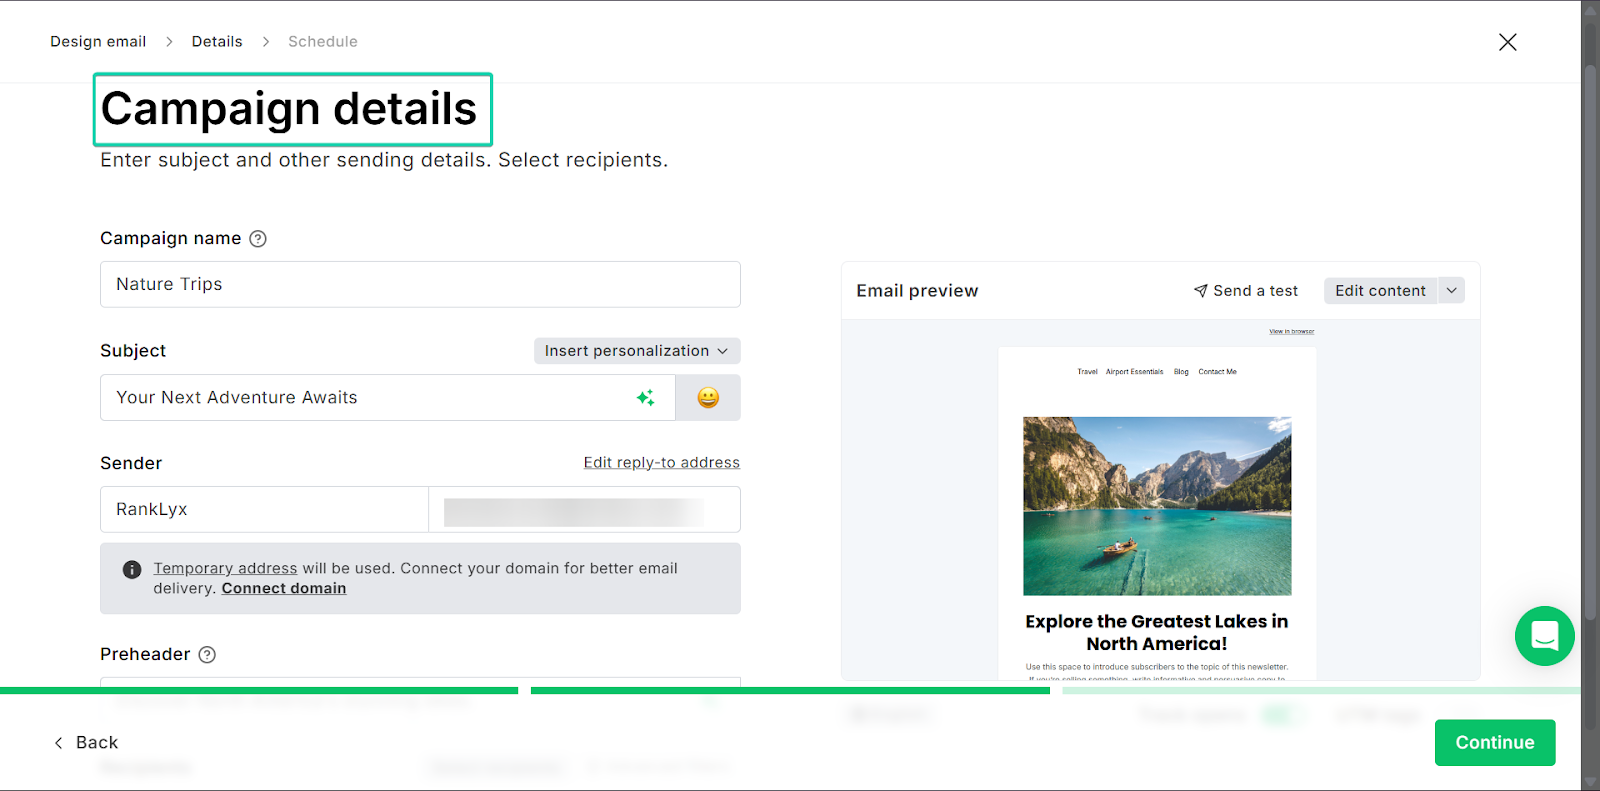
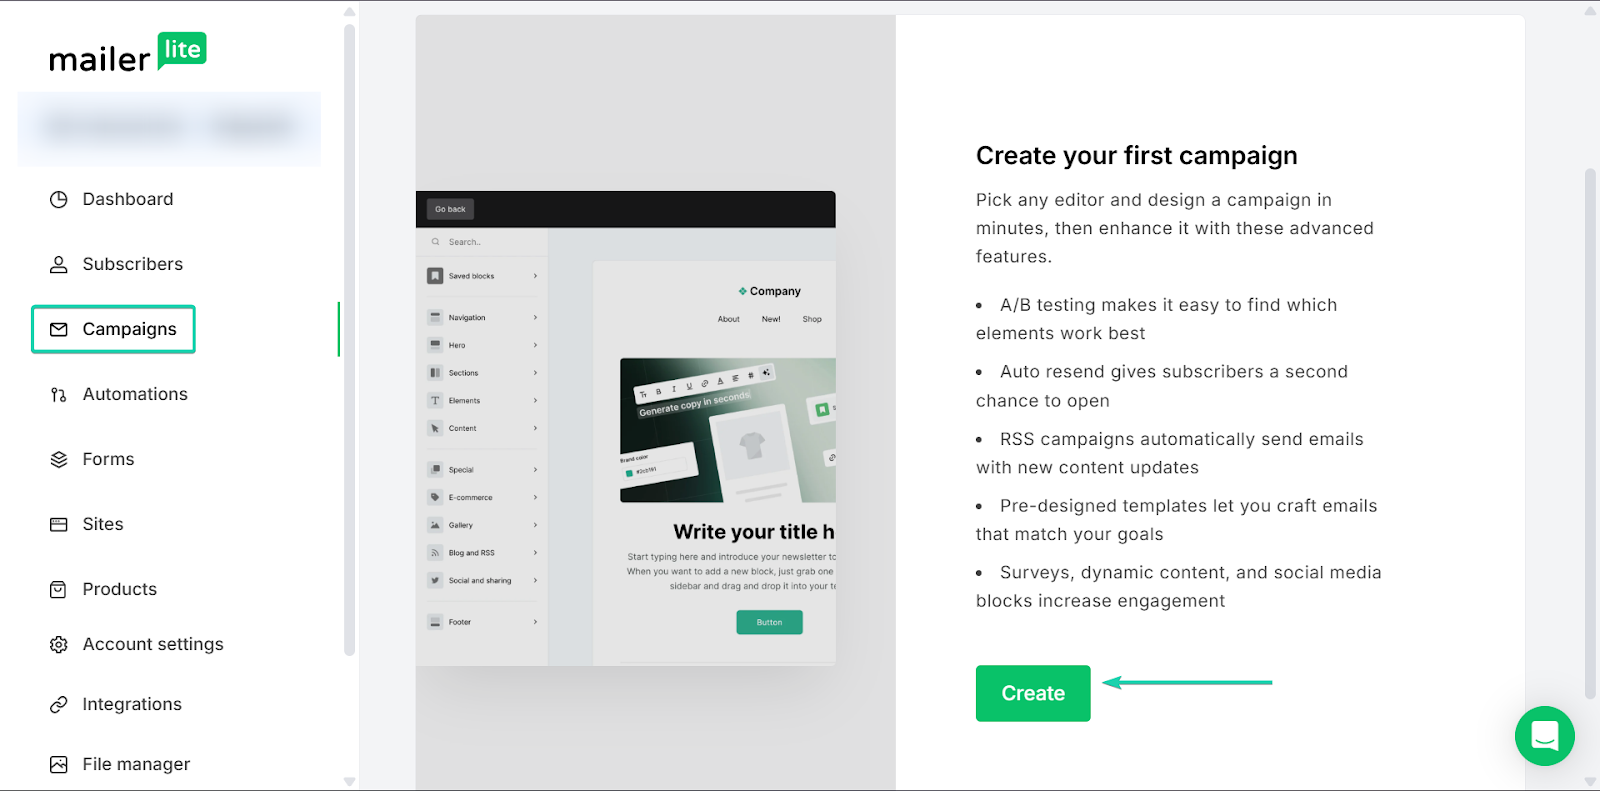
1. Campaigns
Campaigns are one-time emails you send to your audience or followers. These emails could be in the form of blog updates, announcements, or weekly newsletters.
It’s a great way to keep your audience engaged and drive traffic to your blog.
Let’s see how it works:
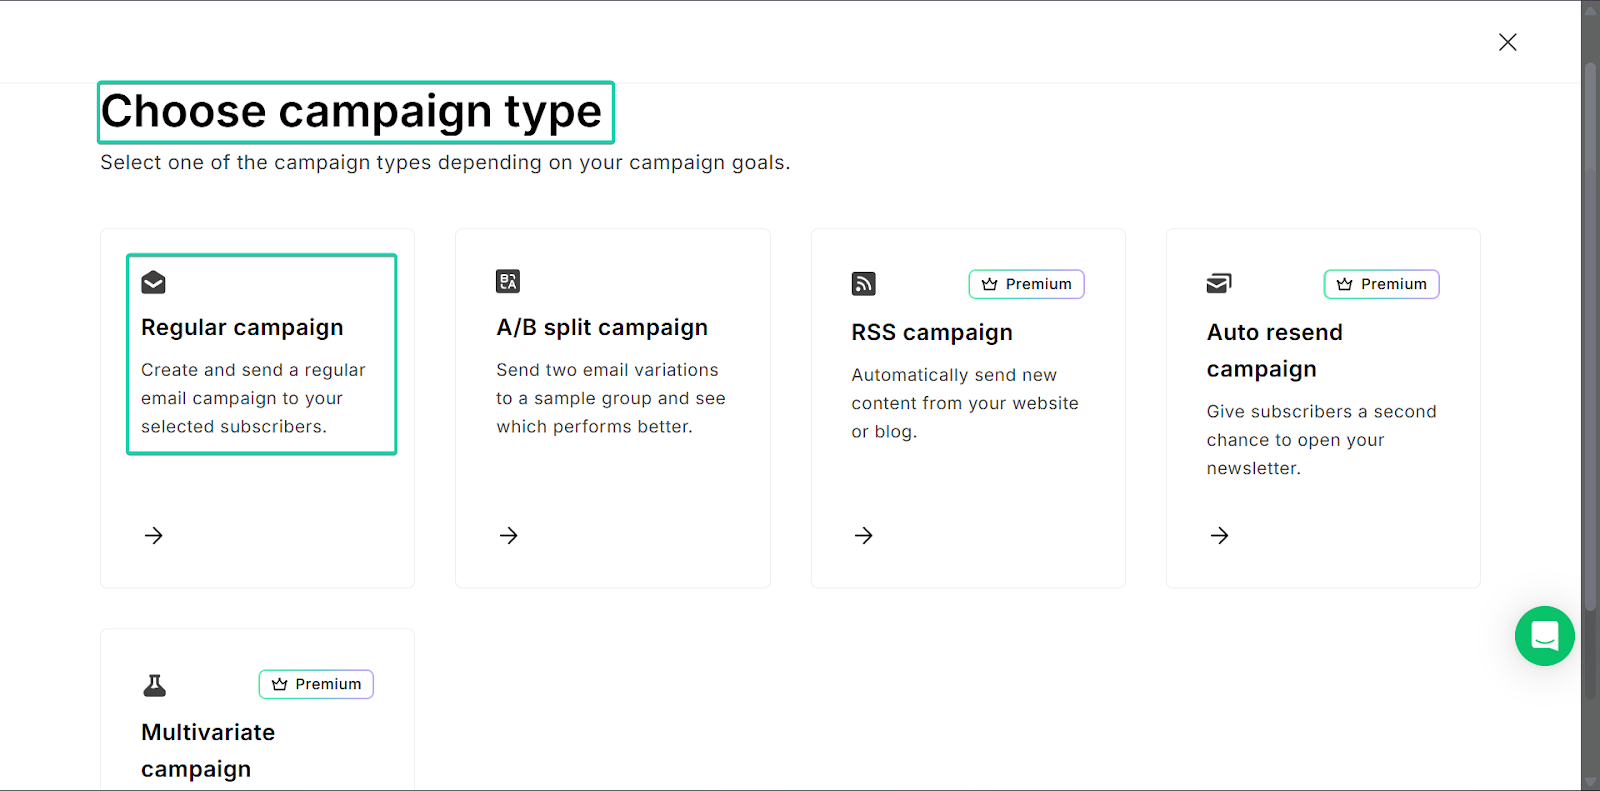
Head to “Campaigns” and click “Create.”
Next, choose a campaign type.
With its premium plan, MailerLite has over 100 templates to choose from. On the free plan, you would have to build from scratch.
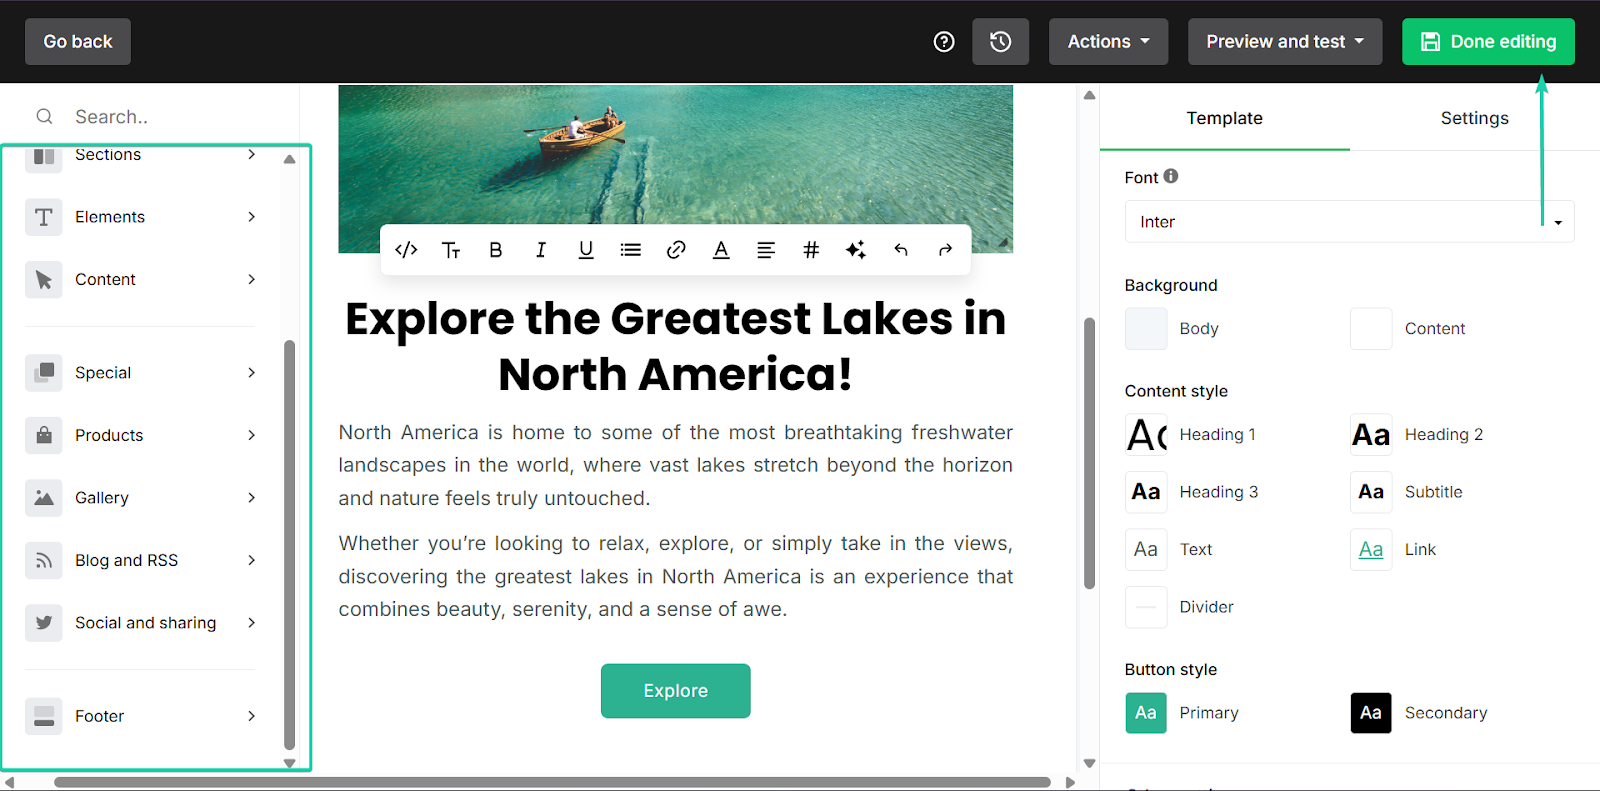
MailerLite has a simple drag-and-drop editor that makes it easy to create these campaigns even if you have limited design experience.
When you’re done, click “Done editing.”
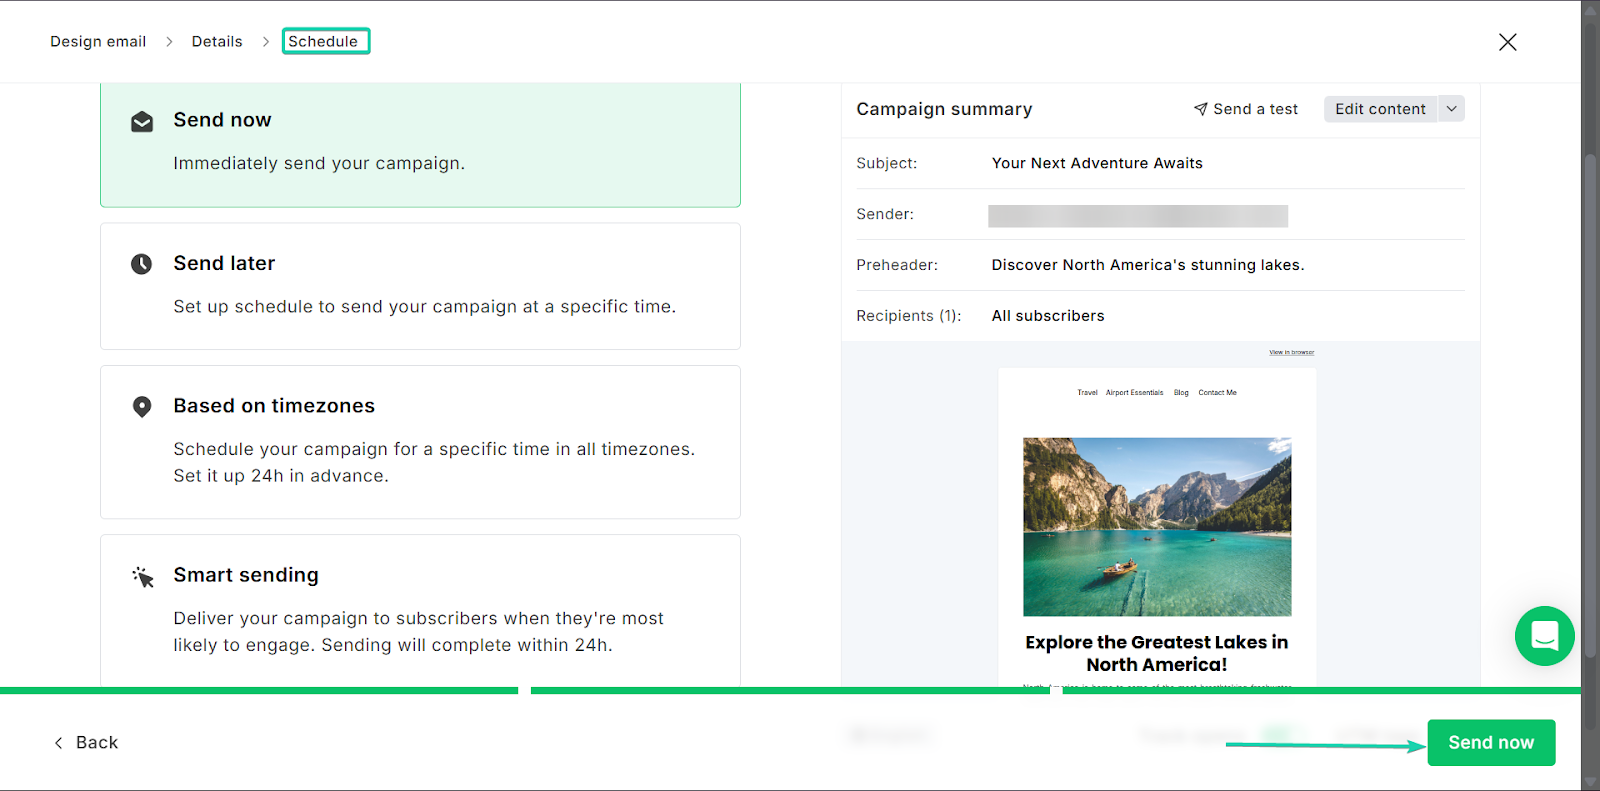
You can also choose how and when you want to send your campaign.
2. Automations
MailerLite’s automations feature allows you to send emails automatically based on specific triggers.
For example, you can set up a welcome email when someone subscribes to your blog.
The feature is designed to save time, so you don’t need to spend as much time on manual tasks.
Let’s check this feature out:
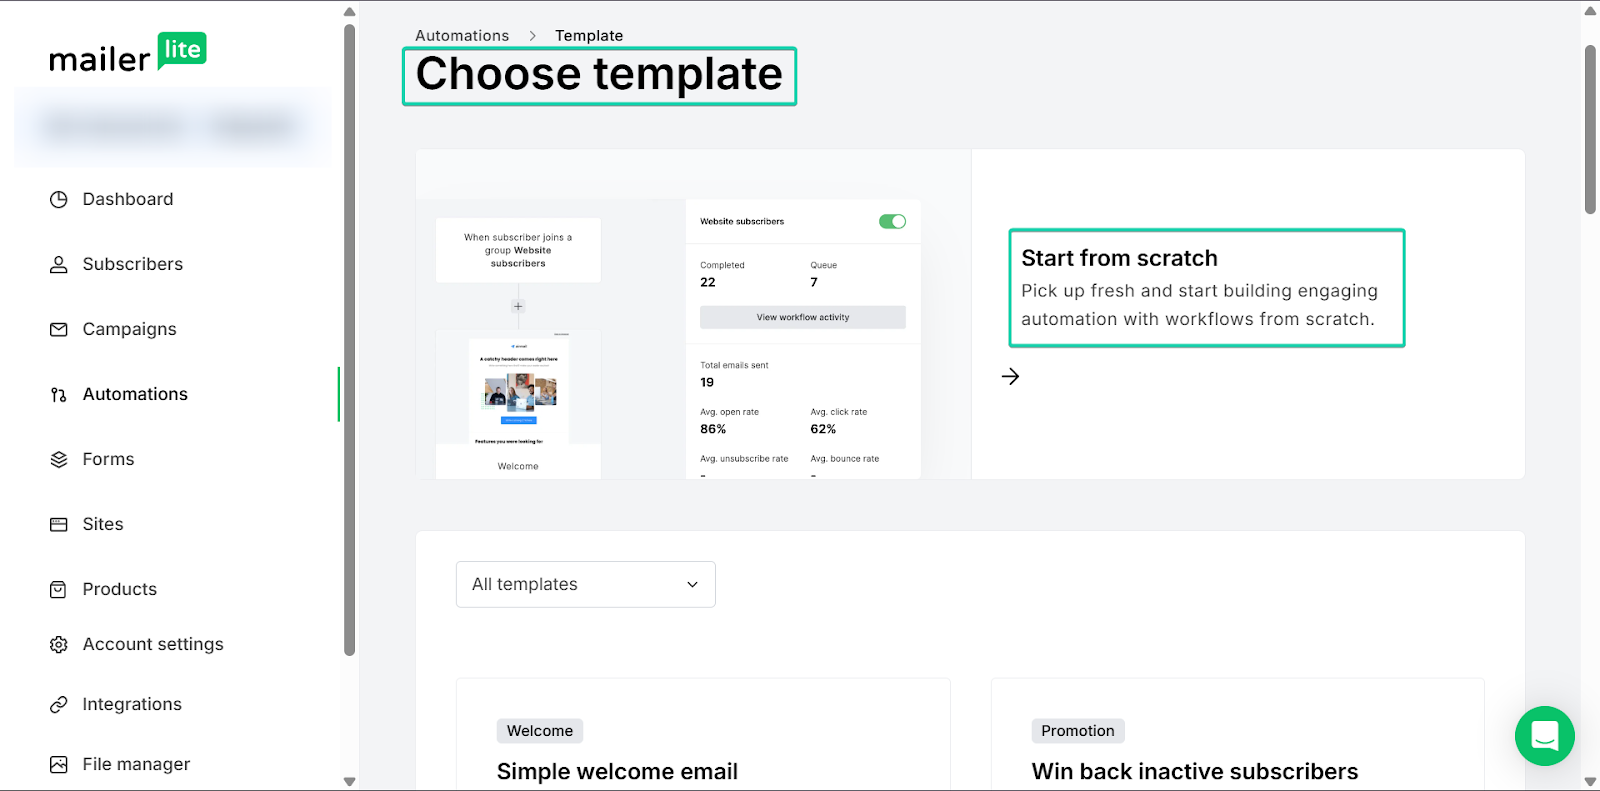
Go to “Automations” and click “Create.”
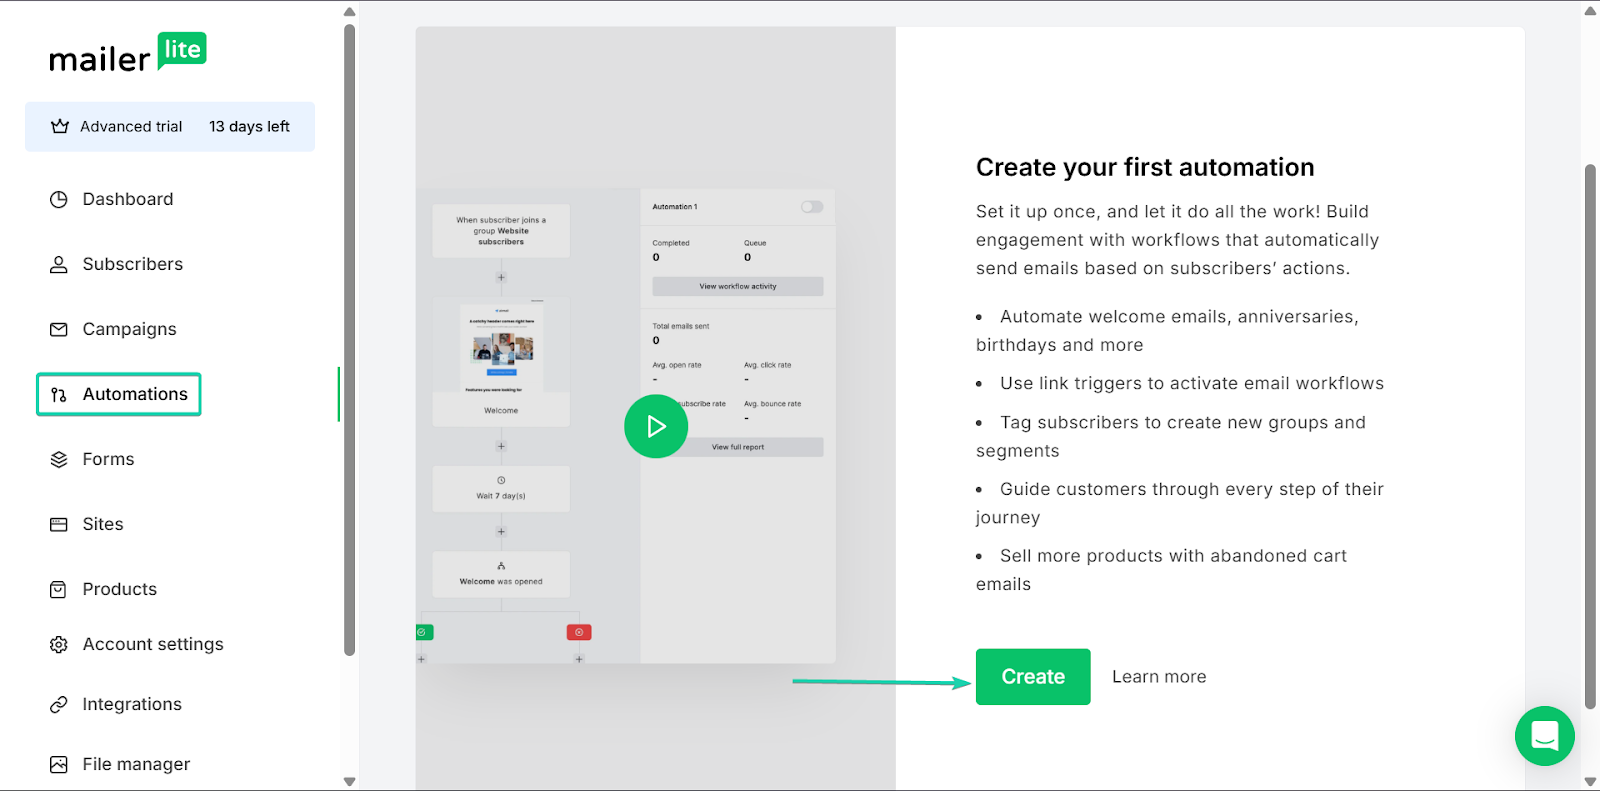
For automations, you can either work with a template or start from scratch.
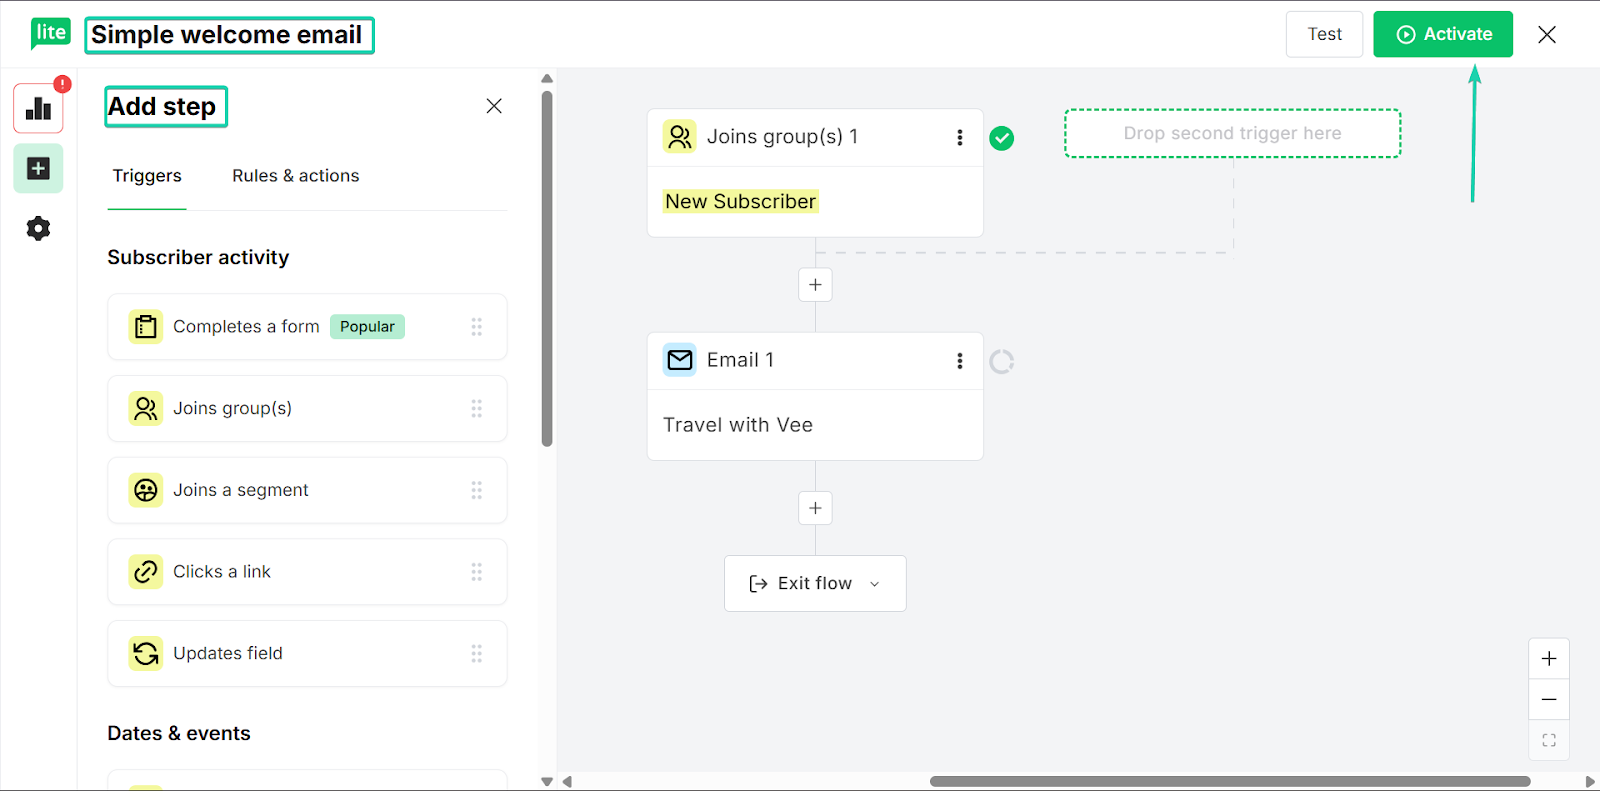
You can create simple workflows with triggers/rules and actions. For example, this workflow intends to automatically send simple welcome messages to new subscribers.
You can add more triggers, rules, and actions. Then, click “Activate” when you’re done, and it’ll start running.
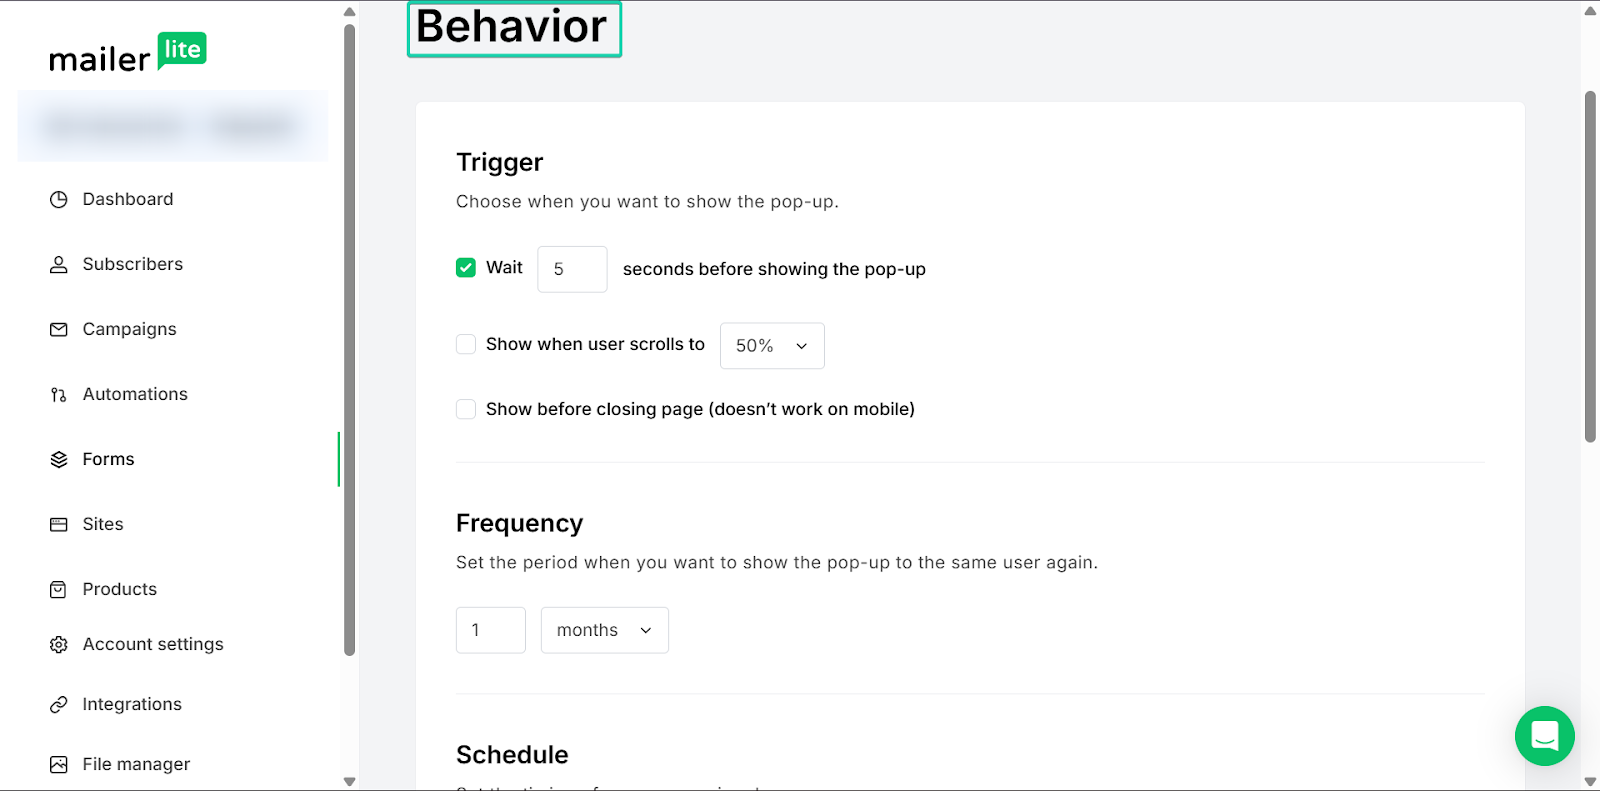
3. Forms
The forms feature helps you collect subscriber information from your website or landing pages.
You can create signup forms and connect them to your email list.
Let’s go on a walkthrough:
Under “Forms”, click “Create.”
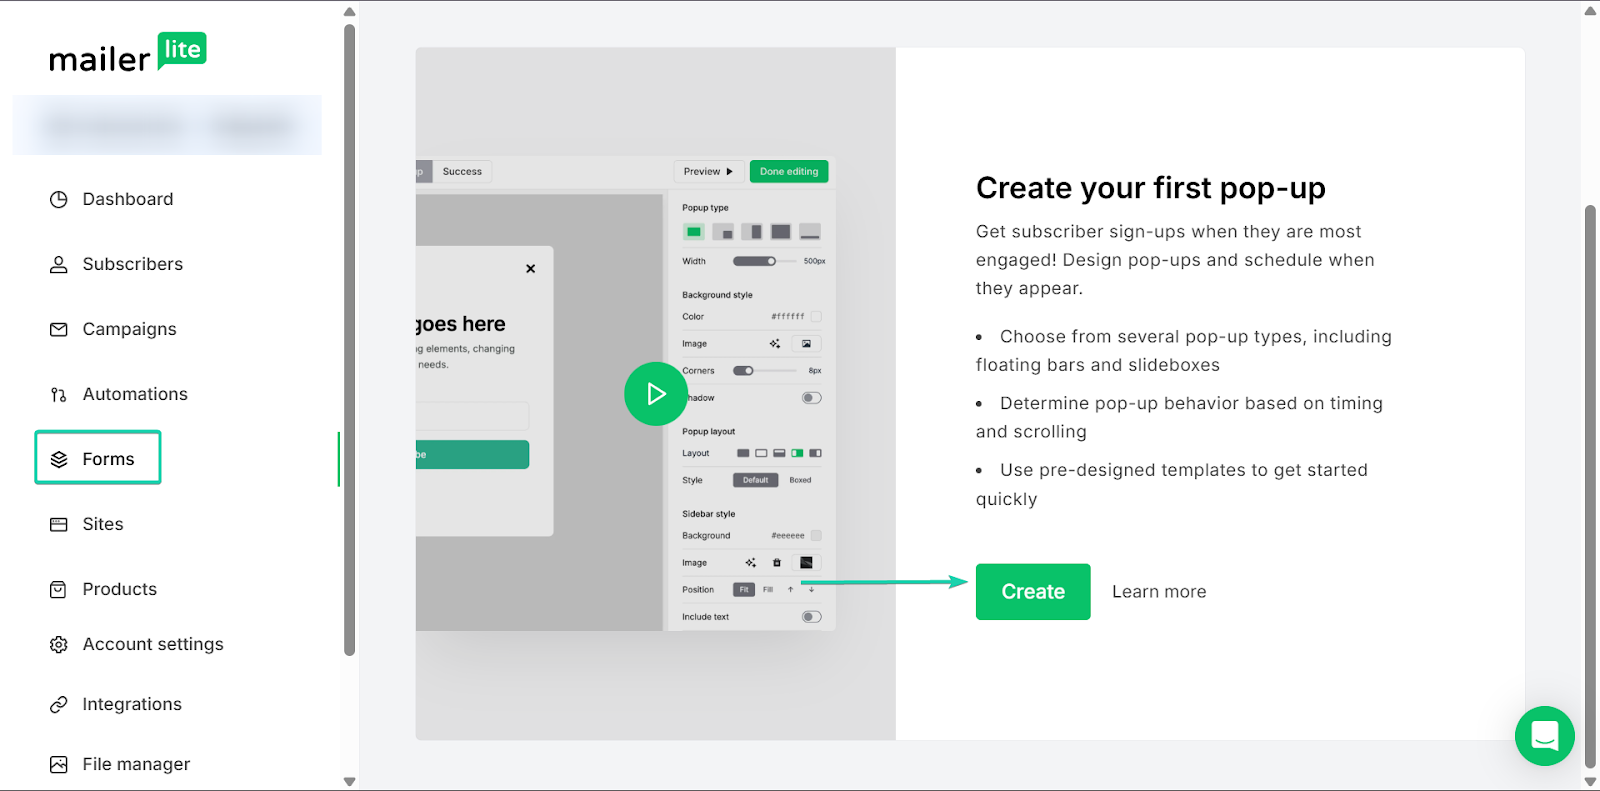
Next, fill out the form details and type.
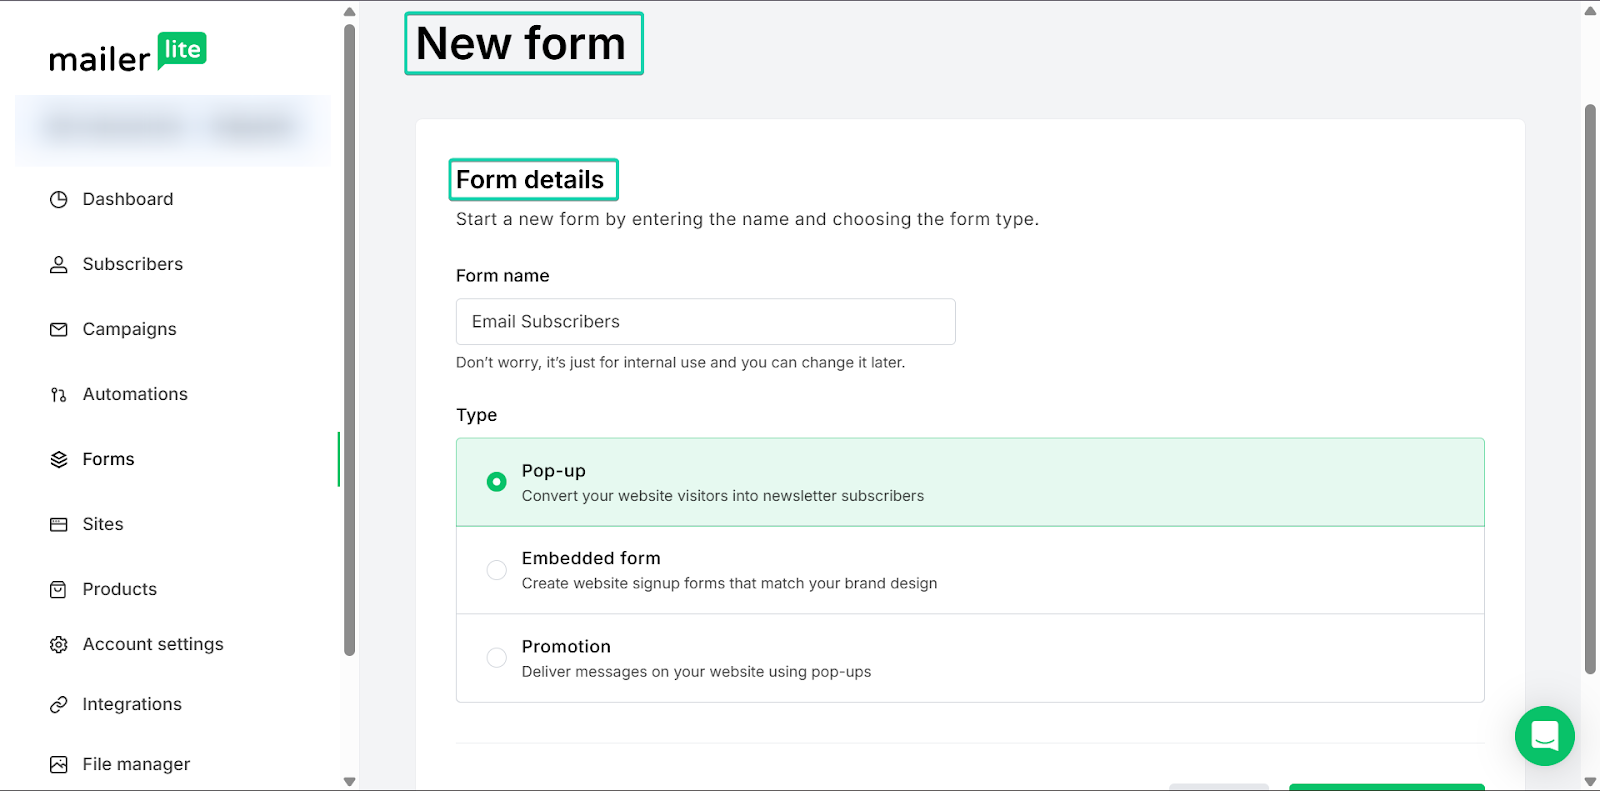
After that, you can choose a template or build a form from scratch.
Click “Done editing” when you’re finished.

You can also choose when you want the form to appear on your website or landing page.
[fs-toc-omit]What I loved vs what I struggled with
What I loved 👍
✅ Beginner-friendly and easy to use
✅ Has a generous free plan with unlimited monthly emails
✅ Great tool for growing and engaging an audience
What I struggled with 👎
❌ Templates are only available on a premium plan
[fs-toc-omit]Best for
- Beginner bloggers who want to build an email list.
[fs-toc-omit]Pricing
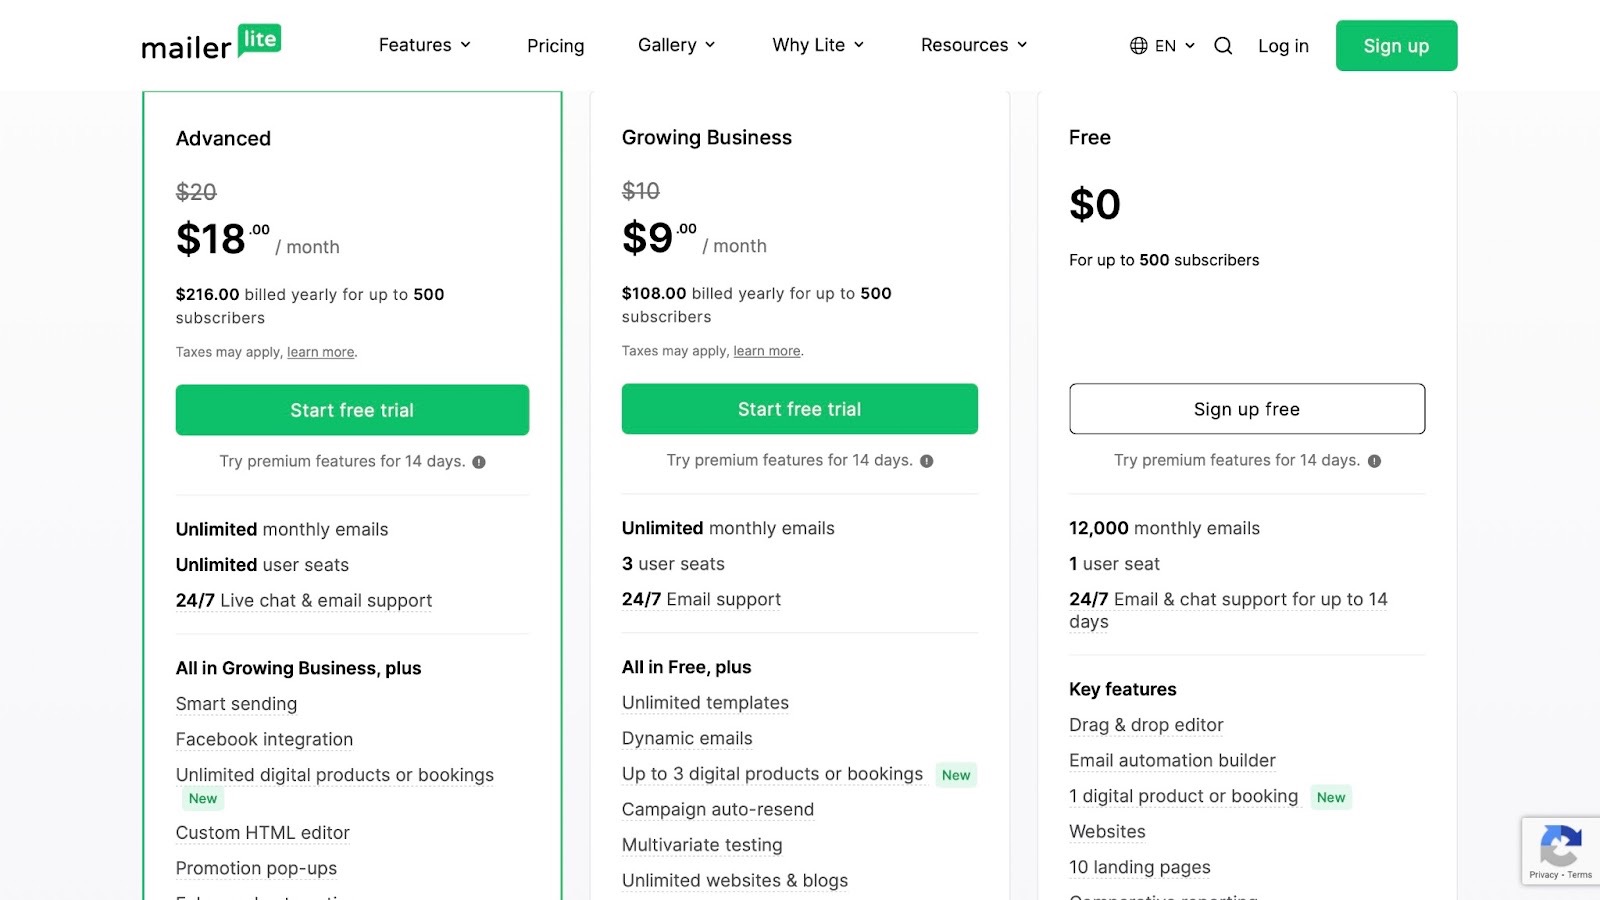
- Free: $0/month
- Growing Business: $9/month
- Advanced: $18/month
5. Fillout - Best for building forms
We’ve got Fillout next on this list of the best blogging tools.
Fillout is a form builder that helps you collect data and manage responses all in one place. It’s great for capturing leads, conducting surveys, and organizing information.
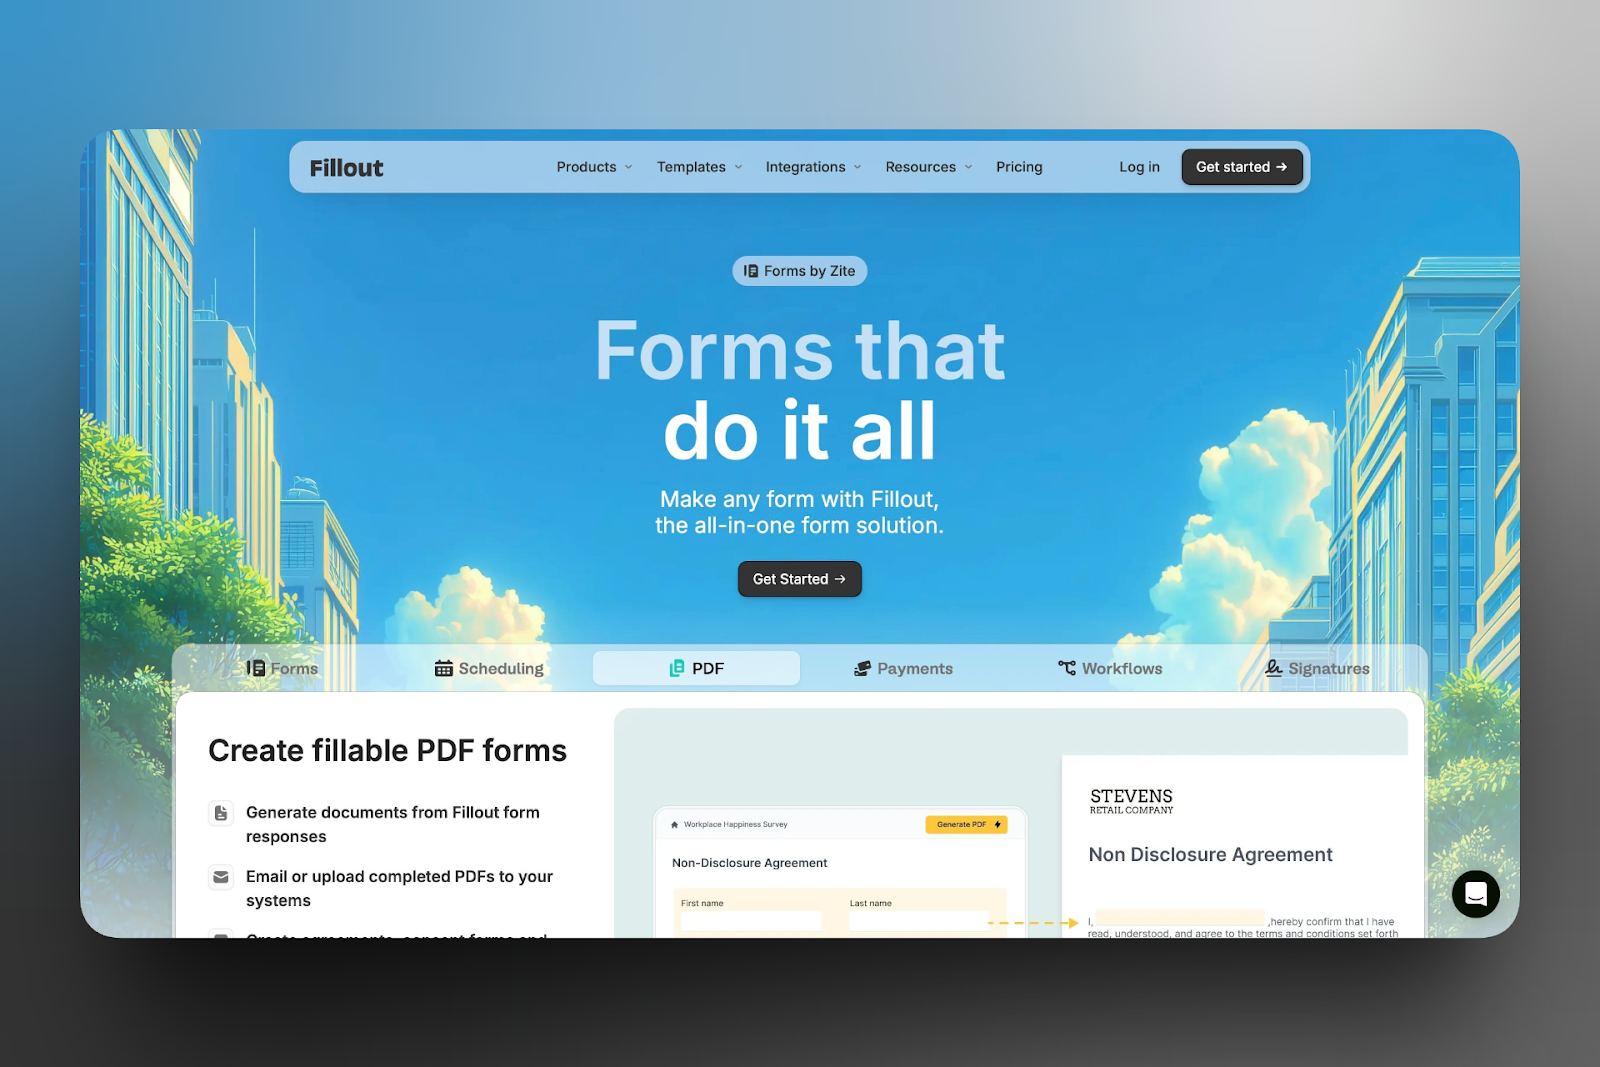
With Fillout, you can create customizable forms to collect information from new and existing subscribers.
You can also use the database feature to store and organize all your information.
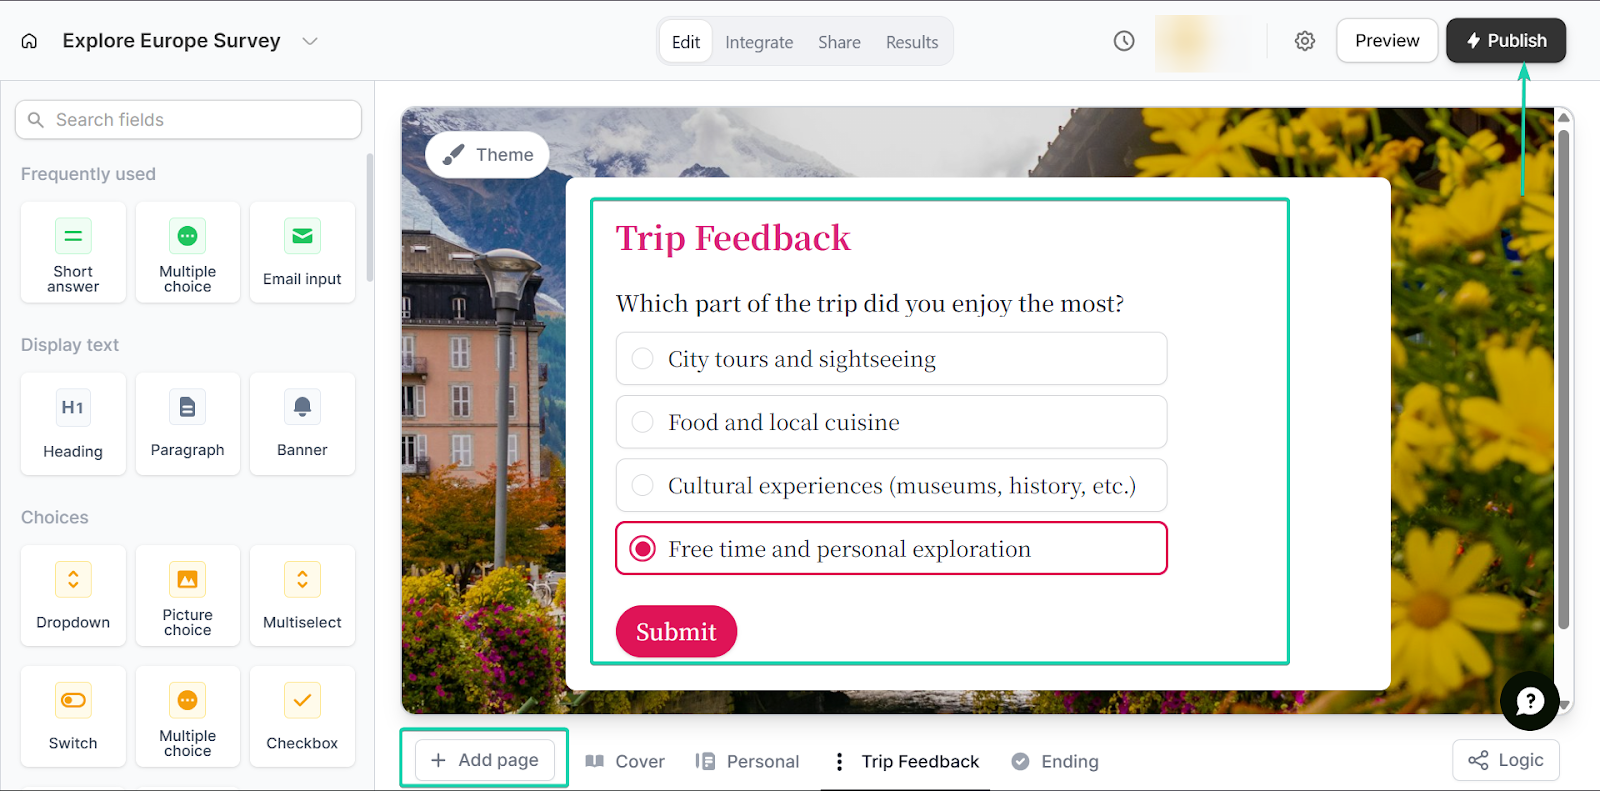
And finally, the scheduling feature lets you book appointments.
[fs-toc-omit]What I loved about Fillout
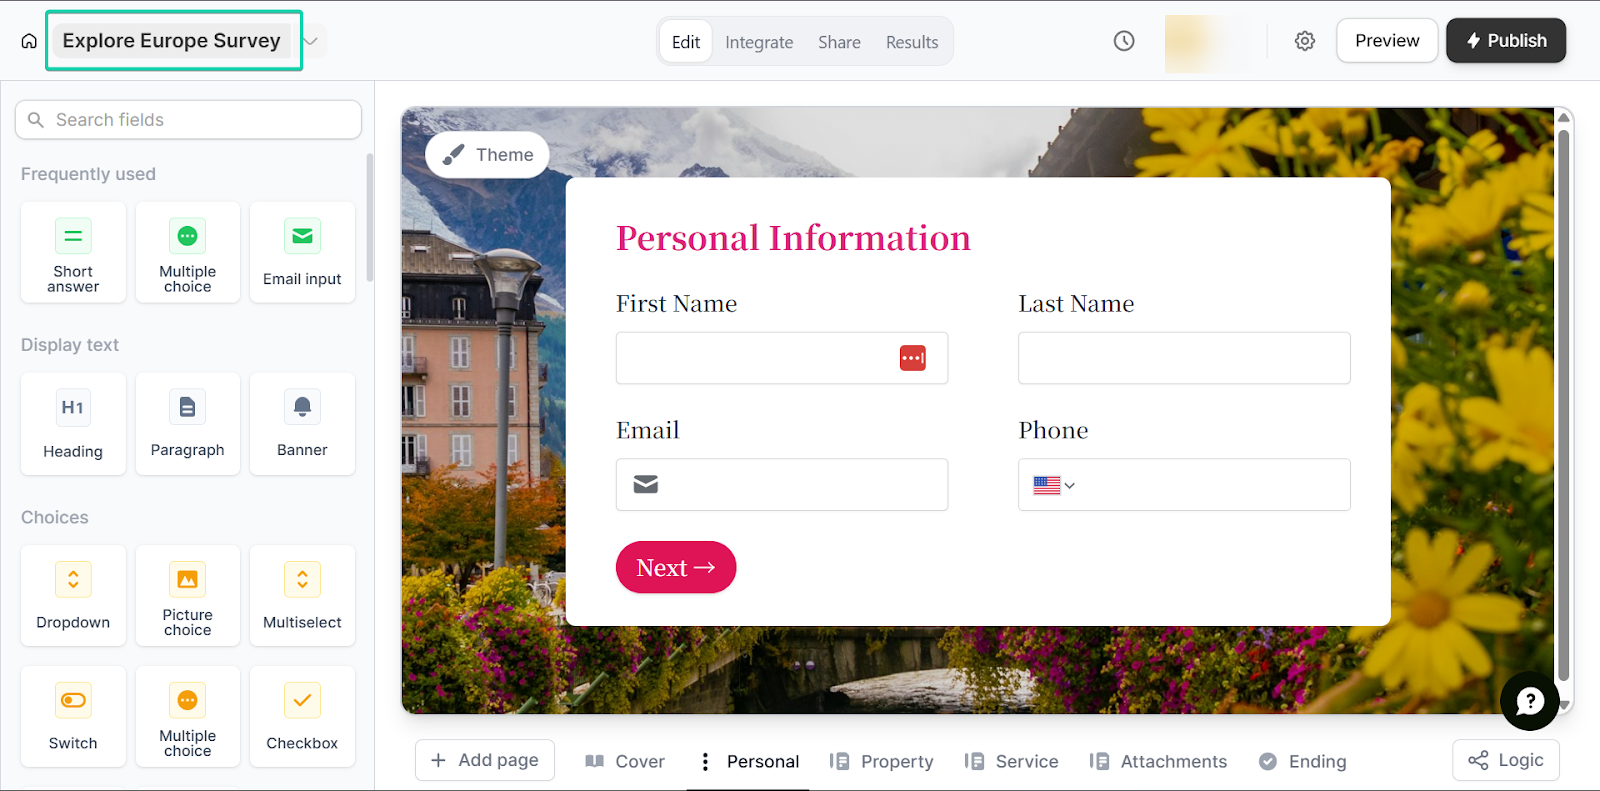
1. Form
Form lets you collect information from your audience, whether it’s email signups, feedback, or inquiries.
You build a form using different fields (text, email, multiple choice, etc.) and share it via a link or embed it on your site.
Let’s see how it works:
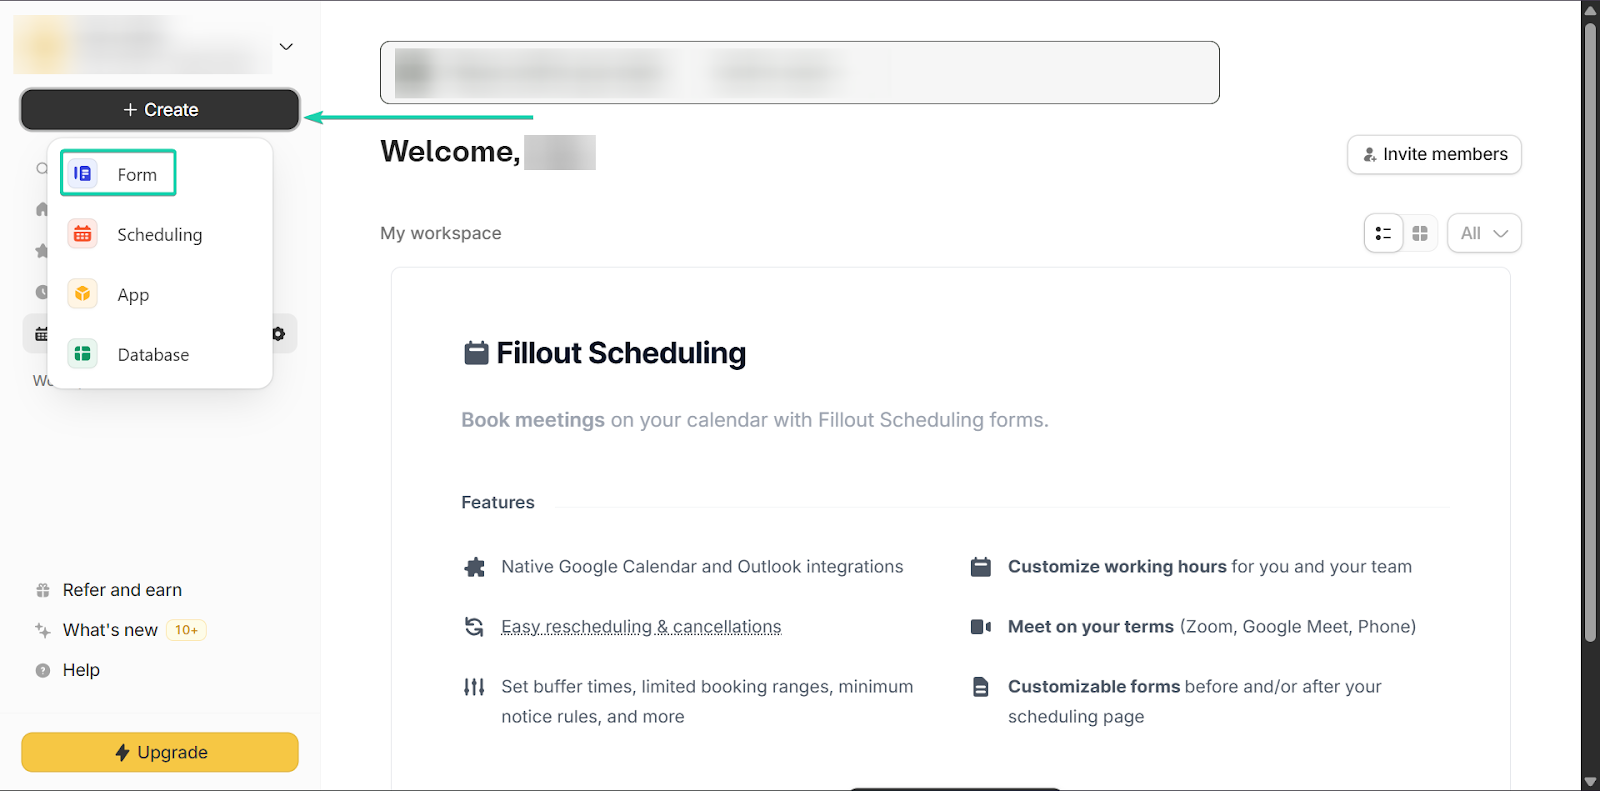
Head to “+ Create” and select “Form.”
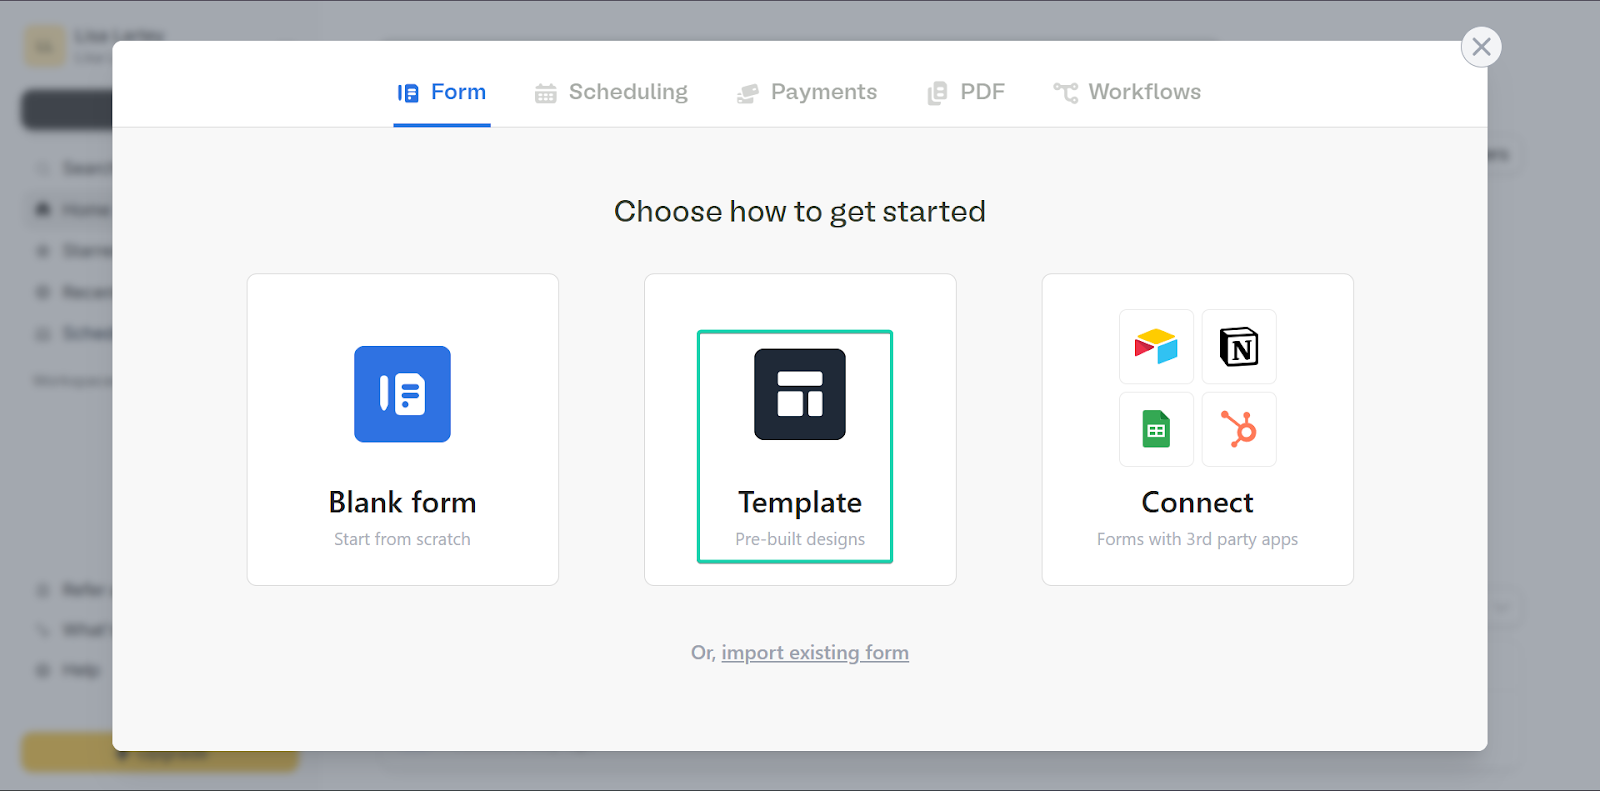
Next, you can choose whether you want to create a form from scratch, with a template, or with a third-party app.
Once you’re done, you can edit the form to fit your branding.
It’s a relatively simple and quick way to create forms thanks to Fillout’s drag-and-drop editing tool.
When you’re done, click “Publish.”
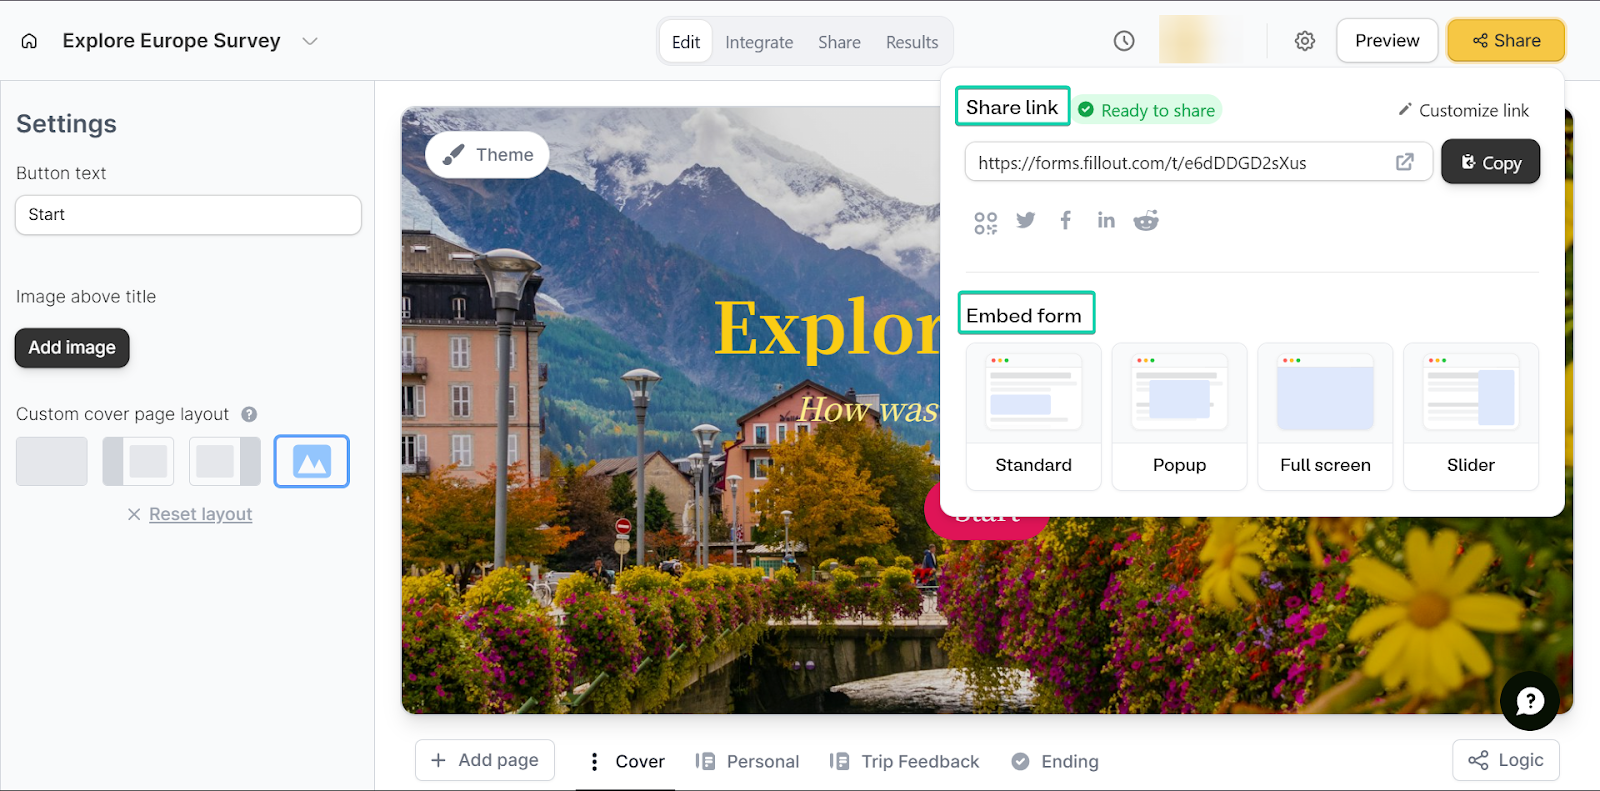
You can share the link to your form or have it embedded on your website.
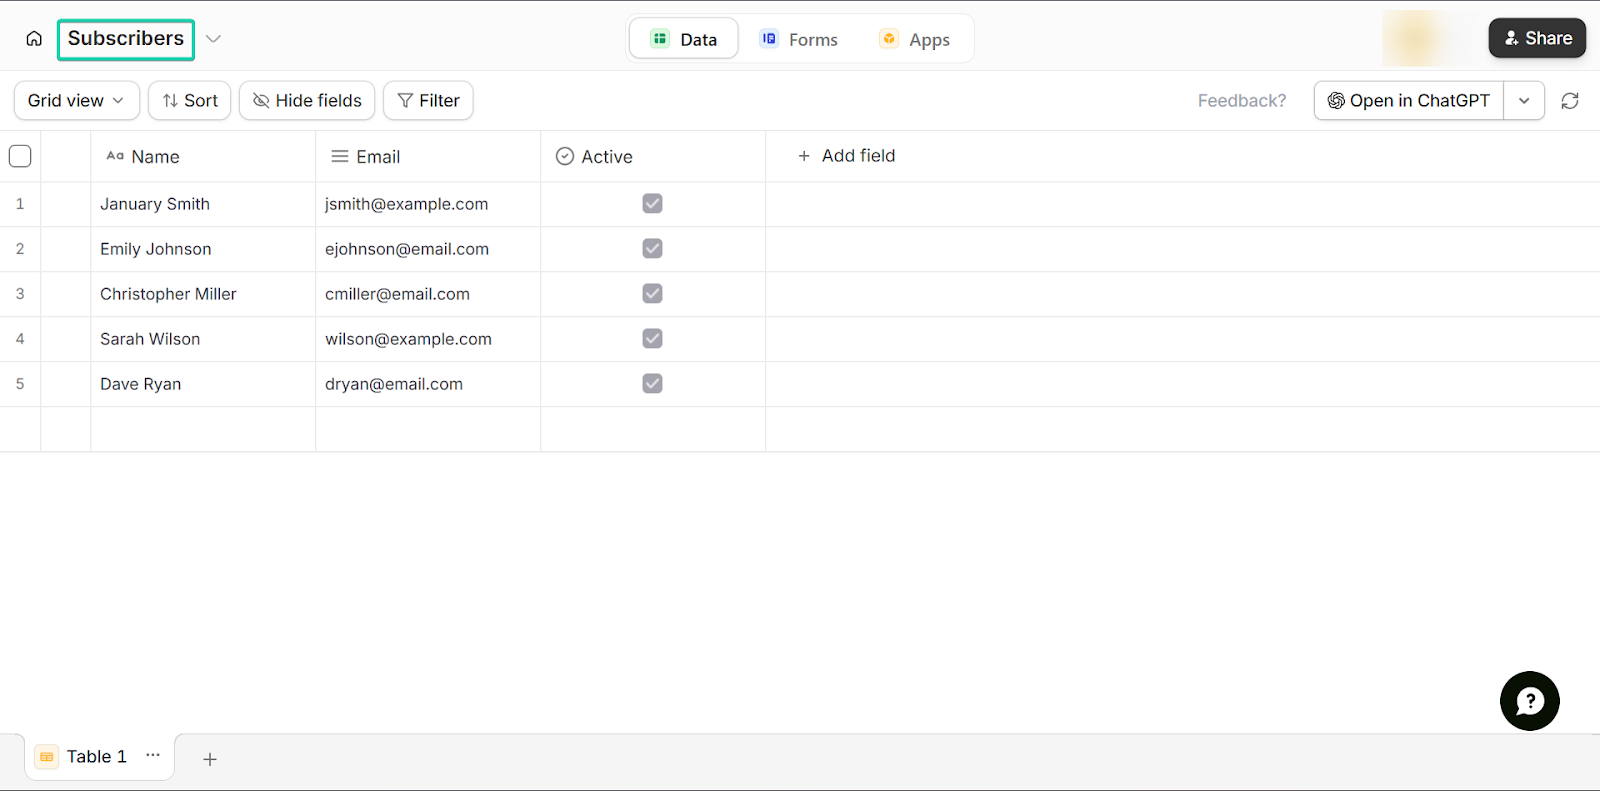
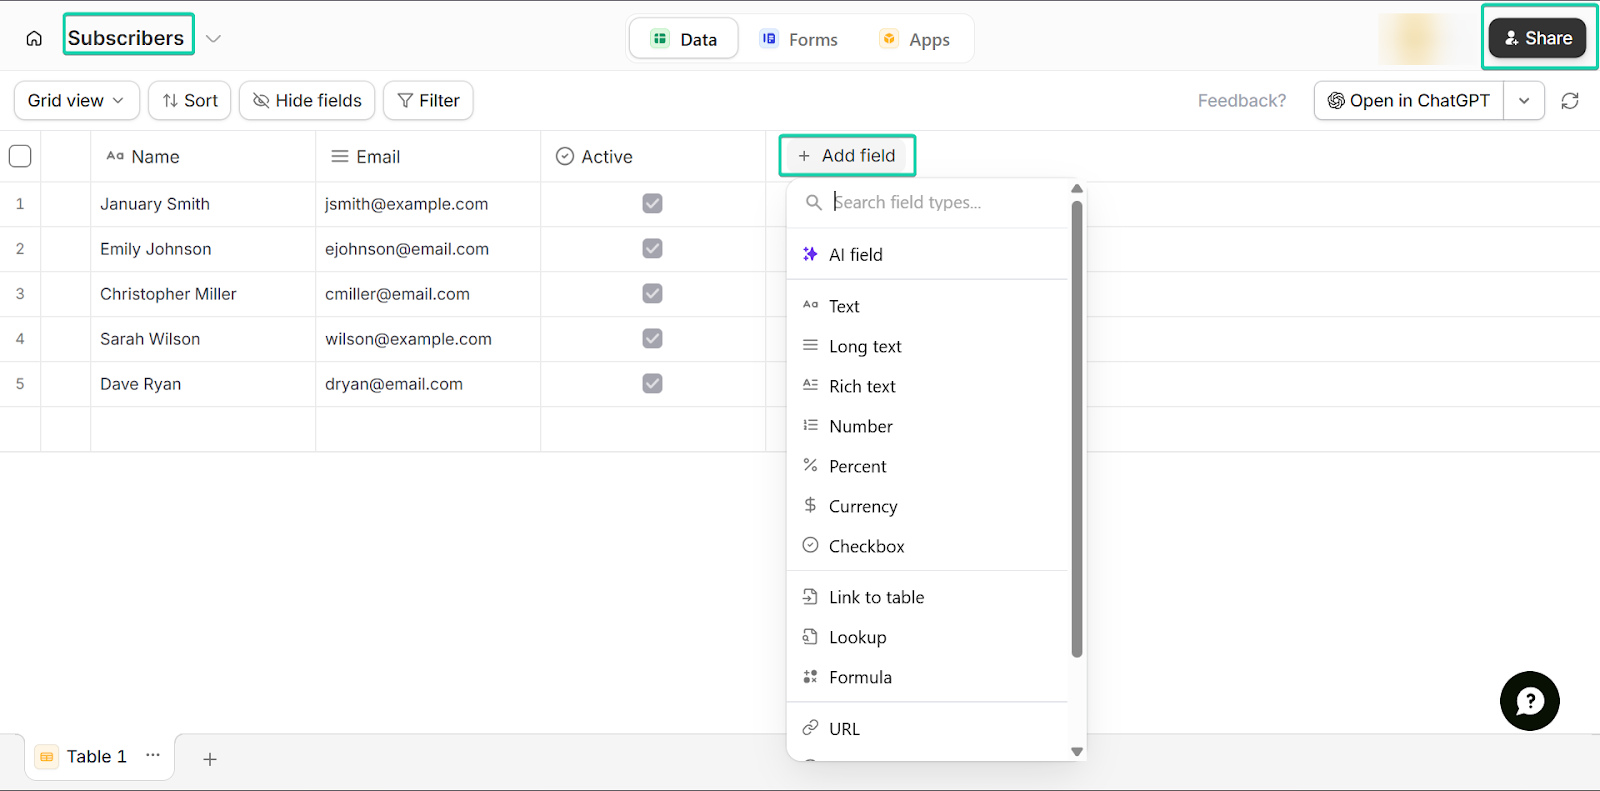
2. Database
The database feature stores all your information in a structured and organized format.
You can view, filter, and arrange the data in one place.
Here’s a brief walkthrough:
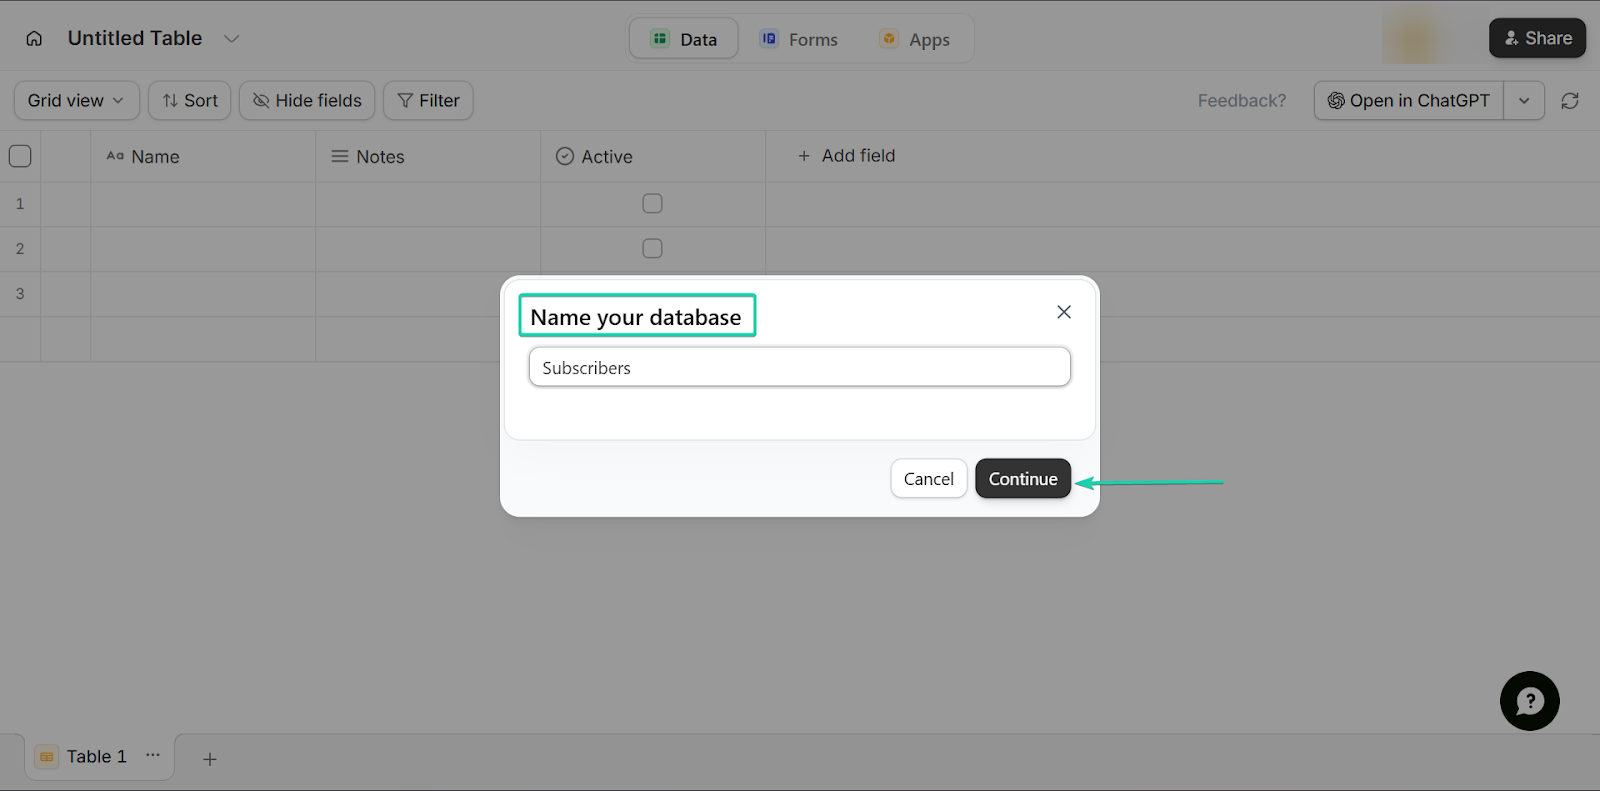
Head to “+ Create” and select “Blank database.”
You can build one from scratch or import your data from a third-party source.

After that, you give your database a name. Click “Continue.”
You can store all kinds of information with these features. And you can add more fields whenever you have more information to include.
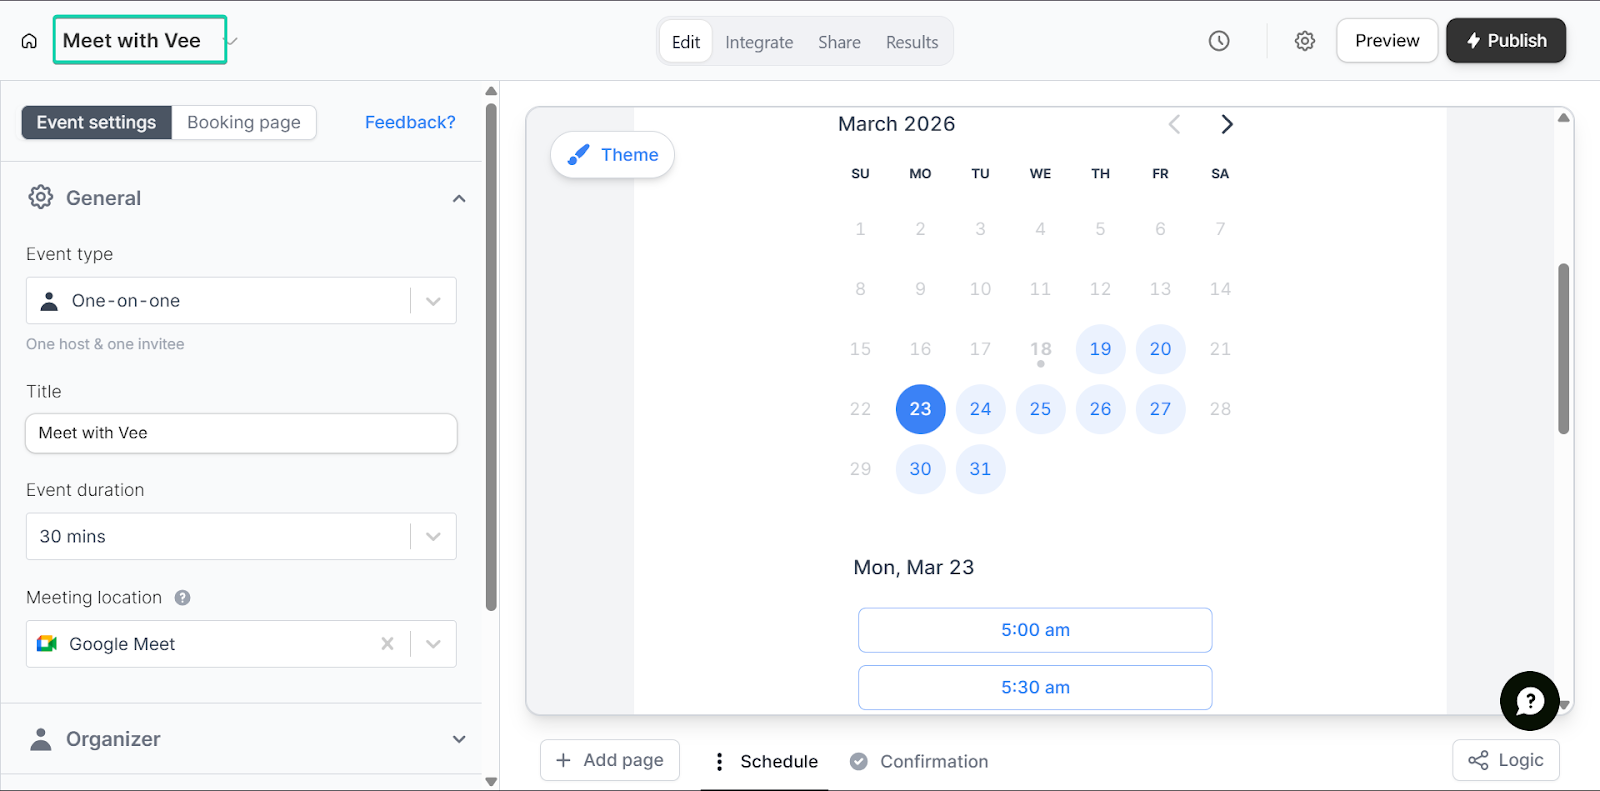
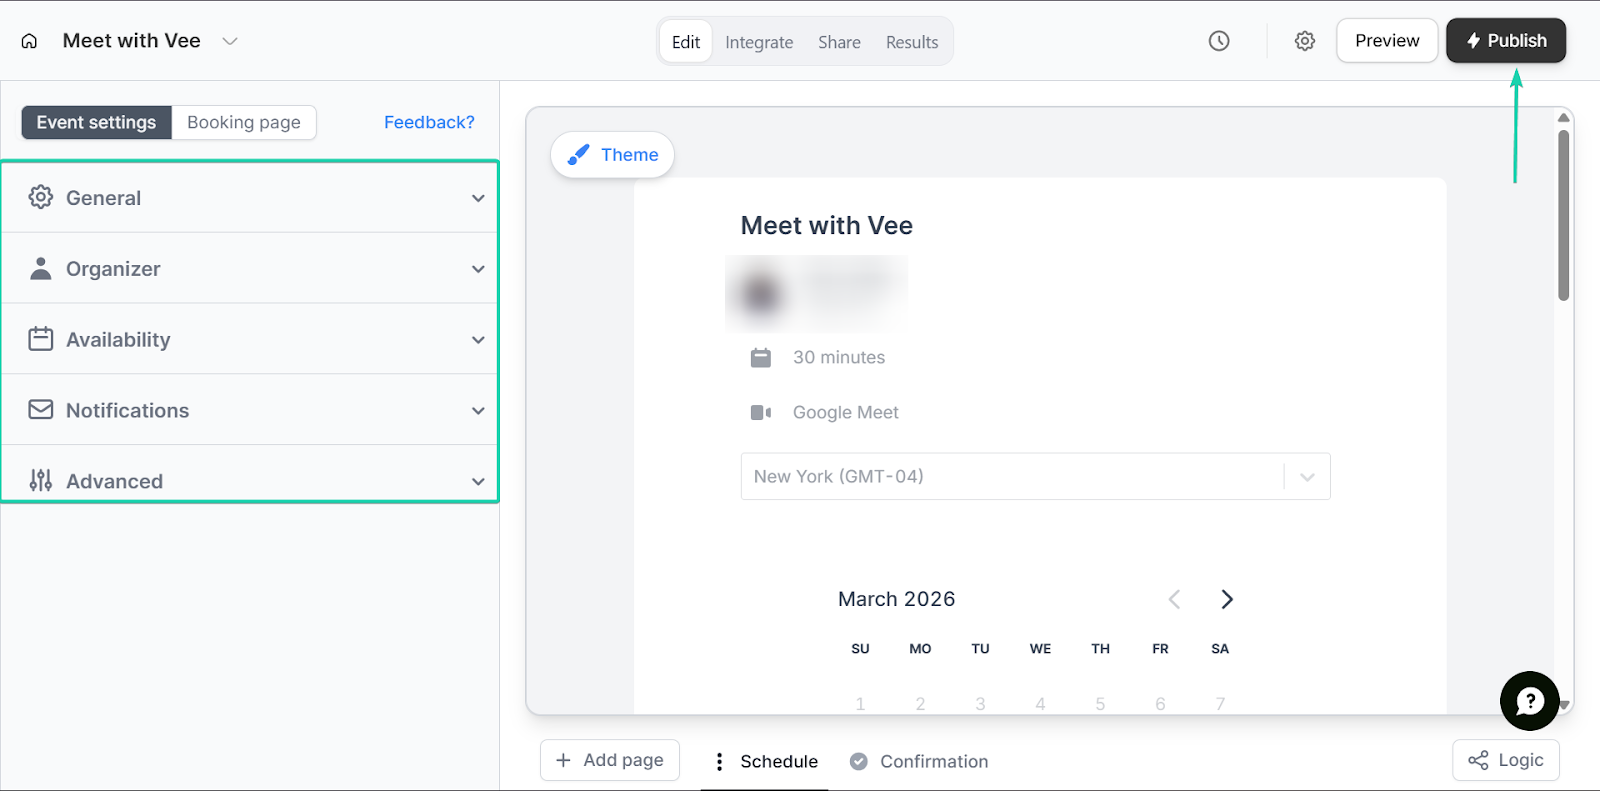
3. Scheduling
The scheduling feature lets users book time with you directly through a form. So, you can set your availability, and your followers can choose a time slot that works for them.
Let’s check it out:
Under “+ Create”, go to “Scheduling.”
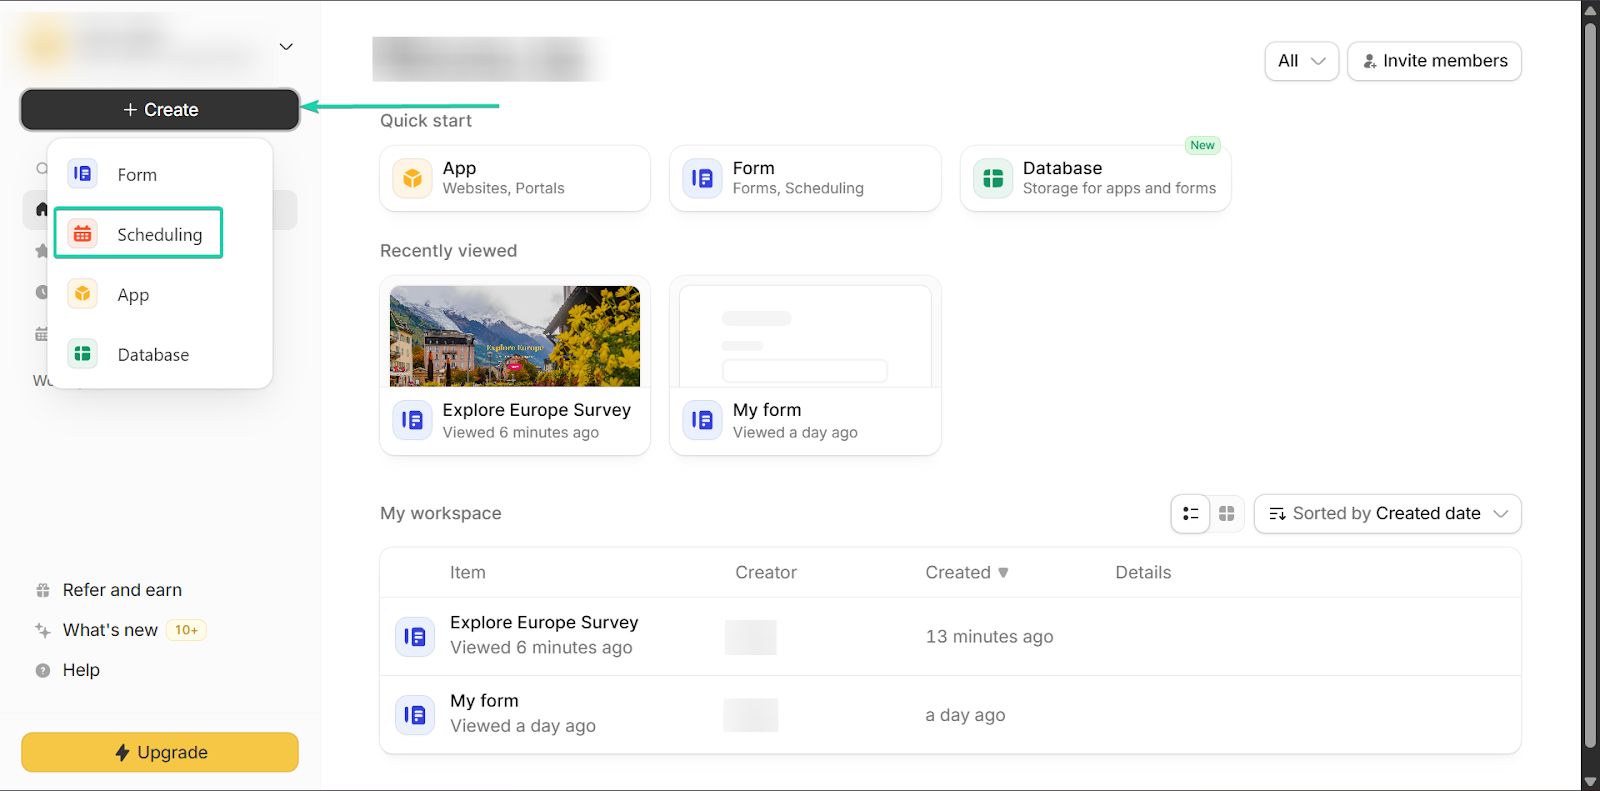
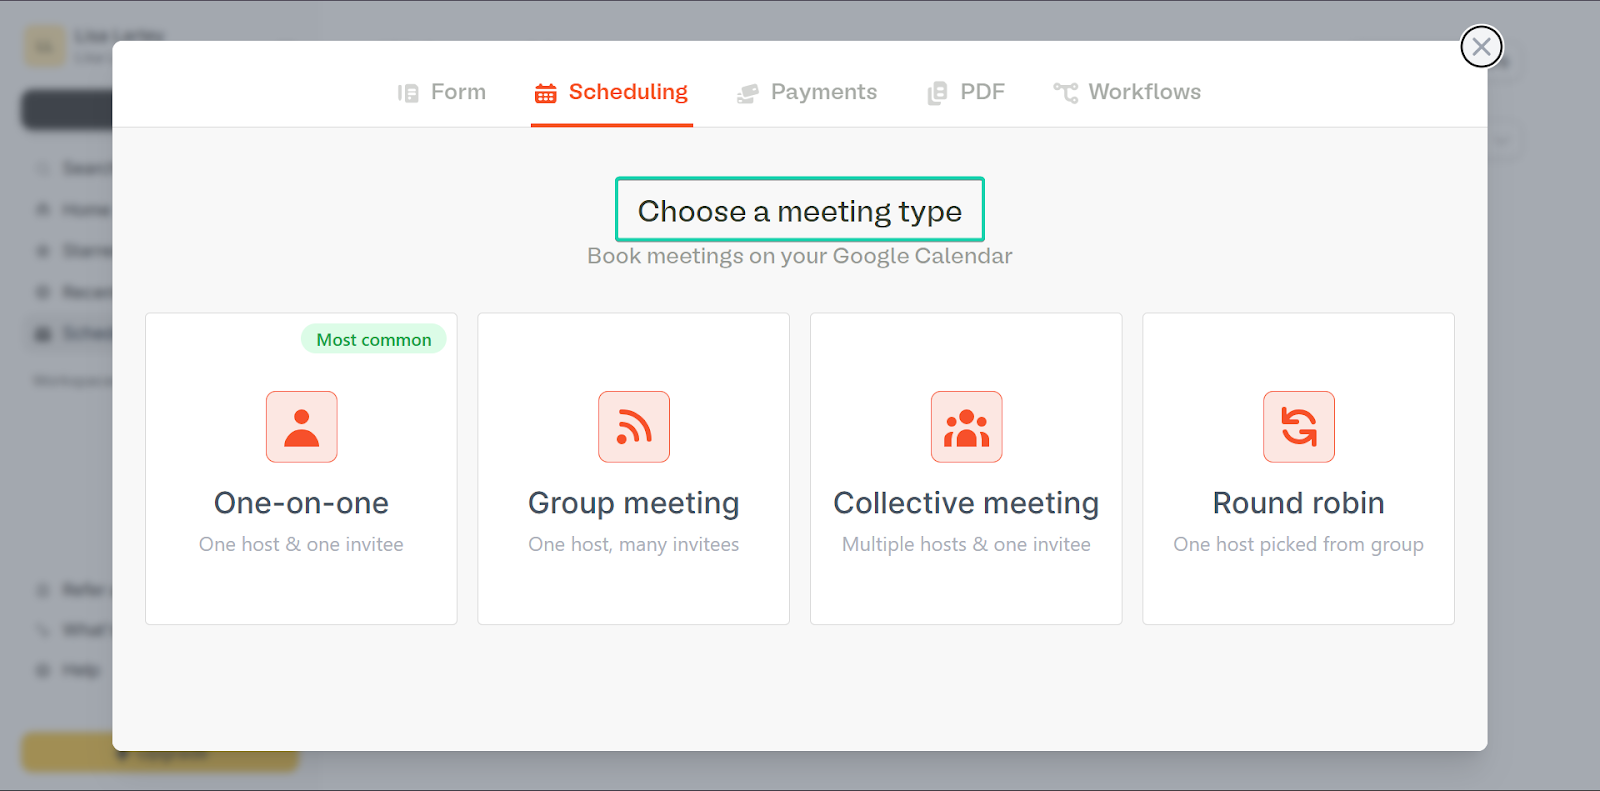
Next, choose the meeting type.
Fillout offers 4 types.
After that, fill out the meeting details and click “Create.”
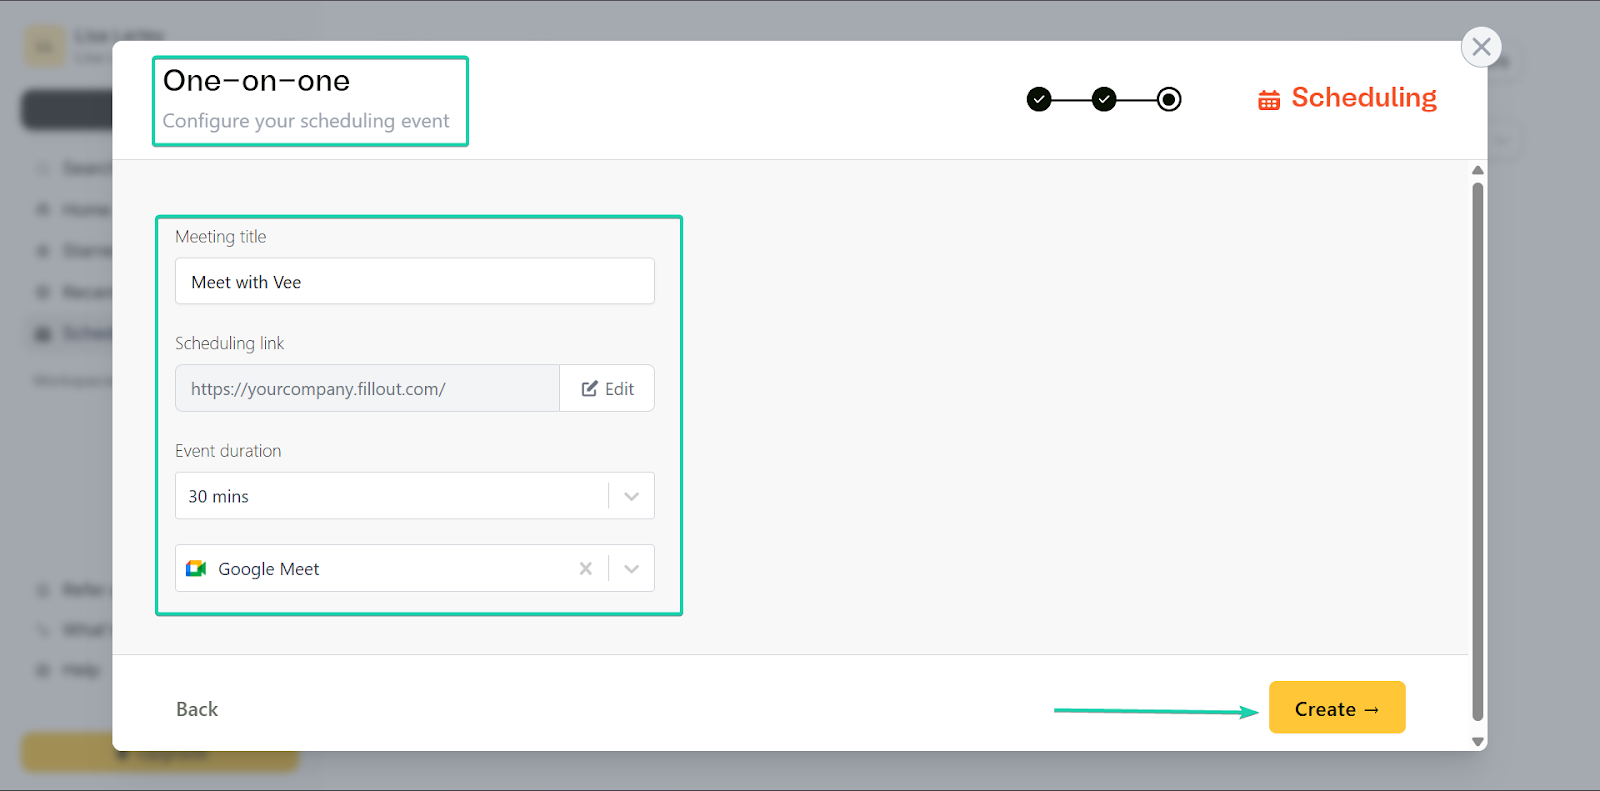
You can set who the event organizer is and your availability.
You can also set reminders in advance.
[fs-toc-omit]What I loved vs what I struggled with
What I loved 👍
✅ Easy-to-use and flexible form builder
✅ Has an intuitive drag-and-drop tool for non-tech users
✅ Combines forms, data, and meetings in a single platform
What I struggled with 👎
❌ It has fewer advanced features compared to enterprise form tools
[fs-toc-omit]Best for
- Small businesses that want a simple way of managing customer enquiries
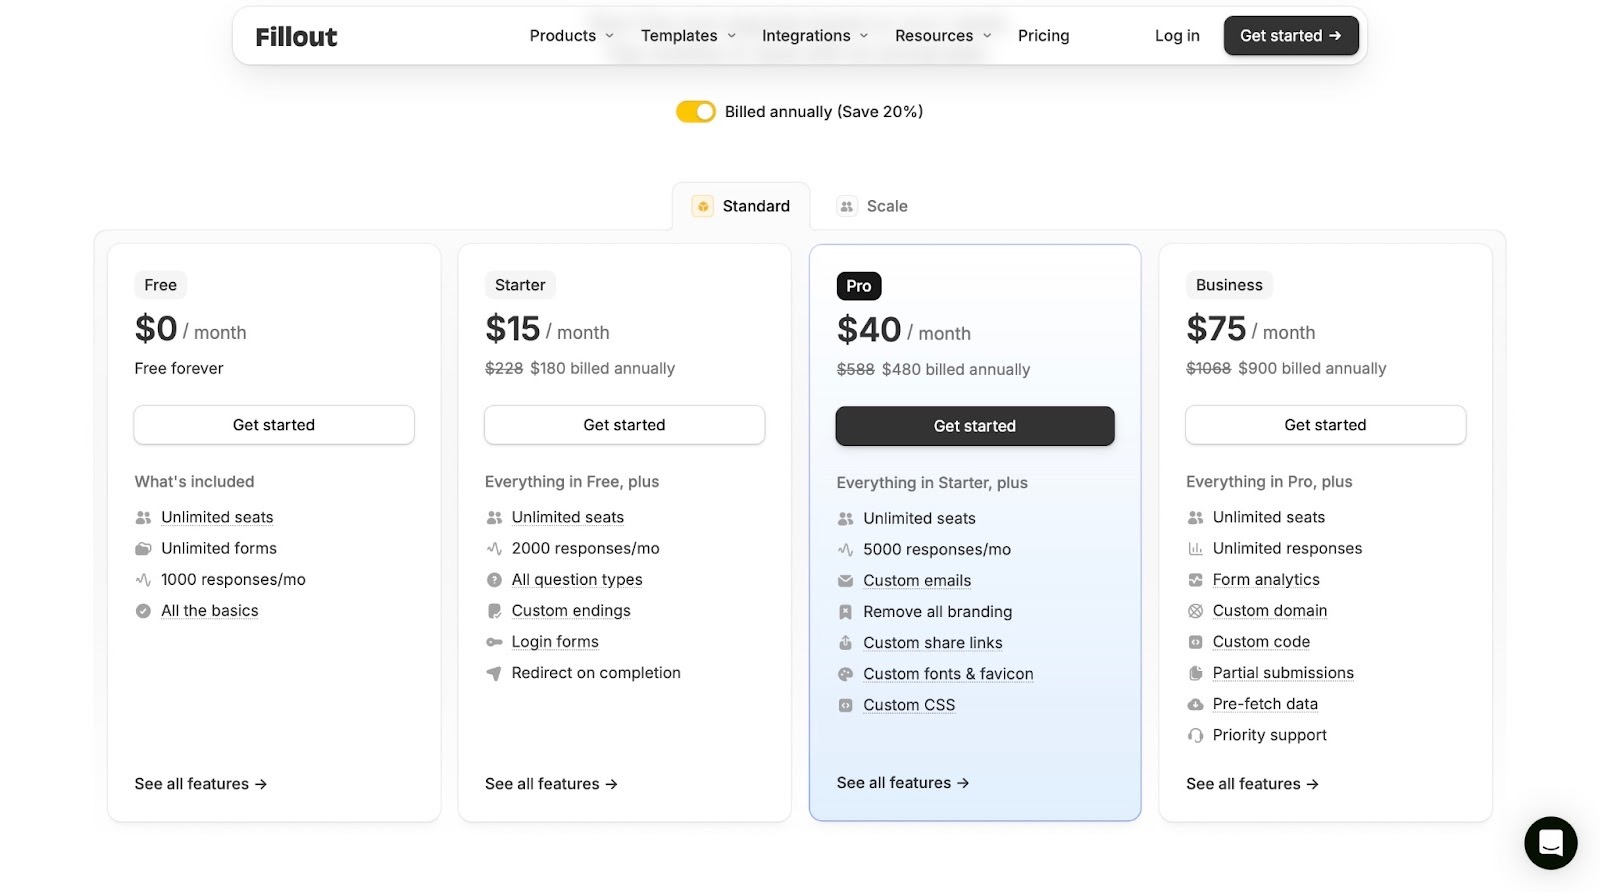
[fs-toc-omit]Pricing
- Free: $0/month
- Starter: $15/month
- Pro: $40/month
- Business: $75/month
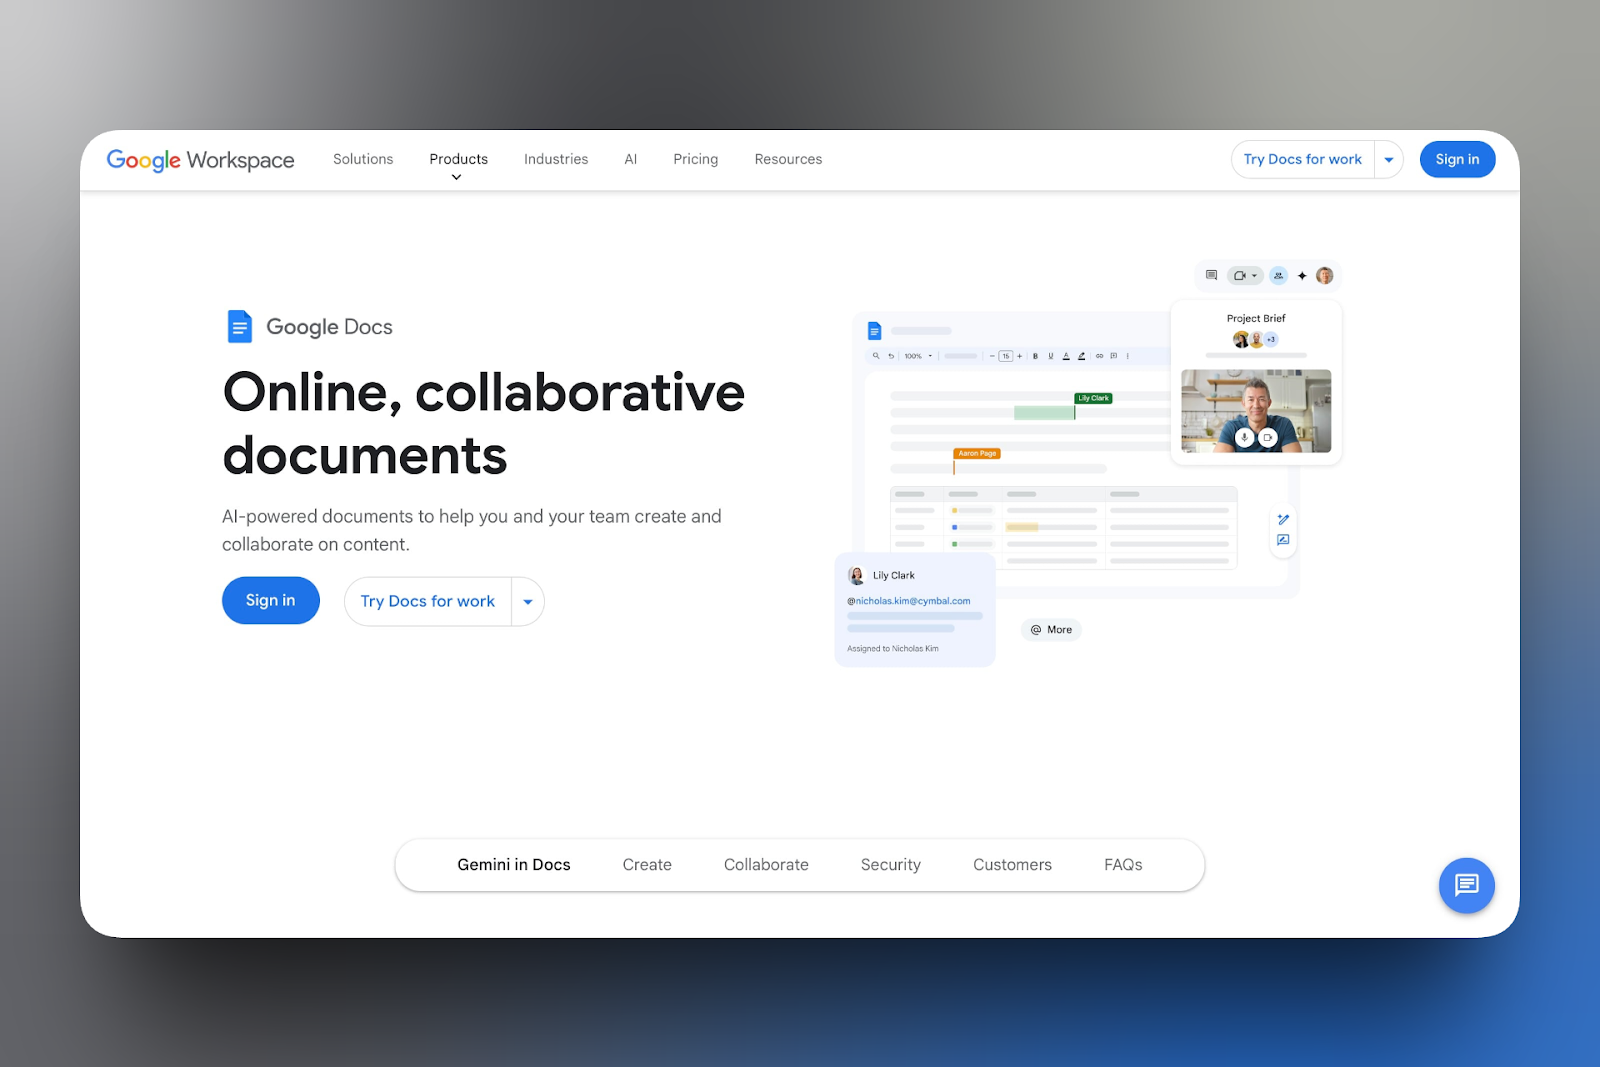
6. Google Docs - Best for writing and collaboration
Google Docs comes next on my list of best blogging tools.
Google Docs is a cloud-based word processing tool that lets you create, edit, and collaborate on documents in real time.
It’s free for anyone with a Google Account, making it a must-have tool for writers working with editors or customers. But it’s also on a paid collaboration platform, Google Workspace.
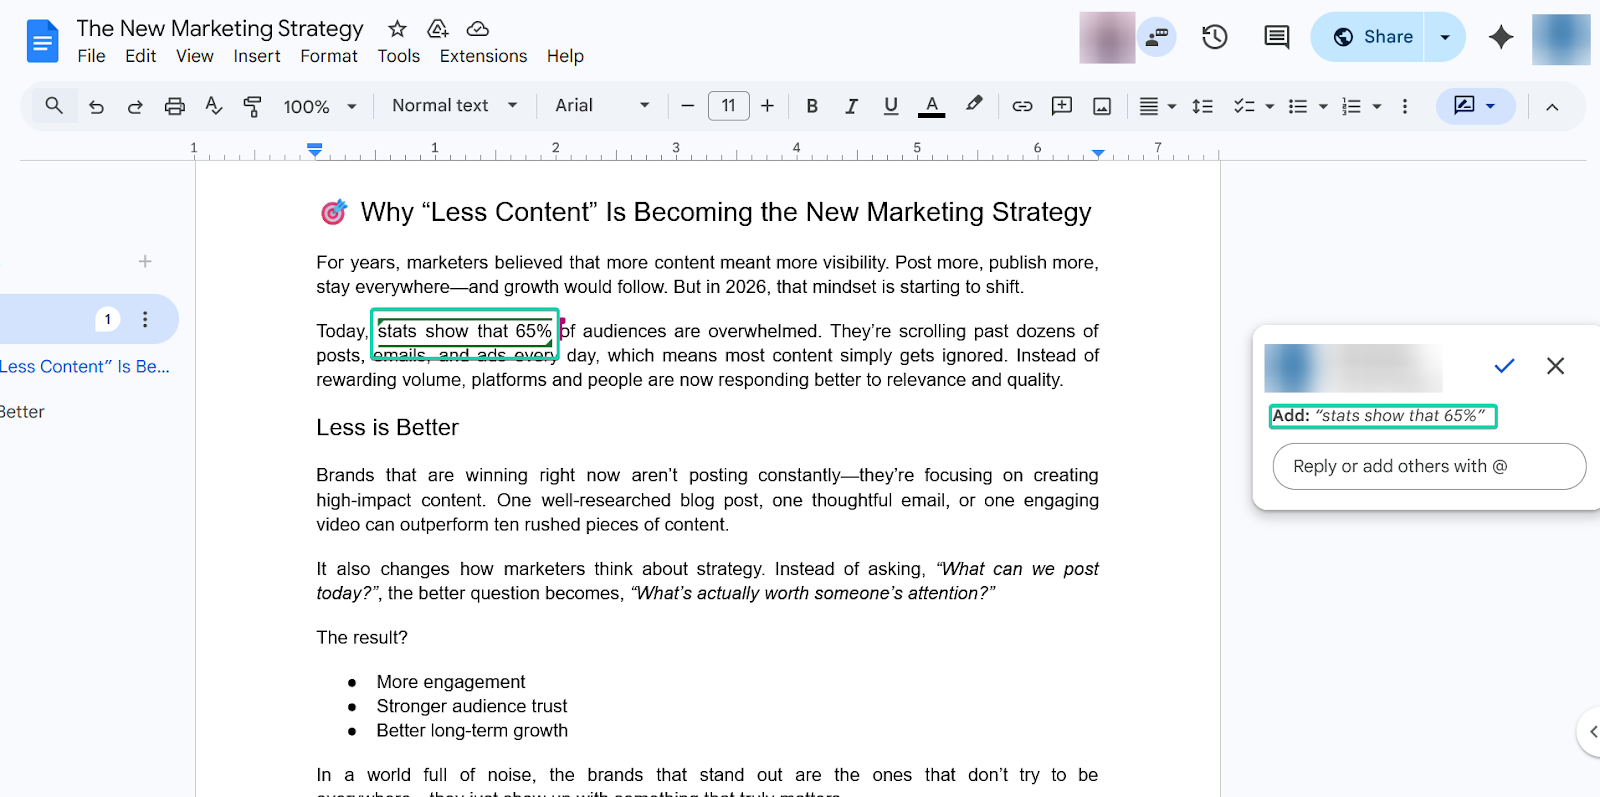
Google Docs makes collaboration simple with its comments feature, which lets users leave feedback and notes on documents.
With the suggestion mode feature, you can edit content without permanently changing it.
And the insert image feature lets you add visuals directly to your document.
[fs-toc-omit]What I loved about Google Docs
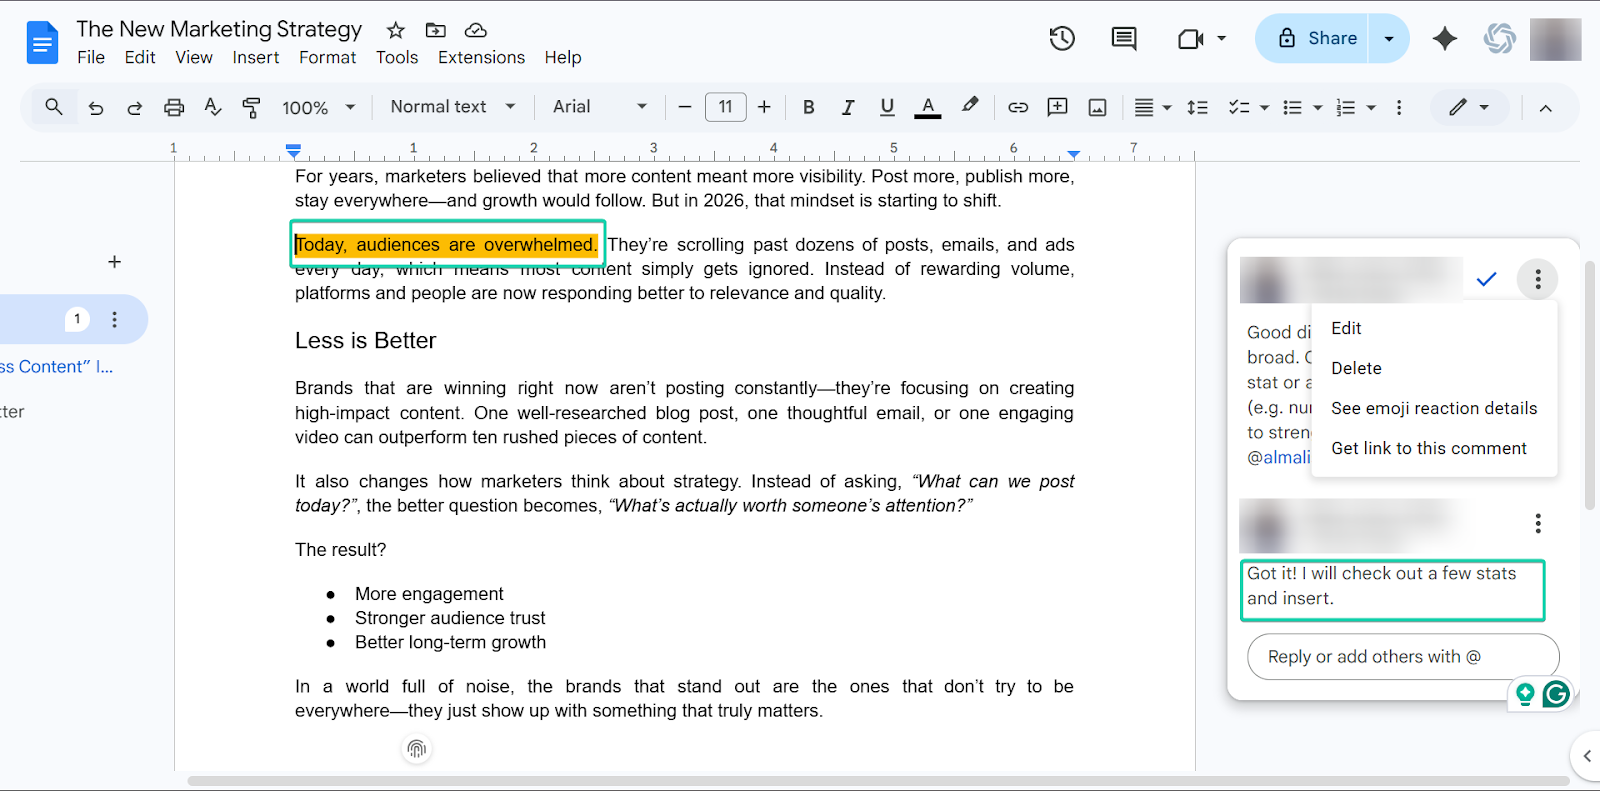
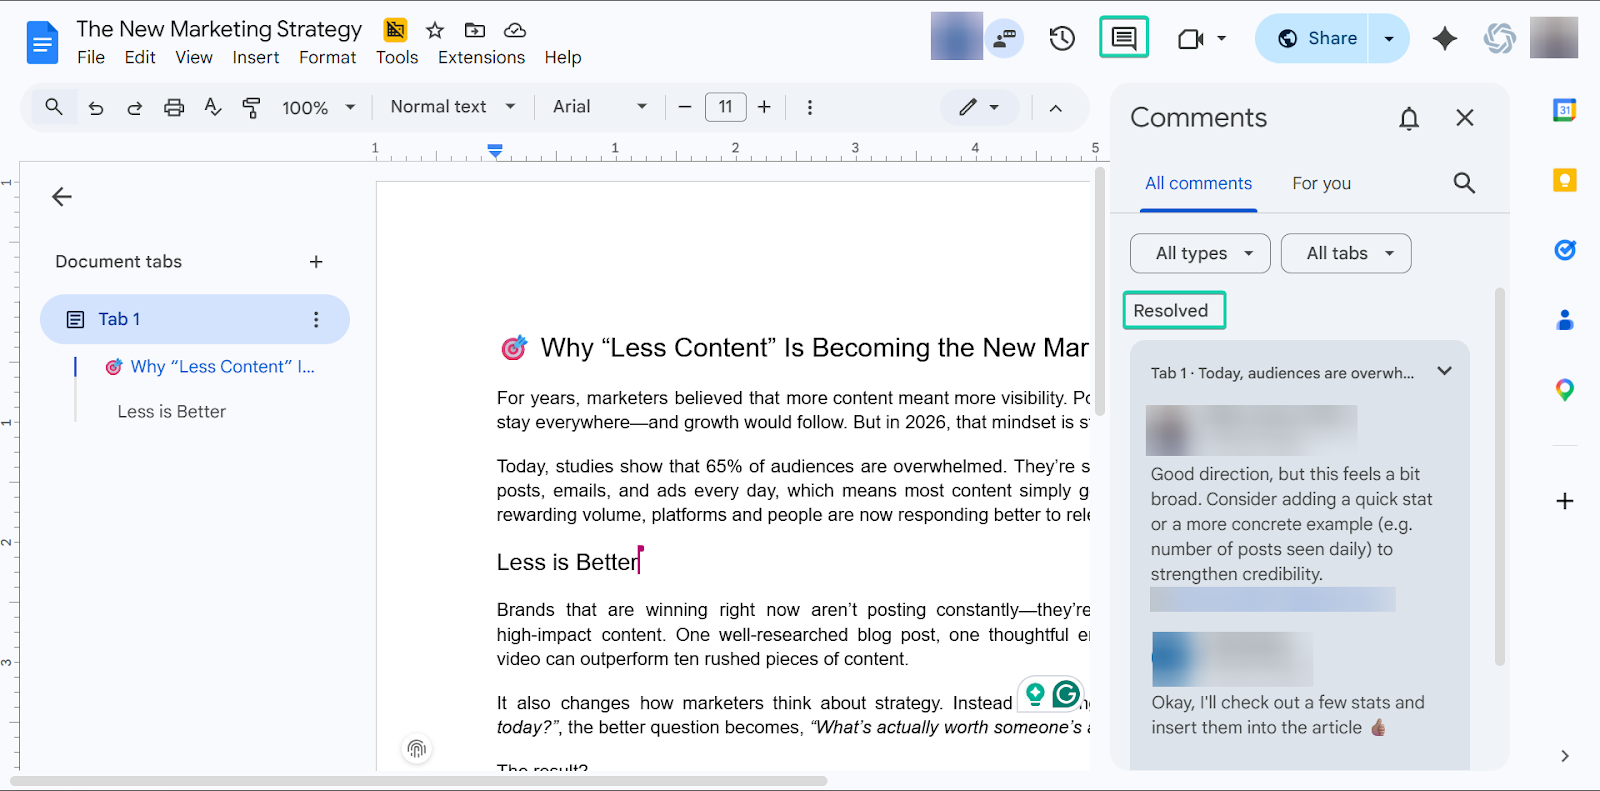
1. Comments
The comments feature lets you leave notes, questions, or feedback on specific parts of a document.
It works by highlighting text and adding a comment, which collaborators can reply to or resolve once addressed.
Here’s how it works:
First, head to Google Docs and start drafting your content.
Next, highlight the text you want to comment on and click the “add comment” button.
You can also right-click the highlighted comment and in the pop-up menu, select “comment.”
Be sure to tag and assign tasks to specific collaborators, so that they receive notifications and can reply on time.
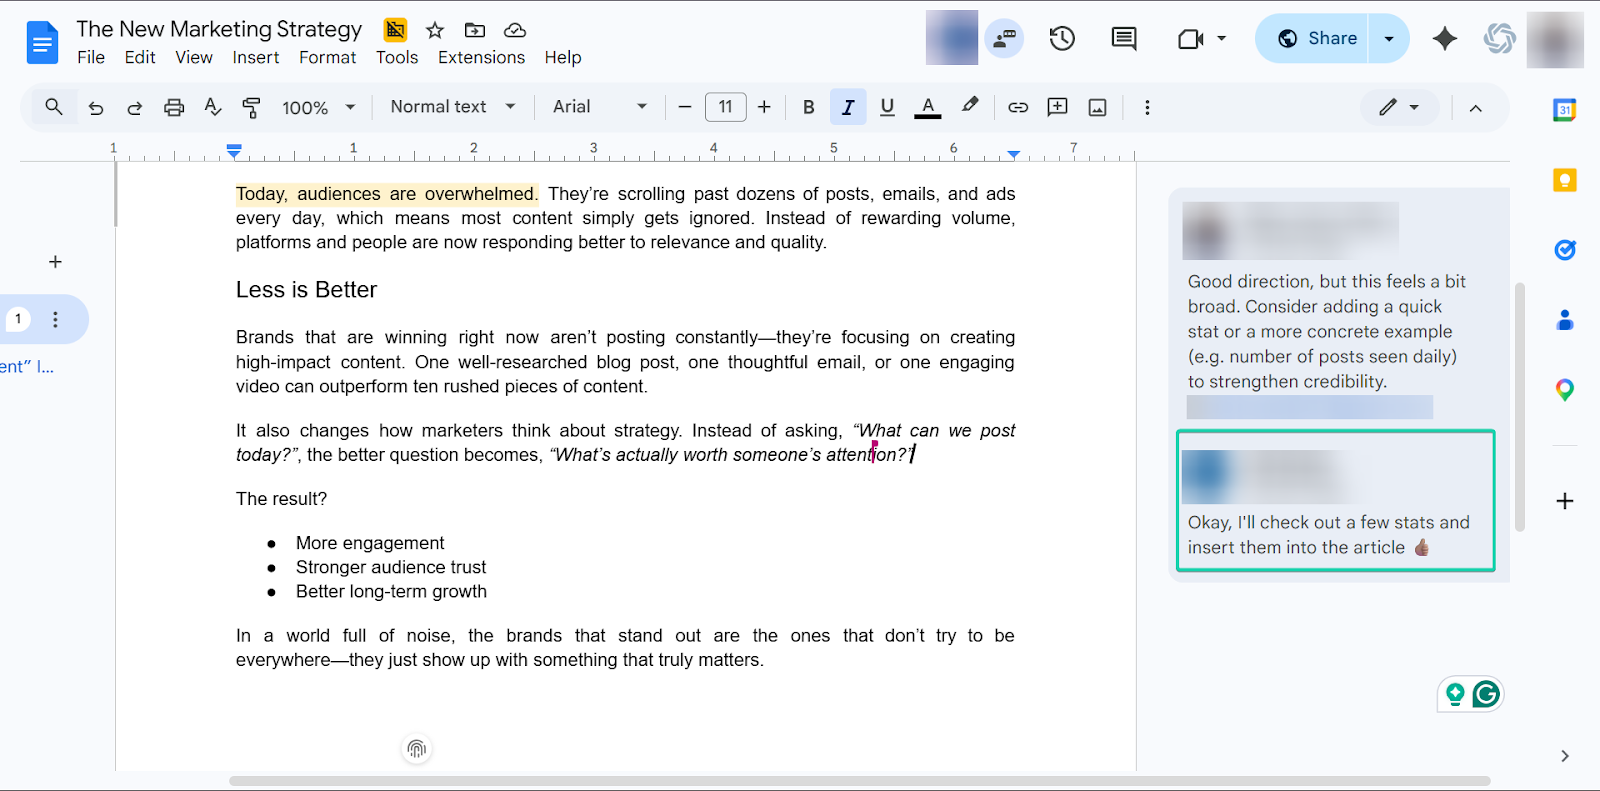
You can keep track of all comments by clicking on the “show all comments” button.
2. Suggesting Mode
Suggestion mode lets you make edits that appear as tracked changes instead of directly changing the document.
Any changes you make appear as suggestions that the document owner can accept or reject.
Let’s see how it works:
To make a suggestion, click the drop-down pencil icon menu and choose “Suggesting.”
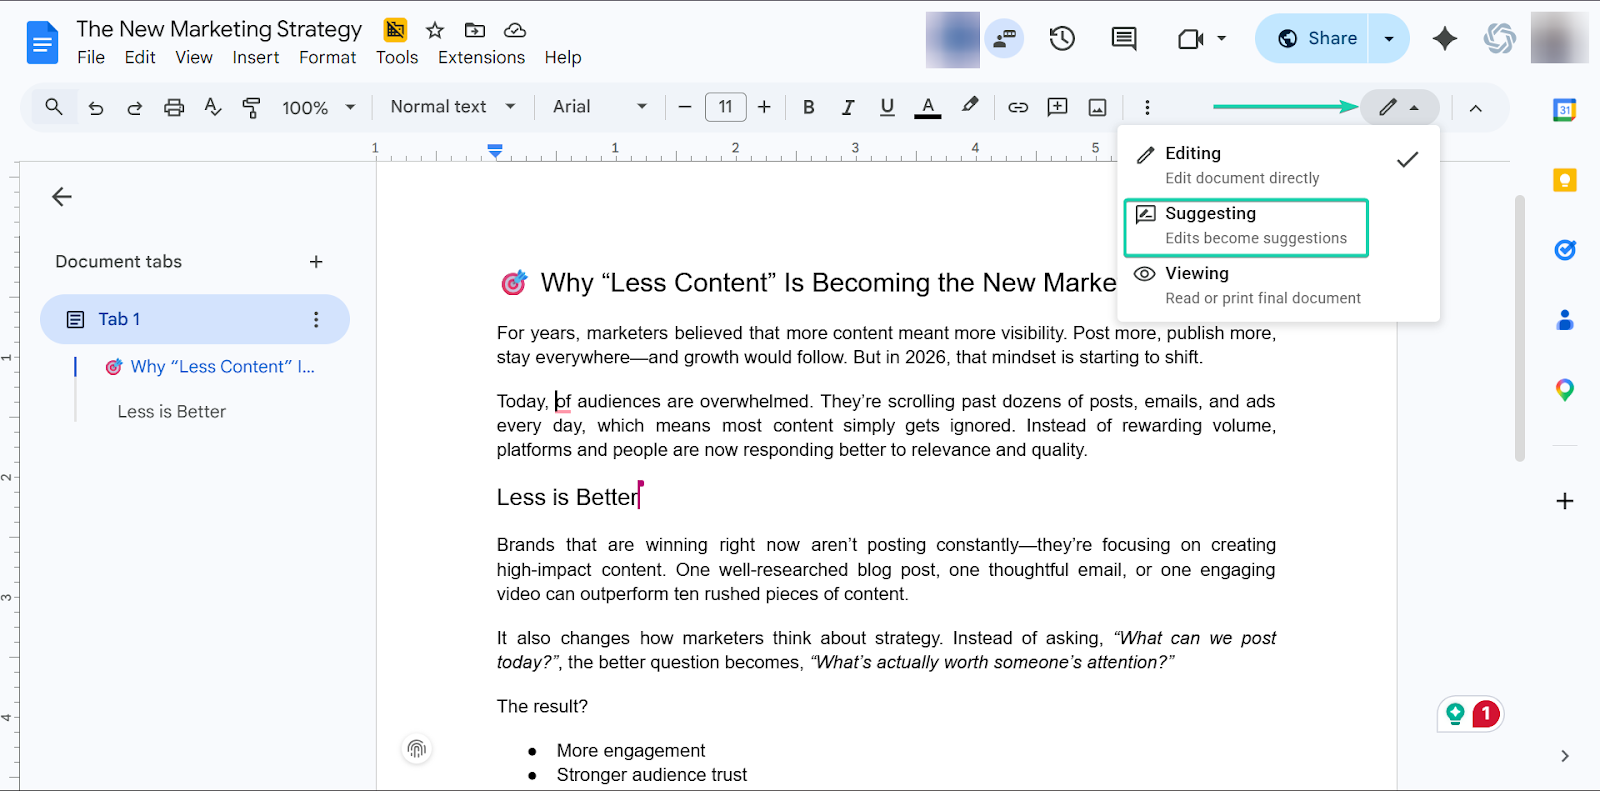
Type your suggested edit into the text.
Once you’re done, the document owner can approve or reject the suggestion.
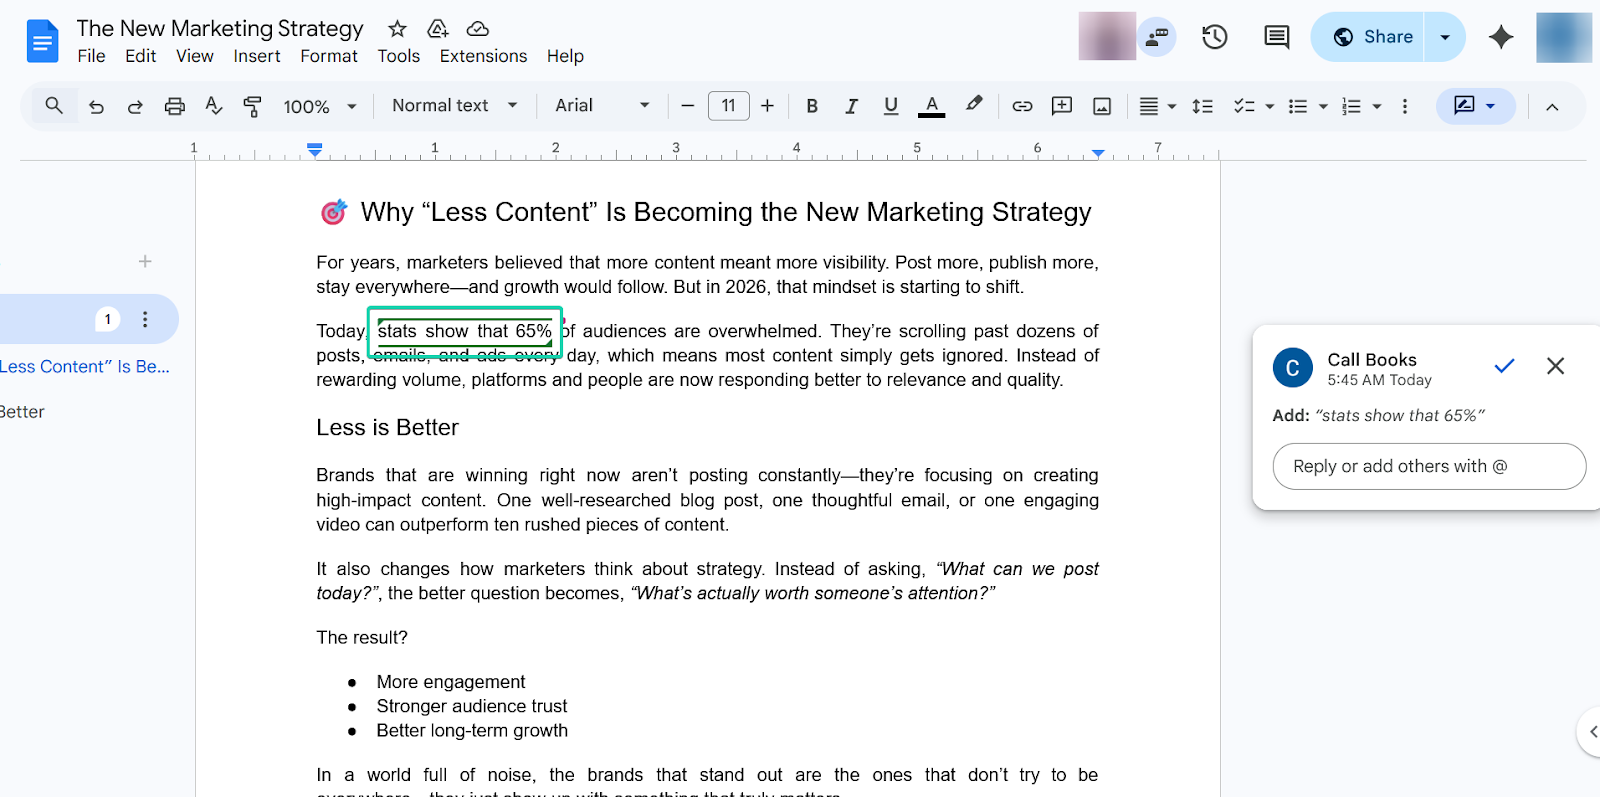
If it’s approved, it’s then permanently added to the text.
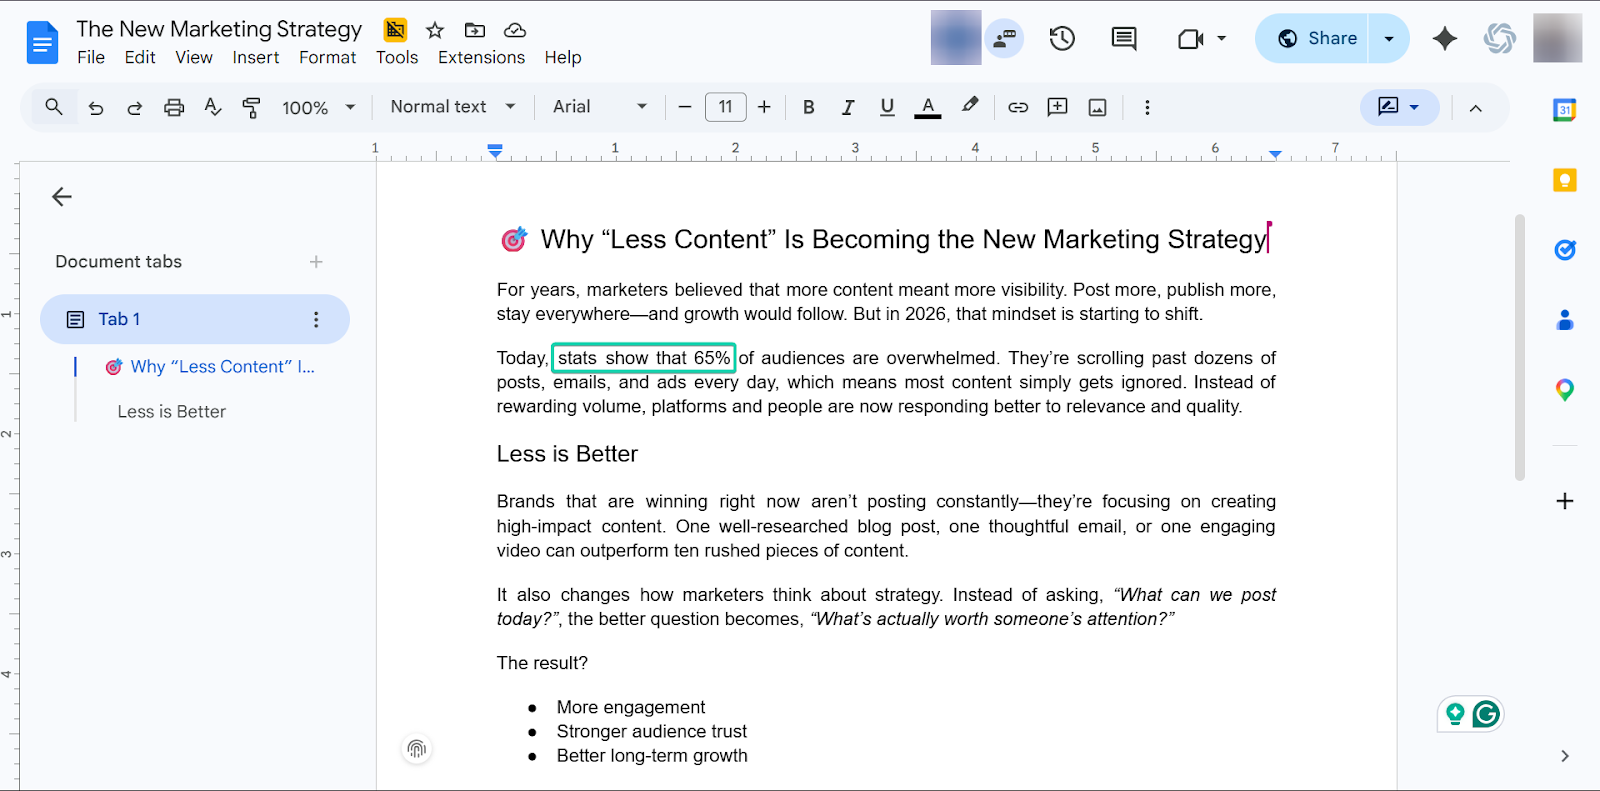
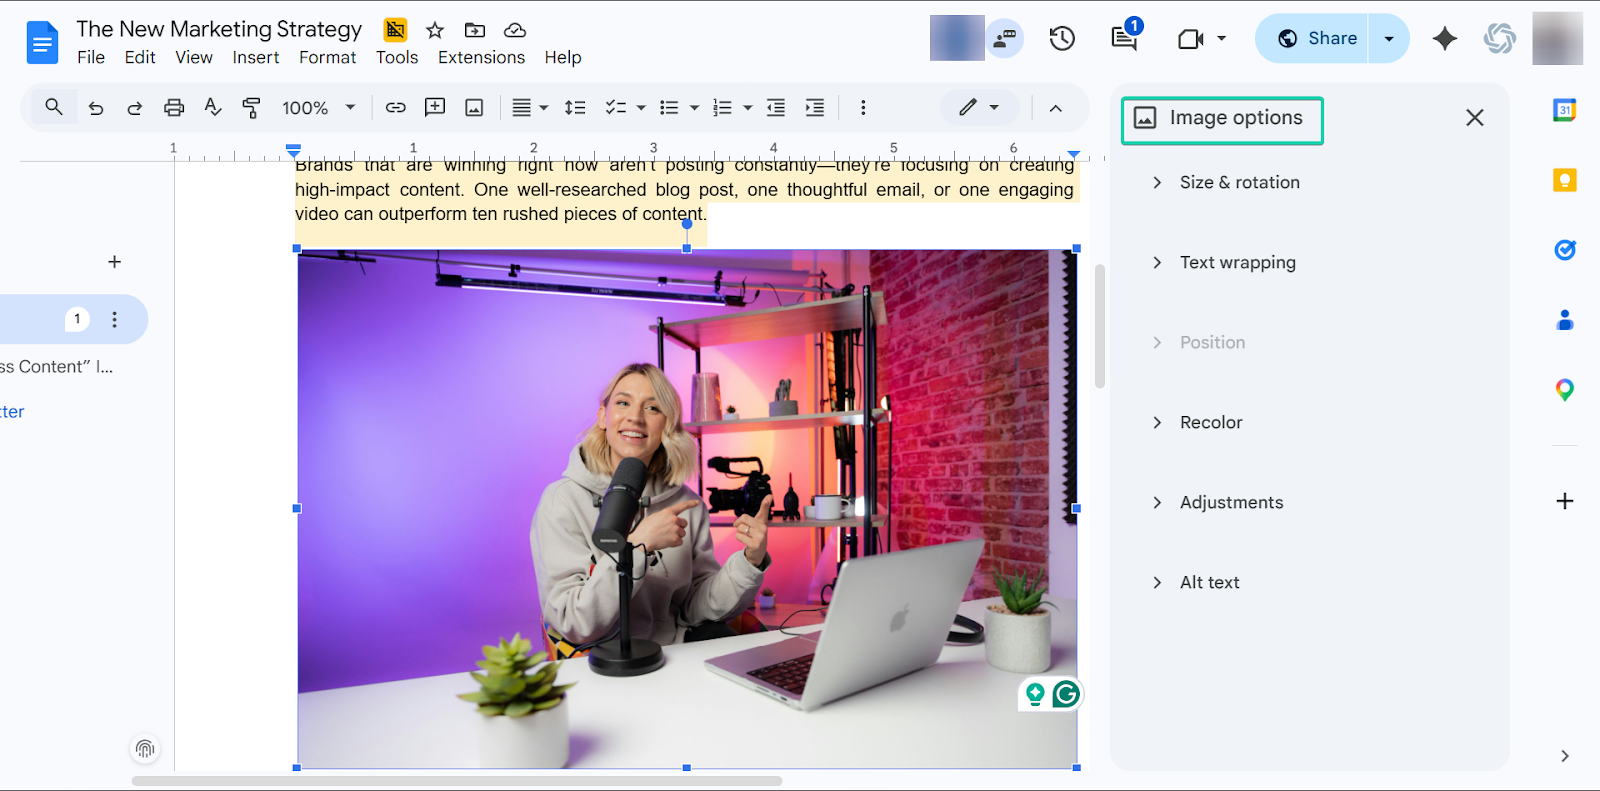
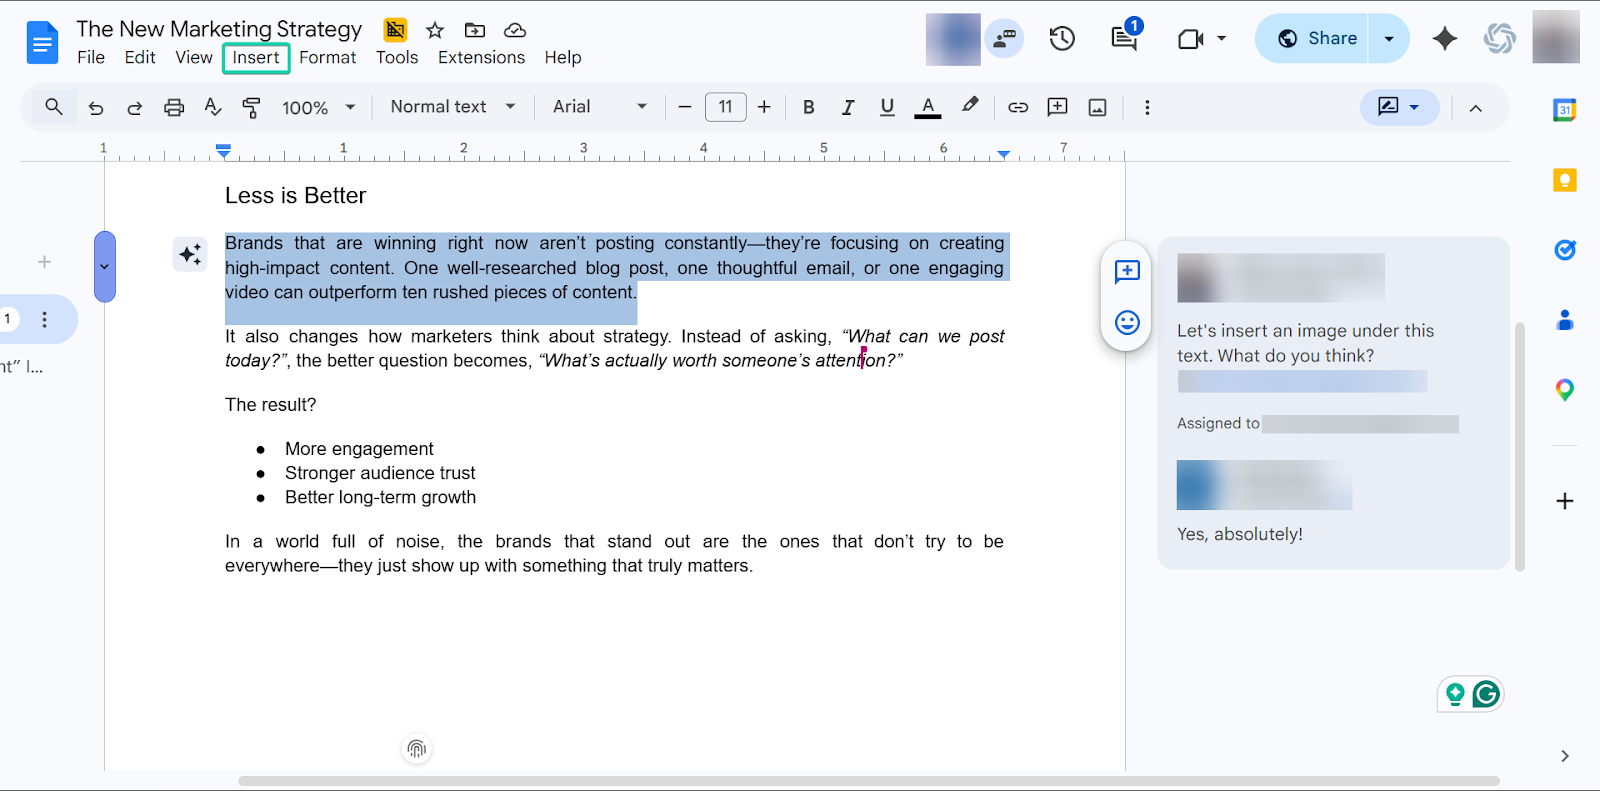
3. Insert Image
Google Docs lets you insert high-quality images directly into your document as you write.
You can do this by uploading images, dragging and dropping them directly into the platform, or inserting from links and Google Drive.
I’ll show you how it works:
To insert an image, head over to “Insert” and choose “Image.”
You can insert an image via upload, web search, from Google Drive, camera, or URL.
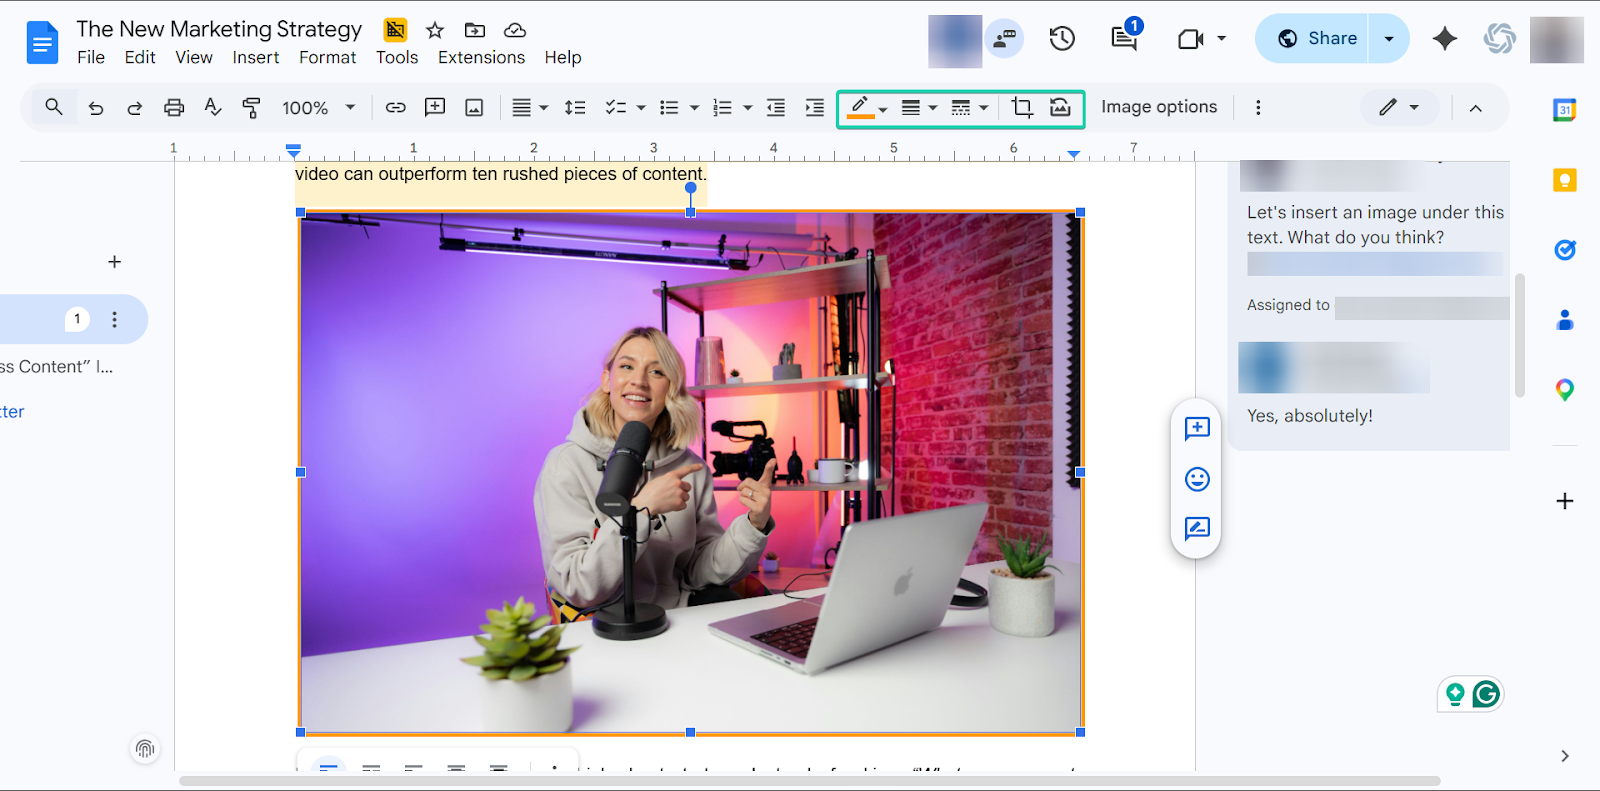
When you insert an image, you can edit it under “Image Options.”
You can tweak the size, transparency, and apply filters.
You can also add borders, crop, and replace images.
[fs-toc-omit]What I loved vs what I struggled with
What I loved 👍
✅ Free and easy to use, making it great for bloggers with lean budgets
✅ Real-time collaboration so you can work with a team or another blogger
✅ It autosaves to Google Drive, so you don’t lose work
What I struggled with 👎
❌ It’s not a publishing tool. You can only draft content
❌ Can get cluttered with many comments
[fs-toc-omit]Best for
- Teams collaborating on blog posts
[fs-toc-omit]Pricing
- Starter: €6.12/user/month
- Standard: €12.24/user/month
- Plus: €21.10/user/month
- Enterprise: Contact for pricing

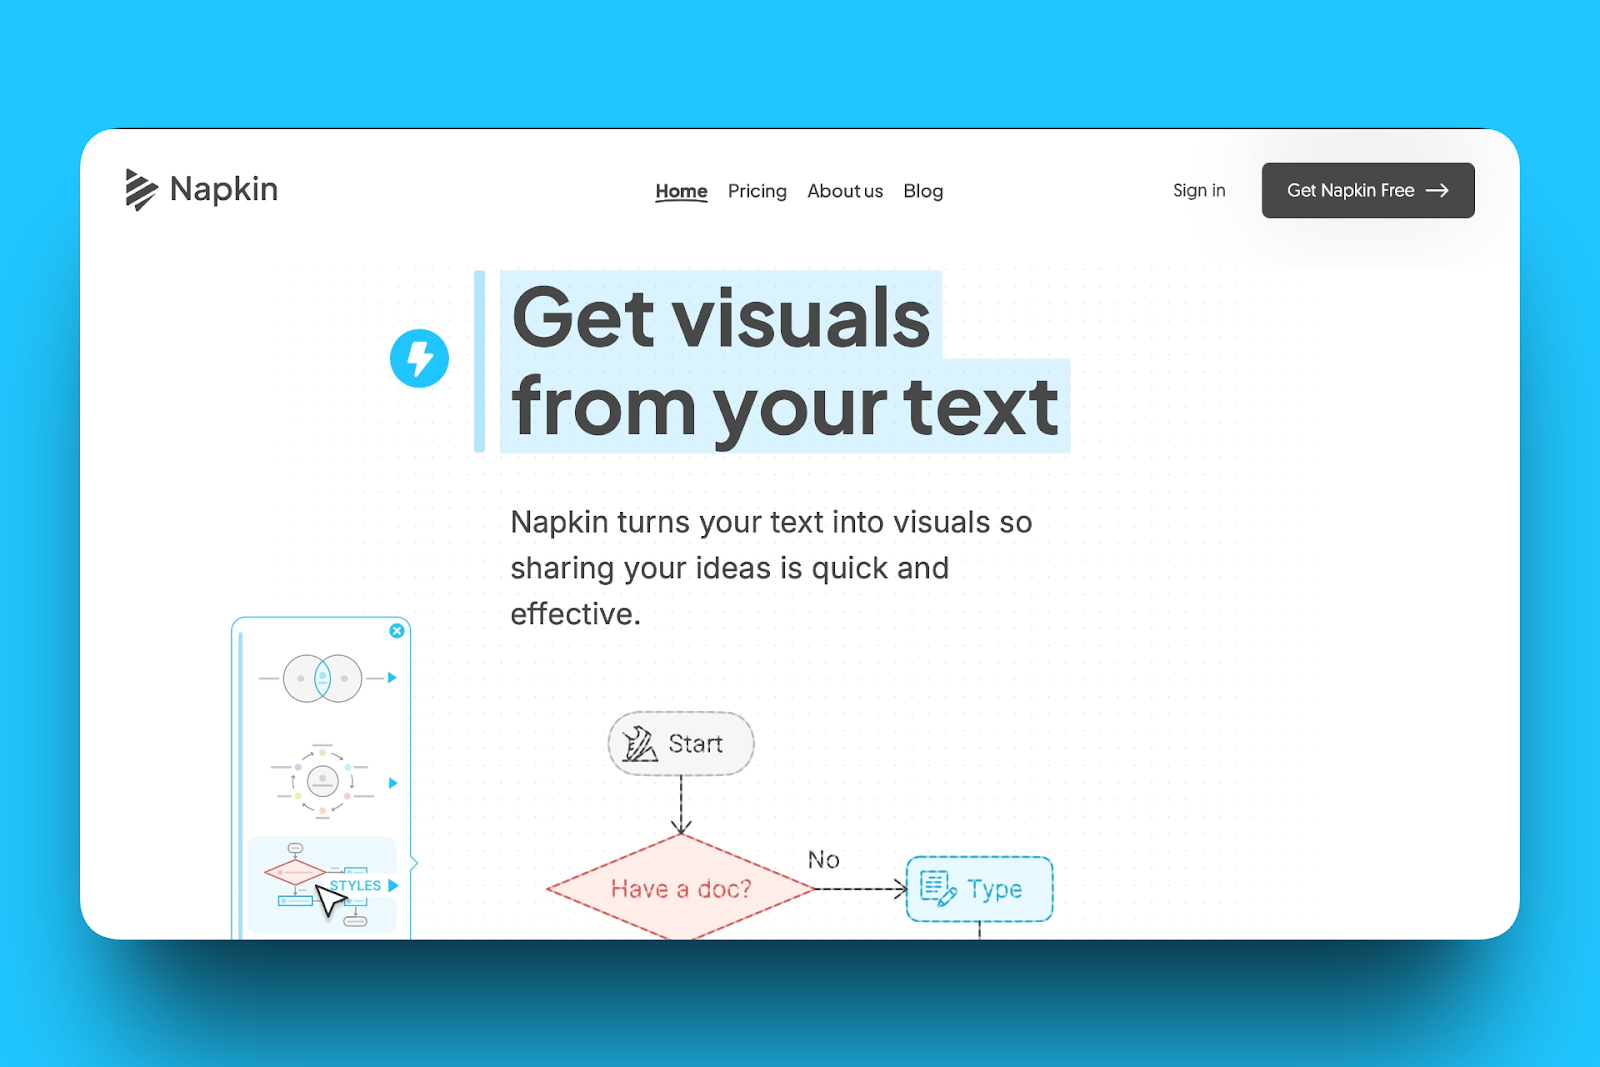
7. Napkin AI - Best for generating visuals for blog posts
Napkin AI is also on my list of the best blogging tools.
It’s a visual thinking blogging software that helps you turn rough ideas into structured content using AI and simple visuals.
It’s great for brainstorming, organizing thoughts, and mapping out content before you start writing.
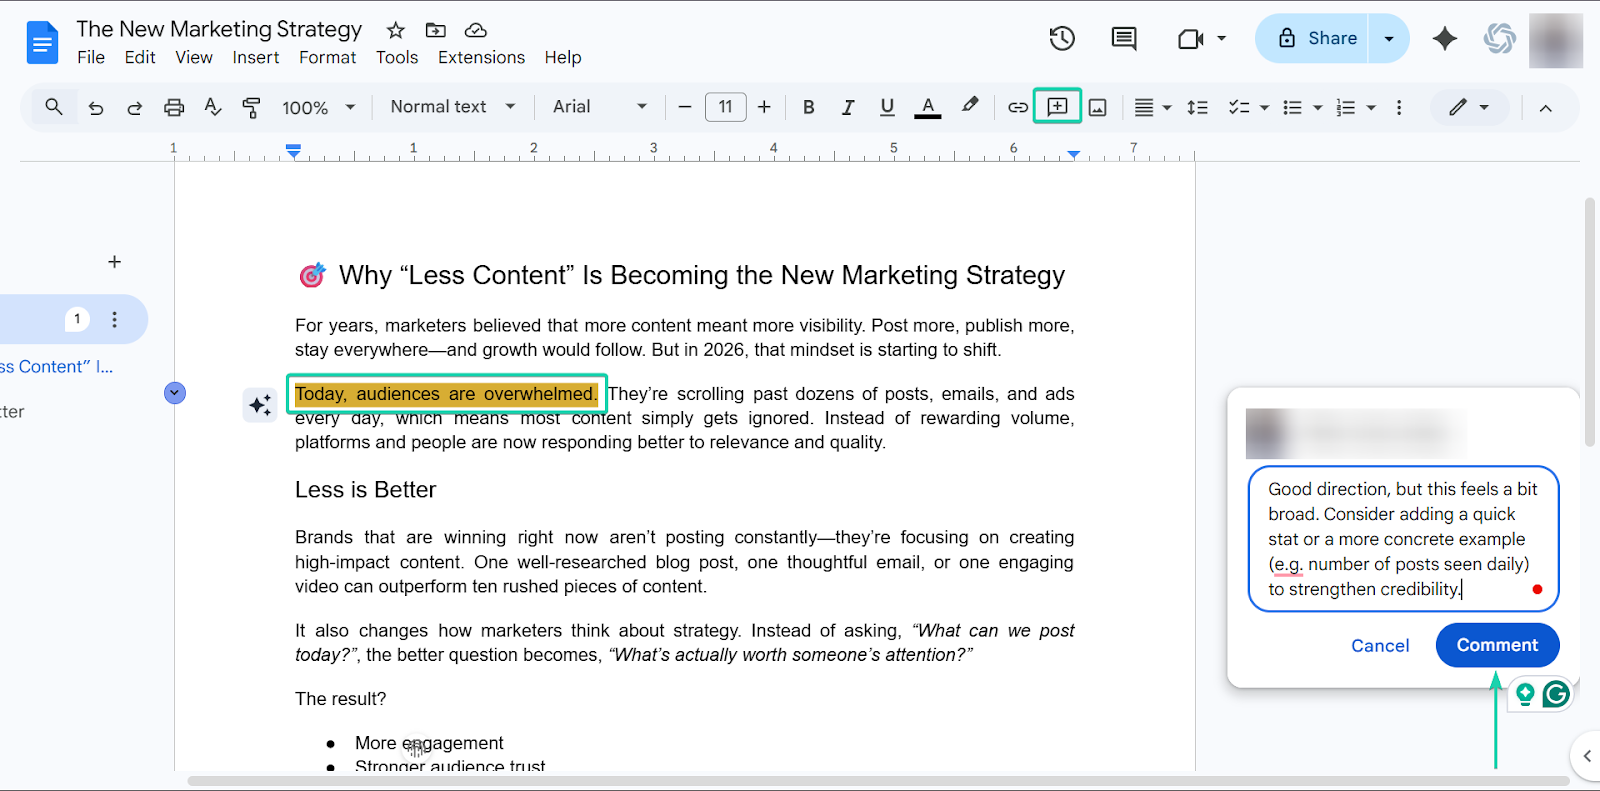
With the new napkin feature, you can create and organize ideas either from scratch, with AI assistance, or by uploading documents.
I also liked the comments feature, which helps with collaboration and giving feedback on ideas.
And finally, the generate visuals feature lets you turn ideas into simple visual diagrams.
[fs-toc-omit]What I loved about Napkin AI
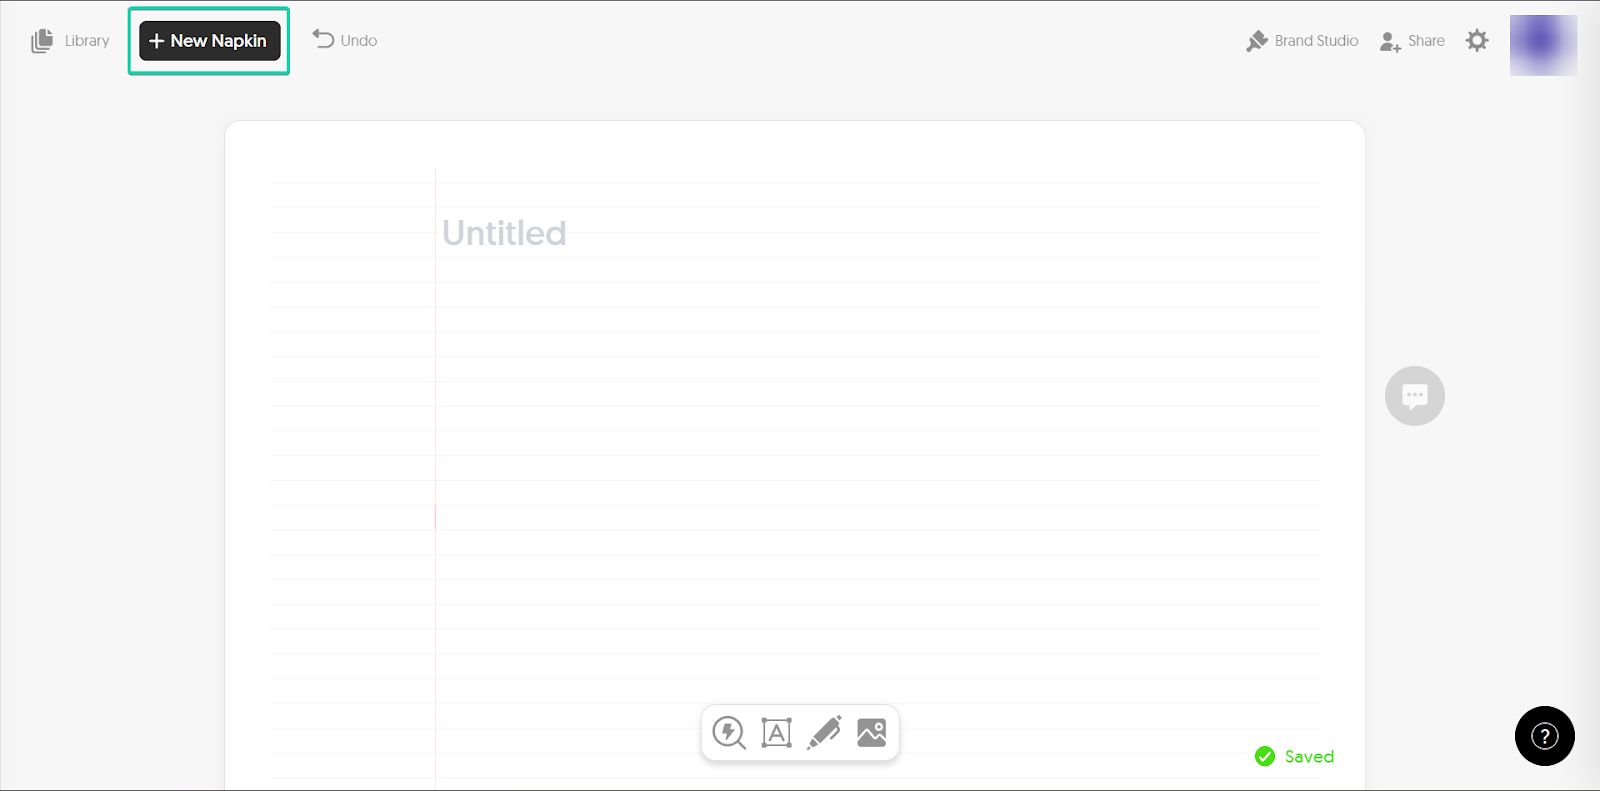
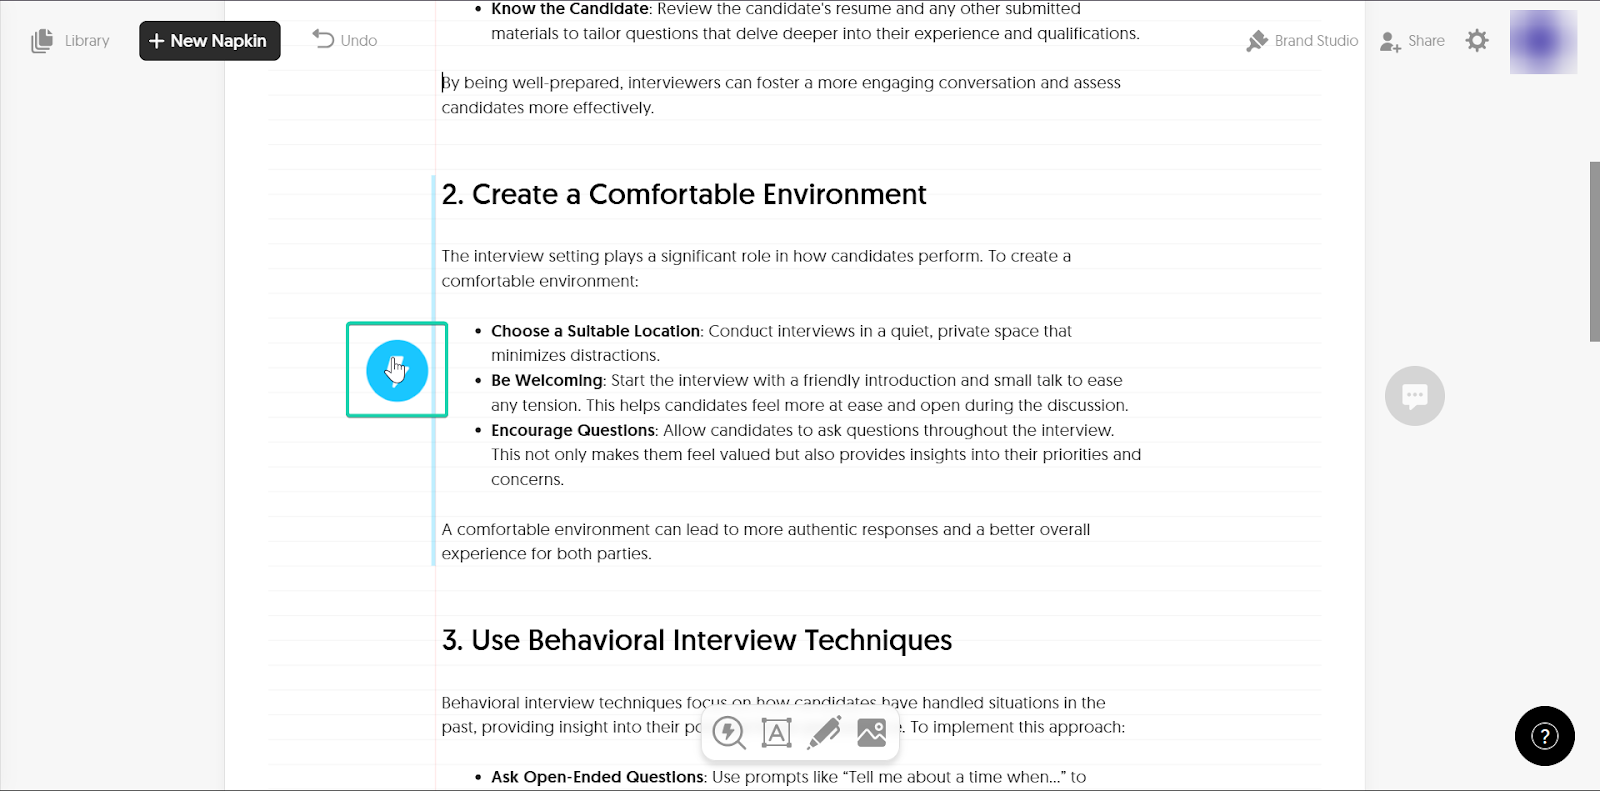
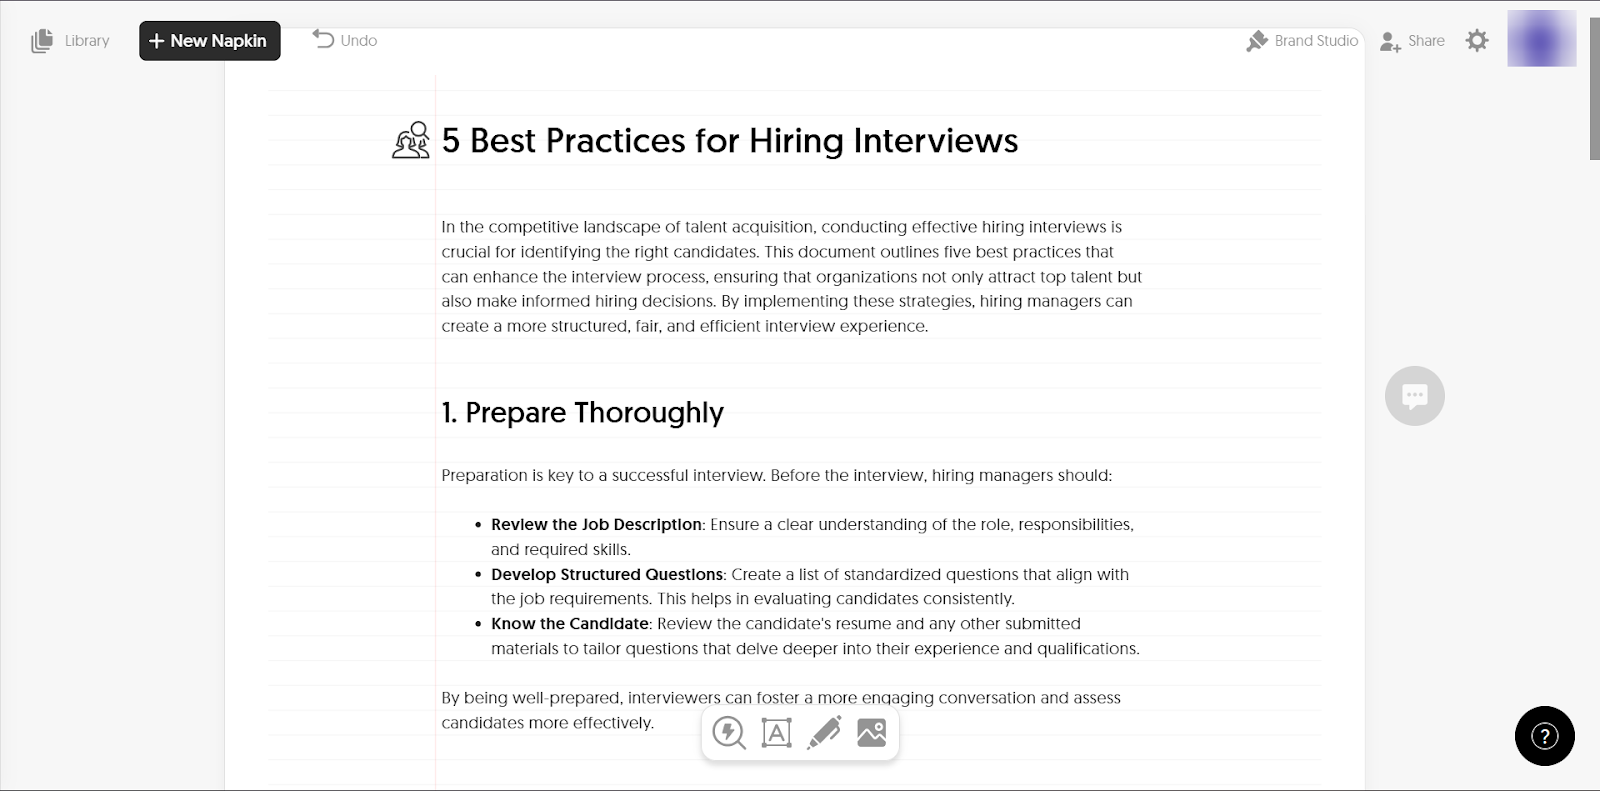
1. New Napkin
A “Napkin” is essentially your workspace where you can capture and write down your ideas.
You can start a new napkin and add notes, thoughts, or prompts, and the AI can help you expand and organize them.
This is how it works:
Go to “+ New Napkin.”
Next, select how you would like to add your text.
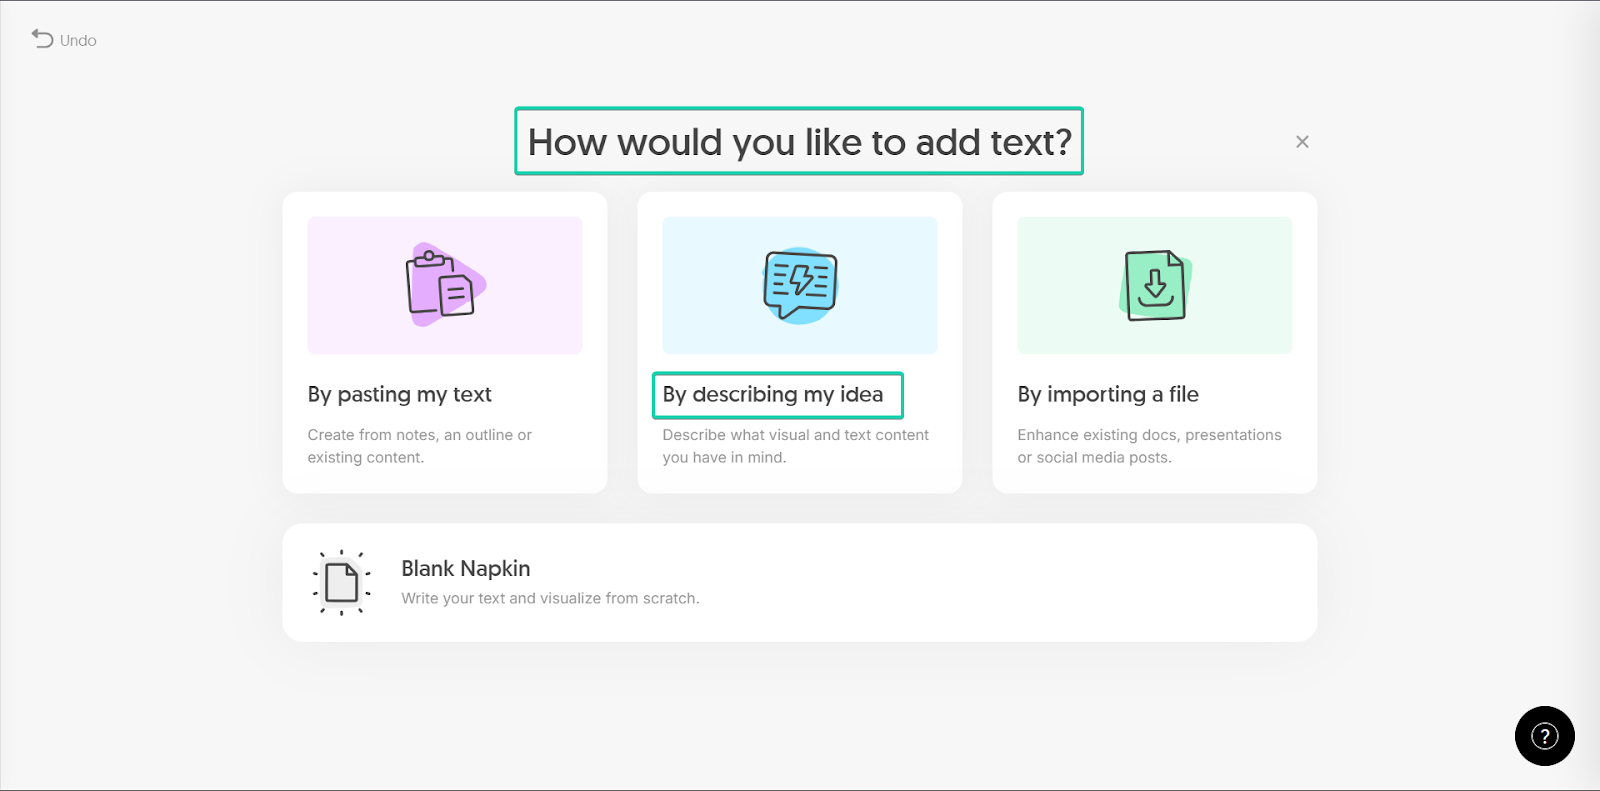
With AI assistance, you can enter a prompt to help in content generation. The more specific, the better.
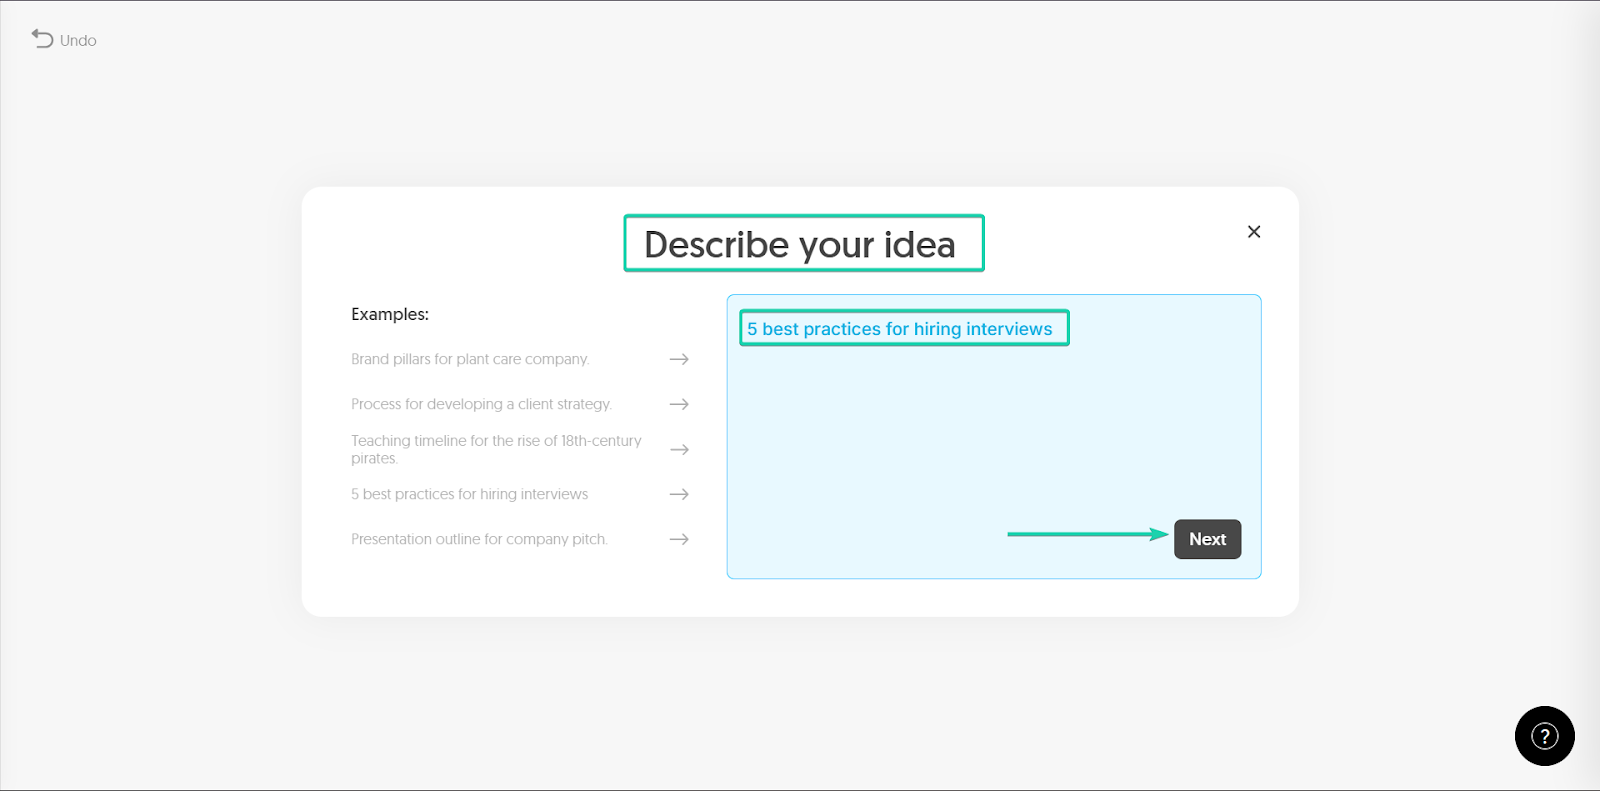
Napkin AI will then generate content for you, which you can edit.

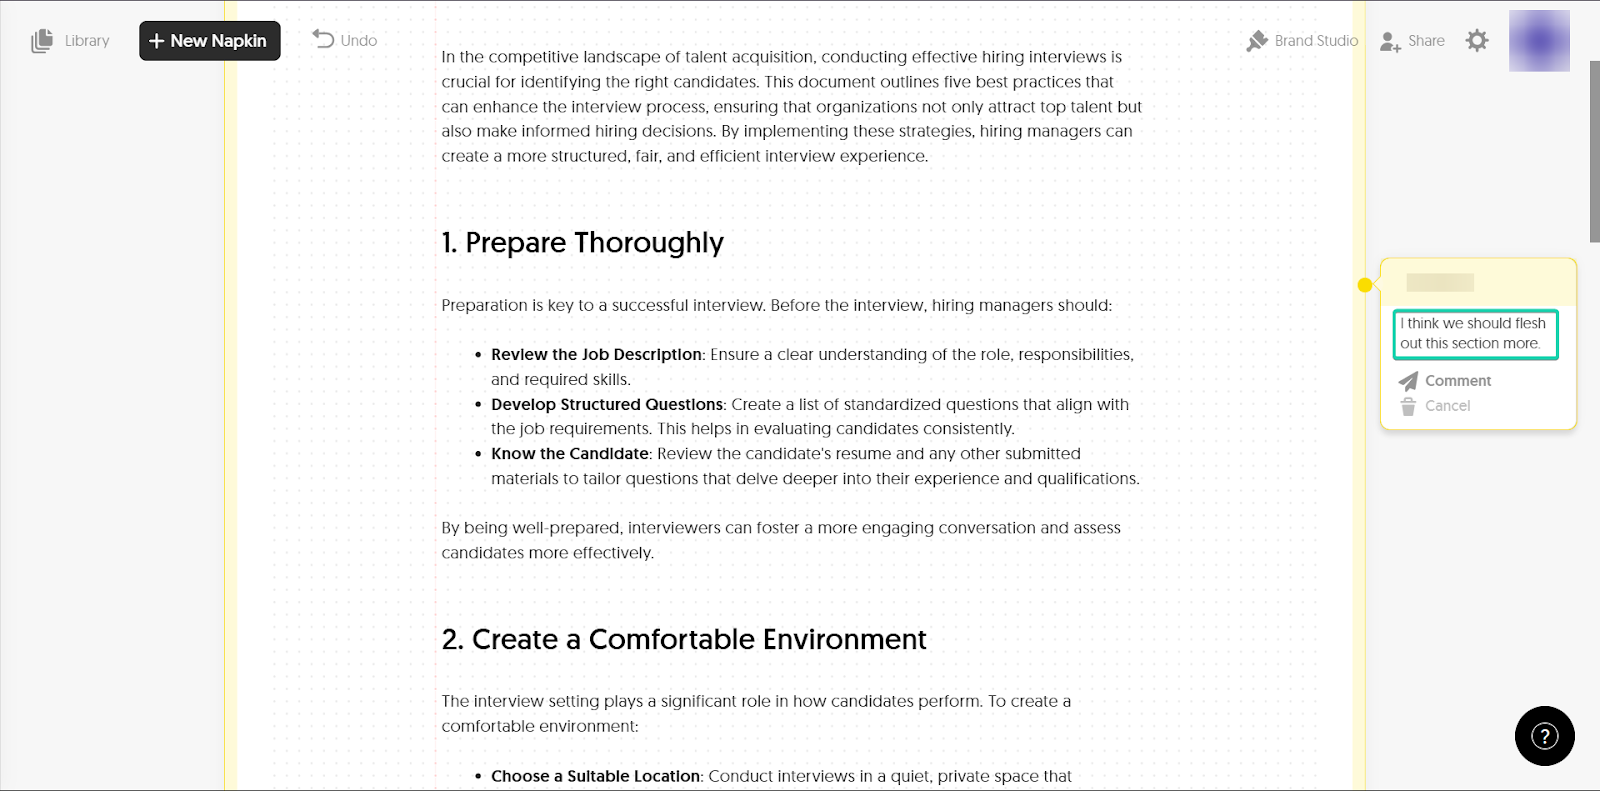
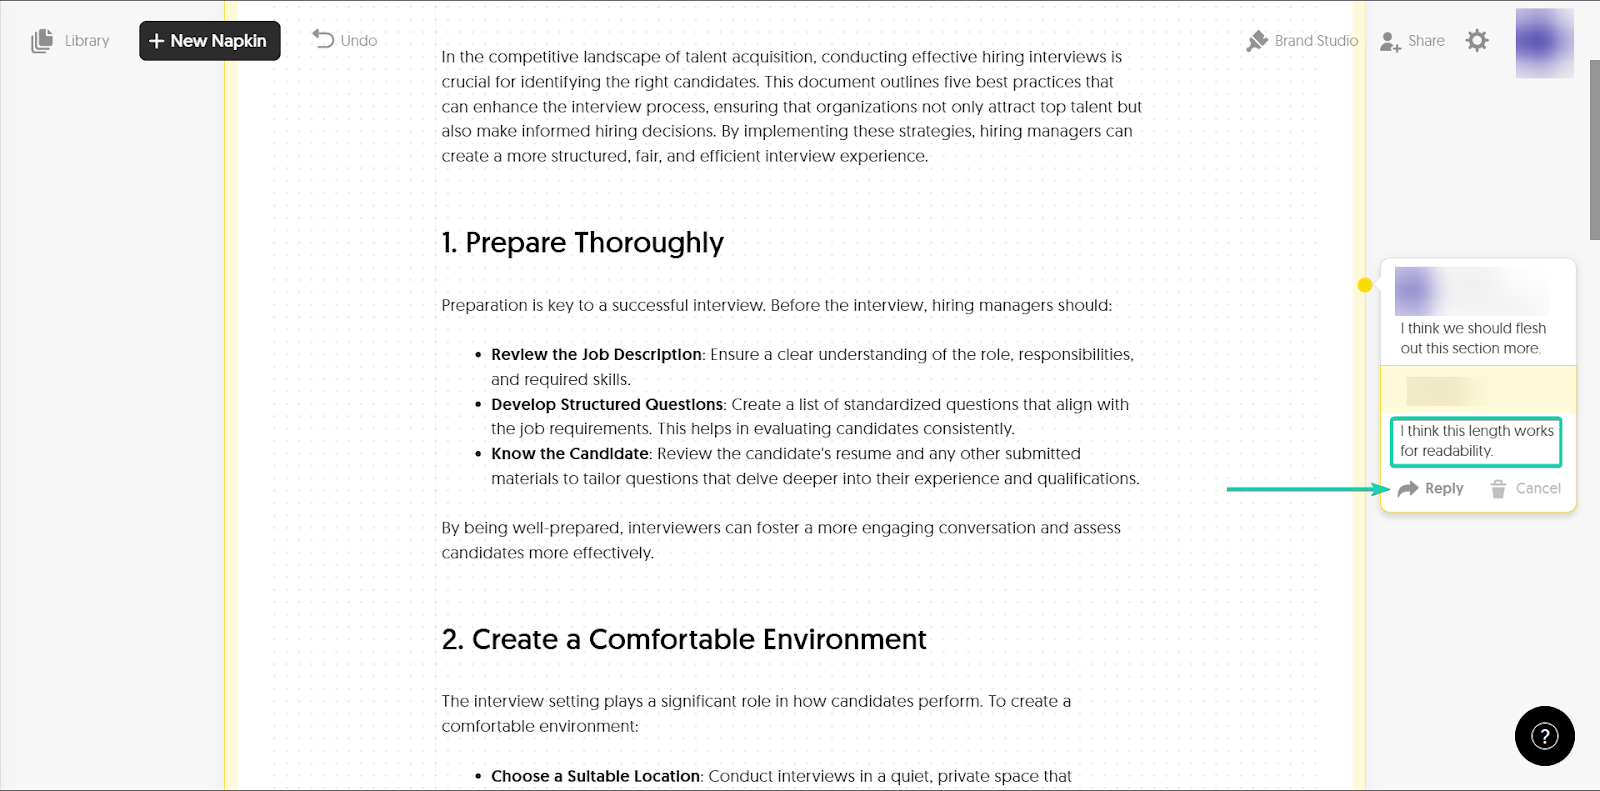
2. Comments
The comments feature lets you and your team give feedback on your ideas and content within a napkin.
You can highlight sections and leave comments, just like in Google Docs.
This is how it works.
Click on “add a comment” (white text box in yellow background) within your napkin.
Next, type your comment and submit it.
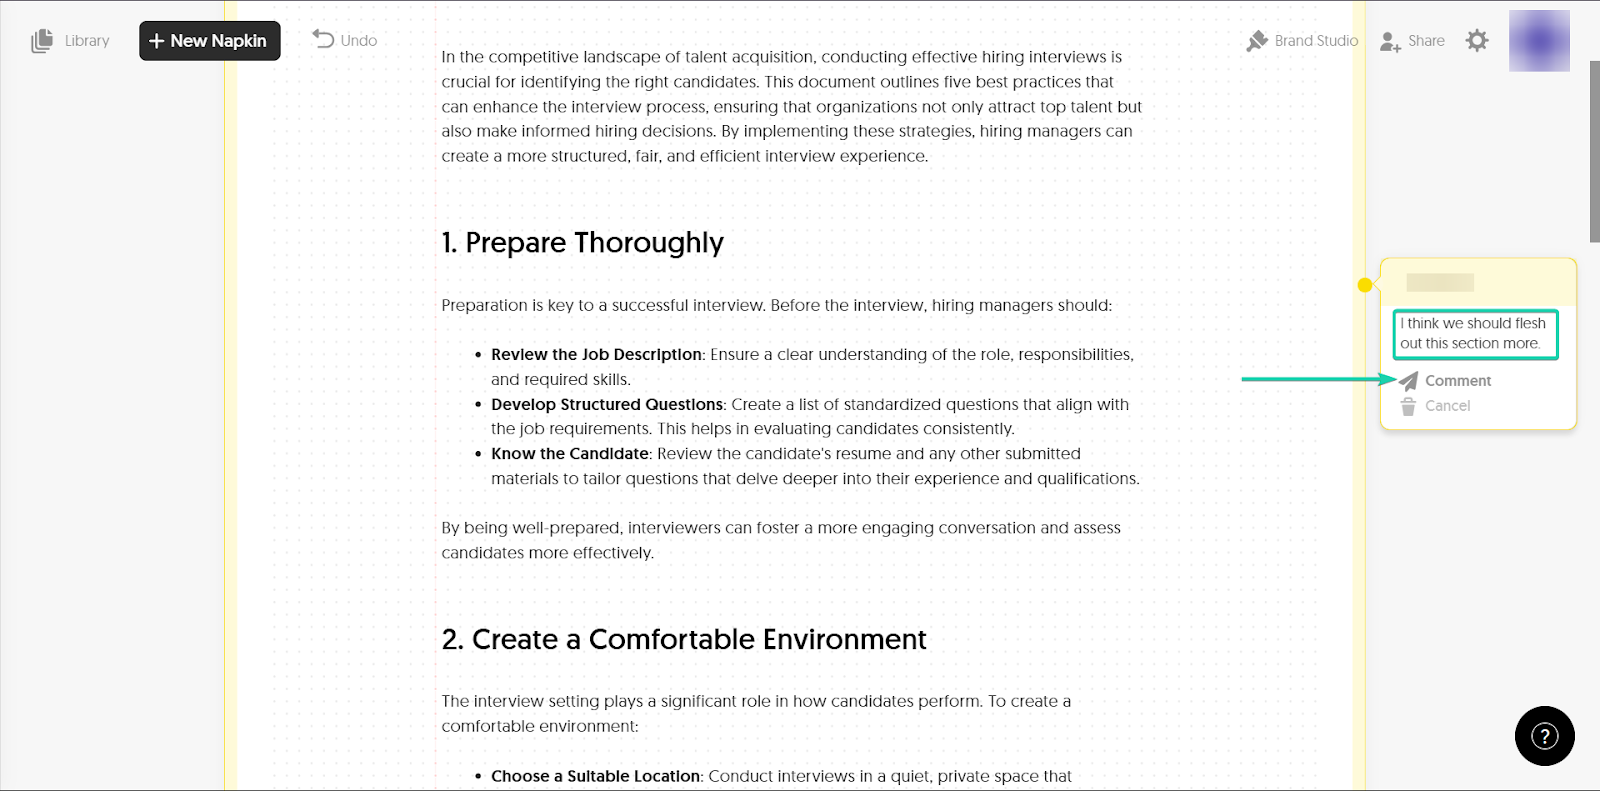
Your team members can also reply to comments.
Once you’ve addressed the comment, you can resolve it.
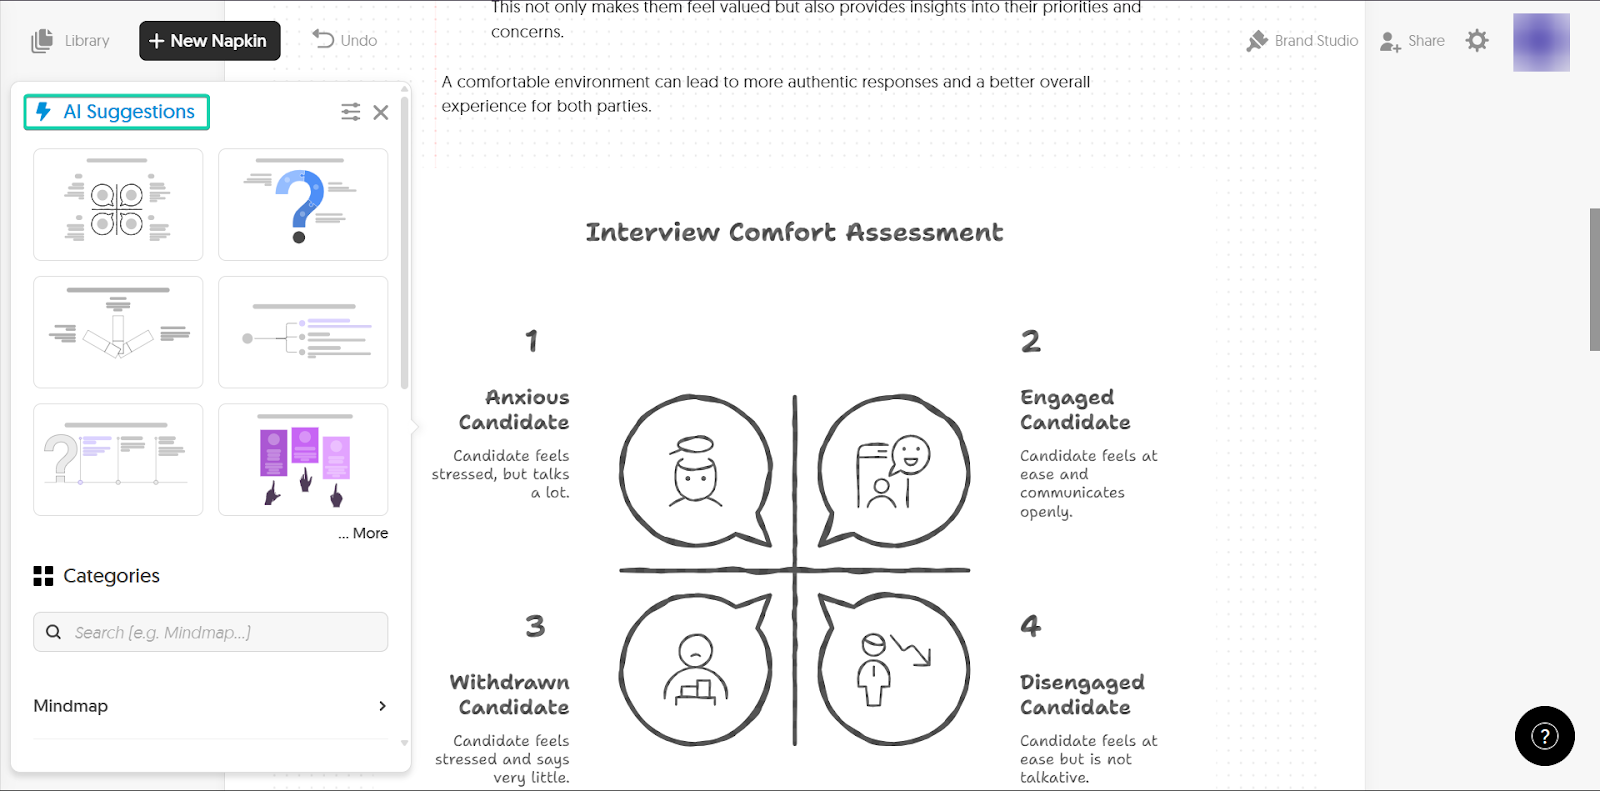
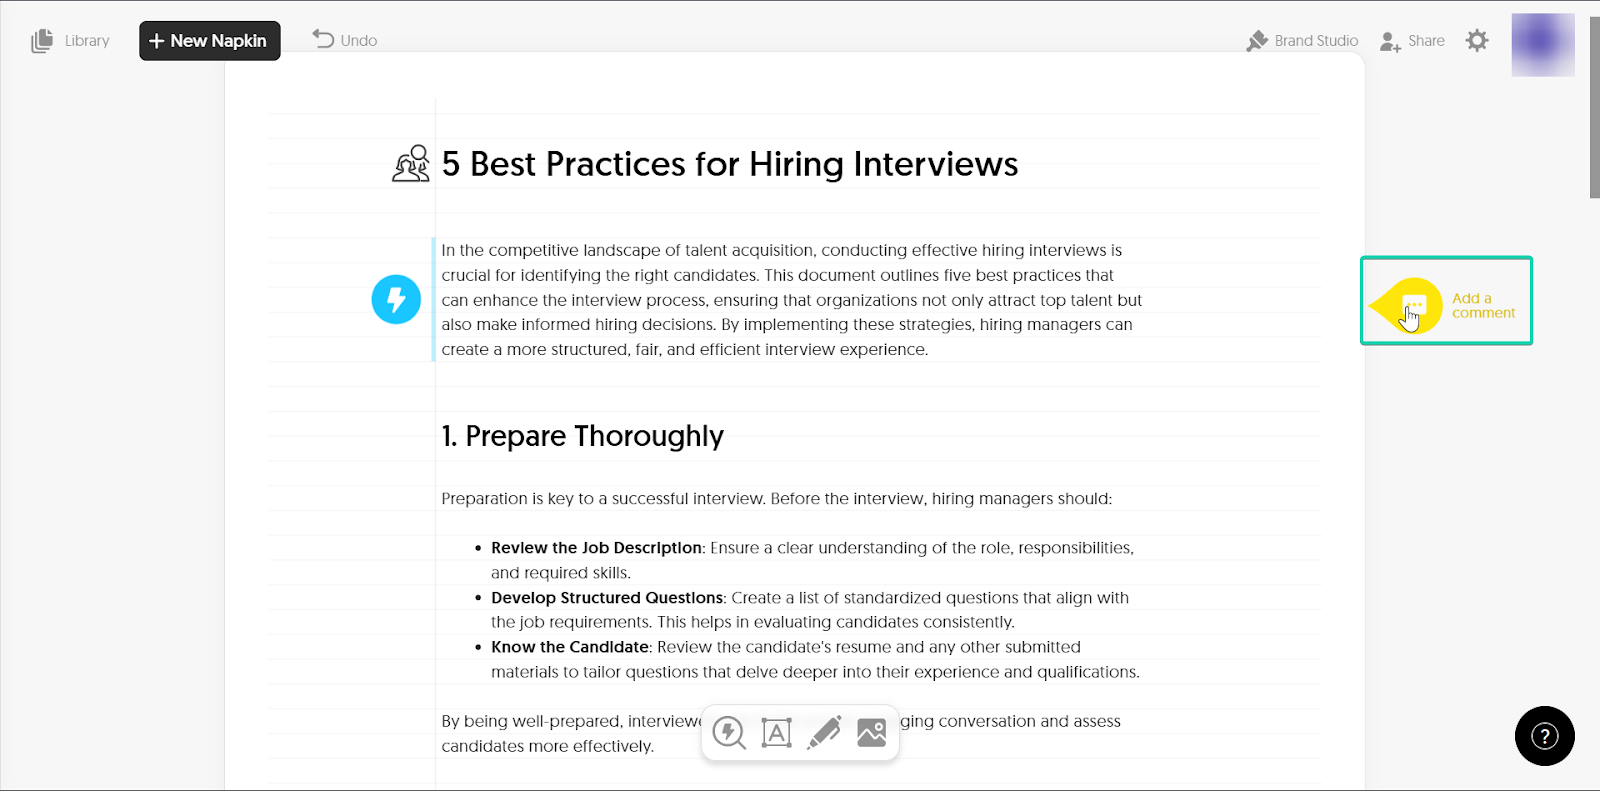
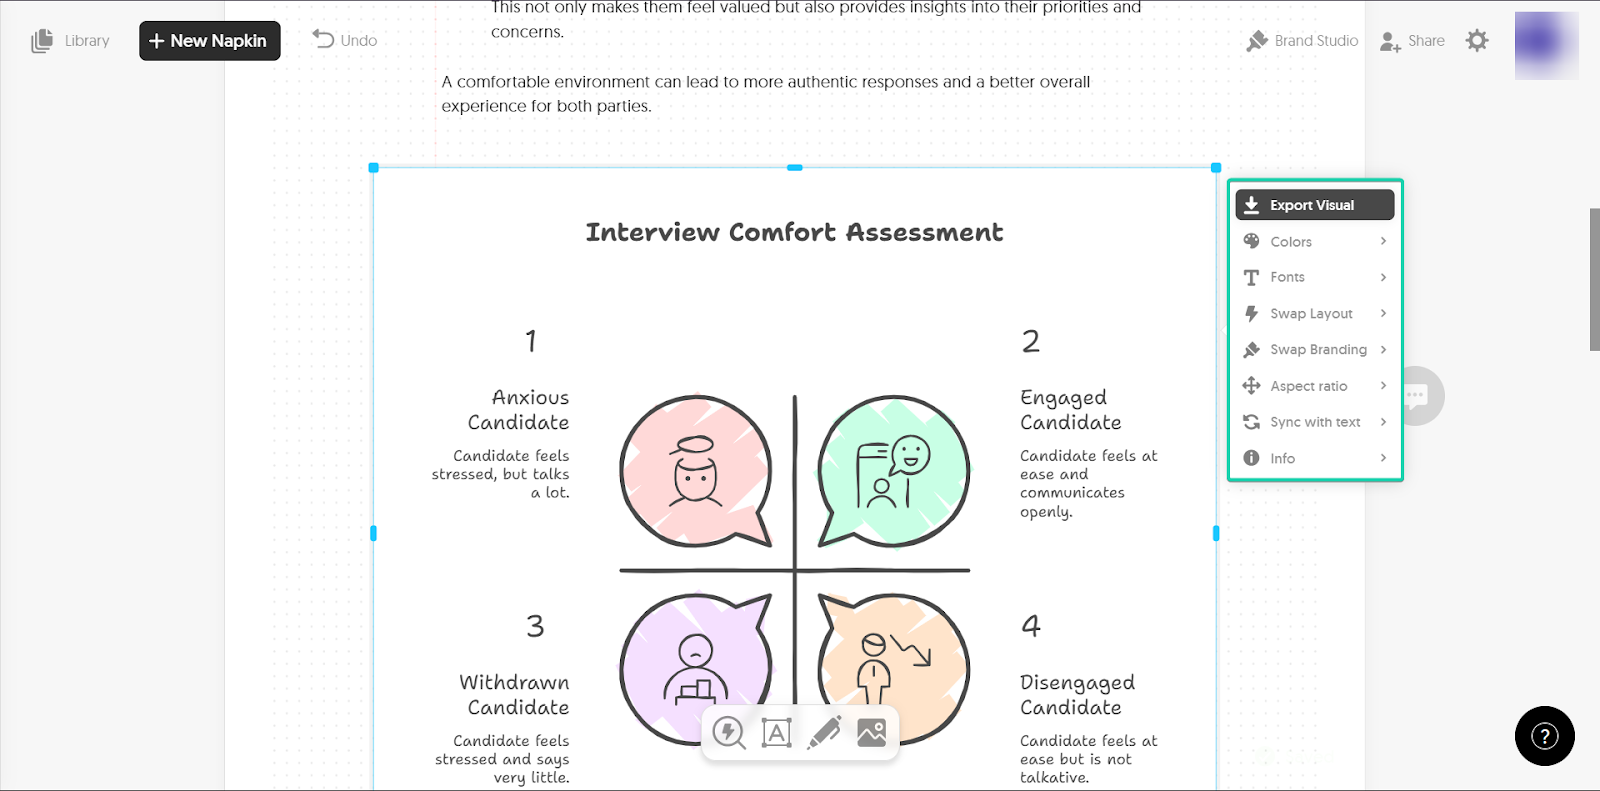
3. Generate visuals
Napkin AI can turn your ideas into simple visual diagrams or layouts. It generates these images based on your notes.
Let’s see how it works:
First, click the “generate visuals” icon on your napkin in the section where you want an image.
Napkin AI will then suggest some visuals that support the text.
You can also edit your visuals.
[fs-toc-omit]What I loved vs what I struggled with
What I loved 👍
✅ Great for brainstorming and organizing ideas
✅ Has a simple and intuitive interface
✅ Can generate visuals in under 10 seconds
What I struggled with 👎
❌ It’s not a full writing and publishing tool, so you’ll still need another platform to publish your blogs.
❌ Might be limiting if you’re looking for deeper customizations
[fs-toc-omit]Best for
- Creators who want a platform for brainstorming ideas
[fs-toc-omit]Pricing
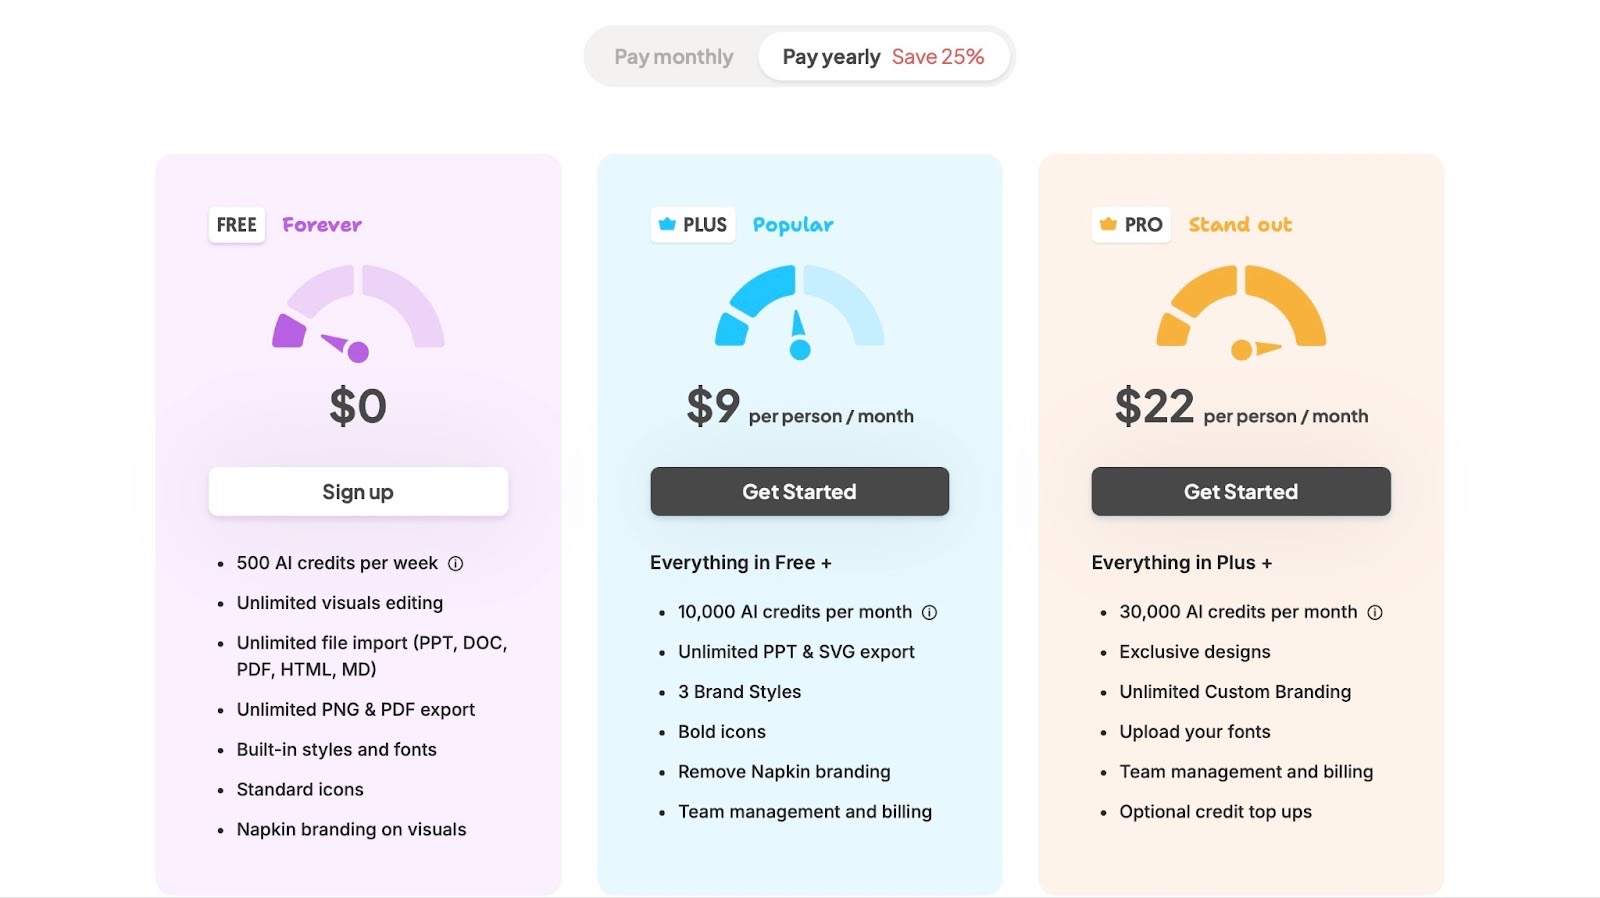
- Free Forever: $0/month
- Plus: $9/person/month
- Pro: $22/person/month
8. Trello - Best for content planning and management
Number eight on my list of the best blogging tools is Trello.
Trello is a visual project management tool that helps you organize tasks and workflows using boards, lists, and cards.
For bloggers and other content creators, it’s a great tool for content planning and management.
You can map out ideas, track progress, and keep your entire content calendar organized in one place.
Three main features stood out to me on Trello: boards, templates, and comments
Boards are the main workspace in Trello where you manage your tasks and workflows.
With the templates feature, you can use pre-built setups for content planning.
And finally, the comments feature lets you collaborate and give feedback on tasks.

Let’s see how these features work in more detail.
[fs-toc-omit]What I loved about Trello
1. Boards
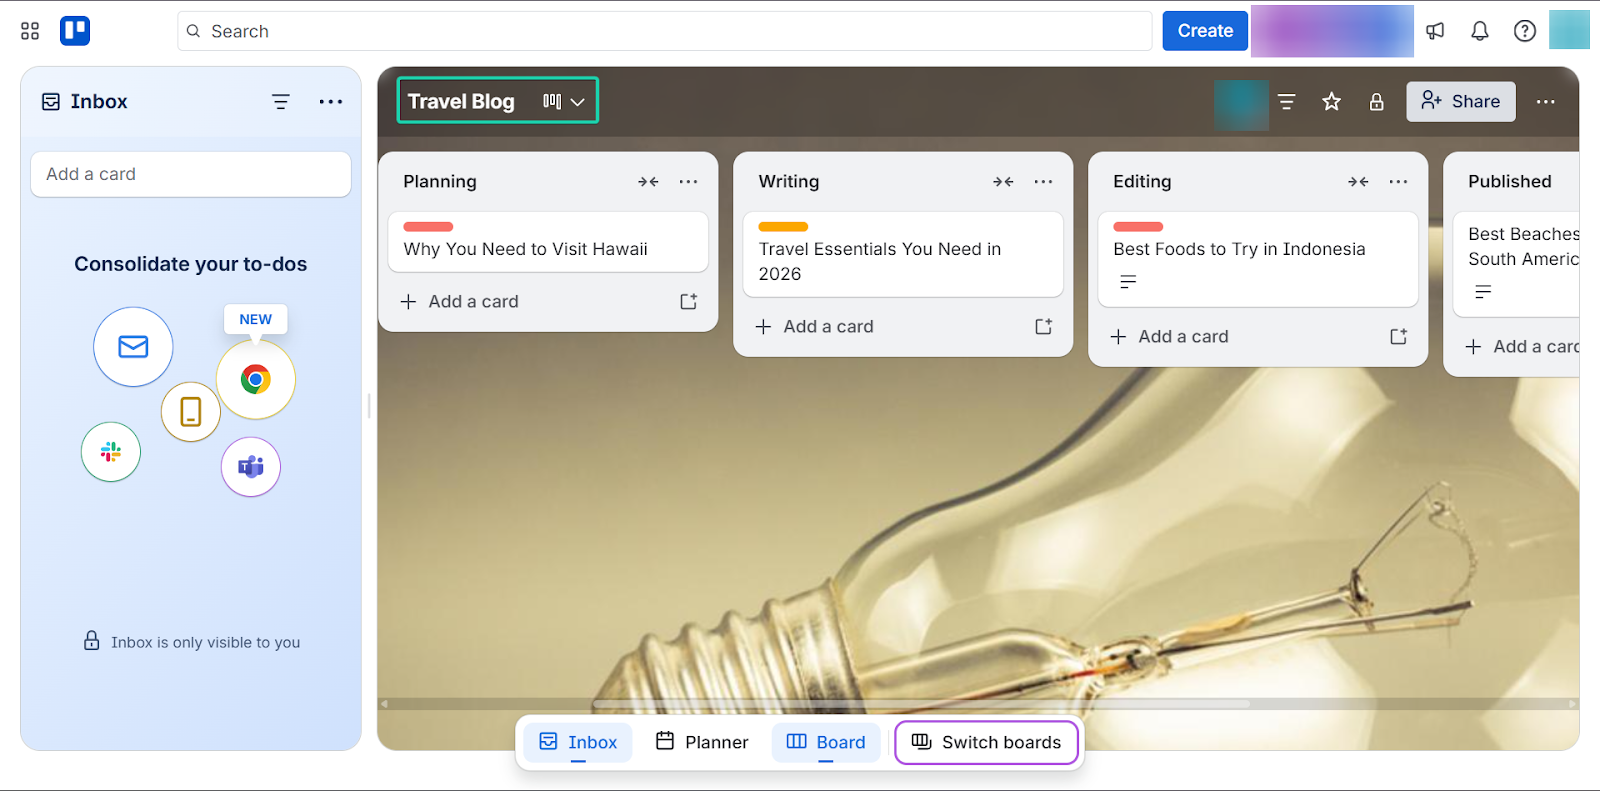
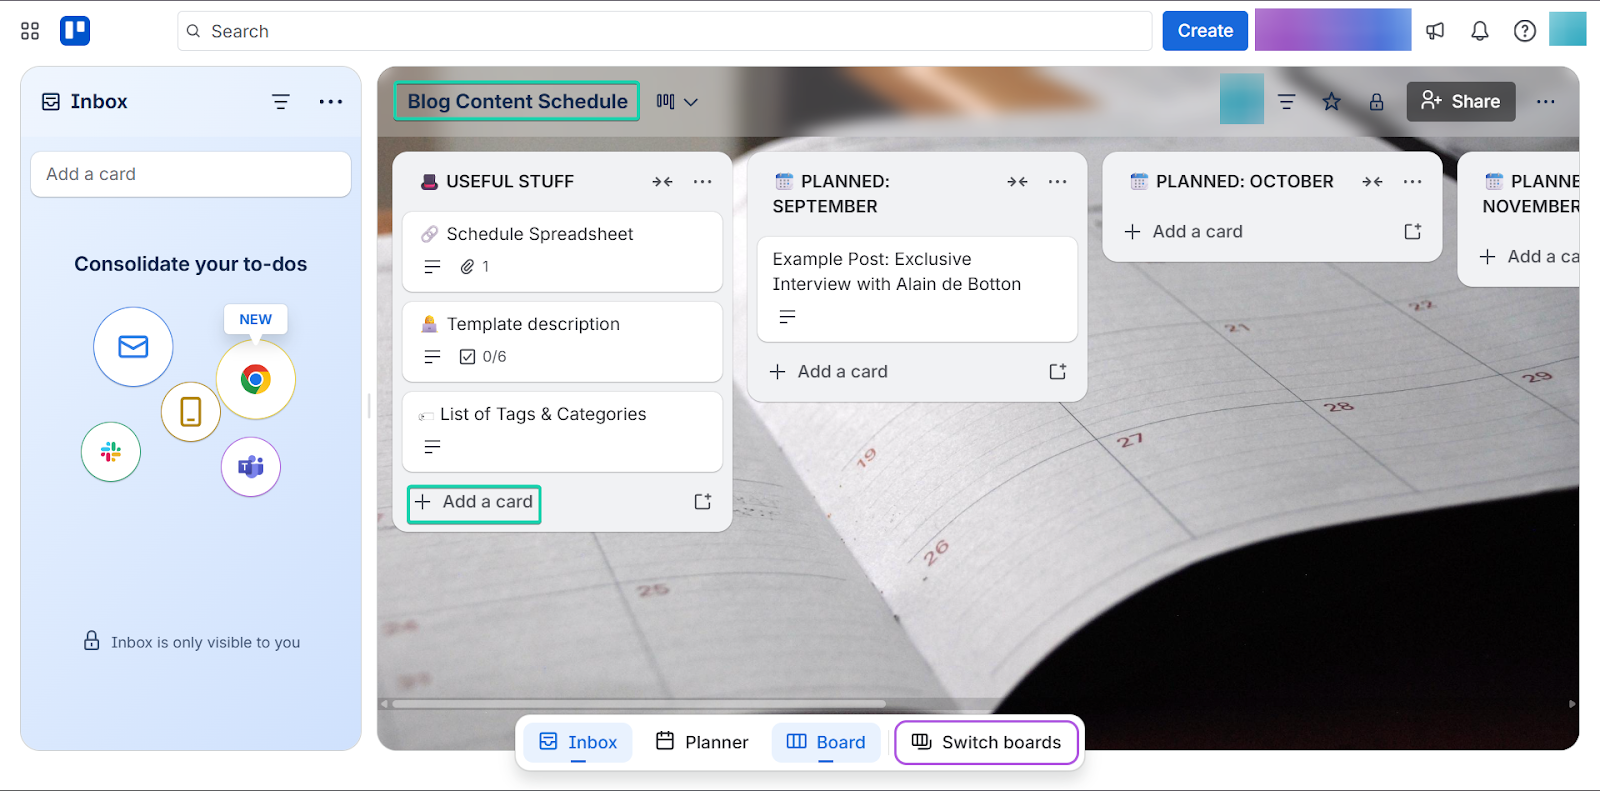
Boards are the main workspace on Trello where you can manage your tasks and content.
For example, you can create a board for blogging, divide it into lists (e.g., ideas, writing, editing, and published), and add cards for each blog post.
Let’s see how it works:
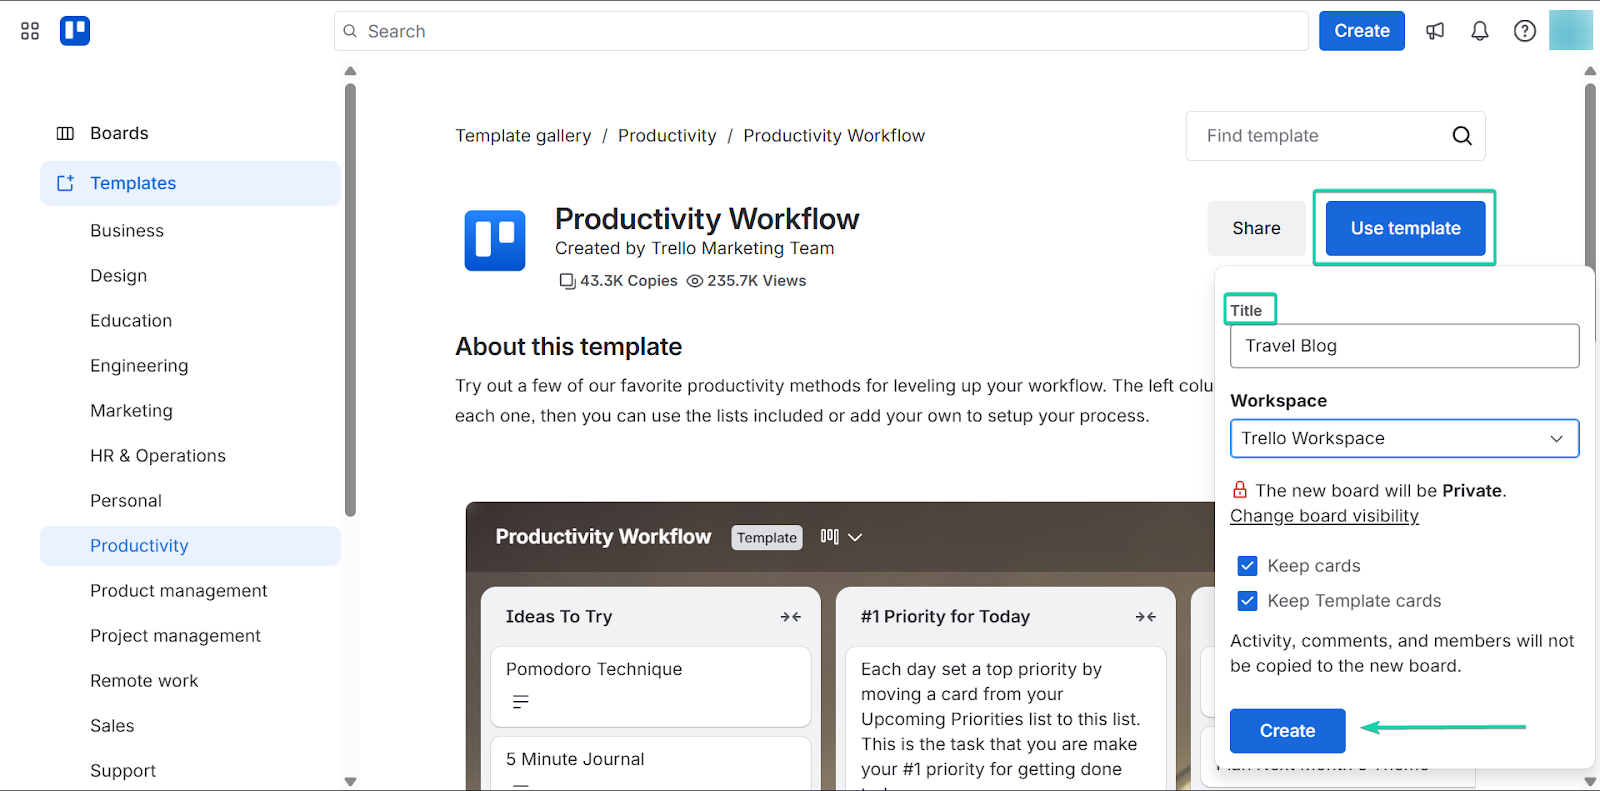
On the homepage, go to “Create” and in the dropdown menu, click “start with a template.”
You can also create a board from scratch.
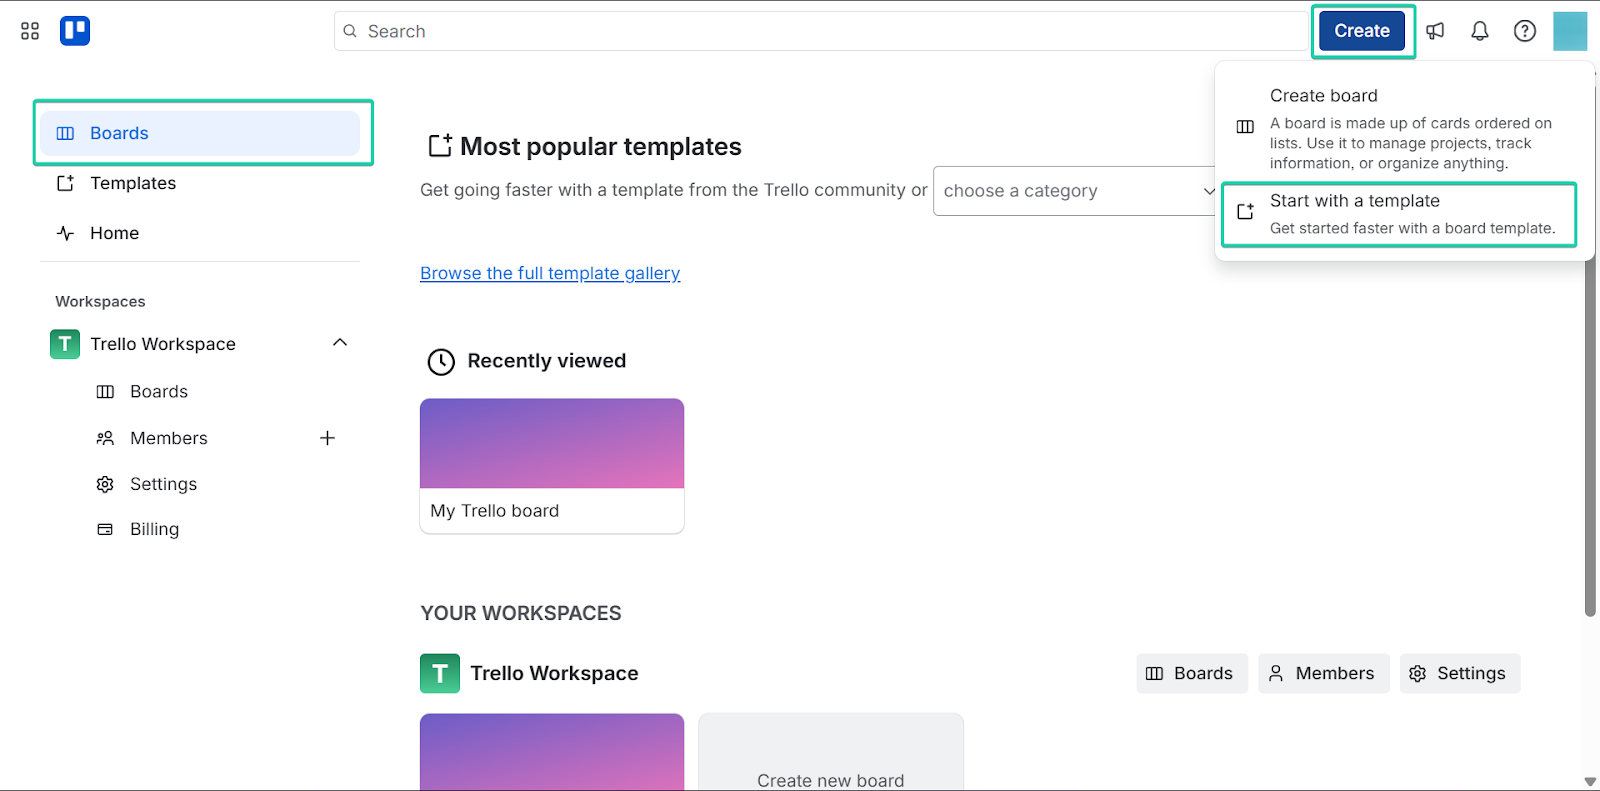
After selecting a template, give it a title and click “Create.”
On your pre-built board, you can edit and add more cards.
You can also use the platform’s drag-and-drop tool to move cards across the board seamlessly.
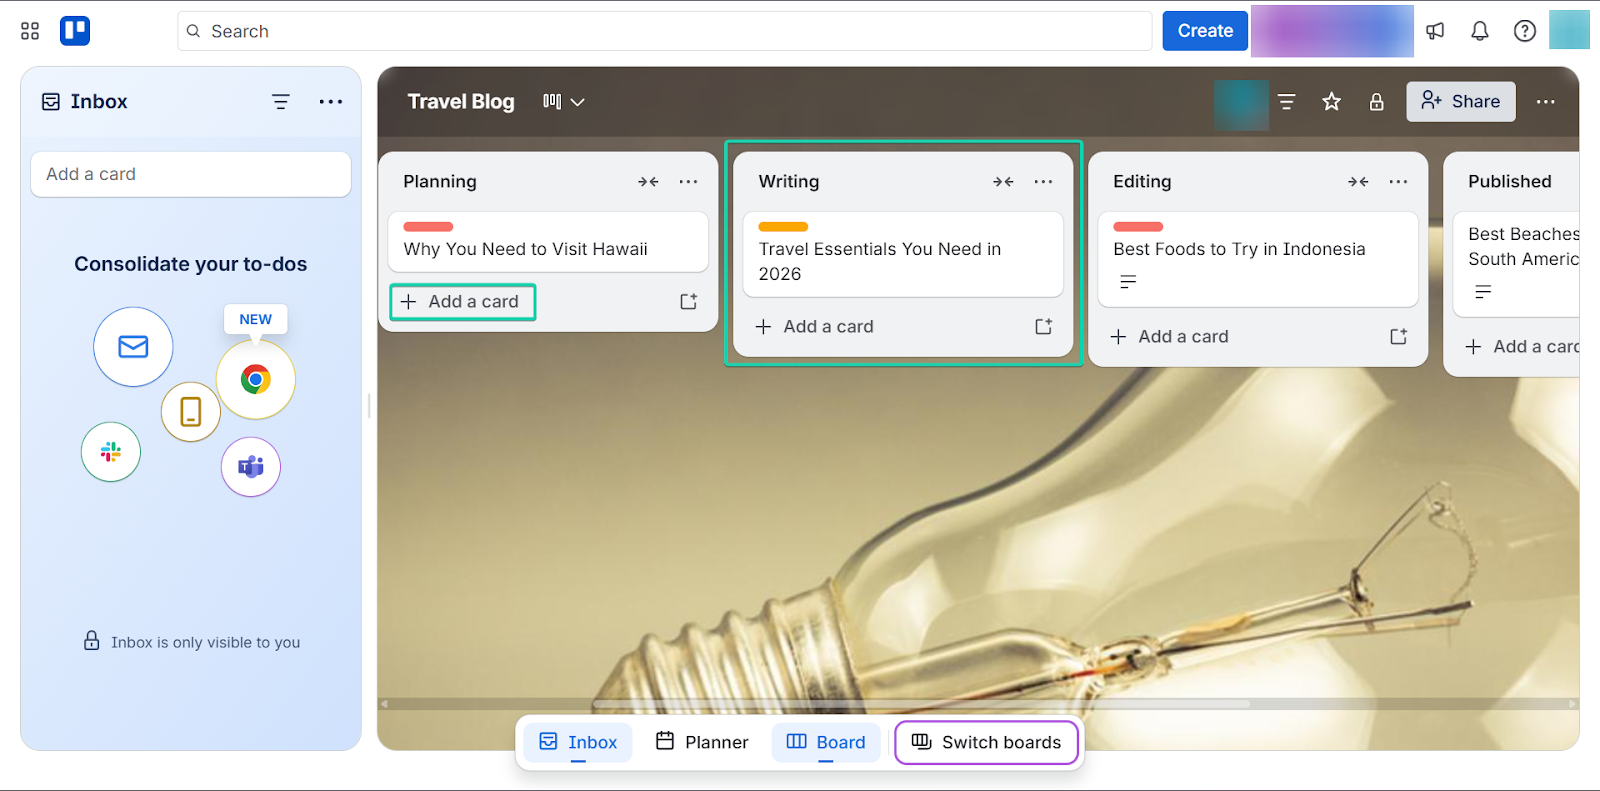
You can also edit your cards.
For example, with the edit labels tool, you can indicate a task's importance by color.
Or you can edit dates and assign members to a card.
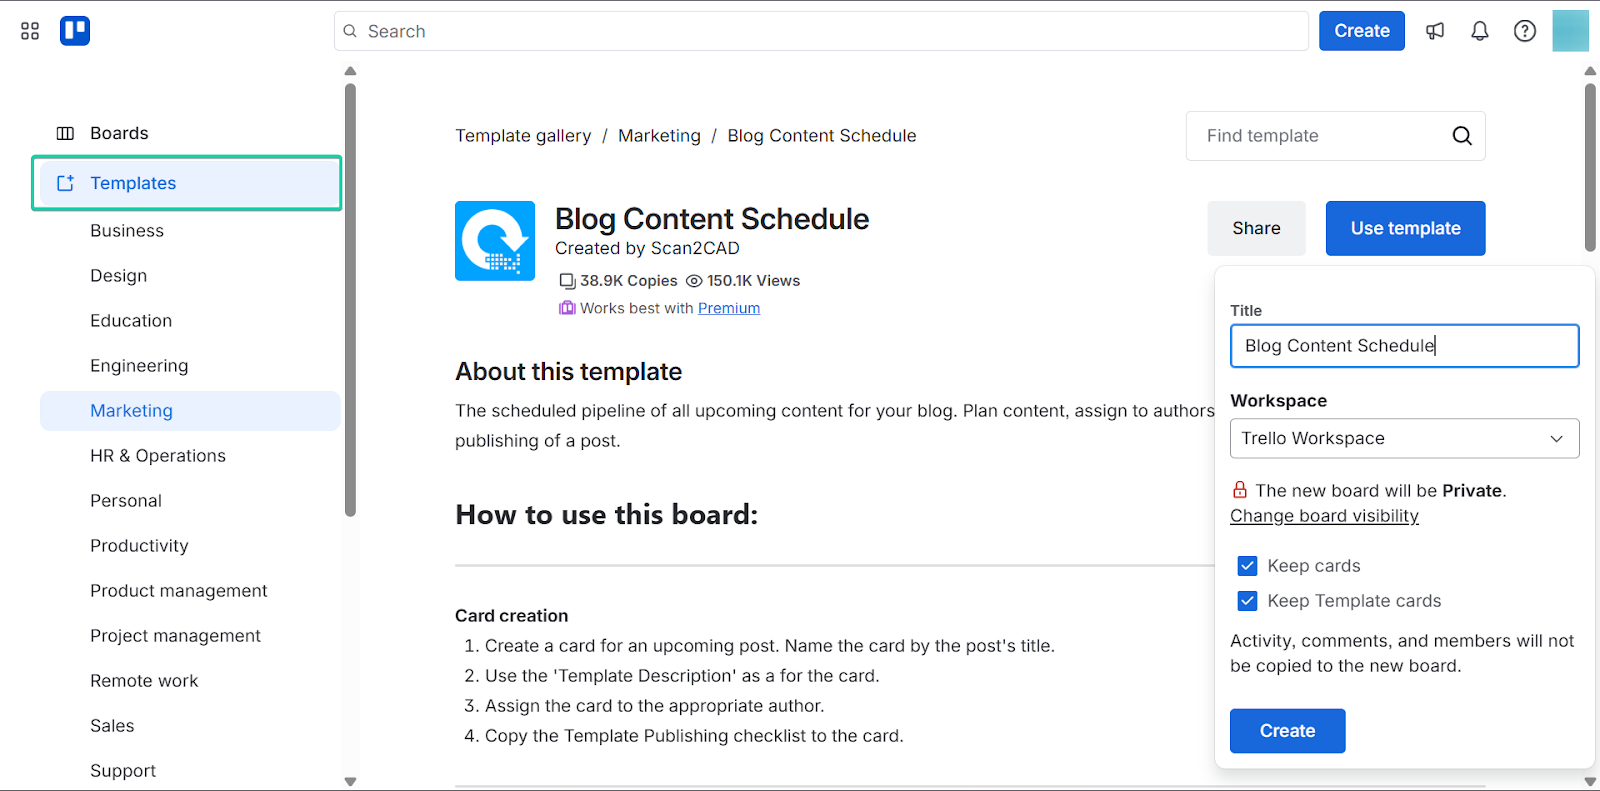
2. Templates
The templates feature lets you use pre-built documents for your workflows.
On Trello, you can create or use existing templates for things like checklists, editorial workflows, or content calendars.
I’ll take you on a walkthrough:
Head to “Templates.”

Select your preferred template, give it a title, and click “Create.”
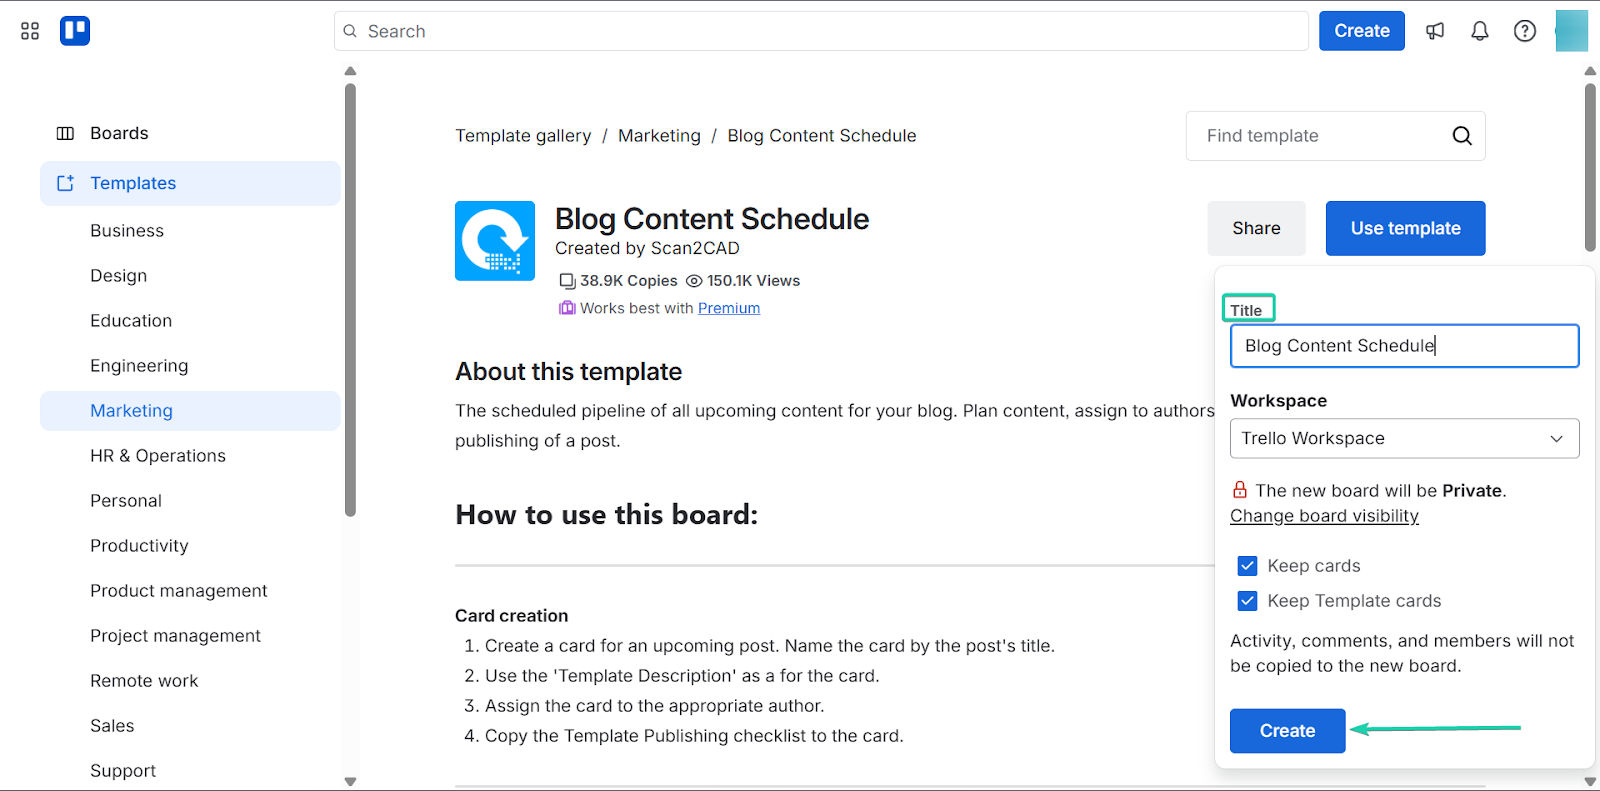
After that, you can tweak the template to suit your needs.
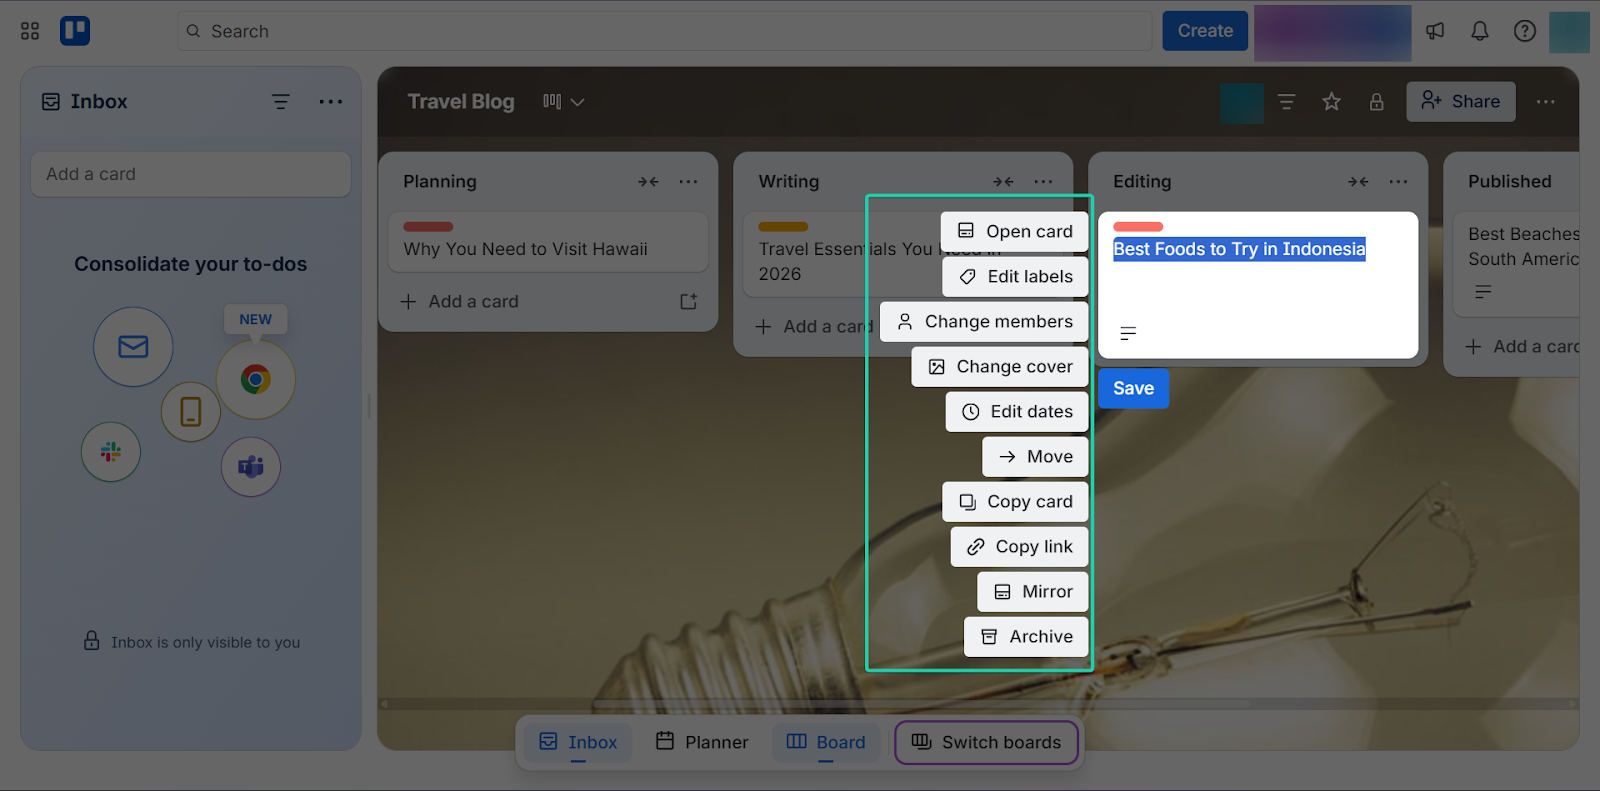
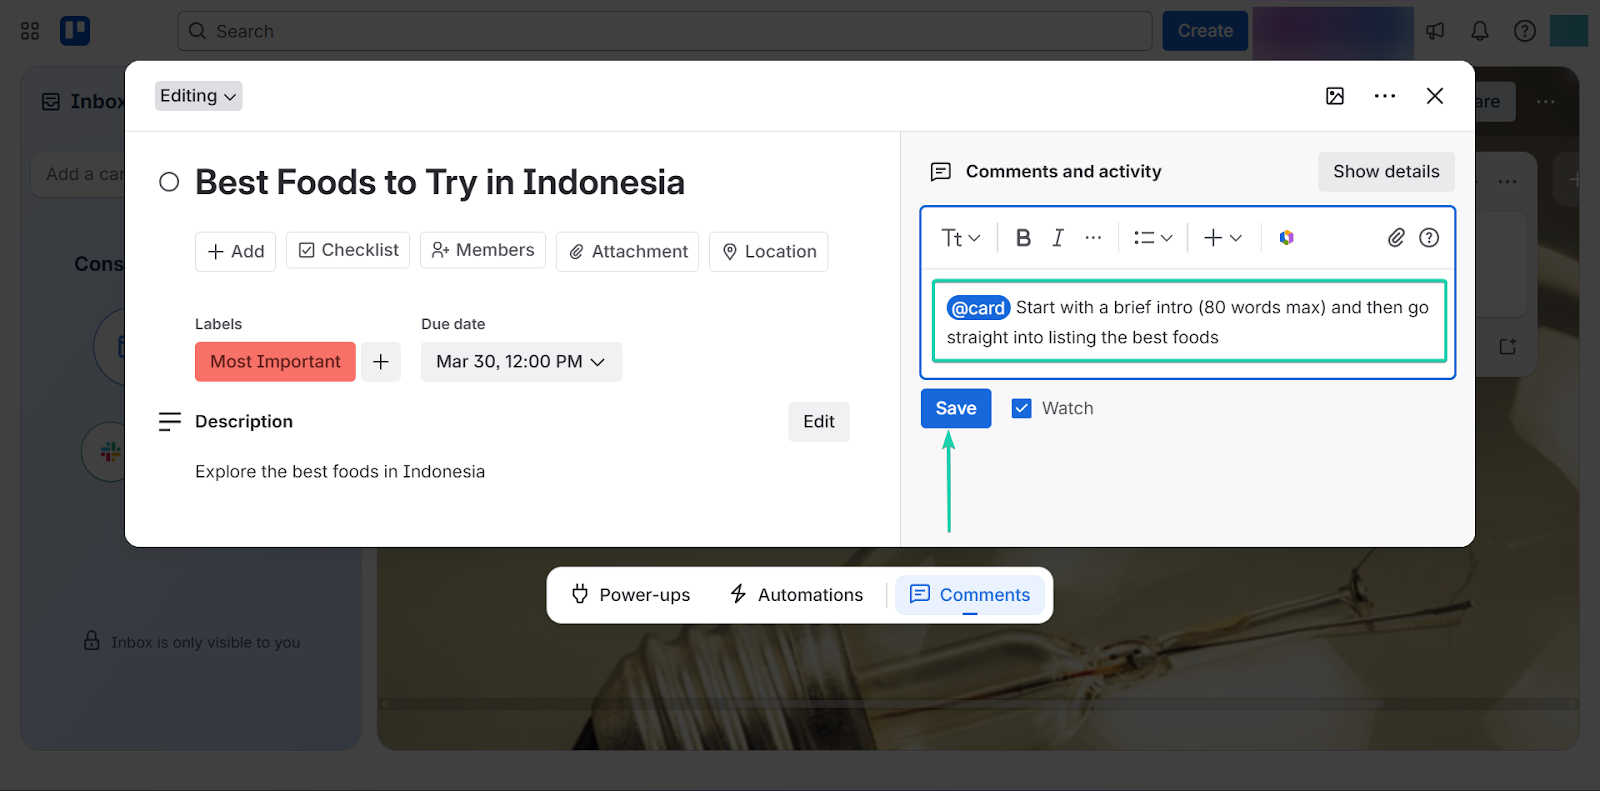
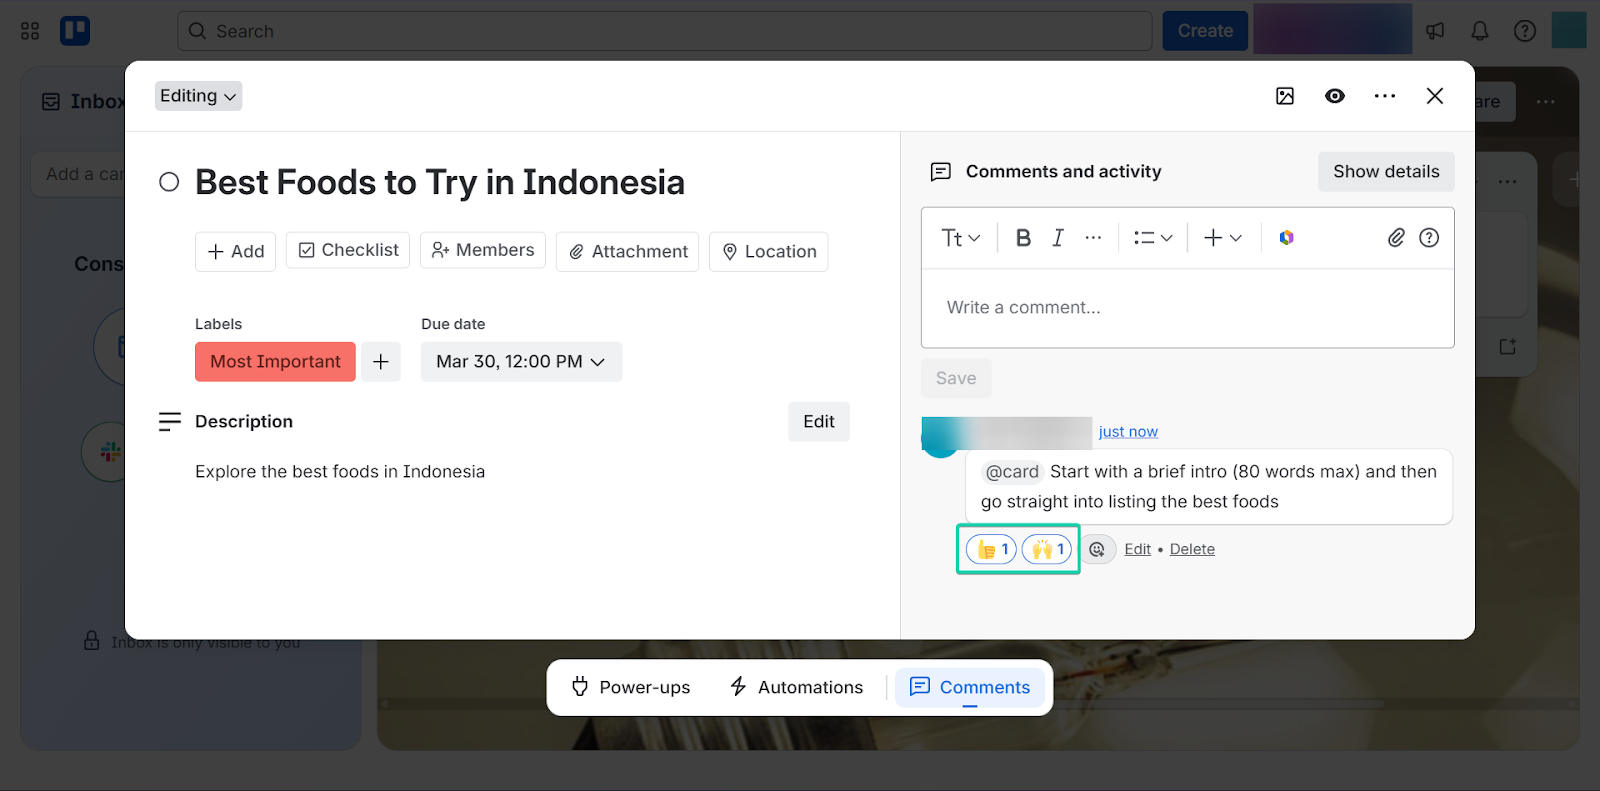
3. Comments
The comments feature lets you communicate with your team and give feedback directly within each card.
You can leave notes and discuss tasks within cards. That way, all communication stays in one place.
Here’s how it works.
On your board, click on the meatball menu (...). Now, select “Open card.”
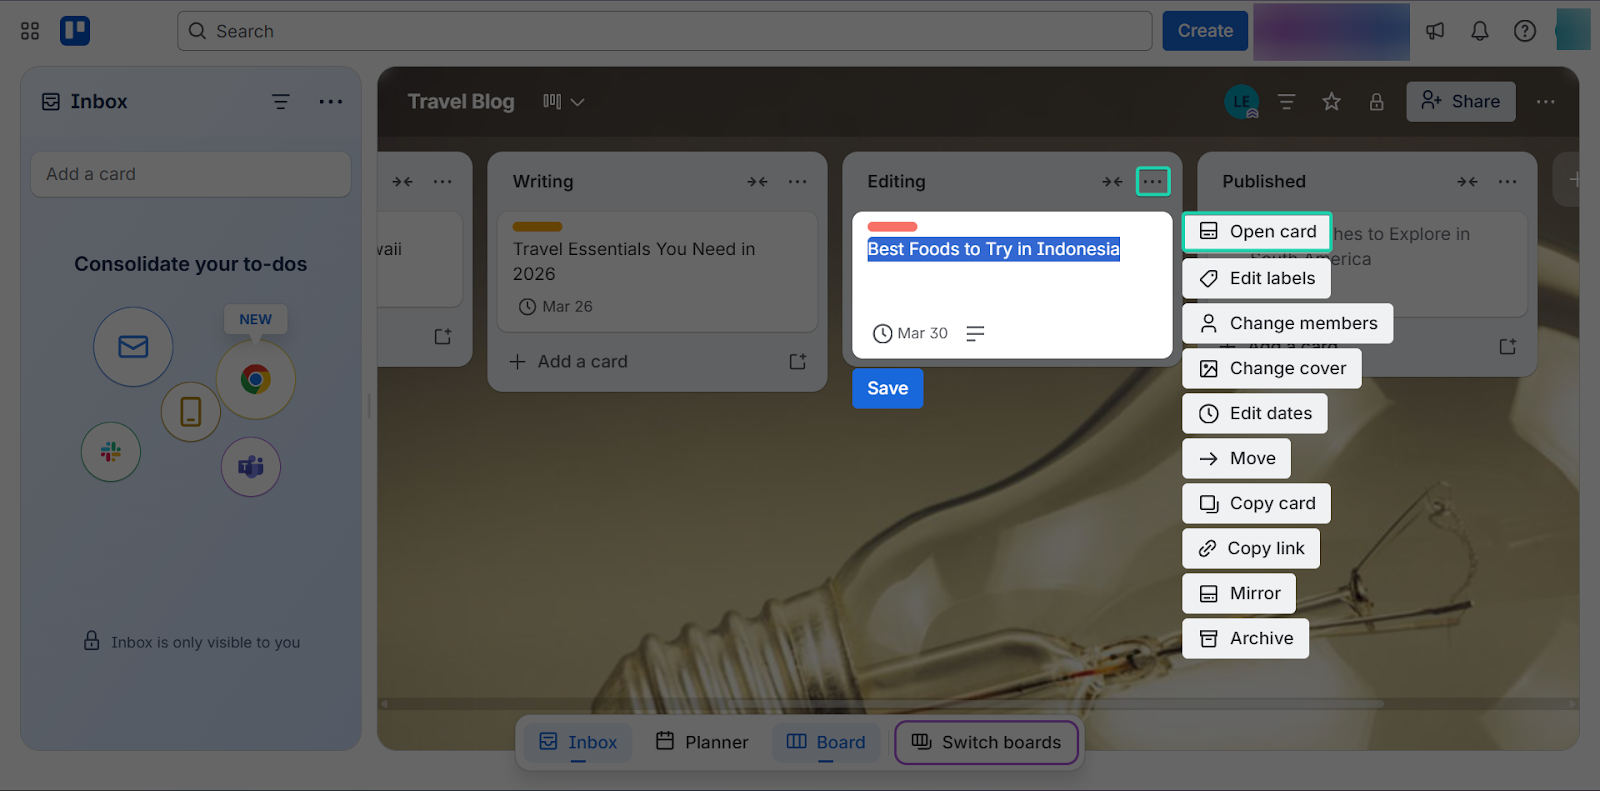
On the right side of your card, you can leave comments.
Type in your comment and hit “save.”
You can also notify members in your comments.
Your team can also reply and react to your comments.
[fs-toc-omit]What I loved vs what I struggled with
What I loved 👍
✅ Has a seamless drag-and-drop tool for moving tasks across boards
✅ Has a generous free plan, offering unlimited cards under this tier
✅ Has a simple and visual interface
What I struggled with 👎
❌ It has limited advanced project management features like Gantt charts
❌ Boards can get cluttered with too many cards
[fs-toc-omit]Best for
- Bloggers who want to manage their content pipeline efficiently.
[fs-toc-omit]Pricing
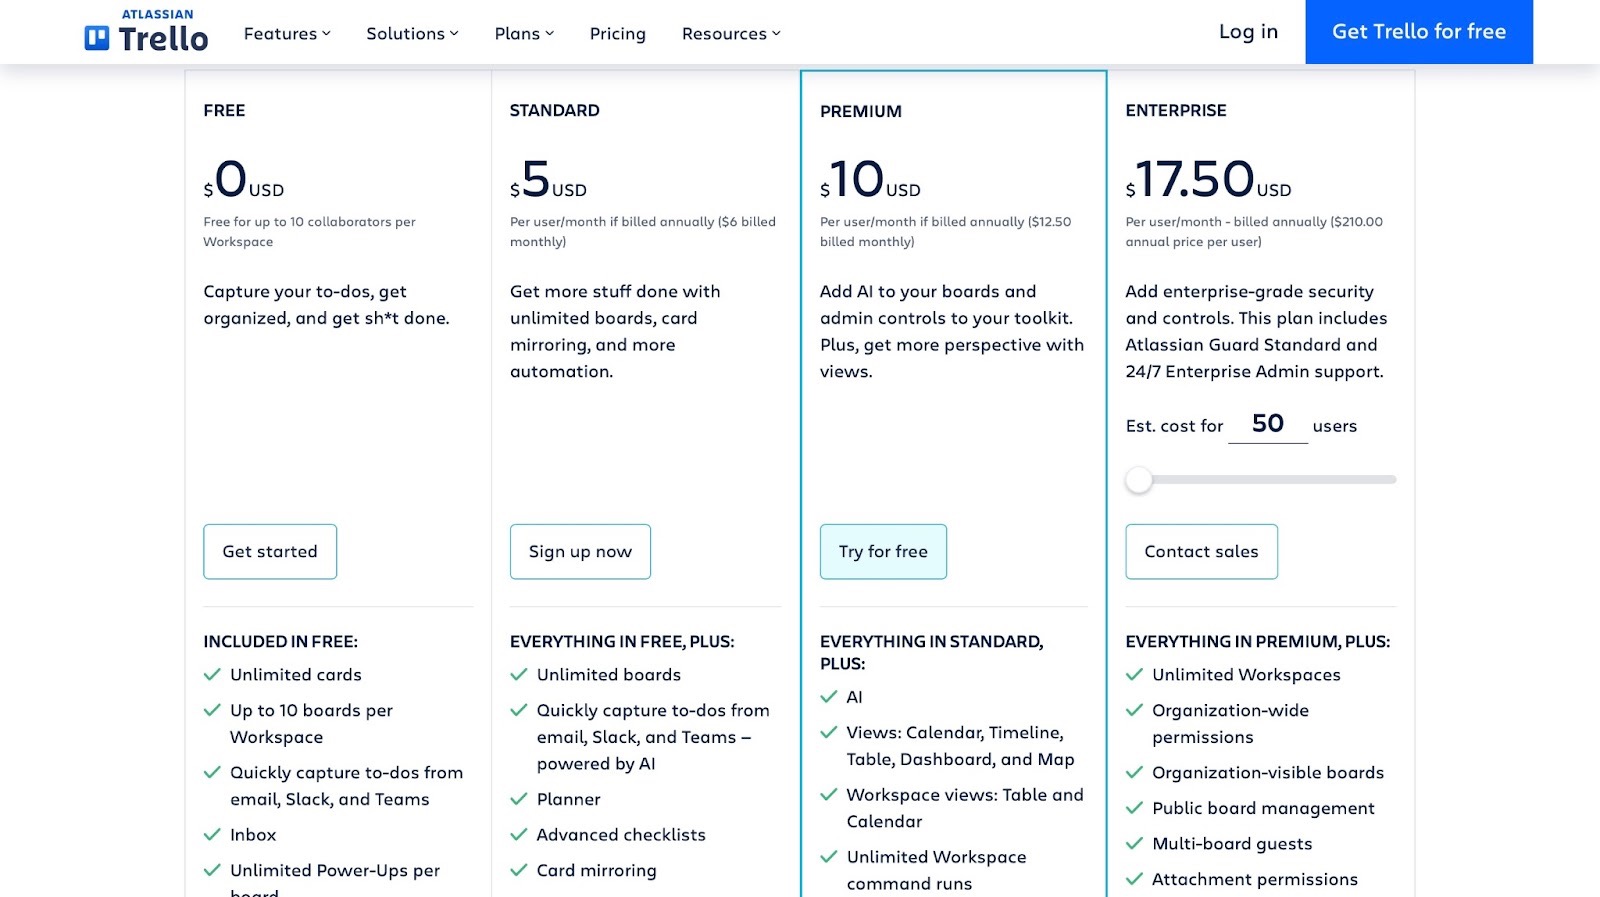
- Free: $0/month
- Standard: $5/user/month
- Premium: $10/user/month
- Enterprise: $17.50/user/month
9. Grammarly - Best for content editing and proofreading
We can’t forget about Grammarly when talking about blogging tools.
Grammarly is an AI-powered writing assistant that helps you improve your writing, from grammar to clarity, style, and tone, before publishing.
Think of it as your second pair of eyes when you’re writing blog posts. It helps your writing sound more polished and professional.
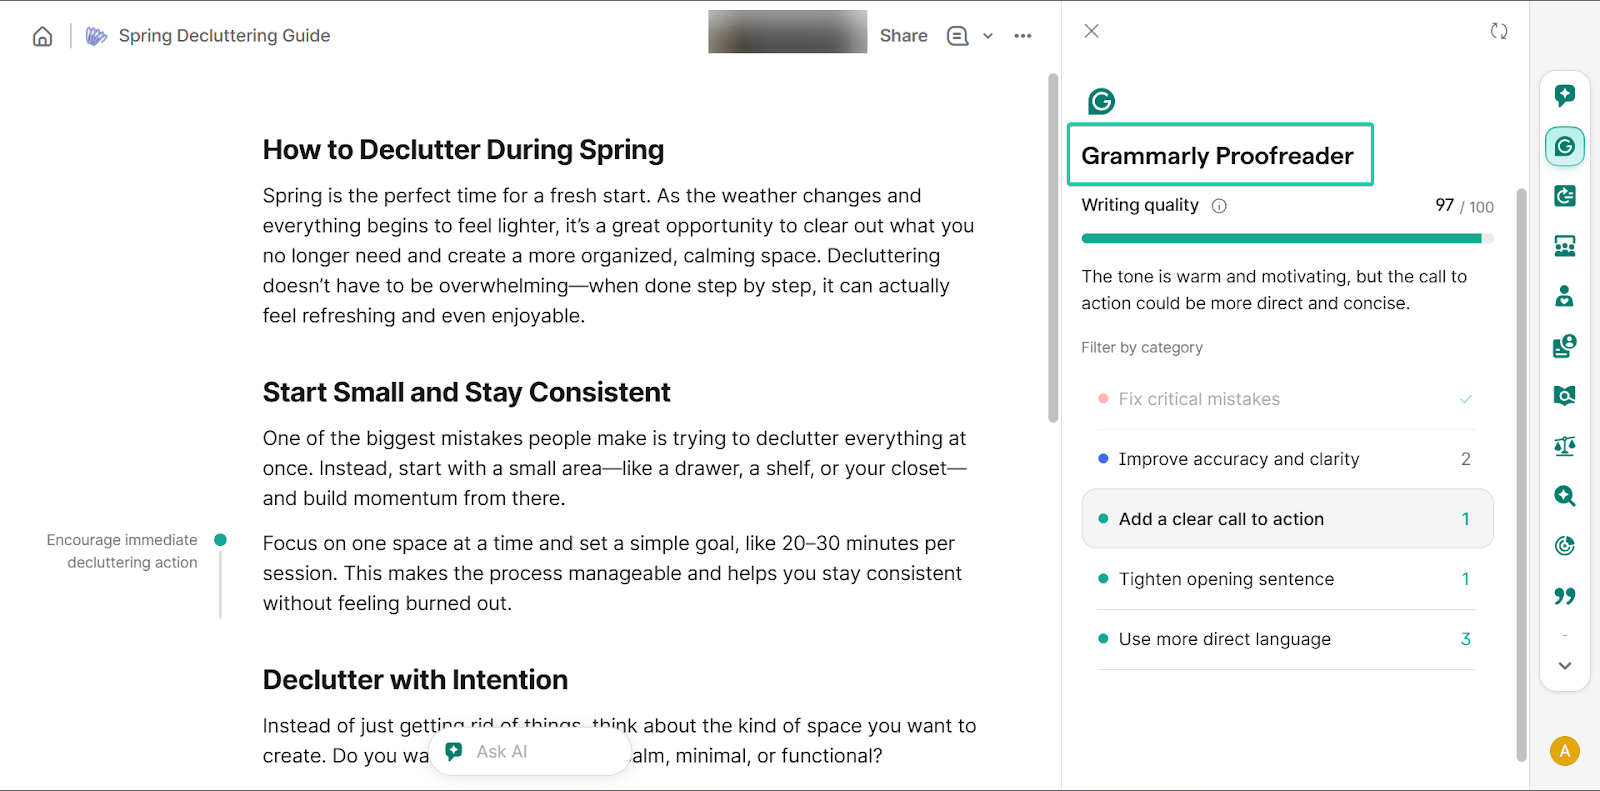
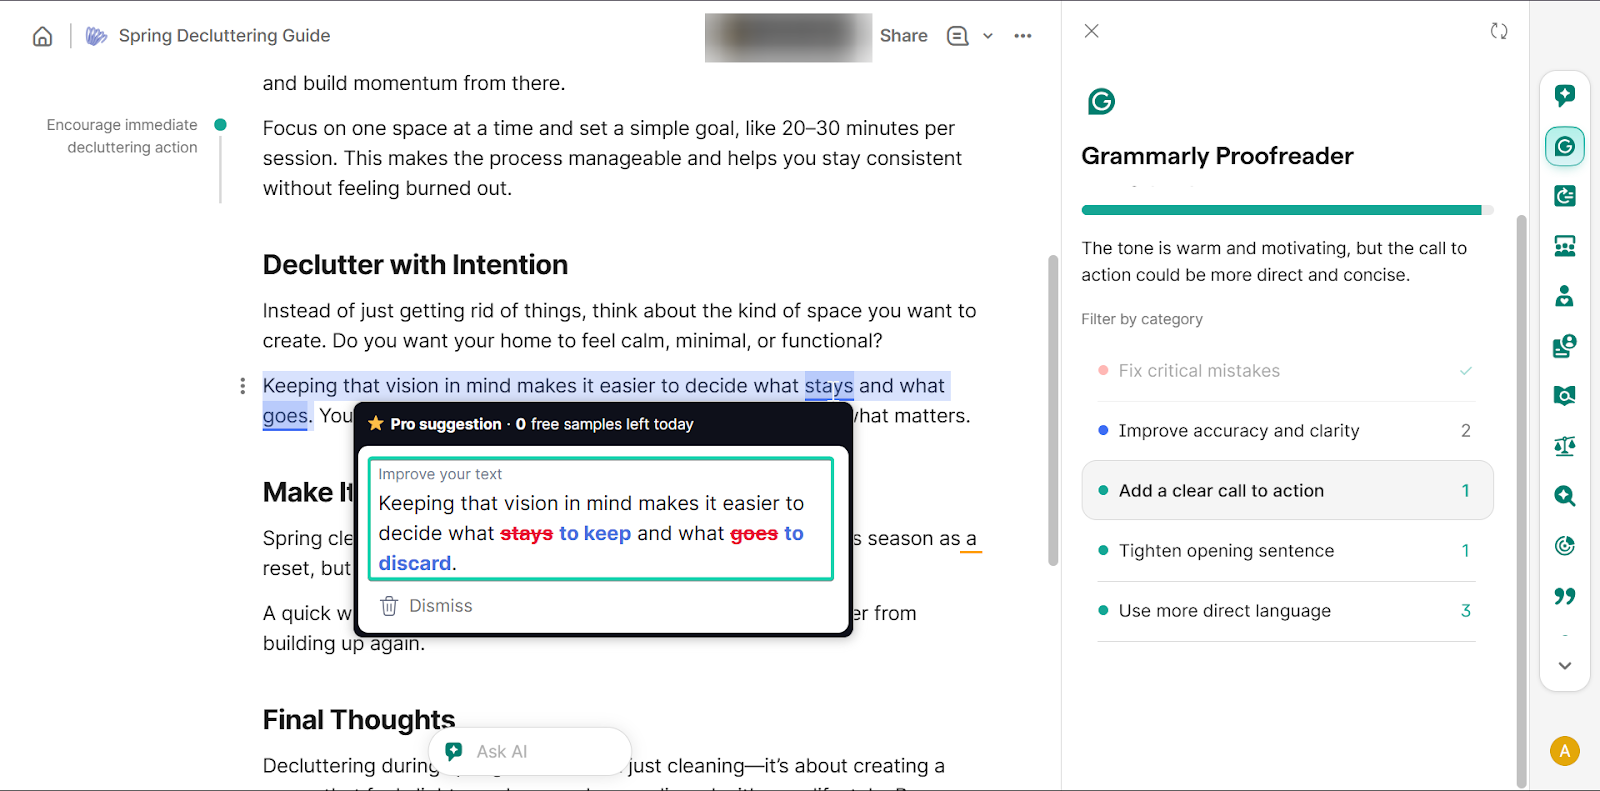
I liked Grammarly’s proofreader feature, which detects and fixes grammar, spelling, and clarity issues.
And with its AI chat feature, you can get help generating, editing, or improving content.

Finally, the paraphraser helps you rewrite sentences for better clarity or tone.
[fs-toc-omit]What I loved about Grammarly
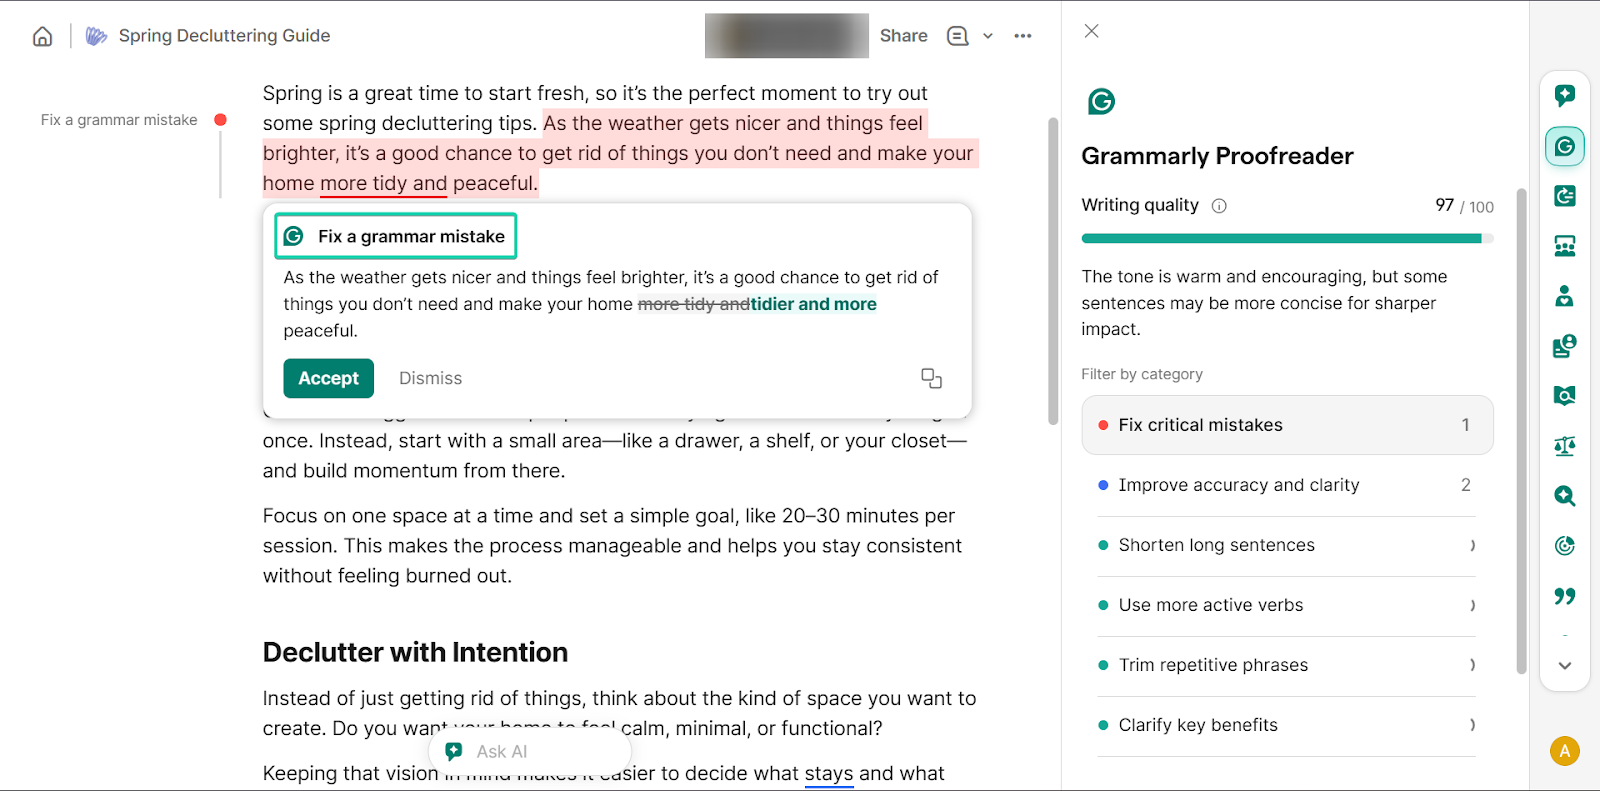
1. Grammarly proofreader
Grammarly proofreader is a feature that checks your content for grammar, spelling, punctuation, and clarity issues.
As you write, Grammarly highlights errors and suggests corrections in real time.
Think of it as your built-in editor that works as you write.
Let’s check it out:
First, start drafting your content, and Grammarly’s proofreader will start working in real time.
As you type, Grammarly provides you with suggestions on how to improve your text.
Grammarly proofreader provides detailed insights into your text, including the tone and overall quality.
It also provides suggestions you can accept or dismiss.

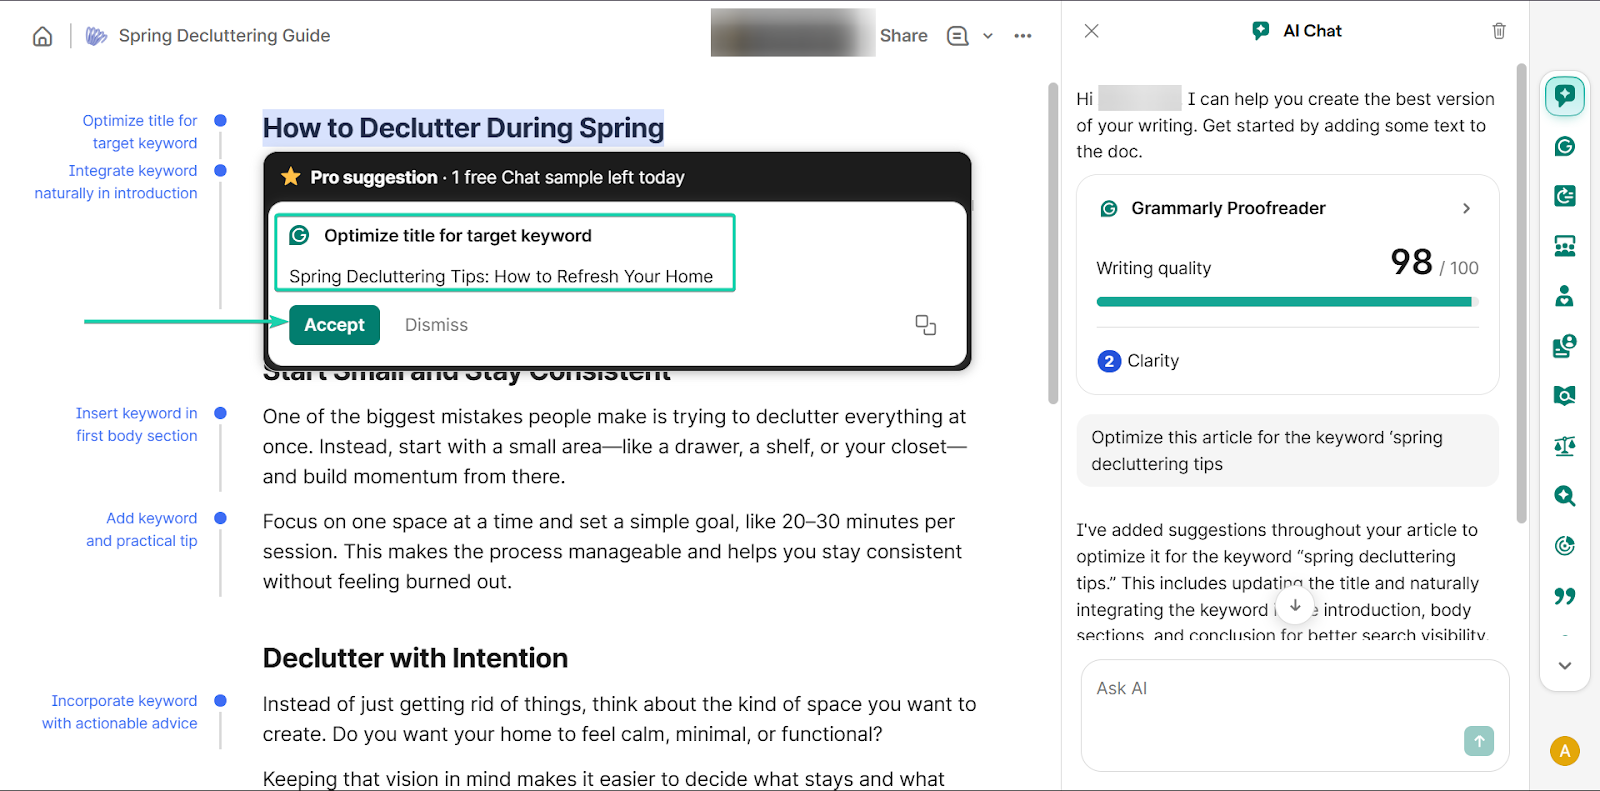
2. AI Chat
Grammarly’s AI chat helps you generate ideas, rewrite content, or improve sections of your writing. You can prompt the AI to simplify sentences, adjust tone, and even expand on ideas.
Here’s how it works:
At the bottom of the page, you’ll find the “Ask AI” bar.
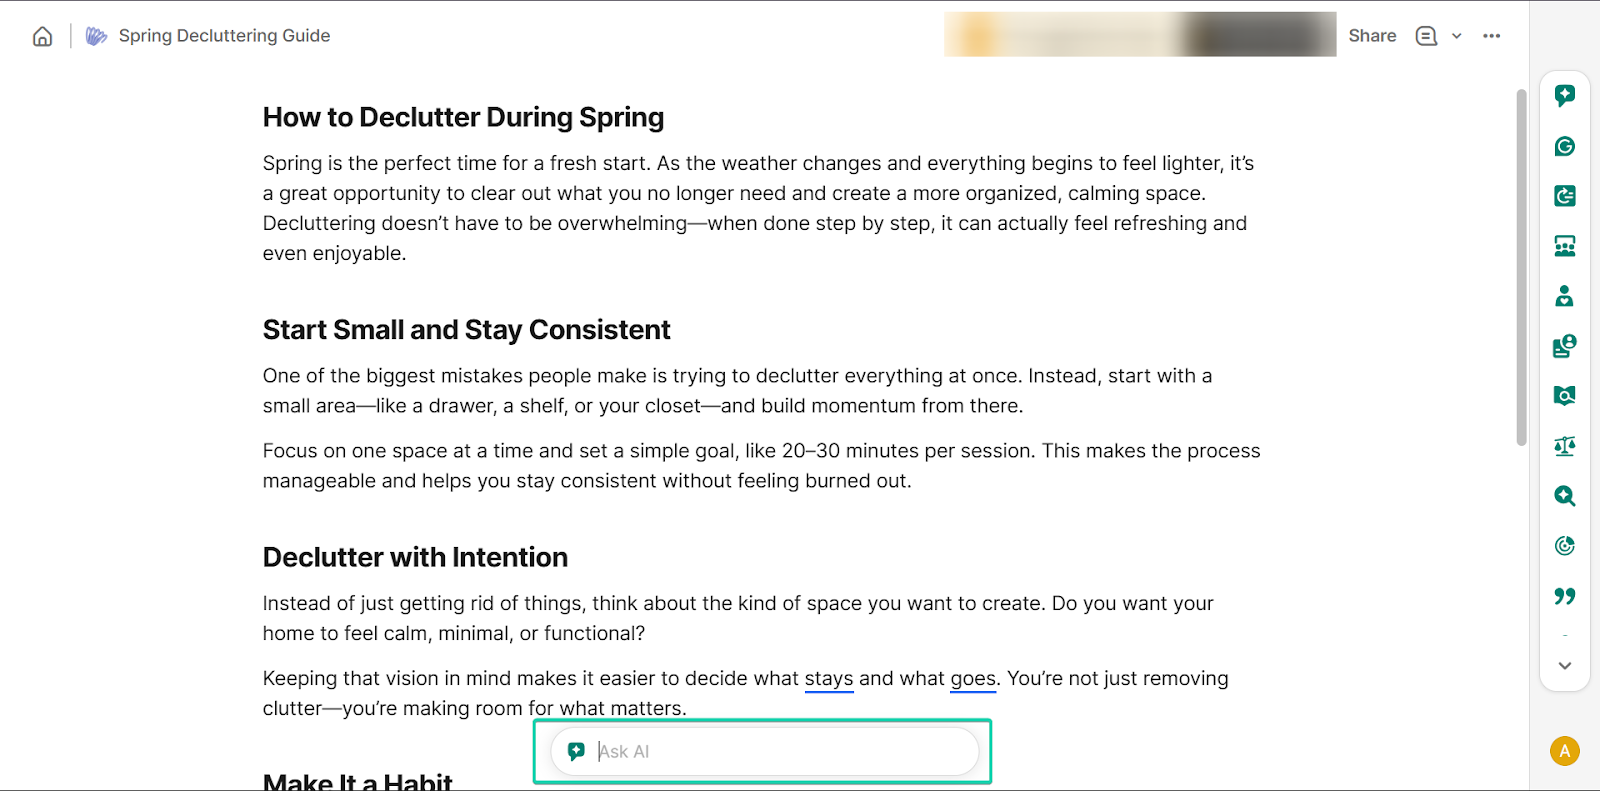
Next, enter your prompt.

AI Chat will then generate suggestions based on your request to help you improve your writing.
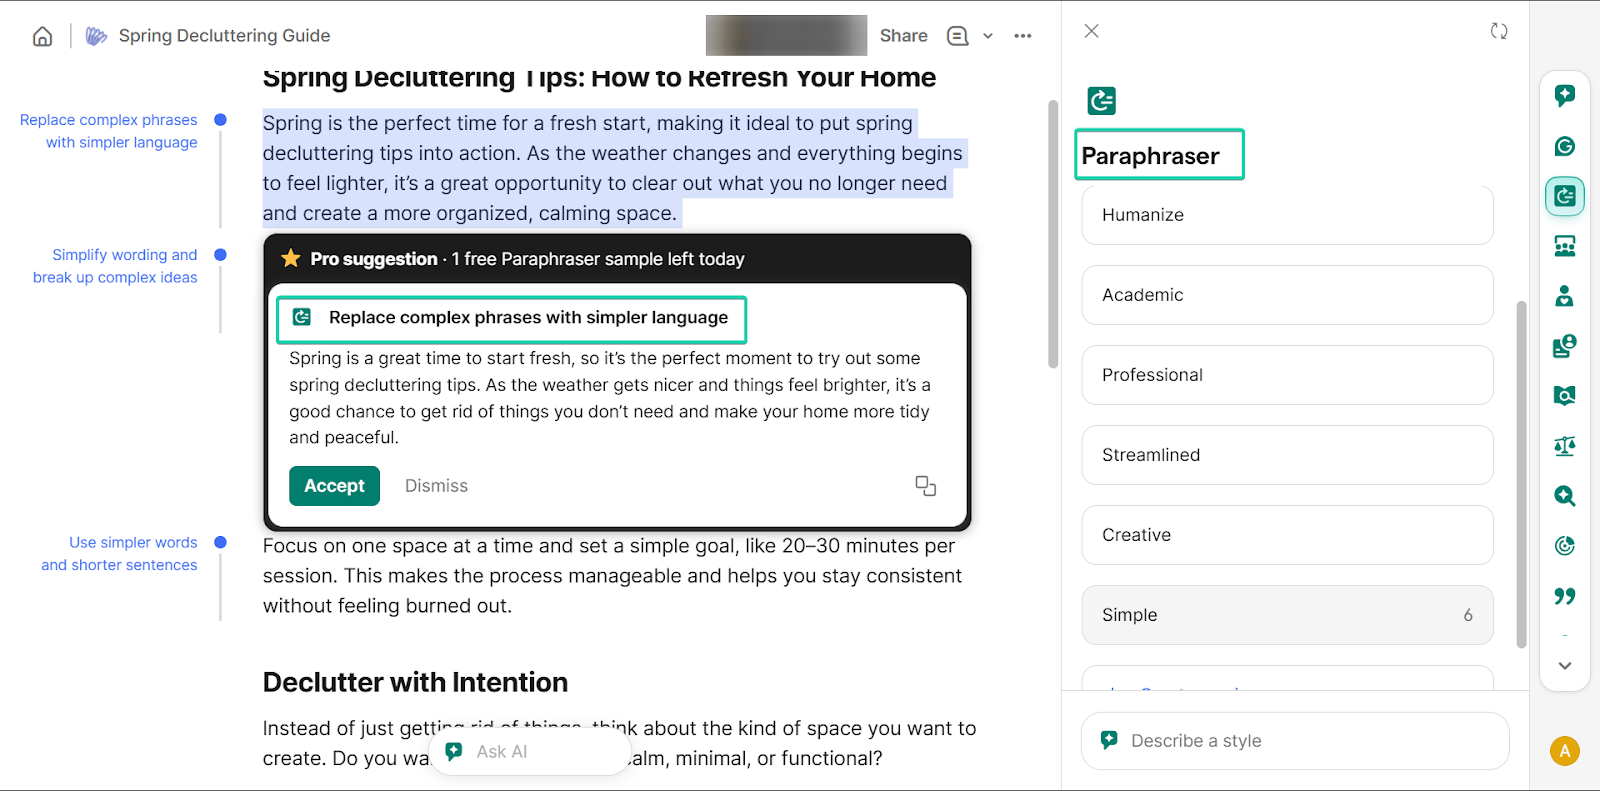
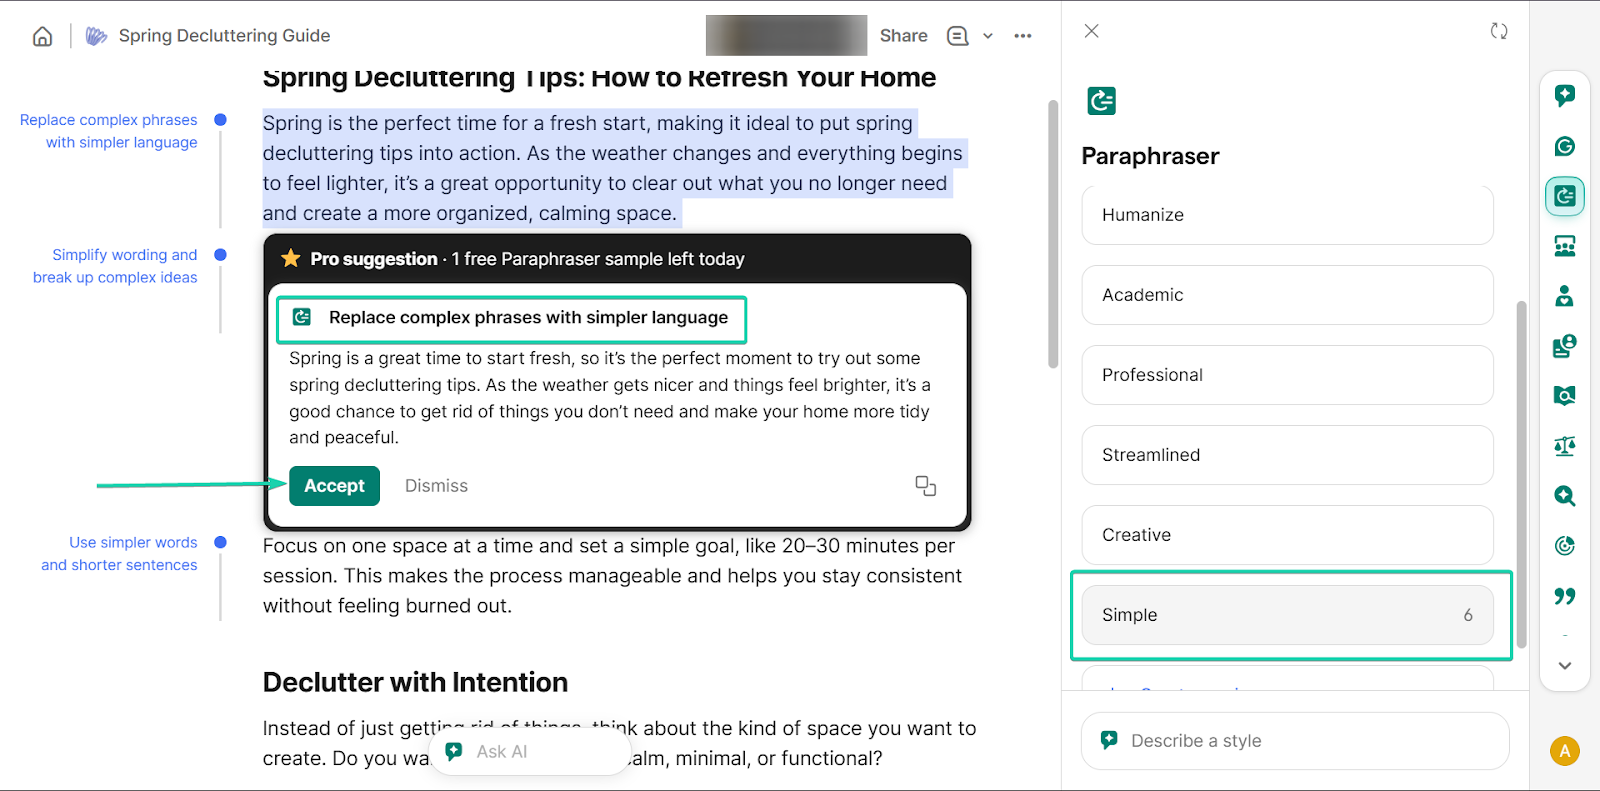
3. Paraphraser
The paraphraser feature helps you rewrite sentences to improve clarity, tone, or structure.
When you highlight text, Grammarly will suggest alternative ways to phrase it. This makes your writing clearer and more concise.
I’ll take you on a walkthrough:
Head over to “Paraphraser.”
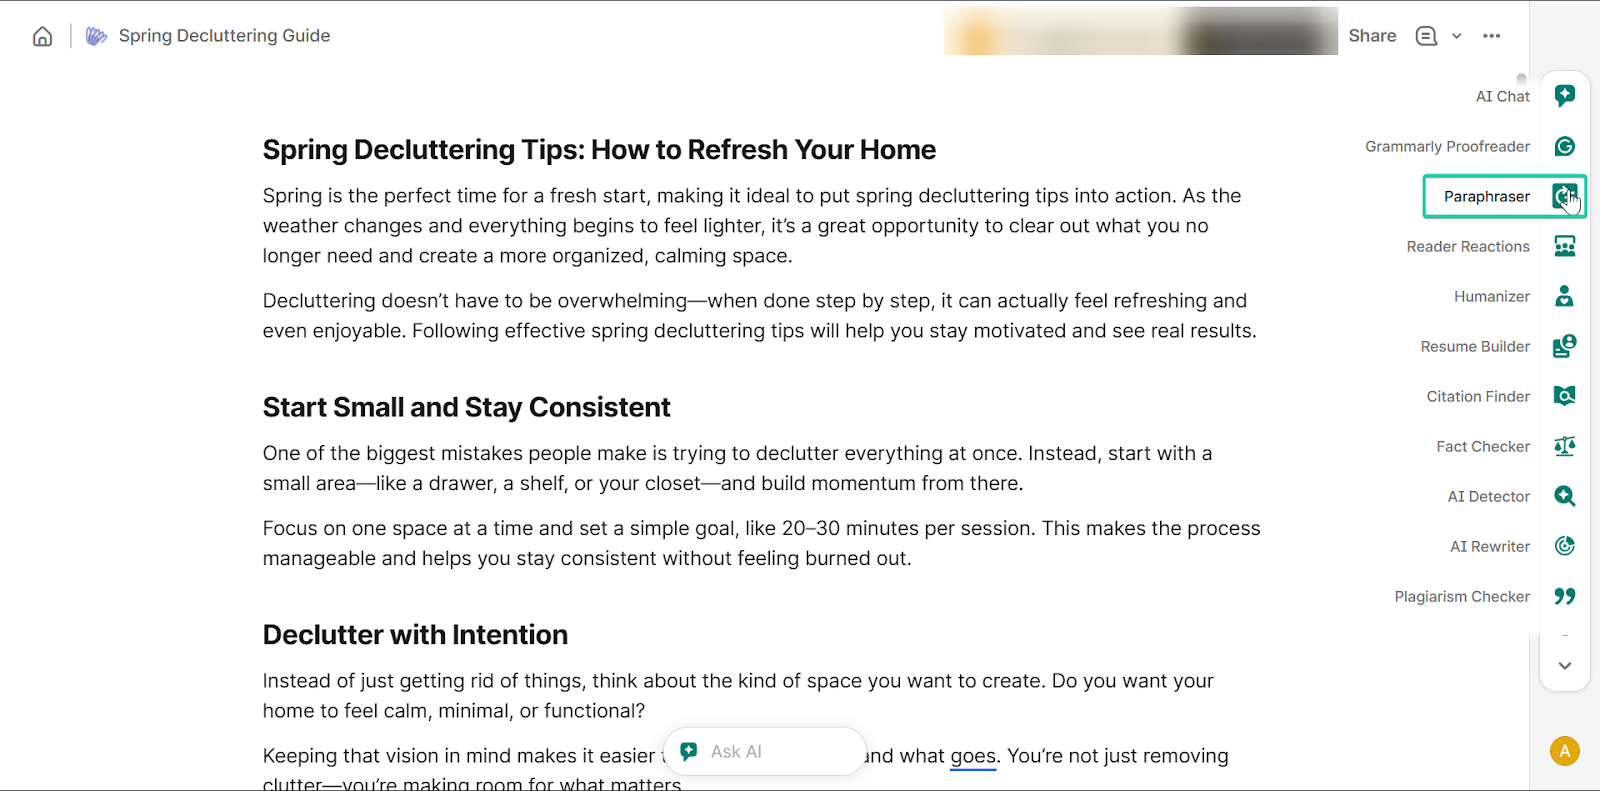
Paraphraser provides feedback and suggestions on your blog post.
You can highlight a portion of your post and ask Grammarly to change the writing style.
You can also use AI chat to describe your style.

Finally, you can review the paraphraser's suggestion and either accept or dismiss the changes.
[fs-toc-omit]What I loved vs what I struggled with
What I loved 👍
✅ Easy to use and integrates with many platforms
✅ AI features support faster writing and editing
✅ Supports real-time writing and editing
What I struggled with 👎
❌ Advanced features like plagiarism detection require a paid plan
❌ Suggestions can get repetitive or not always match your tone
[fs-toc-omit]Best for
- Professionals who want polished, error-free writing
[fs-toc-omit]Pricing
- Free: $0/month
- Pro: $12/month
- Enterprise: Contact sales
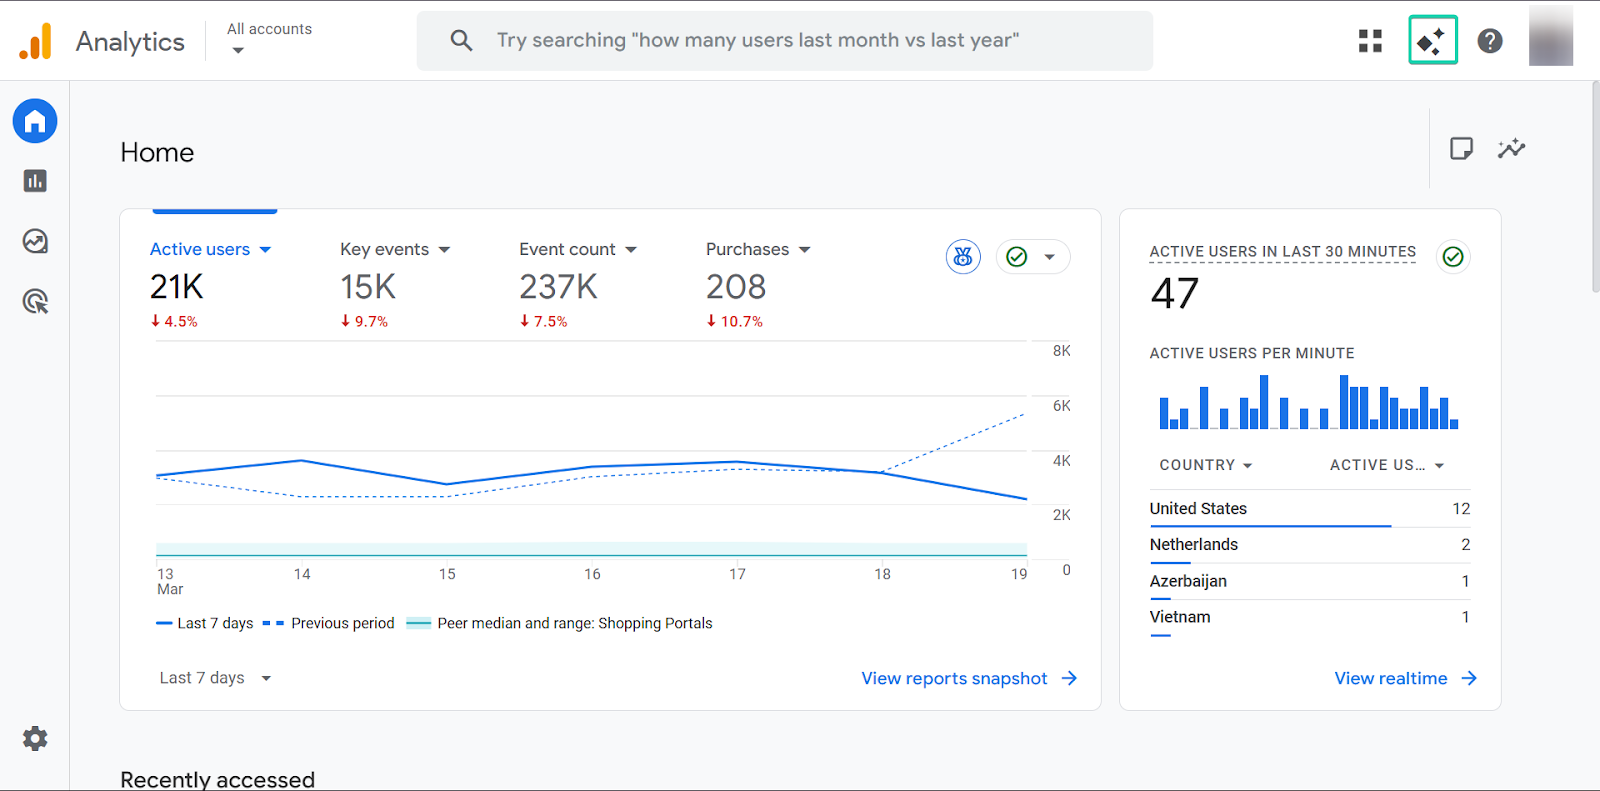
10. Google Analytics - Best for website tracking
Last but not least on my list of best blogging tools is Google Analytics.
It’s a web analytics tool that helps you track and understand how people interact with your blog posts by providing insights into your traffic, audience behavior, and content performance.
That way, it can help you create data-driven blog posts.

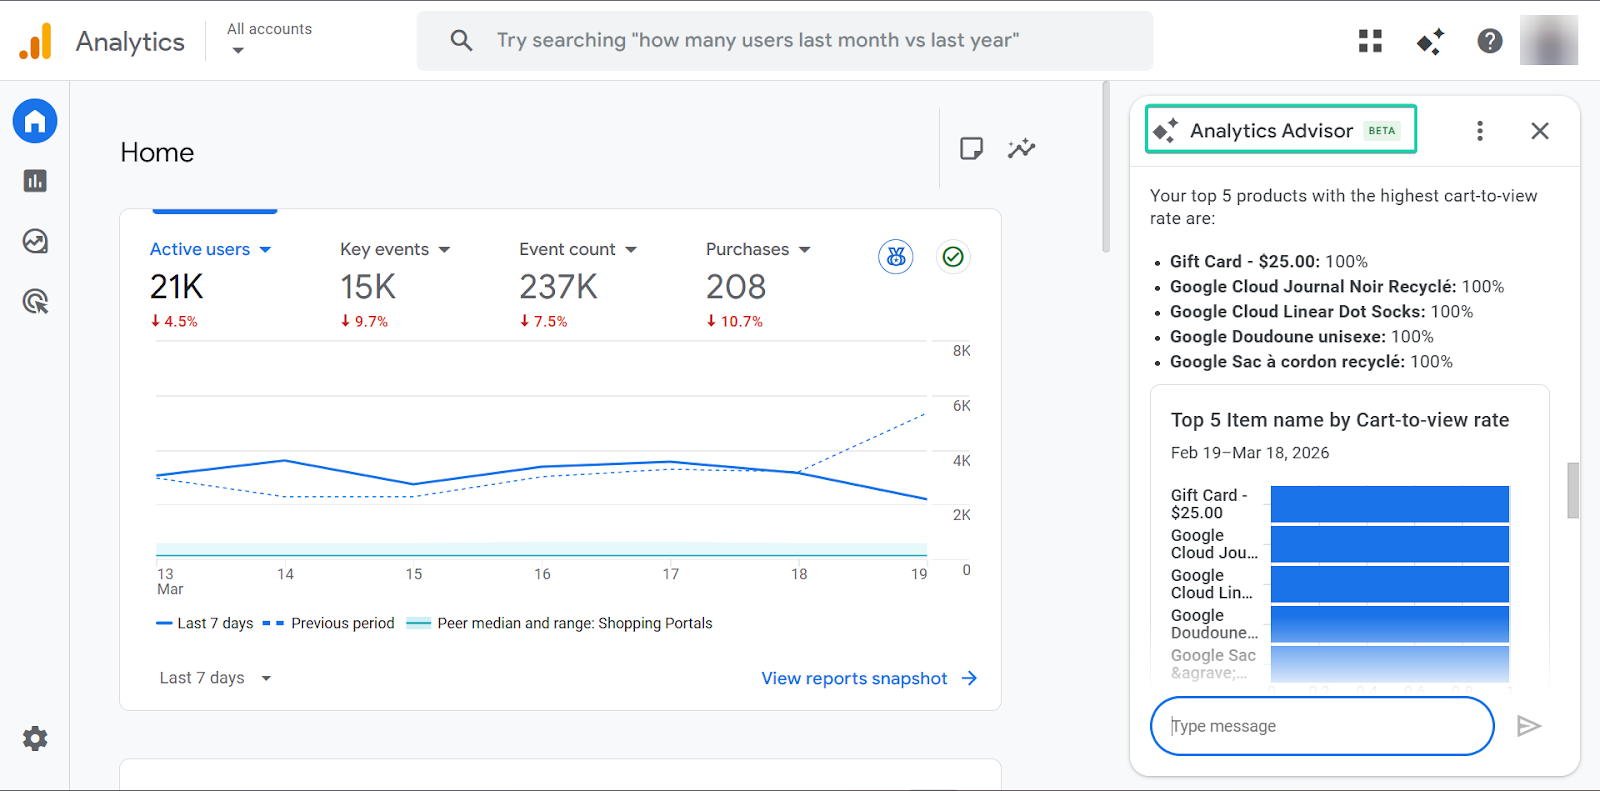
Its analytics advisor feature provides insights and recommendations based on your data.
The reports snapshot feature lets you view a quick summary of your website performance.
And finally, with the explorations feature, you can analyze your data in more detail using customizable reports.
[fs-toc-omit]What I loved about Google Analytics
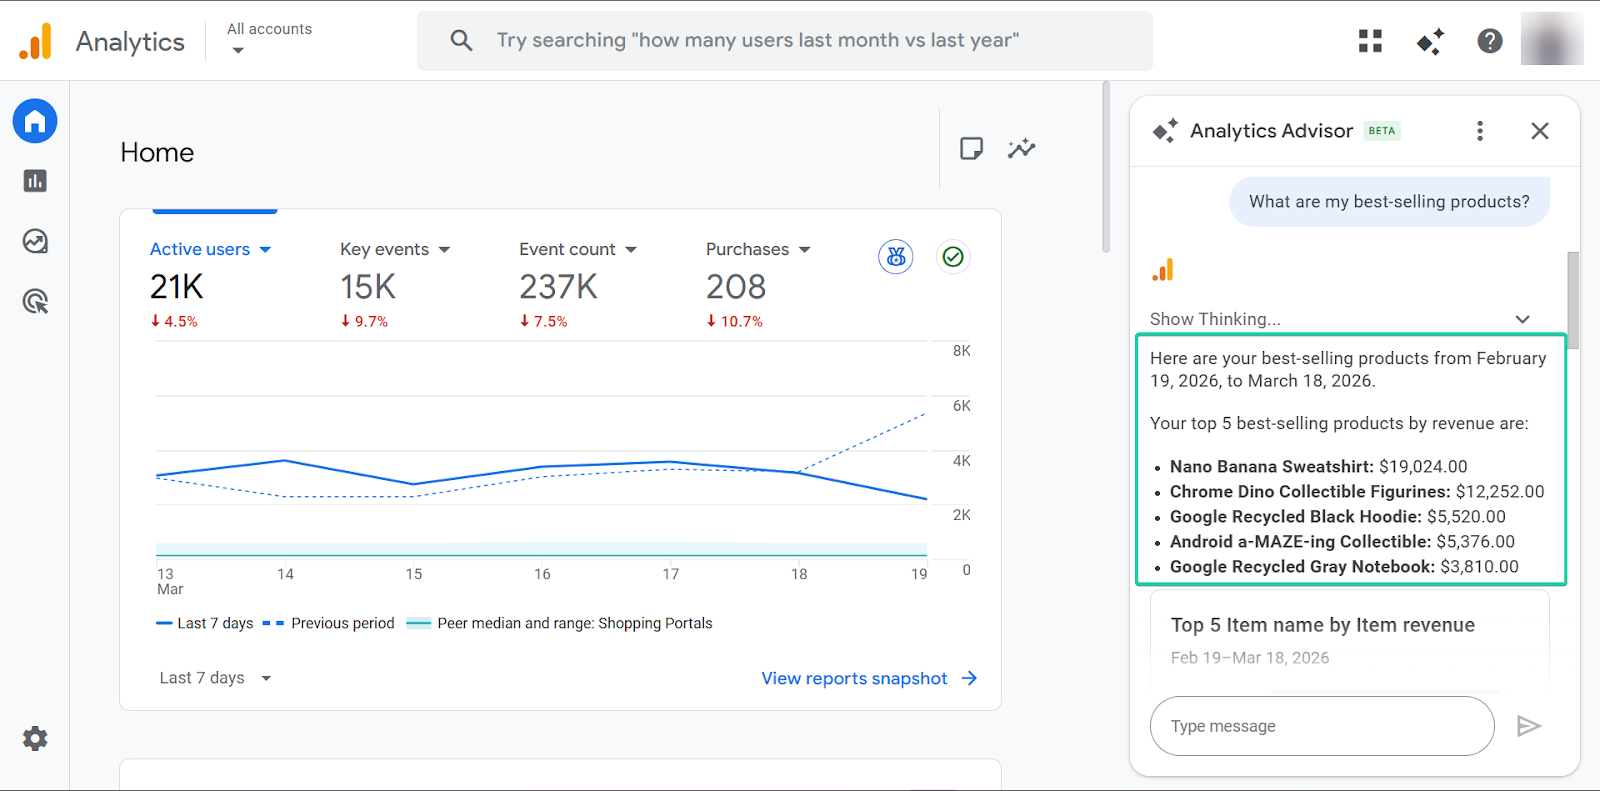
1. Analytics advisor
The analytics advisor feature highlights key trends and provides suggestions based on your data.
It works by automatically analyzing your website traffic and identifying any opportunities or issues.
Here’s how it works:
First, go to “Ask Analytics Advisor.”
Next, enter your prompt.
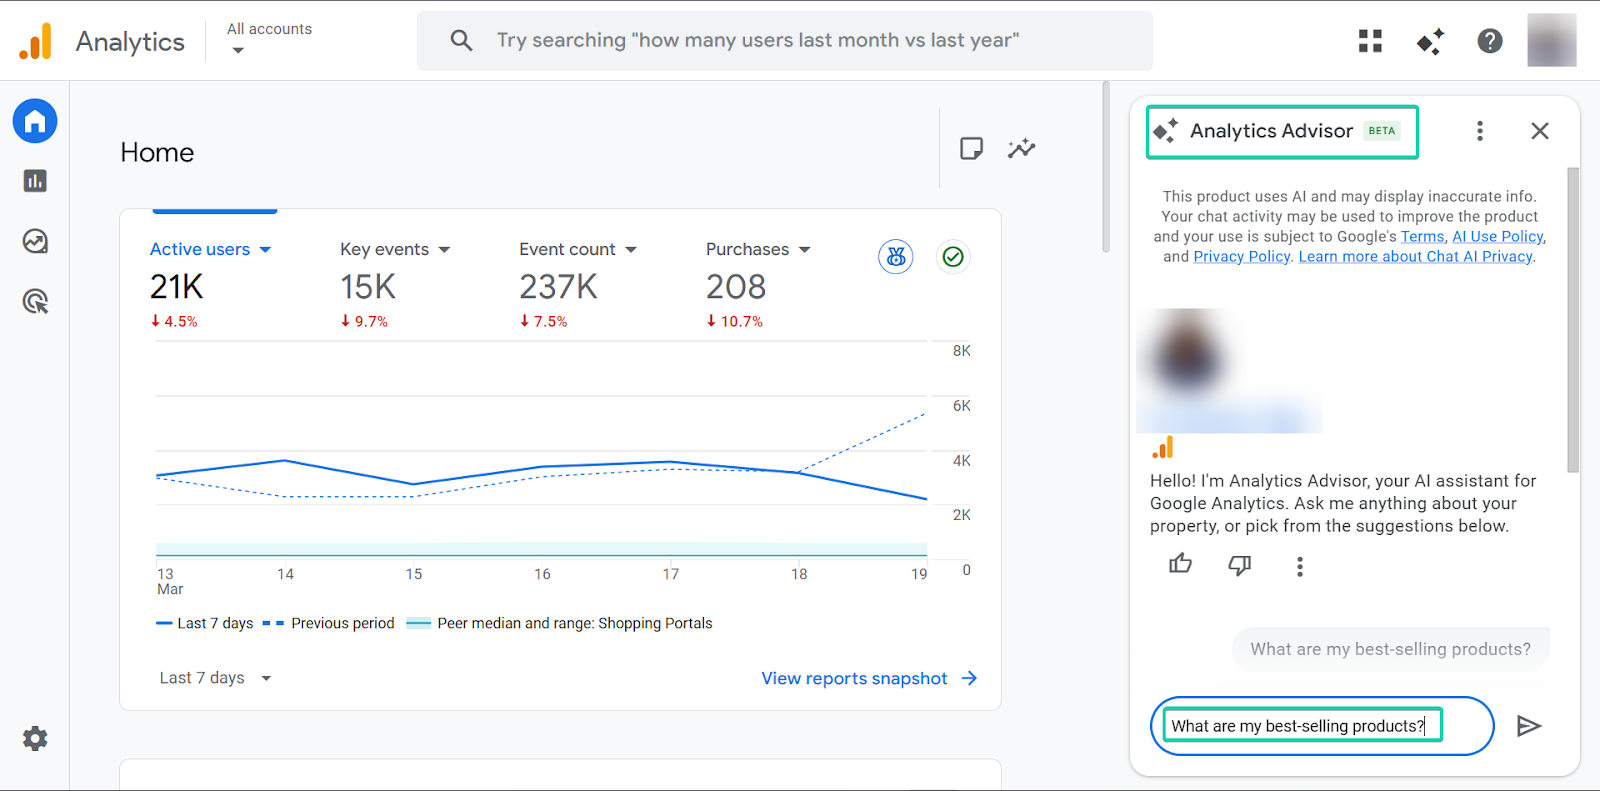
The analytics advisor will then generate answers for you, providing you with a quick summary of your site’s performance.
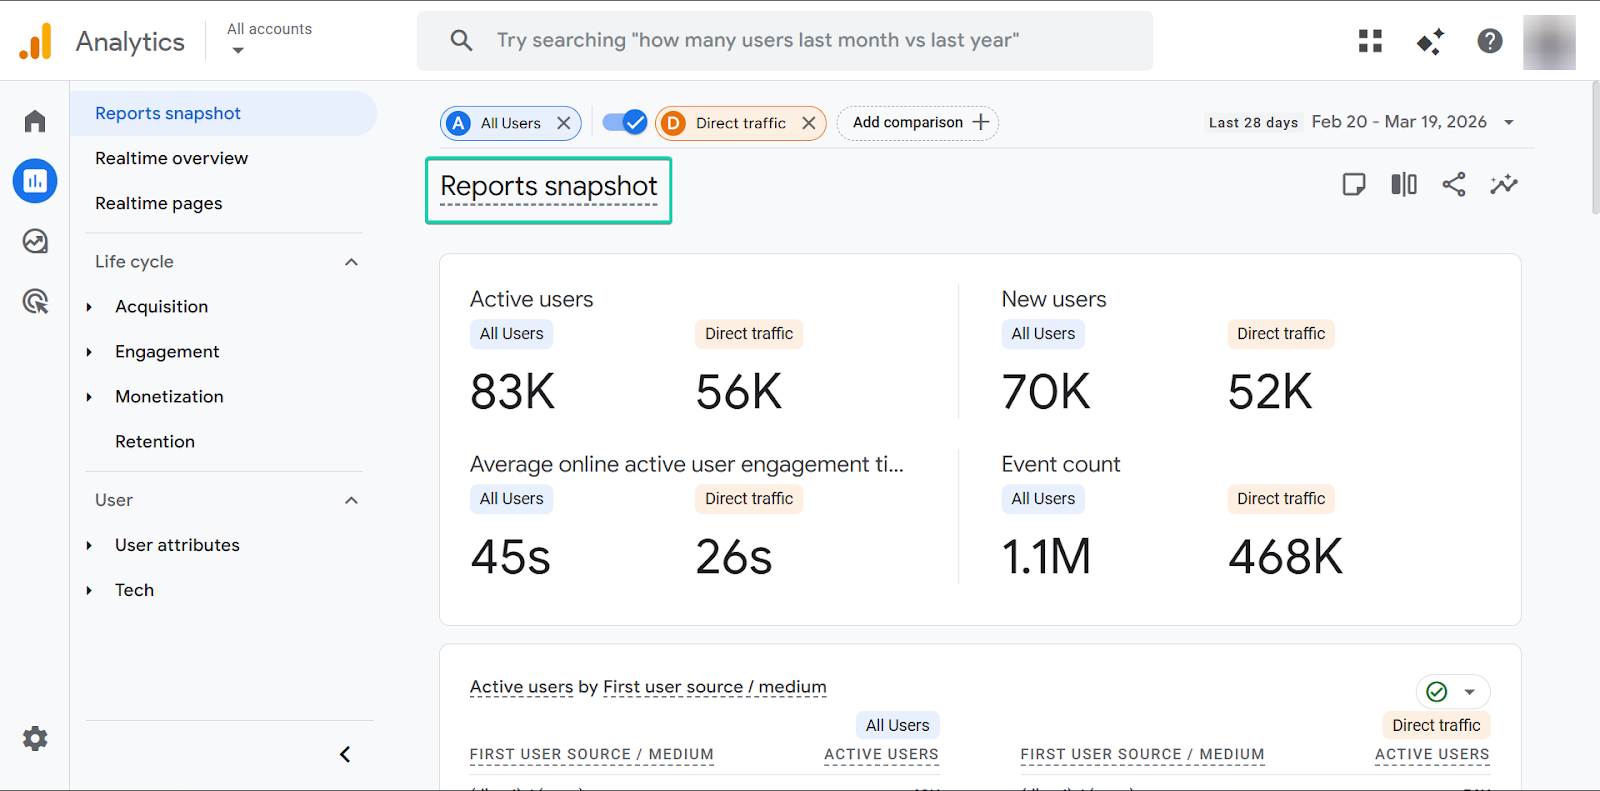
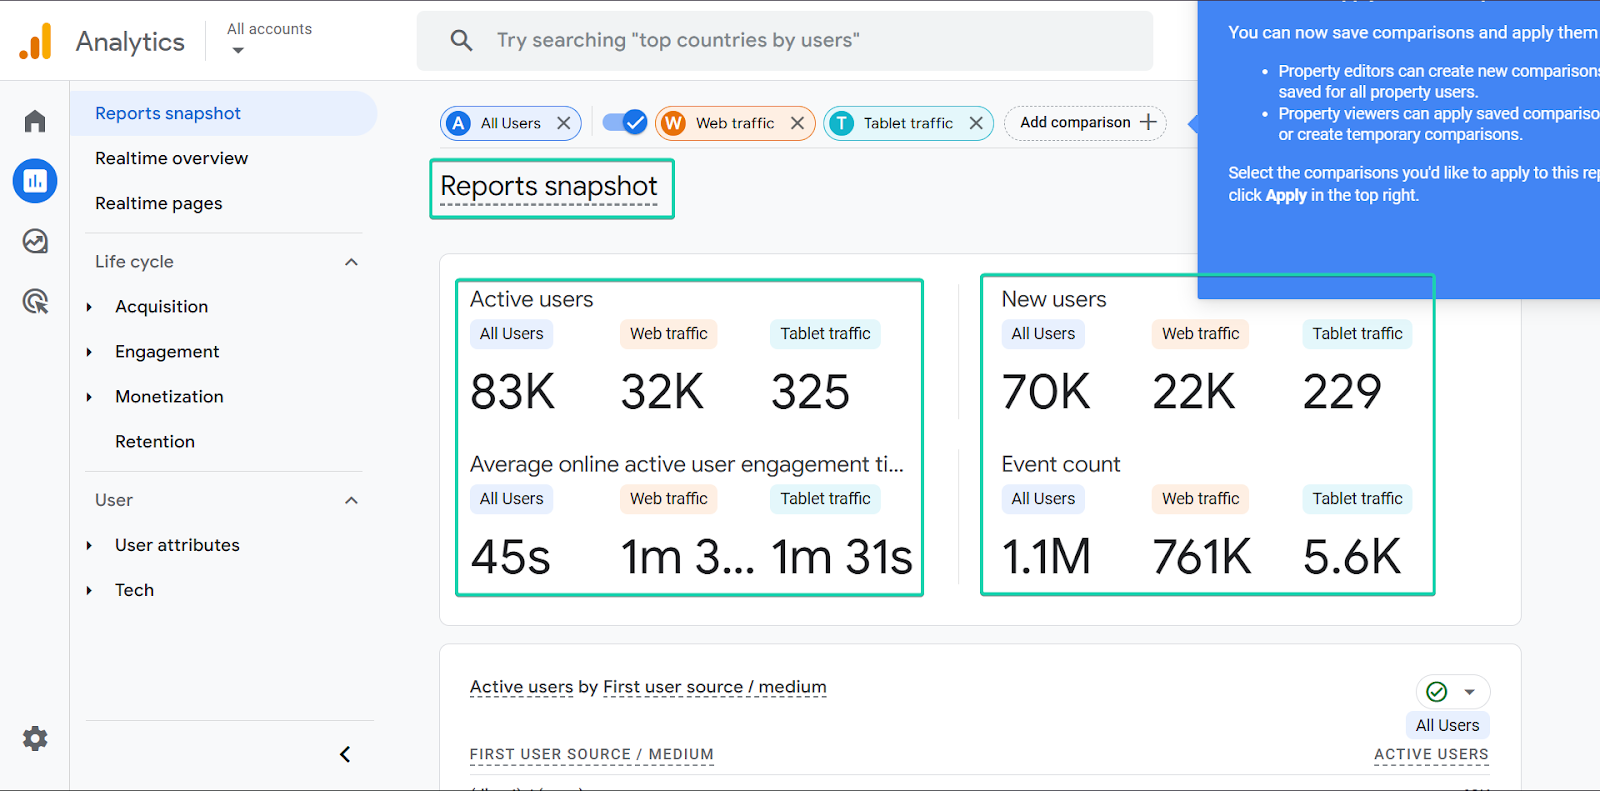
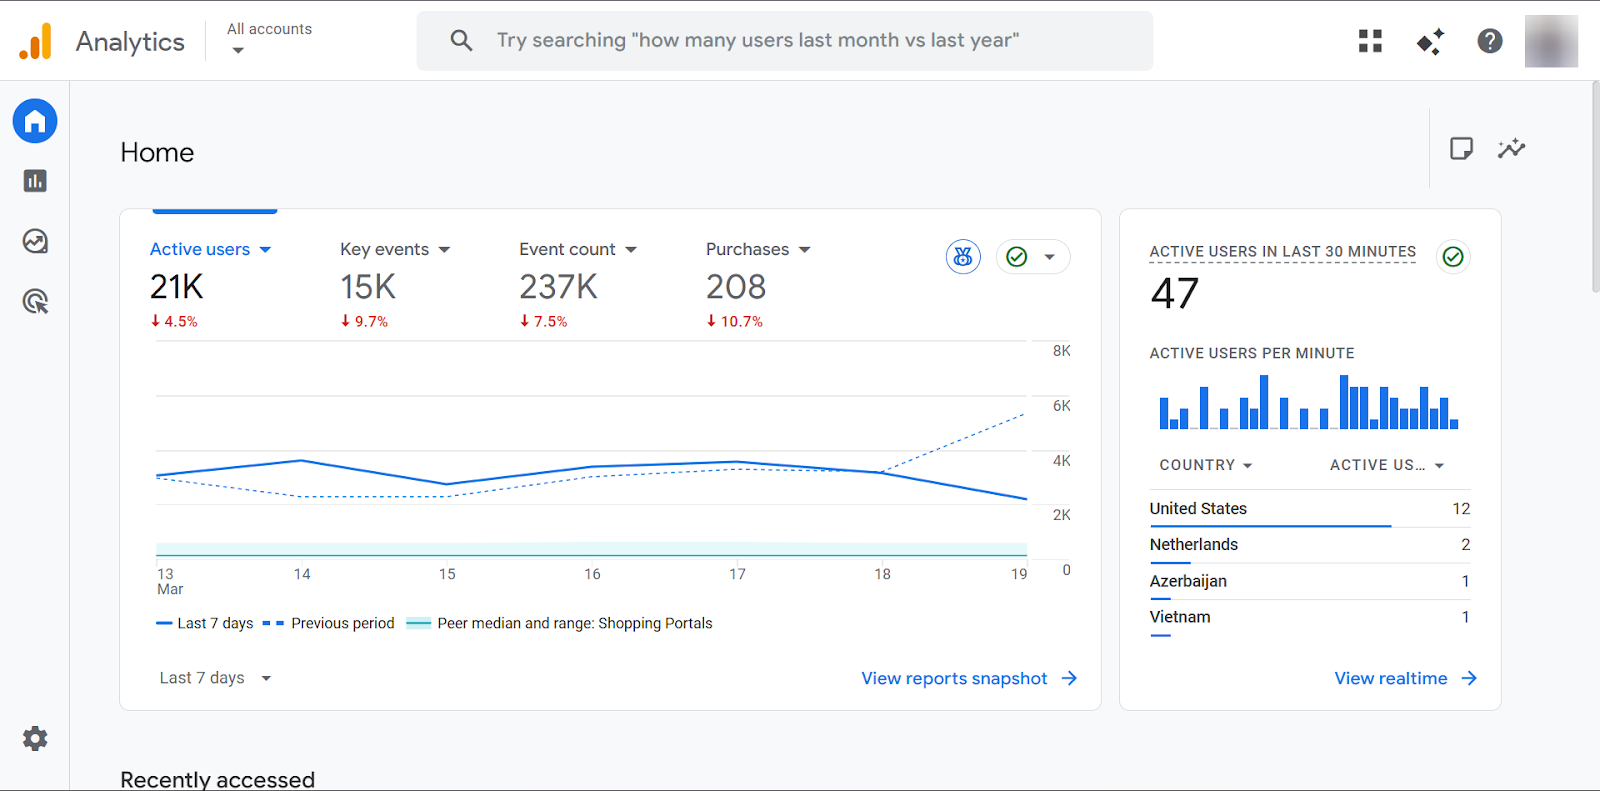
2. Reports snapshot
The reports snapshot feature gives you a quick view of your blog’s performance. You can view metrics like traffic, user activity, and top-performing pages in a single dashboard.
It’s a great way to check your blog’s health at a glance.
Let’s see how it works:
Go to “Reports” on the sidebar and select “Reports snapshot.”
The dashboard gives you an overview of how your website is performing.
But you can also compare your webpages with the “Add comparison +” button.
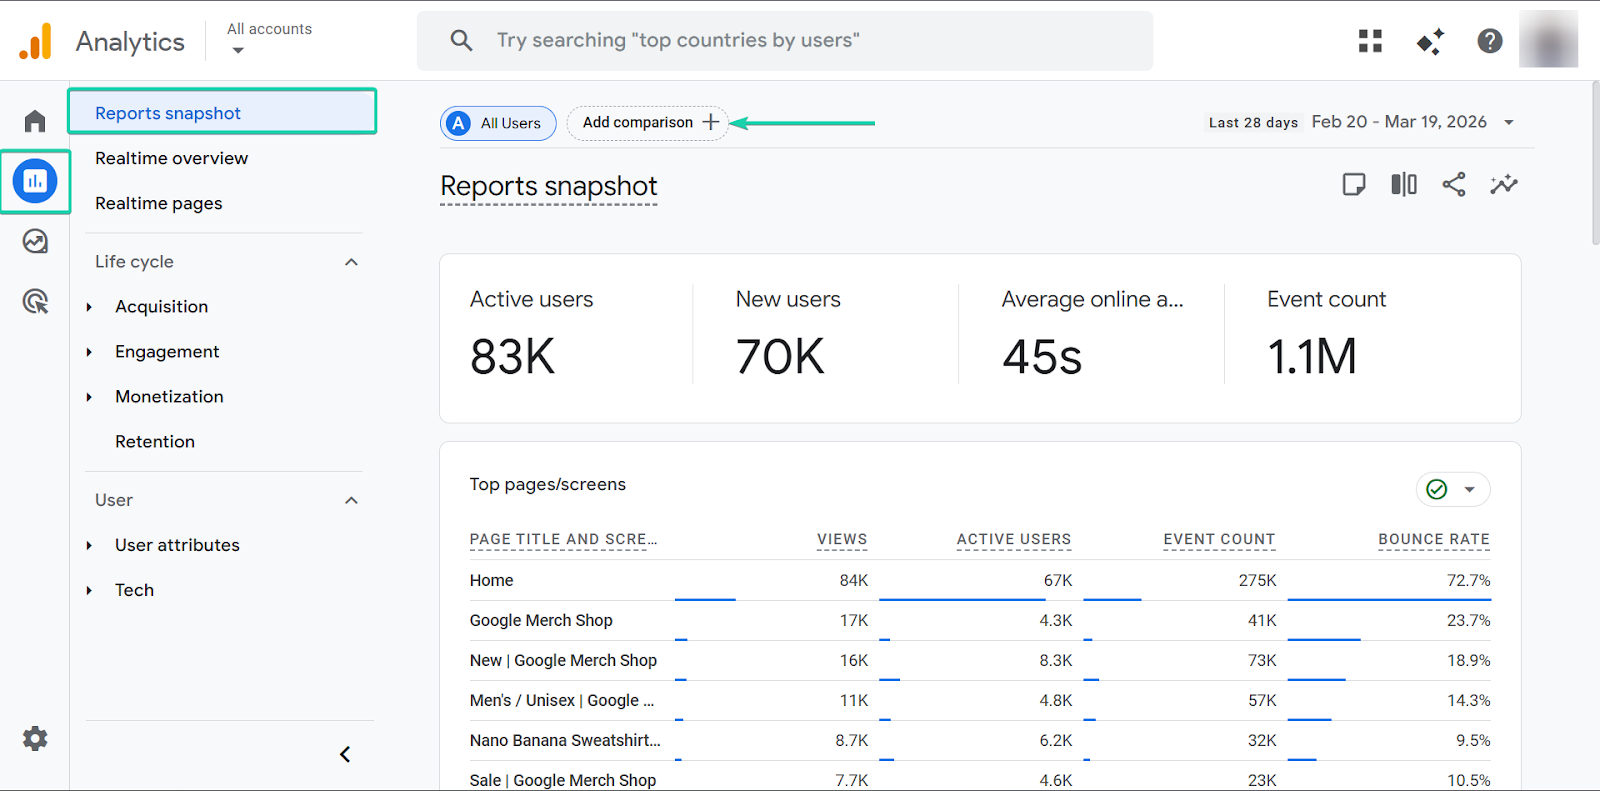
Under “Apply a comparison,” select the pages you want to compare and click “Apply.”
You can also create a new comparison option.
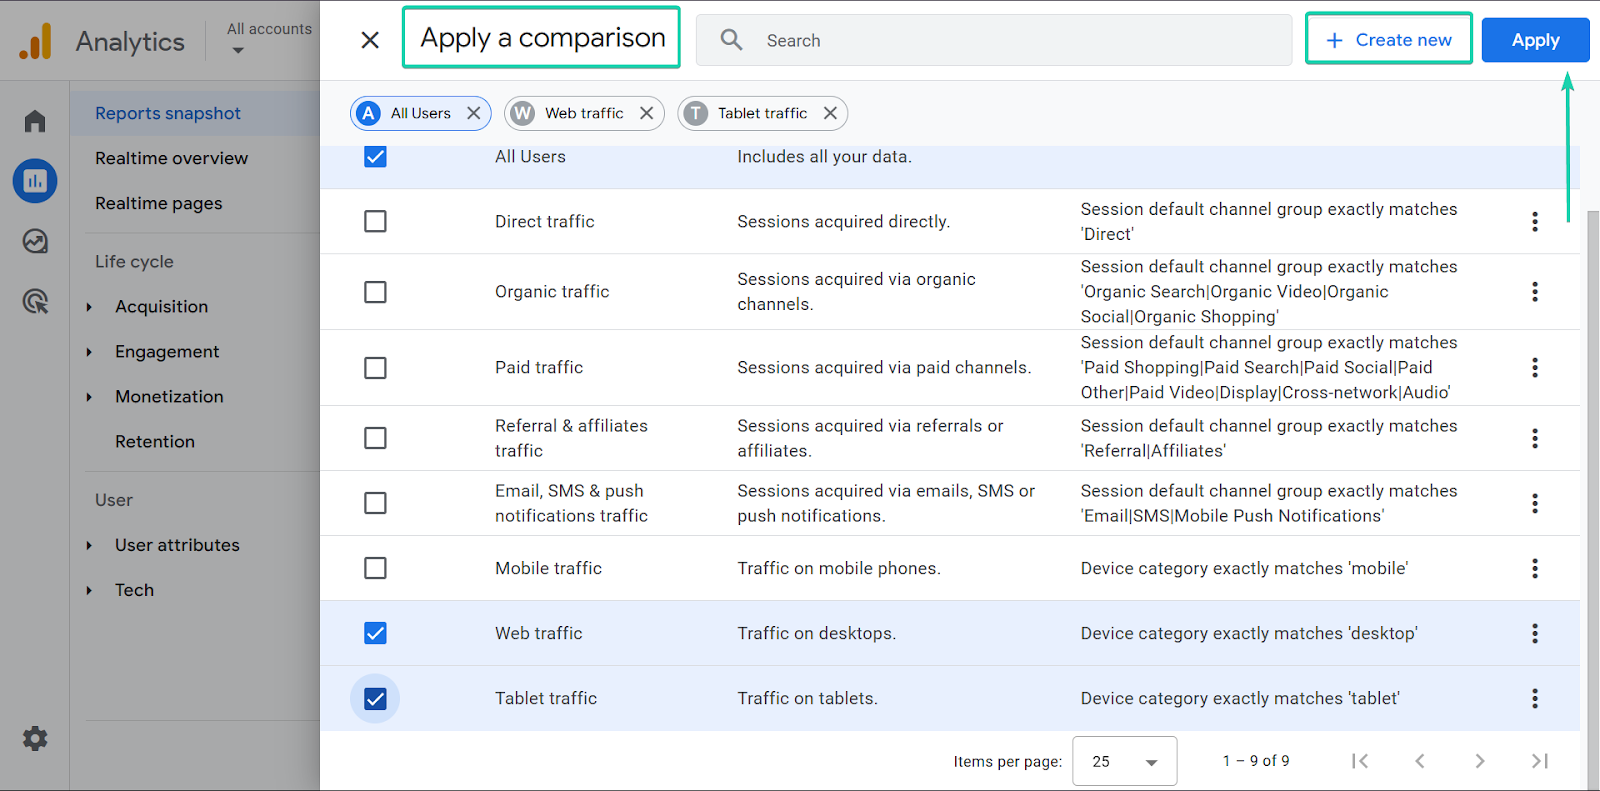
Google Analytics will then generate the data you want.
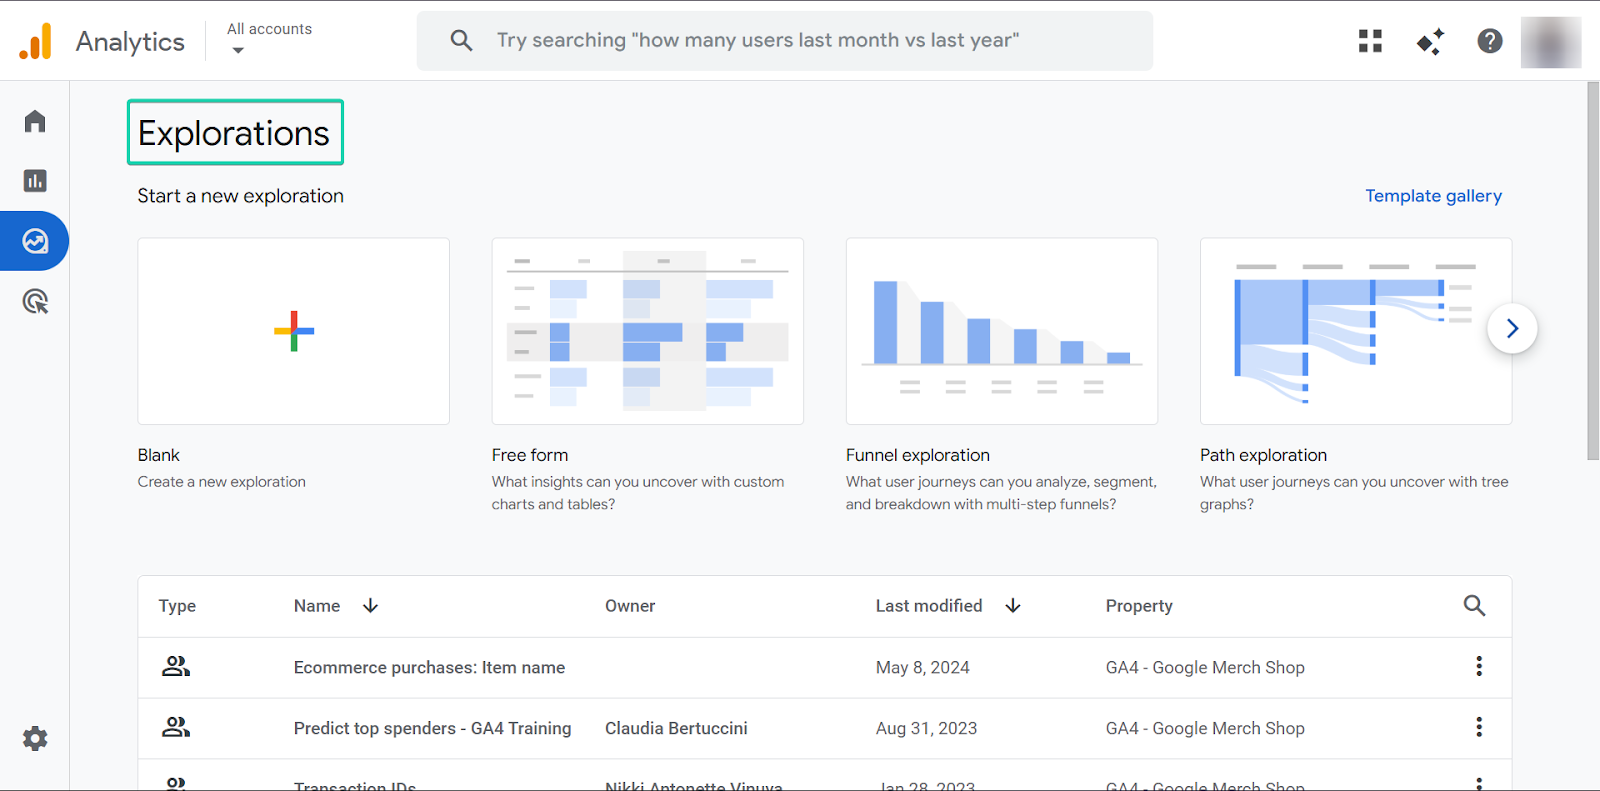
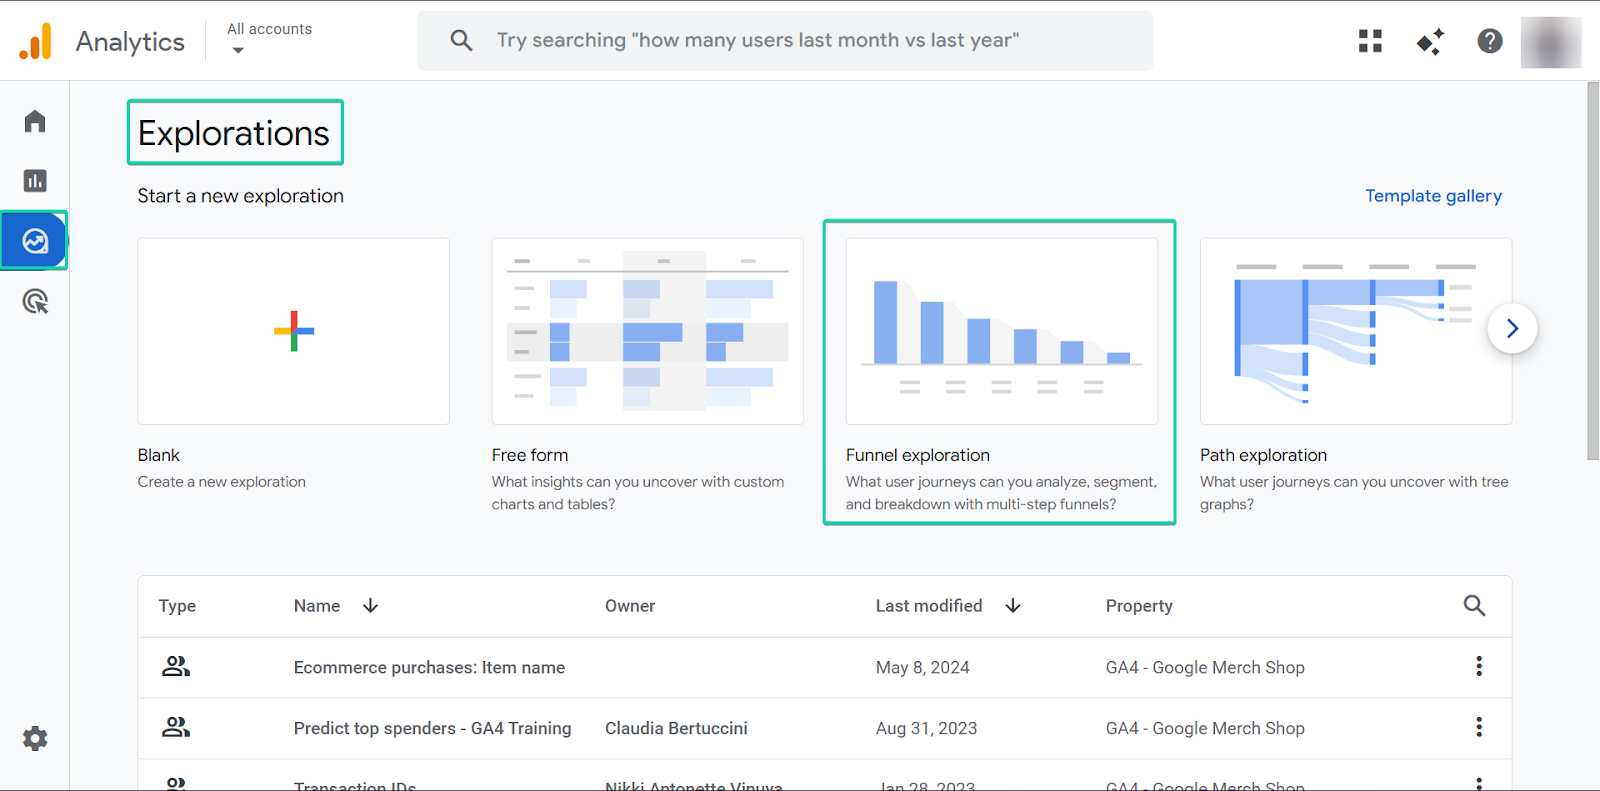
3. Explorations
Explorations is a feature that lets you analyze your data in more detail using customizable reports.
You can create custom reports to explore specific questions. For example, how visitors move through your site or which pages drive the highest conversions.
Here’s how it works:
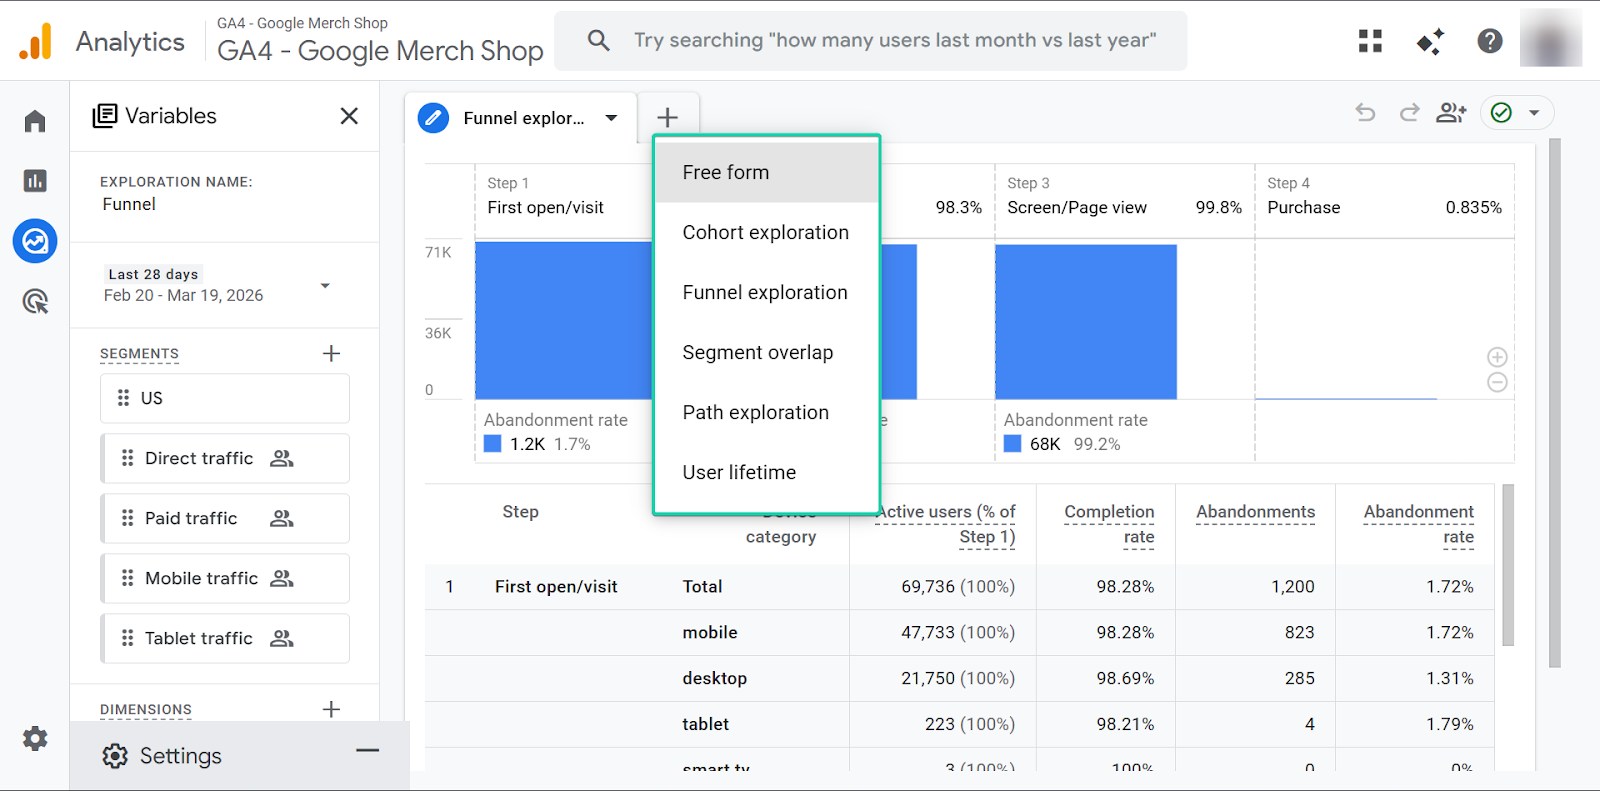
Go to “Explorations.”
You can create a new exploration or select one of the templates Google Analytics provides, including “Free Form,” “Funnel exploration,” and “Path exploration.”
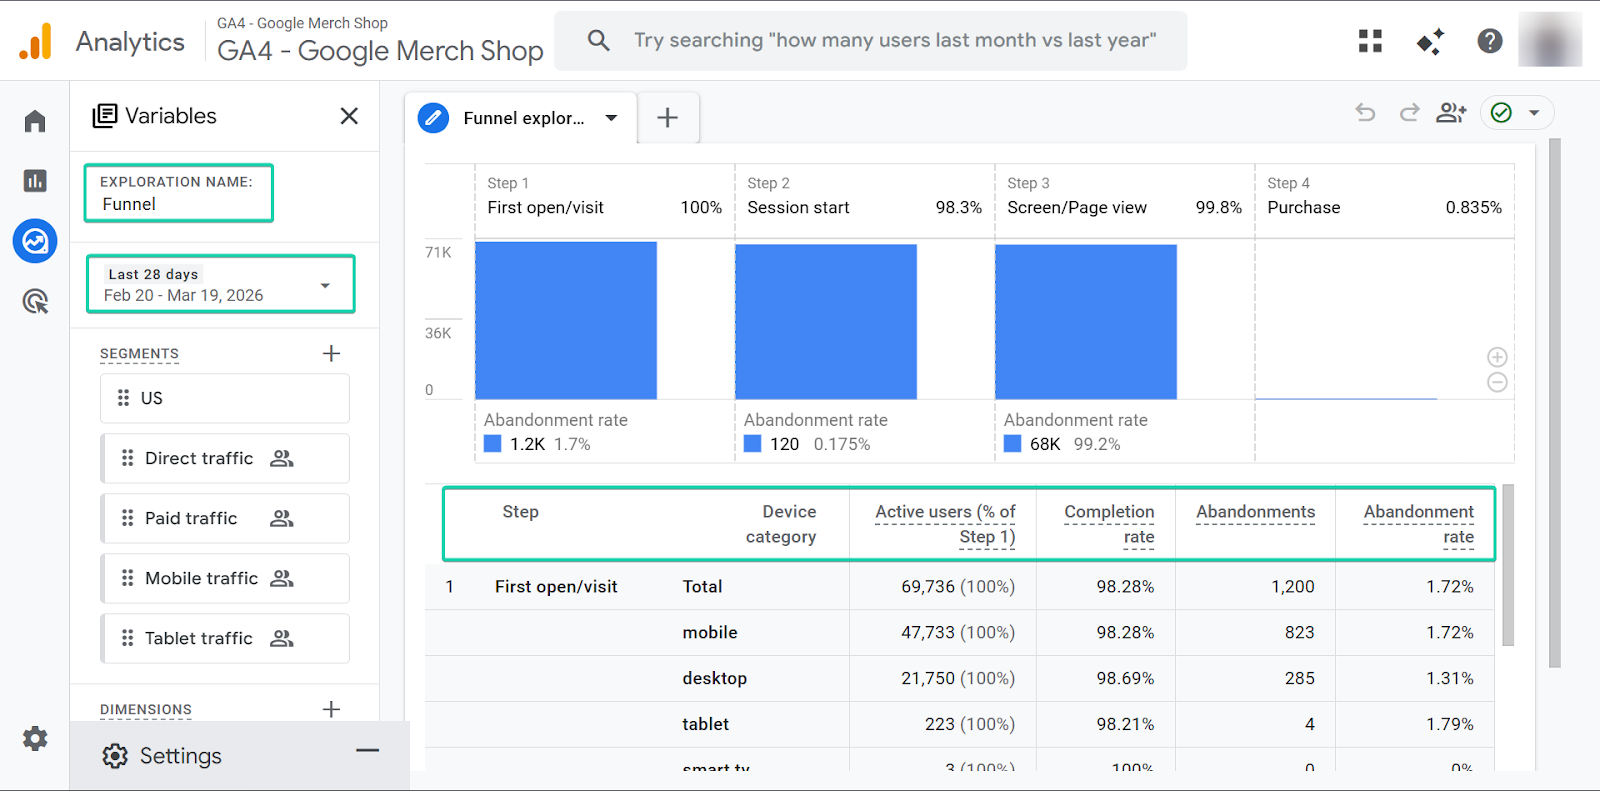
Let’s say you want to track the number of abandonments within a time period.
You simply set your date, and the Analytics will generate the data.
You can also add more templates to your report based on your goal.
So, for example, if you want to see how visitors move through your website, select “Path exploration.”
[fs-toc-omit]What I loved vs what I struggled with
What I loved 👍
✅ Powerful and free analytics tool
✅ You can easily track web visitors and their activities to make data-driven decisions
✅ Connects seamlessly with the Google ecosystem
What I struggled with 👎
❌ Can feel complex for beginners
❌ Data can be overwhelming at first, especially for non-tech users
[fs-toc-omit]Best for
- Bloggers tracking traffic and blog performance.
[fs-toc-omit]Pricing
- Free of charge
What are blogging tools?
Blogging tools help you create, manage, and grow your blog more efficiently, from writing and publishing to promotion and monetization.
Some tools, like Google Docs, focus on writing and editing. Others, like Easytools, help with monetizing content by selling digital products and promoting them through email campaigns.
Here are some benefits of using blogging tools:
- Save time: Blogging software helps streamline tasks like writing, planning, and publishing.
- Better content: You can improve your content quality by using editing, SEO, and AI tools.
- Support growth: Email and analytics blogging tools help you reach more people and understand your audience.
- Simplify workflows: With blogging tools you can create automations to handle repeatable tasks.

How to choose the best blogging software
To choose the best blogging software, you need to:
- Consider the features you want to solve for your need
- Check integrations
- Assess pricing
I’ll explain in more detail below:
1. Consider features you want to solve for your needs
First, identify your goals. Could it be writing, SEO, monetization, or audience growth?
Or perhaps you want to blog as a hobby.
Selecting the best blogging software is the one that solves your main problem without forcing you to rely on many tools.
For example, WordPress is great if your focus is on content publishing and flexibility.
But if you’re also thinking about selling products or running email campaigns, a tool like Easytools can handle those within the same platform.
2. Check integrations
To choose the best blogging tools you should check integrations.
Because as your blog grows, you’ll likely need to use more tools.
The best blogging software should integrate seamlessly with tools that support its core functions, like SEO, email marketing, analytics, and more.
Tools like MailerLite integrate well with a wide range of apps and websites. But this still requires setting up and managing many tools.
Easytools, on the other hand, brings all features, like email campaigns and landing pages, into one place, reducing the need for additional integrations.
It also integrates with CRMs like HubSpot and Pipedrive, as well as other platforms, to maximize your monetization efforts.
You set up custom automations with Zapier or Make.
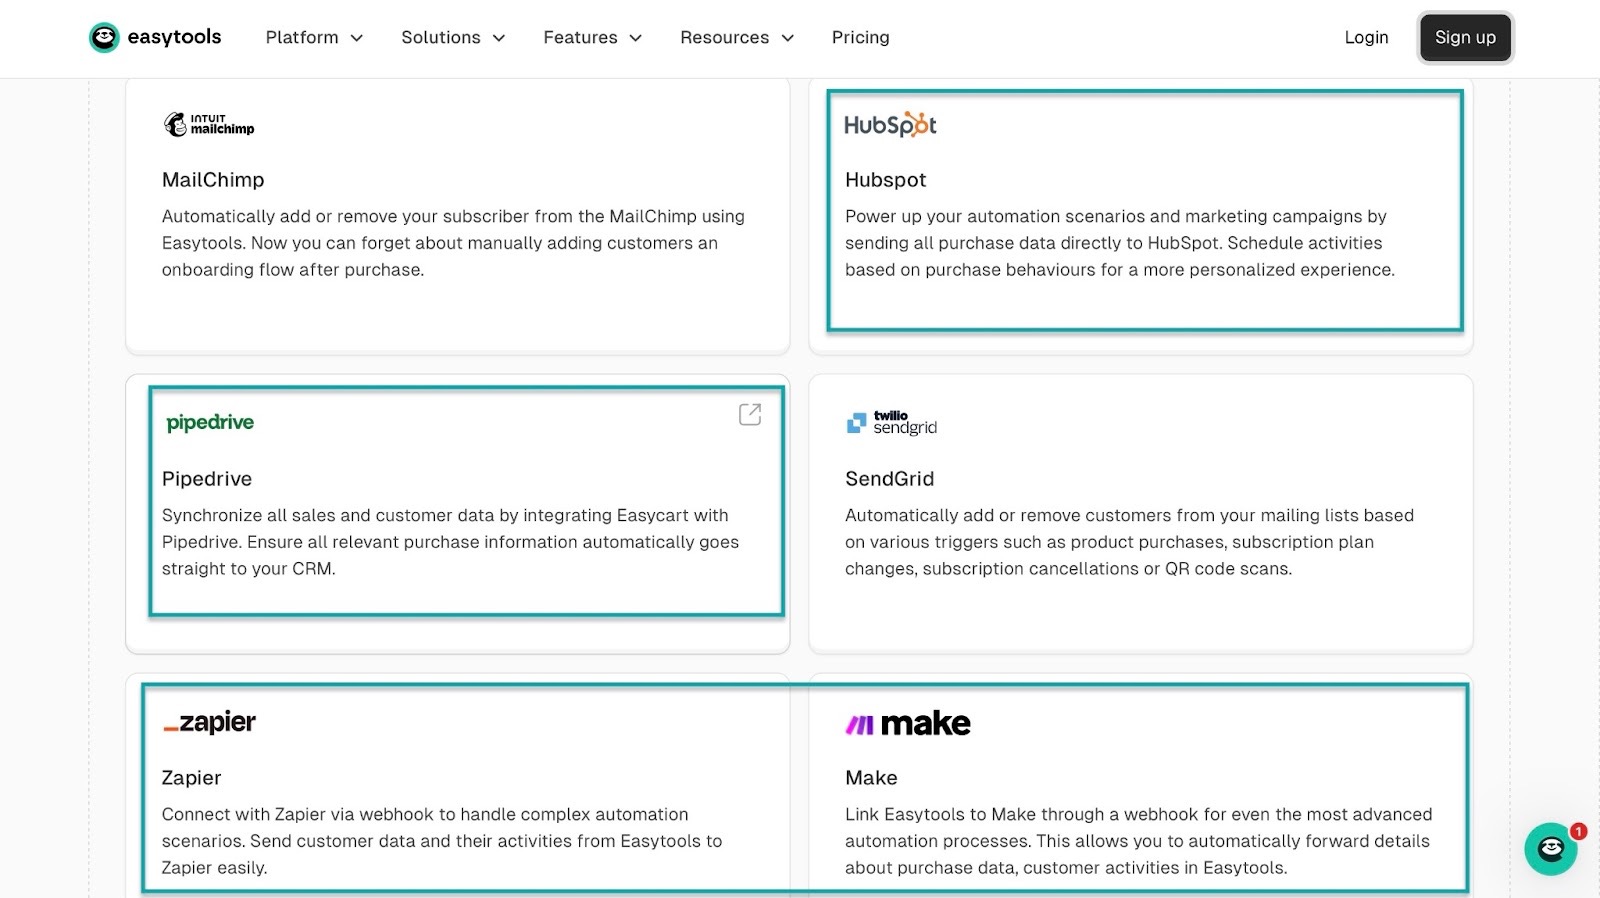
You can also create communities on Discord or Circle and sell memberships to your readers through Easytools.
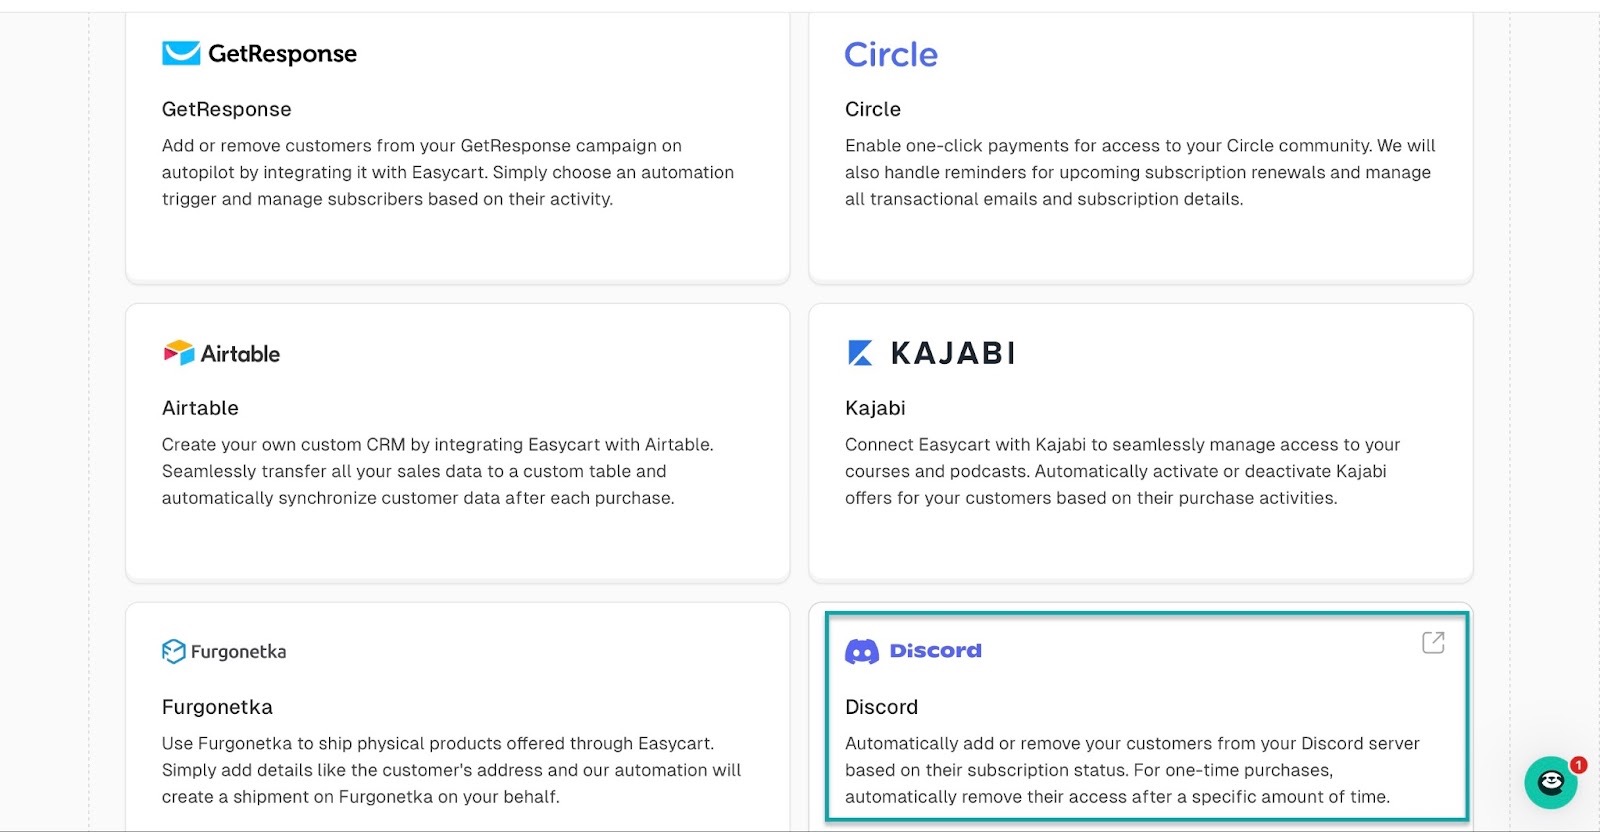
The quality of integrations a blogging software offers can make a huge difference in how far you can grow your blog.
3. Assess pricing
When considering pricing for blogging software, focus on long-term value rather than cost.
Some blogging tools, like WordPress, might appear affordable at first but will require additional paid plugins and integrations as your needs grow.
Another example is Ahrefs, which is a powerful SEO tool. But it comes at a premium price of $129 billed monthly and is often used alongside other tools.
Other blogging software, like Easytools, on the other hand, bundles key features like websites, email campaigns, and product creation into a single plan.
Select the best blogging software
Selecting the best blogging software can make all the difference in how you grow your blog.
In this guide, I explored blogging tools like WordPress, Easytools, Ahrefs, MailerLite, Fillout, Google Docs, Napkin AI, Trello, Grammarly, and Google Analytics.
I also covered what blogging tools are and how to choose the best.
Hopefully, this guide will help you make the right choice.
No fees, no legal hassle – start selling anywhere instantly.
Sign up FREECancel anytime · No merchant lock-in


Start now
Take it easy with Easytools
Focus on creating, and let Easytools handle the behind the scenes work.
No coding · No credit card required · Built on Stripe
© 2024 Easytools. All rights reserved.